


Accessing the system board components and drives
Attention:
Do not open your computer or attempt any repair before reading and understanding the “Important safety information”
on page v.
This section provides instructions on how to access the system board components and drives.
To access the system board components and drives, do the following:
1. Remove all media from the drives and turn off all attached devices and the computer. Then, disconnect
all power cords from electrical outlets and disconnect all cables that are connected to the computer.
2. Remove the computer cover. See “Removing the computer cover” on page 42.
3. Remove the front bezel. See “Removing and reinstalling the front bezel” on page 42.
4. Remove the heat sink fan duct. See “Replacing the heat sink and fan assembly” on page 71.
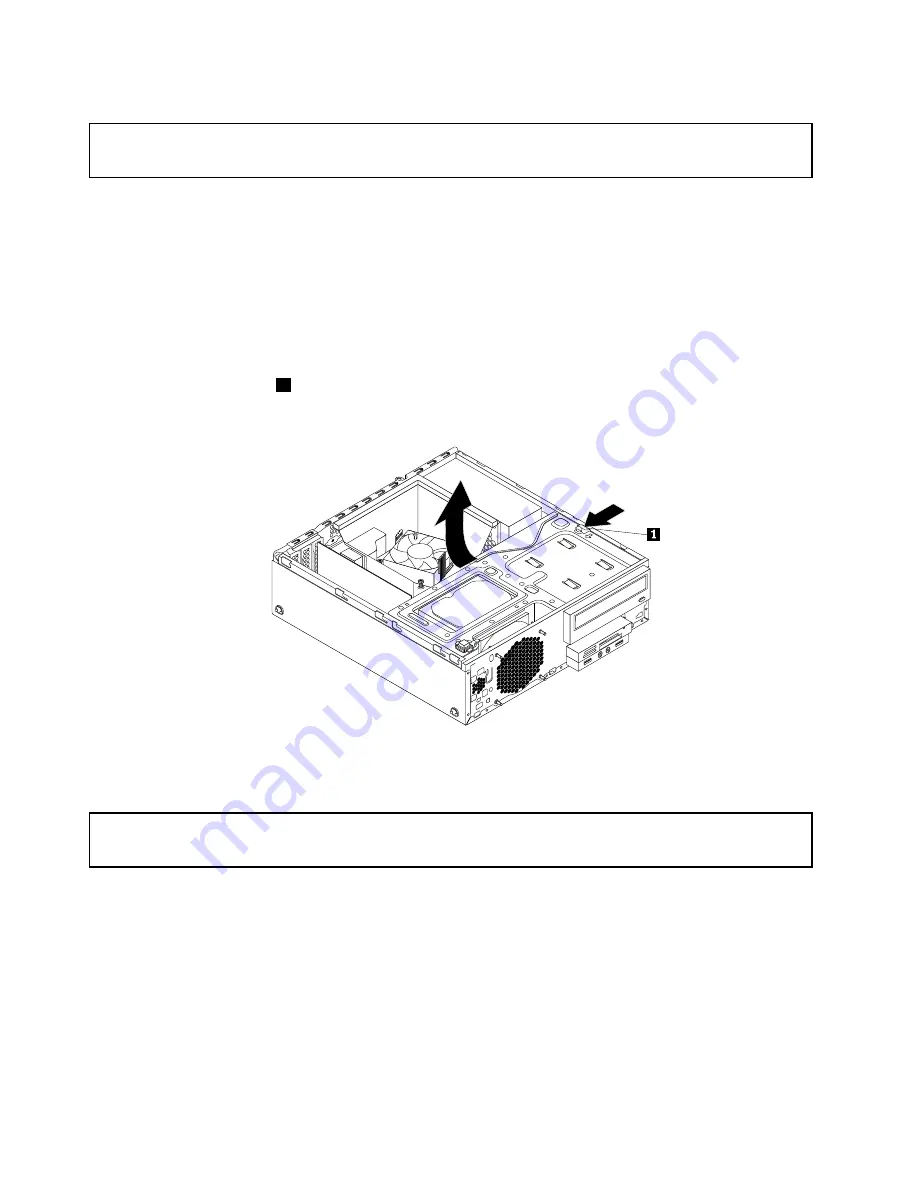
5. Press the retaining clip
1
in the direction as shown and pivot the drive bay assembly upward at the
same time.
Figure 15. Pivoting the drive bay assembly upward
Installing or replacing a PCI card
Attention:
Do not open your computer or attempt any repair before reading and understanding the “Important safety information”
on page v.
This section provides instructions on how to install or replace a PCI card. Your computer has various PCI
card slots. For more information, see “Features” on page 1.
To install or replace a PCI card, do the following:
1. Remove all media from the drives and turn off all attached devices and the computer. Then, disconnect
all power cords from electrical outlets and disconnect all cables that are connected to the computer.
2. Remove the computer cover. See “Removing the computer cover” on page 42.
3. Remove the front bezel. See “Removing and reinstalling the front bezel” on page 42.
4. Rotate the PCI card retainer to the open position. Depending on whether you are installing or replacing
a PCI card, do one of the following:
44
ThinkCentre M83, M93/p User Guide
Содержание 10A2
Страница 1: ...ThinkCentre M83 M93 p User Guide Machine Types 10A2 10A3 10A8 10A9 10AH 10AJ 10AM and 10AN ...
Страница 6: ...iv ThinkCentre M83 M93 p User Guide ...
Страница 12: ...x ThinkCentre M83 M93 p User Guide ...
Страница 30: ...18 ThinkCentre M83 M93 p User Guide ...
Страница 40: ...28 ThinkCentre M83 M93 p User Guide ...
Страница 48: ...3 4 5 6 7 8 Figure 9 Installing a padlock 36 ThinkCentre M83 M93 p User Guide ...
Страница 124: ...112 ThinkCentre M83 M93 p User Guide ...
Страница 166: ...154 ThinkCentre M83 M93 p User Guide ...
Страница 172: ...160 ThinkCentre M83 M93 p User Guide ...
Страница 176: ...164 ThinkCentre M83 M93 p User Guide ...
Страница 180: ...168 ThinkCentre M83 M93 p User Guide ...
Страница 184: ...172 ThinkCentre M83 M93 p User Guide ...
Страница 185: ......
Страница 186: ......