LEMAN LOPOM225 Скачать руководство пользователя страница 19


17 

ASSEMBLY AND INTRODUCTION 

 
CAUTION: 
To prevent accidents, make sure to turn the switch off and disconnect to the plug from the power receptacle. 


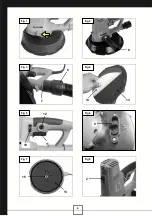
Assembling the auxiliary side handle (Fig 1 & 2) 

The auxiliary side handle (8) can be positioned on the right or left side of the machine. 
- Simply tighten the side handle (8) by turning it. 


Connecting the dust hose (Fig 3) 

- Insert the hose (6) into the dust ejector (7) of the machine. 
- The dust bag(5) is already connected to the hose. 
- Make sure to empty and clean the dust bag in due time. 


Installing/changing the sanding disc (Fig 4) 

- Stick the sanding disc (14) on the sanding pad (13). 
- Make sure the sanding disc is stuck properly and in a flat position. 
- If you install a sanding disc with holes, please make sure they fit the holes on the sanding pad. 
CAUTION: 
Do not work without a sanding disc mounted on the sanding pad. 


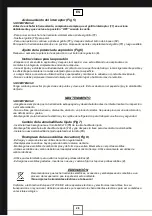
Selecting the speed (Fig 5) 

This machine is equipped with a built-in electronic control circuit that can adjust and regulate the number of 
rotations.


Generally, you should use the higher speed for fast stock removal and the lower speed for more precise 

control. 
- Adjust the speed with the adjuster knob (10), depending upon the contents of operation: this can be done even 
while the machine is running. 
- The speed can be adjusted from the lowest speed 1200rpm to full speed 2000rpm. 
NOTE: 
- If the tool is operated at low speeds for a long period of time, run the machine at the fastest speed for few ten 
seconds when the work is finished in order to cool down the motor. 
- If the tool is operated continuously at low speeds for a long period of time, the operation life of the motor will be 
reduced. 
- The speed adjusting dial can be turned only as far as full speed Max and lowest speed Min. Do not force to pass 
full speed or lowest speed, or the speed adjusting function may no longer work. 


OPERATION 


Switching On and Off (Fig 5) 

- To start the machine, press the On/Off switch (11) and keep it pressed. 
- To switch off the machine, release the On/Off switch (11). 
- To work continuously, press the On/Off switch (11), then press the lock-on button (12). To switch off the machine, 
press the On/Off switch (11) and then release it.  


Adjusting air flow (Fig 6) 

- Adjust the air flow by sliding the pressure plate (9):it will reduce or increase the suction power. 


Operation 

- Do not control the machine’s head: hold the machine with both hands by using the two handles. 
- Before switching on the machine, keep the sanding head slightly away from the work surface. 
- Bring carefully the sanding head in contact with the work surface, as lightly as possible: just enough to keep the 
sanding head flat against the surface. 
- Do not over-press the machine in order to avoid overloading! Press with proper pressure for better grinding 
effects. 
- Make overlapping sweeps and keep the head in constant motion. 
CAUTION
Never stop too long in the same place or there will be wave marks. 

GB 

Содержание LOPOM225

Страница 1: ...Manuel d utilisation Manual de instrucciones Instruction maual Oorspronkelijke gebruiksaanwijzing www leman sa com FR ES EN NL...

Страница 2: ......

Страница 3: ...MOD LE MODEL MODEL MODELO LOPOM225 Manuel d utilisation Instruction manual Gebruiksaanwijzing Manual de instrucciones 30 10 2015...

Страница 4: ...jo Type Ponceuse cloison s che Type Type Tipo Drywall sander Wandschuurder Amoladora Mod le Model JHS 225A N de s rie Serial number 2014 Marque Brand LEMAN R f rence Reference LOPOM225 Est en conformi...

Страница 5: ...machine r pond aux attentes des amateurs avertis et des professionnels Dans le but d am liorer nos produits nous restons l coute de vos remarques et critiques n h sitez pas nous en faire part via not...

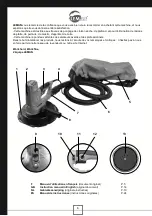
Страница 6: ...4 13 Fig 1 Fig 2 Fig 3 Fig 4 Fig 5 Fig 6 Fig 7 Fig 8 7 8 6 14 10 9 11 15 13 12 2...

Страница 7: ...s et vue clat e P 29 11 Certificat de garantie P 37 1 Vue g n rale et pr sentation de la machine avec fournitures standards 1 Protecteur du plateau 8 Poign e lat rale auxiliaire 2 C che de charbon 9 D...

Страница 8: ...standard une mauvaise maintenance un endommagement de l appareil ou une r paration inappropri e et ou effectu e par une personne non qualifi e 4 S curit 4 1 Utilisation conforme aux prescriptions Cett...

Страница 9: ...xpos e la pluie L aire de travail doit tre s che et l air relativement peu charg en humidit Veillez ce que la machine et le c ble lectrique n entre jamais en contact avec l eau Lors du travail avec la...

Страница 10: ...ication au circuit lectrique fa tes r parer la machine dans un atelier sp cialis agr Avant de commencer un travail faites tourner la machine vide Si vous constatez un bruit ou des vibrations anormales...

Страница 11: ...toutes les pr cautions n cessaires afin de prot ger votre sant surtout dans un environnement contenant certains min raux ou m taux Utilisez imp rativement un appareil d aspiration reli la machine et c...

Страница 12: ...aspiration Fig 3 Cette machine est quip e d un syst me d aspiration int gr e ce qui vous offre deux possibilit s pour la r cup ration des poussi res Soit en utilisant le flexible et le sac de r cup ra...

Страница 13: ...urant correctement install es et contr l es Placez le c ble lectrique de fa on ce qu il ne vous g ne pas pendant votre travail et ne puisse pas tre endommag Gardez le c ble lectrique derri re vous et...

Страница 14: ...l apparition de probl mes ind sirables Ne remplacez les pi ces d t rior es que par des pi ces d origine contr l es et agr es par le constructeur L utilisation de pi ces non contr l es ou non agr es pe...

Страница 15: ...M6x16 15 Otez la vis et la rondelle de 6mm retirez le plateau endommag et remplacez le par un neuf Montez le nouveau plateau placez la rondelle de 6 puis serrez la vis 15 7 3 Balais de charbon Fig 8 R...

Страница 16: ...age Frequency 230 V 1 50 Hz Motor power 900 W 1 2 CV Rotation speed 1200 2000 rpm Sanding pad 215 mm Fixing mode velcro Sanding disc 225 mm Sanding disc type D weight paper disc or sanding mesh Degree...

Страница 17: ...efore turning the power tool on A wrench or a key left attached to a rotating part of the power tool may result in personal injury e Do not overreach Keep proper footing and balance at all times This...

Страница 18: ...wer interruption release the locking switch by pressing the on off switch This will prevent the power tool from restarting unintentionally risk of injury 11 Always keep your hands away from the rotati...

Страница 19: ...tool is operated at low speeds for a long period of time run the machine at the fastest speed for few ten seconds when the work is finished in order to cool down the motor If the tool is operated con...

Страница 20: ...does not become damaged and or wet with oil or water For safe and proper working always keep the machine and ventilation slots clean Periodically blow out all air passages with dry compressed air Cha...

Страница 21: ...meter 225 mm Netto gewicht 2 6 kg Isolatielklasse II Geluid De typisch A gewogen geluidsniveaus conform EN 60745 Geluidsdrukniveau LpA 82 dB A Geluidsvermogenniveau LwA 93 dB A Onzekerheid K 3 dB A Dr...

Страница 22: ...en of om de stekker uit het stopcontact te trekken Houd de kabel uit de buurt van hitte olie scherpe randen en bewegende gereedschapdelen Beschadigde of in de war geraakte kabels vergroten het risico...

Страница 23: ...der snel vast en zijn gemakkelijker te geleiden 7 Gebruik elektrisch gereedschap toebehoren inzetgereedschappen en dergelijke volgens deze aanwijzingen Let daarbij op de arbeidsomstandigheden en de ui...

Страница 24: ...een goede ventilatie van de werkplek Er wordt geadviseerd om een ademmasker met filterklasse P2 te dragen Neem de in uw land geldende voorschriften voor de te bewerken materialen in acht Toerental wi...

Страница 25: ...schap en de ventilatieopeningen altijd schoon om goed en veilig te werken Het schuurpad vervangen Fig 7 Stop de inbussleutel in de inbusbout M6x16 15 van het schuurpad 13 Hou het schuurpad 13 stevig v...

Страница 26: ...de acuerdo con la norma EN 60745 Nivel de presi n sonora LpA 82 dB A Nivel de potencia sonora LwA 93 dB A Incertidumbre K 3 dB A Utilice protecci n para los o dos Valor total de vibraci n suma de vec...

Страница 27: ...con tierra 3 No exponga la herramienta el ctrica a la lluvia y evite que penetren l quidos en su interior Existe el peligro de recibir una descarga el ctrica si penetran ciertos l quidos en la herrami...

Страница 28: ...nta el ctrica accesorios tiles etc de acuerdo a estas instrucciones considerando en ello las condiciones de trabajo y la tarea a realizar El uso de herramientas el ctricas para trabajos diferentes de...

Страница 29: ...ja Fig 4 Aseg rese que el papel de lija que est utilizando convenga para la tarea Un papel de lija de grano excesivamente grueso puede eliminar demasiado material r pido Un papel de lija de grano dema...

Страница 30: ...desenchufada antes de intentar realizar la inspecci n o el mantenimiento Nunca utilice gasolina benceno disolvente alcohol o un producto similar Se puede provocar una decoloraci n una deformaci n o g...

Страница 31: ...rcle de palier Gear box 1 19 Roulement billes 6900 2RS Ball bearing 6900 2RS 1 20 Circlips 22 Hole circlips 22 1 21 Joint 18x24x3 Skeleton seal 18x24x3 1 22 Arbre d entrainement Output shaft 1 23 Vis...

Страница 32: ...ST4x16 Tapping screw ST4x16 14 53 Connecteur d entr e de flexible Connector 1 1 54 Joint feutre 35x 45x2 Foam pad 35x 45x2 2 55 Flexible d aspiration Hose assemblies 1 56 Connecteur de sortie de flexi...

Страница 33: ...31 Figure A 2015 10...

Страница 34: ...ur effet de proroger sa date de validit Les r parations ne donnent lieu aucune garantie Les r parations au titre de la garantie ne peuvent tre effectu es que dans les ateliers de votre revendeur ou de...

Страница 35: ...Notes...

Страница 36: ......

Отзывы: