Leightronix LabVault-SD Скачать руководство пользователя страница 9

LABvault-SD 

System Installation

Page 5

2018-06-08

SYSTEM INSTALLATION

INSTALLING THE LABVAULT-SD

While installing the LABvault-SD, refer to the labeled back panel on page page 4 that matches your LABvault-

SD’s back panel. 

 Perform the following installation steps: 

1.  The LABvault-SD may be left as a standalone, tabletop unit or mounted into a rack as follows:

a.  Insert the LABvault-SD into the rack, aligning the holes of the unit’s mounting bracket with those of the rack.
b.  Secure the LABvault-SD to the rack with user-supplied rack screws.

2.  Connect the included power cable to the LABvault-SD’s power cord connector and then plug the other end into an 

AC power source.

3.  Using a straight-through RJ-45 Ethernet cable, connect the LABvault-SD Ethernet port to a hub or switch on your 

TCP/IP network.  The original LABvault-SD supports 10/100 BASE-T Ethernet, while version 2 of the LABvault-SD 

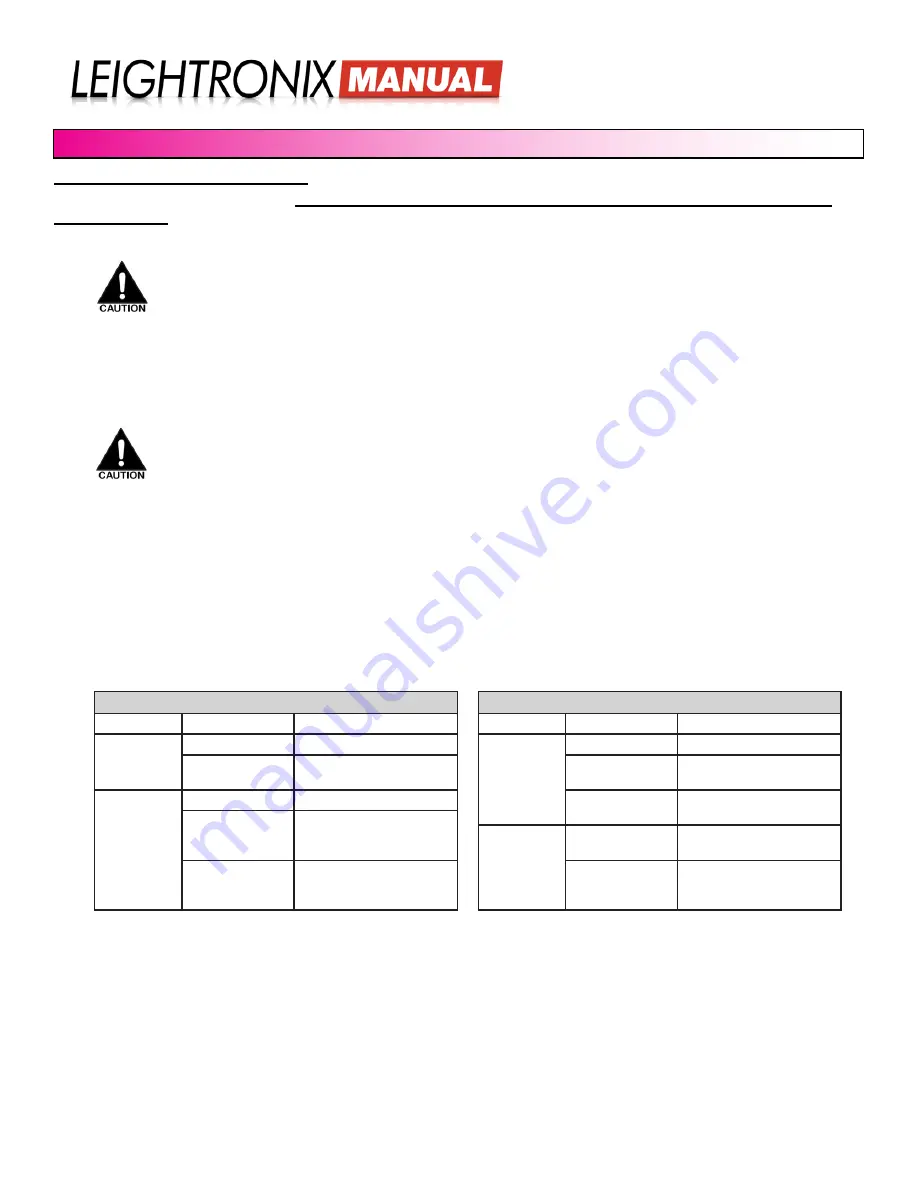
supports 10/100/1000 (gigabit Ethernet).  To check your network connection, look at the Ethernet LEDs above the 

Ethernet port and compare to the table below that corresponds to your LABvault-SD’s back panel. 

4.  Connect your video/audio signal wiring to the LABvault-SD as follows:

a.  Video/Audio Source: this is the resource or signal the LABvault-SD will record.  Connect your video source 

wiring to the LABvault-SD’s BNC video input and stereo RCA audio inputs.

b.  Video/Audio Destination: connect a television monitor to the LABvault-SD’s BNC video output and stereo RCA 

audio outputs to review your recorded digital files.  The LABvault-SD supports simultaneous playback and 

recording, allowing you to watch other files during recording.

5. 

If your external control system has not been configured for network connectivity and supports RS-232 

communication, connect the control system (such as AMX or Crestron touch screen) directly to the LABvault’s RS-

232 control port.  For LABvault control protocol details, refer to the “CONTROL COMMANDS” on page 26.

Version 2 LABvault-SD Ethernet LED Indicators

LED Position

State

Description

Right

Off

Connection speed is 10Mb/s

Green

Connection speed is 

100Mb/s

Orange

Connection speed is 

1000Mb/s

Left

Slow blinking 

yellow

Ethernet link not established

Fast blinking 

yellow

Ethernet link established. 

LABvault-SD is transmitting 

on the network.

NOTE:

  The LABvault requires the following network ports:


23 Telnet

•  21 FTP Control Connection

•  20 FTP Data (if using third party FTP client in passive mode)

•  80 for the LABvault-SD Web interfaces

•  2000 UDP for ePRO-BUS Control

Leave empty rack spaces above and below the LABvault-SD.  The LABvault-SD should not have 

anything stacked on top of it.

LEIGHTRONIX strongly recommends the use of an Uninterruptible Power Supply (UPS) with 

the LABvault-SD.  Damage from power loss or spikes is not covered under warranty.

Original LABvault-SD Ethernet LED Indicators

LED Position

State

Description

Left

Off

Connection speed is 10Mb/s

Green

Connection speed is 

100Mb/s

Right

Off

Ethernet link not established

Steady on yellow

Ethernet link established. 

PEGvault-SD is not trans-

mitting on the network.

Blinking yellow

Ethernet link established. 

PEGvault-SD is transmitting 

on the network.

Содержание LabVault-SD

Страница 1: ...PRODUCT MANUAL Installation Configuration and Operation Instructions SPECIALIZED Video Solutions...

Страница 2: ...243 5589 or 517 694 8000 Fax 517 694 1600 www leightronix com Support At LEIGHTRONIX every customer of our standard product line receives technical support at no extra charge There are no service cont...

Страница 3: ...10 LABvault SD System Time 10 Web Interface Usernames and Passwords 11 ePRO BUS Setting 12 Serial Port Setting 12 SETTING UP FILE TRANSFER DESTINATION S 13 NEXUS Series Server NEXUS UltraNEXUS UltraN...

Страница 4: ...og File 22 Delete a Log File 23 MAINTAINING THE LABVAULT SD 25 Update Firmware 25 Check Internal Hard Drive 25 Reboot Shut Down 25 CONTROL COMMANDS 26 SPECIFICATIONS 31 PRODUCT WARRANTY 33 DECLARATION...

Страница 5: ...layback and storage destinations For instance users may send files to an archive server and then later download the files to view on a PC burn to a DVD or drag into an editing system timeline Further...

Страница 6: ...ularly at the plugs convenience receptacles and the point where they exit from the apparatus 11 Only use attachments accessories specified by the manufacturer 12 Unplug this apparatus during lightning...

Страница 7: ...sword protected TCP IP address entry screens Once the LABvault SD has been booted up press the up or down arrows on the keypad to display the following status screens 11 03 12 00 00PM SN B923D1 V01 00...

Страница 8: ...1000 BASE T Ethernet port with cor responding LED indicators E 1 BNC video input connector F 1 BNC video output connector G 2 RCA audio input connectors left right H 2 RCA audio output connectors lef...

Страница 9: ...uts to review your recorded digital files The LABvault SD supports simultaneous playback and recording allowing you to watch other files during recording 5 If your external control system has not been...

Страница 10: ...ration Steps Corresponding Screen Displays i From the CONFIG MENU screen press or to proceed to the Edit DHCP screen ii Press to select the screen iii Press or to toggle the field value from DISABLED...

Страница 11: ...k Address Configuration Steps Corresponding Screen Displays i From the CONFIG MENU screen press or to proceed to the Edit FTP TCP Buf screen ii Press to select the screen iii Press or to position the...

Страница 12: ...ompatible with Internet Explorer version 8 and higher Firefox Safari and Google Chrome OPENING AND LOGGING IN Type your LABvault SD s IP address into your Web brower s address bar i e http 10 255 14 1...

Страница 13: ...cates whether or not your LABvault SD has been set up to automatically delete transferred files from its internal hard drive The Index Pointers box displays any video index points set for LEIGHTRONIX...

Страница 14: ...information on your System Dashboard screen Site Information Tab on System Management Web Interface Screen Site Information Window on System Dashboard Screen LABvault SD System Time Click the SYSTEM...

Страница 15: ...nts modify file transfer settings and view system log files To change the admin password enter up to eight alphanumeric characters in both fields and then click the Change Password button to save Fron...

Страница 16: ...ePRO BUS feature must be assigned a static IP address and made available for UDP on Port 2000 ePRO BUS Tab on System Management Web Interface Screen Serial Port Setting The serial port mode setting ac...

Страница 17: ...Complete the remaining settings according to the labeled illustration below and click the Apply Changes button when you have finished NEXUS UltraNEXUS Tab on File Destinations Web Interface Screen Ena...

Страница 18: ...decide which hours of the day your LABvault will transfer files to your LEIGHTRONIX streaming Web site Single click each hour segment on the timeline to toggle transfer capabilities on or off green o...

Страница 19: ...r files recorded from an external control system 1 Server with FTP Capabilities Push your files to another LEIGHTRONIX or third party video server with FTP capabilities Enter your server s IP address...

Страница 20: ...ended to the name of each additional recorded file as yy mm dd hh mm ss year month day hours minutes seconds NOTE Alternatively you may enter the new filename into the File Name box in the lefthand co...

Страница 21: ...lt SD s Web interface as follows 1 From the MPEG Recorder panel under the menu buttons or from the MPEG Engine Control panel on the bottom of the File Management screen click the record button to begi...

Страница 22: ...eb interface you will see the control buttons for the LABvault SD s MPEG player Perform the following 1 Click the load button to display the Open File popup window Single click to select the file you...

Страница 23: ...xt to it in the lefthand File Management listing Perform the following 1 Click the FILES menu button to display the File Management screen MPEG Engine Control Panel on File Management Screen MPEG Engi...

Страница 24: ...on the file and select Rename from the menu that appears In the Rename File window that appears enter a new filename of up to 27 alphanumeric characters no spaces and click Ok to accept the change or...

Страница 25: ...the selected destination s on the File Destinations screen Change File Transfer Destinations Change the destination of any file in the Video Transfers queue by right clicking on the file and selectin...

Страница 26: ...e to select it and then click the Save button to display an open save file dialog box Either open or save the selected log file on your computer or network as a txt or Excel file Search a Log File Sea...

Страница 27: ...s date and time severity and type Source The LABvault will continually write to the EVENTS LOG file until it reaches 7 MB Once EVENTS LOG reaches 7 MB the LABvault SD will rename it to OLDEVNTS LOG d...

Страница 28: ...he scan_C log file displays information from the most recent LABvault SD hard drive scan performed with the Disk Diagnostics utility The scan_C log file is automatically overwritten each time you run...

Страница 29: ...ABvault SD disk diagnostics feature automatically fixes many common File Allocation Table FAT errors that may impair or cause data loss on your LABvault s internal hard drive LEIGHTRONIX recommends us...

Страница 30: ...b interface for Internet Explorer that duplicates your touch screen interface Touch Screen Interface RS 232 SERIAL OR TELNET NOTES Serial communication is 115200 N 8 1 The remote control port is stand...

Страница 31: ...eset to guest privileges Show Prompt PROMPTON Turns on the LABVAULT prompt 200 Command OK Hide Prompt PROMPTOFF Turns off the LABVAULT prompt 200 Command OK Play PLAYFILE FILENAME FILENAME is full fil...

Страница 32: ...herwise the result will be fail Ex FINALIZE BROOKS MPG If successful 200 Command OK If unsuccessful 663 Cannot finalize file no destinations are enabled Get File Dir GETMPEGDIR Gets the directory of t...

Страница 33: ...r mode 0 STOP 7 RECORD RECFILE filename of file currently being recorded NONE if none RH RM RS RF current record file length in HH MM SS FF Bump FWD MPGBUMPFWD Bumps the current playback position 10 s...

Страница 34: ...UNCTION COMMAND DETAILS ASCII RESPONSE Rename File XRENAME ORIG PATH FILENAME NEW PATH FILENAME Rename a file on the hard drive Ex XRENAME c mpeg origname mpg c mpeg newname mpg If successful 200 Comm...

Страница 35: ...Data integrity verified Elements IP address Subnet mask Gateway User Information Audio I O 10dBV unbalanced line level dual RCA inputs outputs Video I O NTSC composite video BNC inputs outputs Etherne...

Страница 36: ...ection are not recordable The LABvault SD encoder can capture video at one of the following recording qualities Good VBR of 3 00 5 00 Mb s half video resolution 352x480 192 kb s audio bit rate 44 1 kH...

Страница 37: ...ble for any injury loss or damage direct or consequential arising out of the use of or the inability to use the product Before using the user shall determine the suitability of the product for his her...

Страница 38: ...BUT NOT LIMITED TO PROCUREMENT OF SUBSTITUTE GOODS OR SERVICES LOSS OF USE DATA OR PROFITS OR BUSINESS INTERRUPTION HOWEVER CAUSED AND ON ANY THEORY OF LIABILITY WHETHER IN CONTRACT STRICT LIABILITY O...

Страница 39: ...is product includes the Zend Engine freely available at http www zend com GD STATEMENT Portions copyright 1994 1995 1996 1997 1998 1999 2000 2001 2002 2003 2004 by Cold Spring Harbor Laboratory Funded...

Отзывы: