


Page 6
2018-06-08
LABvault-SD
System Installation
ENTERING NETWORK SETTINGS INTO LABVAULT-SD
CONFIG MENU
Edit unit address
a.
Power up the LABvault-SD by pressing the green check button on
the front panel for at least two seconds.
b.
From the front panel, enter your password by pressing the right arrow button to display the password entry
screen and then the right arrow key five times. If the password is entered correctly, the LABvault-SD’s
configuration menu will be displayed (see below).
If the password is entered incorrectly, the front panel display returns to the status screens.
c.
Either enter your LABvault-SD network addresses manually or use DHCP to automatically configure the addresses
according to the following steps:
• Automatic Network Addressing: enable DHCP on your LABvault-SD according to the table below. When
enabled, DHCP will configure your LABvault with an IP, subnet mask, and gateway network addresses.
•
• Manual Network Address Entry
Obtain an IP address, subnet mask, and a gateway for your LABvault-SD from your network administrator.
Repeat the network configuration steps below to enter your IP, subnet, and gateway network addresses.
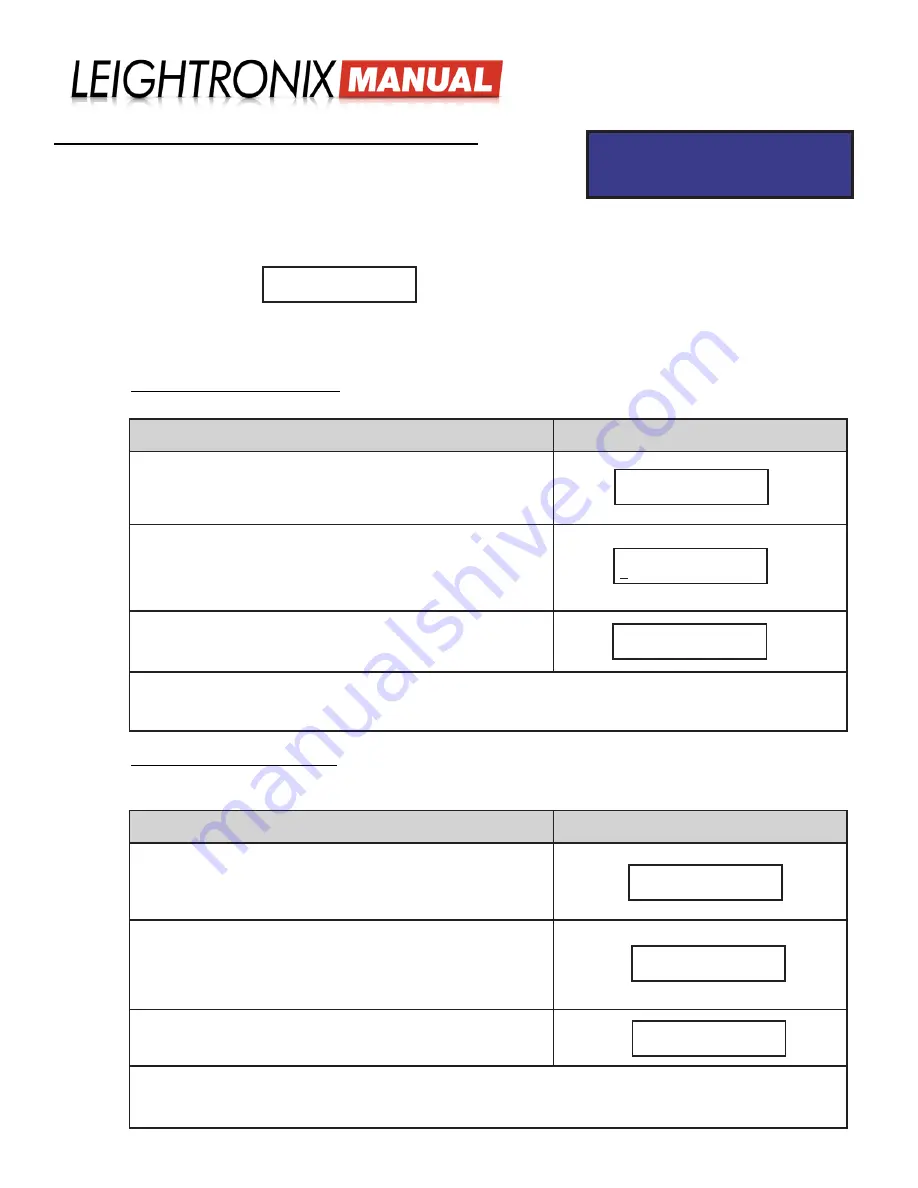
DHCP Configuration Steps
Corresponding Screen Displays
i.
From the “CONFIG MENU” screen, press “↑” or “↓“ to
proceed to the “Edit DHCP” screen.
ii.
Press “→“ to select the screen.
iii.
Press “↑ “ or “↓ “ to toggle the field value from
“DISABLED” to “ENABLED.”
iv.
Press “→“ to enter the next screen.
v.
Either press “→“ again to save your changes or “←“ to
abort changes.
The LABvault-SD must be powered down and then powered back up to apply any DHCP changes
(press the red “X” button for four seconds to turn the unit off and then press the green check
button for two seconds to return power).
ENABLE DHCP:
ENABLED
Press ~ to
confirm DHCP
CONFIG MENU
Edit DHCP
Network Address Configuration Steps
Corresponding Screen Displays
i.
From the “CONFIG MENU” screen, press “↑” or “↓“ to
proceed to the desired address screen.
ii.
Press “→“ to select the screen.
iii.
Press “→“ or “←“ to position the underscore beneath the
editable fields and press “↑“ or “↓“ to edit the values.
iv.
Press “→“ past all of the editable fields to enter the next
screen.
v.
Either press “→“ again to save your changes or “←“ to
abort changes.
The LABvault-SD must be powered down and then powered back up to apply any network address
changes (press the red “X” button for four seconds to turn the unit off and then press the green
check button for two seconds to return power).
Enter address
255. 0. 0. 0.
CONFIG MENU
Edit unit address
Press ~ to
confirm address
Default Front Panel Password:
five right arrow keys


