


Appendix J: Additional PX3TS Information
849
Messages for the USB-cascading chain:
In the Bridging mode, events regarding connection/disconnection of a
downstream slave device via USB is NOT logged.
However, in the Port Forwarding mode, whenever the connection or
disconnection of a downstream slave device via USB is detected, the PX3TS at
the USB-A end of the USB cable logs it in the internal log. Note that the PX3TS
at the USB-B end of the cable does NOT log these events.
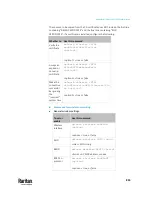
There are two slave-related events in the Port Forwarding mode:
Event
Description
Slave connected
This log entry is generated when the PX3TS detects the
presence of a slave device on its USB-A port.
Slave disconnected This log entry is generated when it detects the
disconnection of a slave device from its USB-A port.
The Ping Tool
The PX3TS provides a ping tool in the web interface and CLI so you can ping any
host or PX3TS in your data center.
Ping via the Web Interface:
To log in to the web interface, see
Login
(on page 170).
The Ping tool is useful for checking whether a host is accessible through the
network or Internet.
•
Choose Maintenance > Network Diagnostics
Ping via the CLI:
You can access the CLI interface by connecting a computer to the PX3TS or
using SSH/Telnet. See
With SSH or Telnet
(on page 526).
1.
You must perform the ping command in the diagnostic mode. See
Entering
Diagnostic Mode
(on page 706).
2.
Then perform the ping command. See
Testing the Network Connectivity
(on page 708).
Содержание Raritan PX3TS
Страница 4: ......
Страница 6: ......
Страница 20: ......
Страница 52: ...Chapter 3 Initial Installation and Configuration 32 Number Device role Master device Slave 1 Slave 2 Slave 3...
Страница 80: ...Chapter 4 Connecting External Equipment Optional 60...
Страница 109: ...Chapter 5 PDU Linking 89...
Страница 117: ...Chapter 5 PDU Linking 97...
Страница 440: ...Chapter 7 Using the Web Interface 420 If wanted you can customize the subject and content of this email in this action...
Страница 441: ...Chapter 7 Using the Web Interface 421...
Страница 464: ...Chapter 7 Using the Web Interface 444...
Страница 465: ...Chapter 7 Using the Web Interface 445 Continued...
Страница 746: ...Appendix A Specifications 726...
Страница 823: ...Appendix I RADIUS Configuration Illustration 803 Note If your PX3TS uses PAP then select PAP...
Страница 824: ...Appendix I RADIUS Configuration Illustration 804 10 Select Standard to the left of the dialog and then click Add...
Страница 825: ...Appendix I RADIUS Configuration Illustration 805 11 Select Filter Id from the list of attributes and click Add...
Страница 828: ...Appendix I RADIUS Configuration Illustration 808 14 The new attribute is added Click OK...
Страница 829: ...Appendix I RADIUS Configuration Illustration 809 15 Click Next to continue...
Страница 860: ...Appendix J Additional PX3TS Information 840...
Страница 890: ...Appendix K Integration 870 3 Click OK...
Страница 900: ......


