


Chapter 7: Using the Web Interface
498
Sending Links to Snapshots or Videos
When opening a Primary Standalone Live Preview window, a unique URL is
generated for this window session. You can email or instant message this URL
to as many people as possible as long as your system resources permit.
Recipients can then click on the provided link and view live snapshots or videos
simultaneously in the Secondary Standalone Live Preview window(s).
Tip: All Live Preview window sessions sharing the same URL, including one
Primary Standalone Live Preview window and multiple Secondary Standalone
Live Preview windows, are identified as one single "<webcam>" user in the
Connected Users list. You can disconnect a "<webcam>" user to terminate all
sessions sharing the same URL. See
Viewing Connected Users
(on page 471).
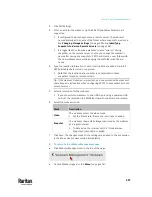
Best practice:
1.
The sender opens the Primary Standalone Live Preview window, and sends
the link to one or multiple recipients.
2.
The sender must wait until at least one recipient opens the Secondary
Standalone Live Preview window.
3.
The recipient(s) should inform the sender that the link has been opened.
4.
Now the sender can close the Primary Standalone Live Preview window.
▪
For additional information, see
How Long a Link Remains Accessible
(on page 500).
To send a snapshot or video link via email or instant message:
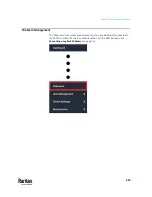
1.
Choose Webcams in the
Menu
(on page 176).
2.
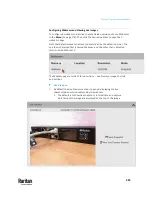
Click the desired webcam to open the Webcam page.
▪
Note that default webcam names are determined by the detection
order. The one that is detected first is named
Webcam
, and the other
that is detected later is named
Webcam 2
.
3.
Click
in the Live Preview section.
The live snapshot or video in a standalone window opens. See
Configuring
Webcams and Viewing Live Images
(on page 495).
4.
Copy the URL from that live preview window.
Содержание Raritan PX3TS
Страница 4: ......
Страница 6: ......
Страница 20: ......
Страница 52: ...Chapter 3 Initial Installation and Configuration 32 Number Device role Master device Slave 1 Slave 2 Slave 3...
Страница 80: ...Chapter 4 Connecting External Equipment Optional 60...
Страница 109: ...Chapter 5 PDU Linking 89...
Страница 117: ...Chapter 5 PDU Linking 97...
Страница 440: ...Chapter 7 Using the Web Interface 420 If wanted you can customize the subject and content of this email in this action...
Страница 441: ...Chapter 7 Using the Web Interface 421...
Страница 464: ...Chapter 7 Using the Web Interface 444...
Страница 465: ...Chapter 7 Using the Web Interface 445 Continued...
Страница 746: ...Appendix A Specifications 726...
Страница 823: ...Appendix I RADIUS Configuration Illustration 803 Note If your PX3TS uses PAP then select PAP...
Страница 824: ...Appendix I RADIUS Configuration Illustration 804 10 Select Standard to the left of the dialog and then click Add...
Страница 825: ...Appendix I RADIUS Configuration Illustration 805 11 Select Filter Id from the list of attributes and click Add...
Страница 828: ...Appendix I RADIUS Configuration Illustration 808 14 The new attribute is added Click OK...
Страница 829: ...Appendix I RADIUS Configuration Illustration 809 15 Click Next to continue...
Страница 860: ...Appendix J Additional PX3TS Information 840...
Страница 890: ...Appendix K Integration 870 3 Click OK...
Страница 900: ......


