


Chapter 7: Using the Web Interface
474
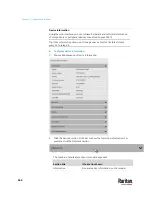
Updating the PX3TS Firmware
Firmware files are available on Raritan website's
Support page
http://www.raritan.com/support/
).
When performing the firmware upgrade, the PX3TS keeps each outlet's power
status unchanged so no server operation is interrupted. During and after the
firmware upgrade, outlets that have been powered on prior to the firmware
upgrade remain powered ON and outlets that have been powered off remain
powered OFF.
You must be the administrator or a user with the Firmware Update permission
to update the PX3TS firmware.
Before starting the upgrade, read the release notes downloaded from Raritan
website's
Support page
http://www.raritan.com/support/
). If you have any
questions or concerns about the upgrade, contact Raritan Technical Support
BEFORE upgrading.
On a multi-inlet PDU, all inlets must be connected to power for the PDU to
successfully upgrade its firmware.
Note that firmware upgrade via iOS mobile devices, such as iPad, requires the
use of iCloud Drive or a file manager app.
Warning: Do NOT perform the firmware upgrade over a wireless network
connection.
Firmware upgrade restrictions:
•
Intermediate firmware required for upgrades from "pre-3.3.0" to 3.5.0 or
later:
If your PX3TS is running any firmware version older than 3.3.0, such as
3.2.30, an intermediate firmware is required for the upgrade to 3.5.0 or
later. Follow the sequence below:
a.
Upgrade to an intermediate firmware first, which is either
3.3.x
or
3.4.x
.
b.
Then upgrade from the intermediate firmware to 3.5.0 or later.
•
Upgrade from "pre-3.3.10" versions on a cascading CHAIN:
If you are upgrading an existing cascading chain from a "pre-3.3.10"
firmware version, you must follow the
Upgrade Guidelines for Existing
Cascading Chains
(on page 476).
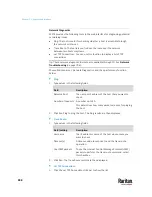
To update the firmware:
1.
Choose Maintenance > Update Firmware.
2.
Click
to select an appropriate firmware file.
3.
Click Upload. A progress bar appears to indicate the upload process.
Содержание Raritan PX3TS
Страница 4: ......
Страница 6: ......
Страница 20: ......
Страница 52: ...Chapter 3 Initial Installation and Configuration 32 Number Device role Master device Slave 1 Slave 2 Slave 3...
Страница 80: ...Chapter 4 Connecting External Equipment Optional 60...
Страница 109: ...Chapter 5 PDU Linking 89...
Страница 117: ...Chapter 5 PDU Linking 97...
Страница 440: ...Chapter 7 Using the Web Interface 420 If wanted you can customize the subject and content of this email in this action...
Страница 441: ...Chapter 7 Using the Web Interface 421...
Страница 464: ...Chapter 7 Using the Web Interface 444...
Страница 465: ...Chapter 7 Using the Web Interface 445 Continued...
Страница 746: ...Appendix A Specifications 726...
Страница 823: ...Appendix I RADIUS Configuration Illustration 803 Note If your PX3TS uses PAP then select PAP...
Страница 824: ...Appendix I RADIUS Configuration Illustration 804 10 Select Standard to the left of the dialog and then click Add...
Страница 825: ...Appendix I RADIUS Configuration Illustration 805 11 Select Filter Id from the list of attributes and click Add...
Страница 828: ...Appendix I RADIUS Configuration Illustration 808 14 The new attribute is added Click OK...
Страница 829: ...Appendix I RADIUS Configuration Illustration 809 15 Click Next to continue...
Страница 860: ...Appendix J Additional PX3TS Information 840...
Страница 890: ...Appendix K Integration 870 3 Click OK...
Страница 900: ......


