


Chapter 7: Using the Web Interface
473
Viewing or Clearing the Local Event Log
By default, the PX3TS captures certain system events and saves them in a local
(internal) event log.
You can view over 2000 historical events that occurred on the PX3TS in the
local event log. When the log size exceeds 256KB, each new entry overwrites
the oldest one.
To display the local log:
1.
Choose Maintenance > Event Log.
Each event entry consists of:
▪
ID number of the event
▪
Date and time of the event
Tip: The date and time shown on the PX3TS web interface are
automatically converted to your computer's time zone. To avoid time
confusion, it is suggested to apply the same time zone settings as those of
PX3TS to your computer or mobile device.
▪
Event type
▪
A description of the event
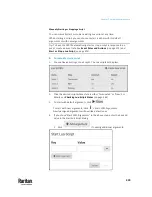
2.
To view a specific type of events only, select the desired event type in the
'Filter event class' field.
3.
The log is refreshed automatically at a regular interval of five seconds. To
avoid any new events' interruption during data browsing, you can suspend
the automatic update by clicking
.
▪
To restore automatic update, click
. Those new
events that have not been listed yet due to suspension will be
displayed in the log now.
To clear the local log:
1.
Click
on the top-right corner.
2.
Click Clear Log on the confirmation message.
Содержание Raritan PX3TS
Страница 4: ......
Страница 6: ......
Страница 20: ......
Страница 52: ...Chapter 3 Initial Installation and Configuration 32 Number Device role Master device Slave 1 Slave 2 Slave 3...
Страница 80: ...Chapter 4 Connecting External Equipment Optional 60...
Страница 109: ...Chapter 5 PDU Linking 89...
Страница 117: ...Chapter 5 PDU Linking 97...
Страница 440: ...Chapter 7 Using the Web Interface 420 If wanted you can customize the subject and content of this email in this action...
Страница 441: ...Chapter 7 Using the Web Interface 421...
Страница 464: ...Chapter 7 Using the Web Interface 444...
Страница 465: ...Chapter 7 Using the Web Interface 445 Continued...
Страница 746: ...Appendix A Specifications 726...
Страница 823: ...Appendix I RADIUS Configuration Illustration 803 Note If your PX3TS uses PAP then select PAP...
Страница 824: ...Appendix I RADIUS Configuration Illustration 804 10 Select Standard to the left of the dialog and then click Add...
Страница 825: ...Appendix I RADIUS Configuration Illustration 805 11 Select Filter Id from the list of attributes and click Add...
Страница 828: ...Appendix I RADIUS Configuration Illustration 808 14 The new attribute is added Click OK...
Страница 829: ...Appendix I RADIUS Configuration Illustration 809 15 Click Next to continue...
Страница 860: ...Appendix J Additional PX3TS Information 840...
Страница 890: ...Appendix K Integration 870 3 Click OK...
Страница 900: ......


