background image

4

e-Screen ETX – QUICK START GUIDE – ENGLISH

e-SCREEN ETX – QUICK START GUIDE


15

14

16

8

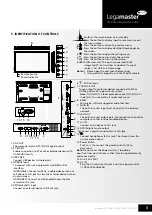
AUDIO

TOUCH

 OUT 2

2

9 10

11

12

13

7

8


P

C

 O

U

T

V

G

A


O

U

T

A

U

D

IO

O

U

T

U

S

B

U

S

B

H

D

M

I


Y

W

R

Y

W

R

V

G

A


O

U

T

A

U

D

IO

O

U

T

U

S

B

U

S

B

H

D

M

I

AV

 O

U

T

V

ID

E

O

A

U

D

IO

Y

W

R

P

C

 O

U

T

1

2
3

4
5
6
7

AC IN

AUDIO

TOUCH

 OUT 2

2

3

4

5

6

7

3

1

3.0

2.0

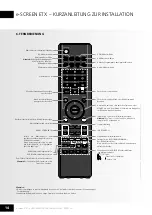
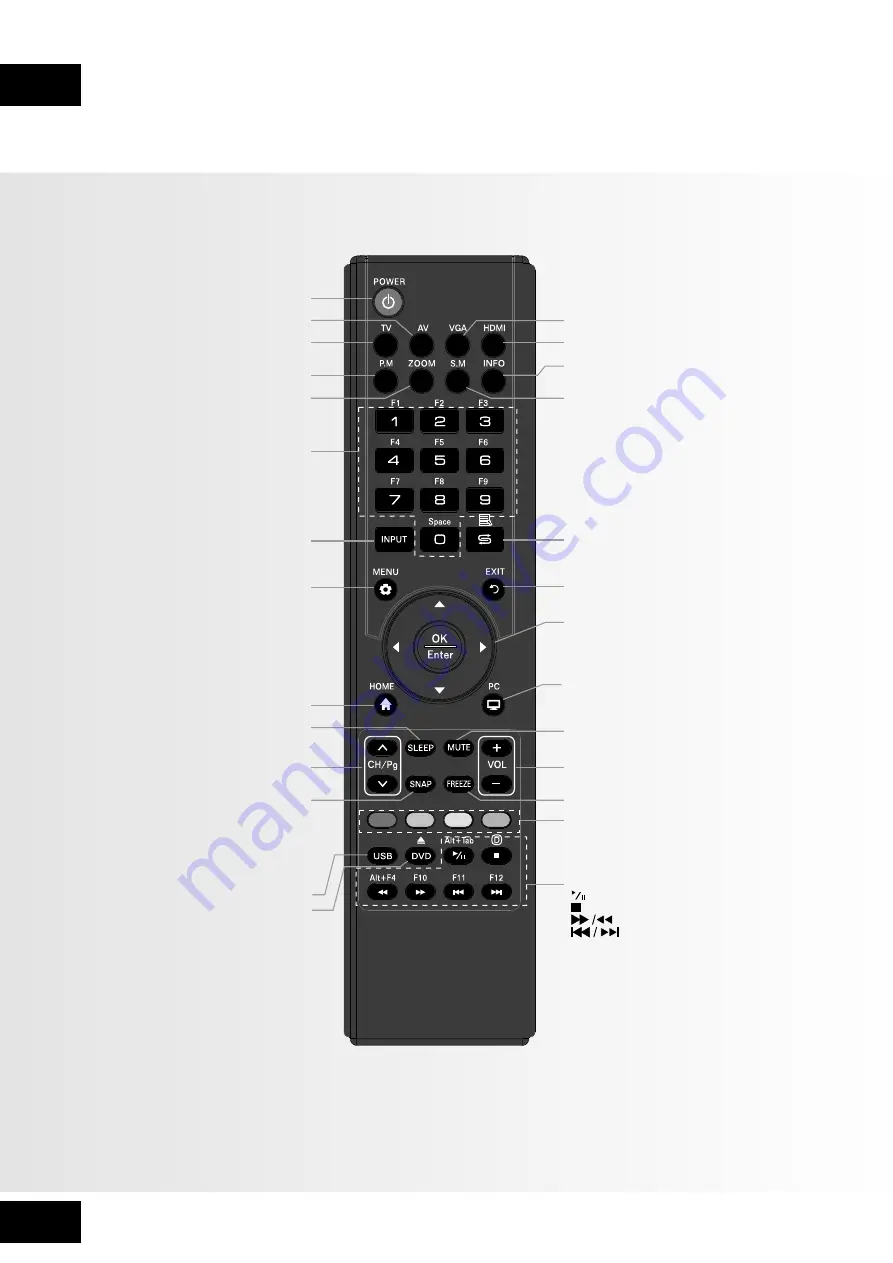
Switches the screen power on or Standby

Switches to VGA mode

Switches to HDMI mode

Displays or exits the current program information

Selects sound mode

Returns to the previous channel

Returns to previous menu
or exit the on-screen menu

To confirm or enter a sub-menu or toggle between 
options during MENU operation. Use Arrow buttons to 
navigate in onscreen menu.

Displays integrated PC on the screen 

Note:

  If there is no integrated PC, this button has no 

function.

Mutes the sound

VOLUME UP/DOWN

Freezes the content displayed on the screen

Coloured buttons(RED/GREEN/YELLOW/BLUE)
Red: Screen off /on.
Blue: Call or exit recent application list.

Control buttons for USB/DVD Multi Media Player 

 : Play/Pause button

 : STOP button 

 : Fast forward/fast reverse 

 : Previous/next

Takes a screenshot and stores the 


data onto your connected USB 

storage device.

If there is no USB storage, the 

screenshot will be stored on the built-

in storage.

Notes:

• This operation manual provides a description based on operating functions using the remote control.

• In different mode, some buttons may have different function.

Switches to AV mode

Switches to analog mode

Note: 

If no analogue mode available, this button has no function.

Selects picture mode

Selects aspect ratio

0-9 number buttons

Displays or exits input source menu

Displays or exits the setting menu screen

Displays desktop (Home page)on the screen

Sets up the sleep timer

Goes to USB multi media player

Goes to DVD multi media player

Press to enter or exit the disc tray 

Note:

 If there is no DVD, this button has no 

function.

CHANNEL UP/DOWN

6. REMOTE CONTROL

Содержание e-SCREEN ETX

Страница 1: ...rols 3 6 Remote Control 4 7 Precautions Before Connecting 5 8 Operating the Float menu 7 9 Home Menu Overview 7 10 Device Settings 8 11 Network Settings 8 12 Wired Network Setting 9 13 Wireless Network Setting 10 14 Wireless Network Setting 11 GB ENGLISH 1 DE GERMAN DEUTSCH 12 FR FRENCH FRANÇAIS 22 NL DUTCH NEDERLANDS 32 1 e Screen ETX QUICK START GUIDE ENGLISH ...

Страница 2: ...d unplug it Use a soft slightly damp cloth to clean the product Do not use liquid cleaners or cleaning spray cleaners 10 Please turn off and unplug whenever the product is not in use 11 Please ensure air flow around the product it can not be covered or blocked 12 Please ensure to clean the covers on the infrared boards to avoid touch screen failure 13 Do not place the product in direct sunlight or...

Страница 3: ...n MHL enabled device such as a cell phone to this jack to view the external device s screen on your screen HDMI2 ARC Connect an ARC enabled home theater receiver to this jack 5 DP DisplayPort Input Connect an external device to DP out jack Remote Sensor Power Indicator 6 WiFi antenna 7 TOUCH1 2 OUT Touch output for external devices connected to PCx or HDMIx port which support touch system Note TOU...

Страница 4: ...ns for USB DVD Multi Media Player Play Pause button STOP button Fast forward fast reverse Previous next Takes a screenshot and stores the data onto your connected USB storage device If there is no USB storage the screenshot will be stored on the built in storage Notes This operation manual provides a description based on operating functions using the remote control In different mode some buttons m...

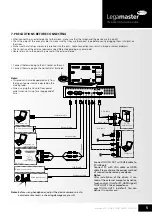
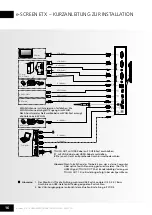
Страница 5: ...ys unplug the AC cord from power outlet when not using for a long period of time 1 Connect the female plug to the AC socket on the unit 2 Connect the male plug to the wall outlet as illustrated Serial port cable Network cable Network cable Audio cable VGA cable S PDIF cable Headphone cable AV adapter Network connection Computer etc Internet devices AV devices Digital sound system Audio input devic...

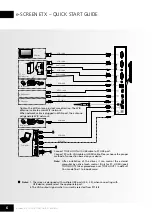
Страница 6: ... device please select the appropriate port 2 The VGA output signals what is currently selected from PC1 2 3 Connect TOUCH OUT with USB cable to PC USB port Connect PC with VGA cable or HDMI cable Please choose the proper method of connection based on your device Note After installation of the driver it can control the external computer by native touch control Only for PC HDMI signal TOUCH OUT 2 ta...

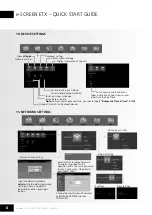
Страница 7: ... Turn off the screen Call the application history Call the input source menu ES File Explorer Call the device Settings menu Go to your USB Drive Note Design and specifications are subject to change without notice Note When using the app Camera store the data onto your connected USB device If USB device is not connected store the data onto the built in storage 1 Slide up from bottom of the screen c...

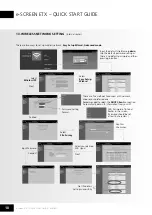
Страница 8: ...t in WiFi IP settings Proxy settings To set on screen language To set Date and time Note To manually set date and time you should toggle Automatic Date time to OFF Automatic search for Bluetooth devices Input the default UserName admin skip the default password setting as there is no default password and then press login button Reset internal router by hardware Password is required for this operat...

Страница 9: ...he DHCP Client connection Automatically obtain IP information from your ISP DHCP Client Automatically obtain IP information from your ISP If your ISP doesn t provide a designated IP for you then choose DHCP Client Static IP If all Internet IP information is provided by your ISP then choose Static IP PPPOE Ethernet Point to Protocol Your ISP will provide you with Login ID and password Usually this ...

Страница 10: ...n press login button Select Easy Setup Wizard Password Setting Format WiFi Password of Internal Router in the screen Password should be set at least 8 characters Confirm Site Survey Select Site Survey Select your desired WiFi signal Next There are five methods to connect with network choose your preferred one Recommended to select the DHCP Client connection Automatically obtain IP information from...

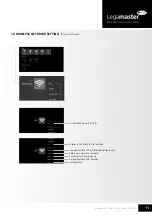
Страница 11: ...ELESS NETWORK SETTING Built in WiFi card Turn on off the built in WiFi Display all of the WiFi sites avaible Connect to WPS WiFi Protected Setup router Add a new network manually Scanning WiFi direct device Setting Portable WiFi hotspot Setting Mcast ...

Страница 12: ...uch verwenden Keine Flüssigreiniger oder Reinigungssprays verwenden 10 Produkt ausschalten und vom Netz trennen wenn es nicht benutzt wird 11 Für ausreichende Luftzirkulation um das Produkt herum sorgen Nicht abdecken oder zustellen 12 Zur Vermeidung von Defekten am Touchscreen die Abdeckungen der Infrarot Platinen reinigen 13 Das Produkt keiner direkten Sonneneinstrahlung aussetzen und nicht in d...

Страница 13: ...en Geräts auf Ihrem Monitor anzuzeigen HDMI2 ARC Buchse zum Anschluss eines ARC fähigen Heimkino Receivers 5 DP DisplayPort Eingang DP Ausgangsbuchse zum Anschluss eines externen Geräts Fernbedienungssensor Betriebsanzeige 6 WLAN Antenne 7 TOUCH1 2 OUT Ausgang der Touchfunktion für die an den PCx oder HDMIx Port angeschlossenen externen Geräte die Touchfunktionalität unterstützen Hinweis TOUCH OUT...

Страница 14: ...ltimedia Player Abspielen Pause STOP Taste Schneller Vor Rücklauf Zurück Vor Erstellt ein Bildschirmfoto und speichert es auf dem angeschlossenen USB Speichermedium Wenn keines angeschlossen ist wird das Bildschirmfoto im eingebauten Speicher abgelegt Hinweise Die Beschreibungen in diesem Handbuch beziehen sich auf die Betriebsfunktionen bei Verwendung der Fernbedienung In anderen Betriebsmodi kön...

Страница 15: ...nn das Gerät längere Zeit nicht benutzt wird 1 Steckerbuchse am WS Anschluss des Geräts anschließen 2 Stecker wie gezeigt an die Wandsteckdose anschließen Kabel für seriellen Port Netzwerkkabel Netzwerkkabel Audiokabel USB Kabel VGA Kabel S PDIF Kabel Kopfhörerkabel AV Adapter Netzwerkverbindung Computer usw Internetgeräte AV Geräte Digitales Audiosystem Audio Eingangsgeräte Computer usw Computer ...

Страница 16: ...schluss von USB Geräten bitte den geeigneten Port wählen 2 Das VGA Ausgangssignal entspricht der aktuellen Einstellung in PC1 2 3 TOUCH OUT mit USB Kabel an PC USB Port anschließen PC mit VGA Kabel oder HDMI Kabel anschließen Bitte je nach Gerät entsprechende Anschlussmethode wählen Hinweis Nach Installation des Treibers kann der externe Computer über native Touch Steuerung gesteuert werden Nur fü...

Страница 17: ...enü der Eingabequelle aufrufen ES Datei Explorer Menü Einstellungen des Geräts aufrufen Zum USB Laufwerk wechseln Hinweis Design und Spezifikationen können ohne vorherige Ankündigung verändert werden Hinweis Beim Benutzen der Kamera App die Daten auf dem angeschlossenen USB Gerät speichern Wenn kein USB Gerät angeschlossen ist Daten im eingebauten Speicher sichern 1 Zum Aufrufen von der Mitte des ...

Страница 18: ...instellungen Proxy Einstellungen Bildschirmsprache einstellen Datum Uhrzeit einstellen Hinweis Zur manuellen Einstellung von Datum und Uhrzeit den Schalter Datum Zeit automatisch auf AUS setzen Automatische Suche nach Bluetooth Geräten Voreingestellten Benutzernamen eingeben admin die voreingestellte Passworteinstellung überspringen da nicht vorhanden Anschließend die Anmeldetaste Login drücken Ha...

Страница 19: ...erbindung mit dem Netzwerk gibt es fünf Methoden Bitte die bevorzugte wählen IP Daten automatisch vom ISP erhalten DHCP Client IP Daten automatisch vom ISP erhalten Wählen Sie DHCP Client wenn Ihr ISP keine dedizierte IP für Sie bereitstellt Statische IP Wählen Sie Statische IP wenn Ihr ISP alle Internet IP Daten bereitstellt PPPOE Ethernet Point to Protocol Sie erhalten Login ID und Passwort von ...

Страница 20: ...Anschließend die Anmeldetaste Login drücken Auswählen Easy Setup Wizard Einstellung des Passwortformats WLAN Passwort des internen Routers im Monitor Passwort sollte aus mindestens 8 Zeichen bestehen Bestätigen Site Survey Site Survey wählen Gewünschtes WLAN Signal auswählen Weiter Für die Verbindung mit dem Netzwerk gibt es fünf Methoden Bitte die bevorzugte wählen Empfohlen bei Wahl der DHCP Cli...

Страница 21: ...NETZWERK EINRICHTEN Eingebaute WLAN Karte Eingebautes WLAN ein ausschalten Alle verfügbaren WLAN Sites anzeigen Verbinden mit WPS WiFi Protected Setup Router Neues Netzwerk manuell hinzufügen Mobilen WLAN Hotspot einstellen Setting Portable WiFi hotspot Mcast einstellen ...

Страница 22: ...t éteignez le et débranchez le Utilisez un chiffon doux légèrement humide pour nettoyer le produit N utilisez pas de nettoyants liquides ou spray 10 Veuillez éteindre et débrancher le produit lorsqu il n est pas utilisé 11 Veuillez vous assurer de la circulation d air autour du produit Assurez vous qu il n est ni couvert ni obturé 12 Veillez à nettoyer les protections sur les capteurs tactiles inf...

Страница 23: ...un appareil MHL tel qu un téléphone portable à ce jack pour afficher l écran de l appareil externe sur votre écran HDMI2 ARC Connectez un récepteur ARC de home cinéma à ce jack 5 Entrée DP DisplayPort Connectez un appareil externe au jack de sortie DP Capteur à distance Témoin d alimentation 6 Antenne Wi Fi 7 TOUCH1 2 OUT Sortie de l écran tactile pour les appareils externes connectés au port PCx ...

Страница 24: ...our le lecteur multimédia USB DVD Bouton Lecture Pause Bouton ARRÊT Avance rapide rembobinage rapide Précédent Suivant Prend une capture d écran et stocke les données sur votre périphérique de stockage USB connecté S il n y a pas de stockage USB la capture d écran sera stockée dans la mémoire intégrée Remarques Cette notice d utilisation offre une description basée sur l utilisation des fonctions ...

Страница 25: ...n utilisez pas l appareil pendant une longue durée 1 Branchez la prise femelle sur la prise secteur sur l appareil 2 Branchez la prise mâle sur la prise de courant murale conformément à l illustration Câble du port série Câble réseau Câble réseau Câble audio Câble VGA Câble S PDIF Câble du casque Adaptateur audiovisuel Connexion au réseau Ordinateur etc Périphériques Internet Appareils audiovisuel...

Страница 26: ...uillez sélectionner le port approprié 2 La sortie VGA est celle actuellement sélectionnée depuis PC1 2 3 Connectez TOUCH OUT avec le câble USB au port USB du PC Connectez le PC avec le câble VGA ou le câble HDMI Veuillez choisir la méthode appropriée de connexion en fonction de votre périphérique Remarque après l installation du pilote il peut contrôler l ordinateur externe par contrôle tactile na...

Страница 27: ...rique d applications Appeler le menu de la source d entrée Explorateur de fichiers ES Appeler le Menu Paramètres du périphérique Pour aller à votre Lecteur USB Remarque La conception et les caractéristiques techniques peuvent être modifiées sans préavis Remarque lors de l utilisation de l application Caméra stockez les données dans votre périphérique USB connecté Si le périphérique USB n est pas c...

Страница 28: ...u Proxy Pour définir la langue à l écran Pour définir la date et l heure Remarque Pour définir manuellement la date et l heure vous devez désactiver Date et heure automatiques Recherche automatique pour les périphériques Bluetooth Entrez le nom d utilisateur par défaut admin ignorez le mot de passe par défaut car il n y en a pas puis appuyez sur le bouton login Réinitialiser le routeur interne de ...

Страница 29: ...s permet d obtenir automatiquement des informations sur l adresse IP de votre fournisseur de services Internet DHCP Client Cette sélection vous permet d obtenir automatiquement des informations sur l adresse IP de votre FAI Si votre FAI ne fournit pas d adresse IP désignée pour vous sélectionnez DHCP Client Static IP Si toutes les informations d adresse IP sont fournies par votre FAI sélectionnez ...

Страница 30: ...ion simple Format de définition du mot de passe Mot de passe Wi Fi du routeur interne à l écran le mot de passe doit comporter au moins 8 caractères Confirmer Site Survey Sélectionnez Site Survey Sélectionnez le signal Wi Fi de votre choix Suivant Cinq méthodes de connexion au réseau sont proposées sélectionnez la méthode de votre choix Il est recommandé de sélectionner la connexion DHCP Client Ce...

Страница 31: ...arte Wi Fi intégrée Activer Désactiver le Wi Fi intégré Afficher tous les sites Wi Fi disponibles Se connecter au routeur WPS WiFi Protected Setup Ajouter manuellement un nouveau réseau Analyse du périphérique direct Wi Fi Paramétrage du point d accès Wi Fi portable Paramétrage de Mcast ...

Страница 32: ...ontact Gebruik een zachte vochtige doek Gebruik geen vloeibare schoonmaakmiddelen of reinigingsspray 10 Schakel het apparaat uit en haal de stekker uit het stopcontact wanneer u het niet gebruikt 11 Zorg ervoor dat er lucht rondom het product kan stromen Bedek of blokkeer het niet 12 Reinig de kappen van de infraroodplaten om te voorkomen dat het touchscreen defect raakt 13 Plaats het product niet...

Страница 33: ...n mobiele telefoon aan dit contact om het scherm van het externe apparaat op uw scherm te zien HDMI2 ARC Sluit een ARC geactiveerde thuisbioscoopontvanger op dit contact aan 5 DP DisplayPort ingang Sluit een extern apparaat aan op het DP uit contact Externe sensor Stroomlichtje 6 6 WiFi antenne 7 TOUCH1 2 OUT Deze poort is voor externe apparaten aangesloten op de PCx of HDMIx poort van het touchsy...

Страница 34: ...aspeler Weergeven pauzeren knop STOP knop Snel vooruit snel achteruit Vorige volgende Maakt een schermafdruk en slaat de gegevens op het aangesloten USB apparaat op Als er geen USB apparaat is wordt de schermafbeelding in de interne opslag opgeslagen Opmerkingen Deze handleiding bevat een beschrijving van de functies met gebruik van de afstandsbediening Op een andere stand hebben de knoppen soms e...

Страница 35: ...t wanneer het product lange tijd niet wordt gebruikt 1 Sluit de vrouwelijke stekker in het AC contact van het apparaat 2 Steek de mannelijke stekker in het stopcontact zoals weergegeven Seriële kabel Netwerkkabel Netwerkkabel Audiokabel VGA kabel S PDIF kabel Koptelefoonkabel AV adapter Netwerkverbinding Computer etc internet apparatuur AV apparaten Digitaal geluidssysteem Audio apparatuur Compute...

Страница 36: ... u de juiste poort selecteren 2 De VGA uitgang is het signaal dat op dit moment is geselecteerd via PC1 2 3 Sluit TOUCH UIT met een USB kabel aan op de USB poort van de pc Sluit de pc aan met een VGA of HDMI kabel Kies de juiste aansluitingsmethode voor uw apparaat Opmerking Na installatie van de driver kan de externe computer aangestuurd worden via het touchscreen alleen voor pc en HDMI signaal T...

Страница 37: ...iehistorie Toon het ingangsbronmenu ES File Explorer Toon het Instellingen menu van het apparaat Ga naar de USB drive Opmerking Ontwerp en specificaties kunnen zonder voorafgaande kennisgeving worden gewijzigd Opmerking Wanneer u de app camera gebruikt wordt de data op het aangesloten USB apparaat opgeslagen Als er geen USB apparaat is aangesloten wordt de data in de ingebouwde opslag opgeslagen 1...

Страница 38: ...i IP instellingen Proxy instellingen De schermtaal instellen De datum en tijd instellen Opmerking Als u de datum en tijd automatisch wilt instellen zet u Automatische datum tijd op UIT Automatisch zoeken naar Bluetooth apparaten Voer de standaardgebruikersnaam in admin sla de standaard wachtwoordinstelling over omdat er geen standaard wachtwoord is en druk op Inloggen Reset de interne router via d...

Страница 39: ...en keuze Aanbevolen wordt de DHCP Client aansluiting te kiezen DHCP Client Verkrijg de IP informatie automatisch van uw internetprovider Als uw internetprovider geen specifieke IP voor u verschaft kiest u DHCP Client Static IP Als alle internet IP informatie door uw internetprovider wordt geleverd kiest u Static IP PPPOE Ethernet Point to Protocol Uw internetprovider levert u de login ID en het wa...

Страница 40: ...p Inloggen Selecteer Easy Setup Wizard instellen van het type Wifi beveiliging Wifi wachtwoord van de interne router op het scherm Het wachtwoord moet minstens 8 tekens bevatten Bevestig Site Survey Selecteer Site Survey Selecteer het gewenste wifi signaal Volgende Er zijn vijf manieren om met het netwerk te verbinden selecteer de gewenste Het wordt aanbevolen DHCP Client te kiezen Hierbij wordt a...

Страница 41: ...gebouwde wifi kaart In en uitschakelen van de ingebouwde Wifi kaart Toon alle beschikbare wifi sites Zorg voor een aansluiting op de WPS WiFi Protected Setup router Voeg een nieuw netwerk handmatig toe Wifi direct apparaat scannen Mobiele wifi hotspot instellen Mcast instellen ...

Страница 42: ...42 NOTES e Screen ETX QUICK START GUIDE ...

Страница 43: ...43 NOTES e Screen ETX QUICK START GUIDE ...

Страница 44: ...ES e Screen ETX QUICK START GUIDE Legamaster brand of the edding group Legamaster International B V Postbus 111 NL 7240 AC Lochem T 31 0 573 71 30 00 F 31 0 573 71 30 01 info legamaster com www legamaster com ...

Отзывы: