Knowledge
of
X
-
431 PAD IV
X-431 PAD IV
Quick
Start
Guide
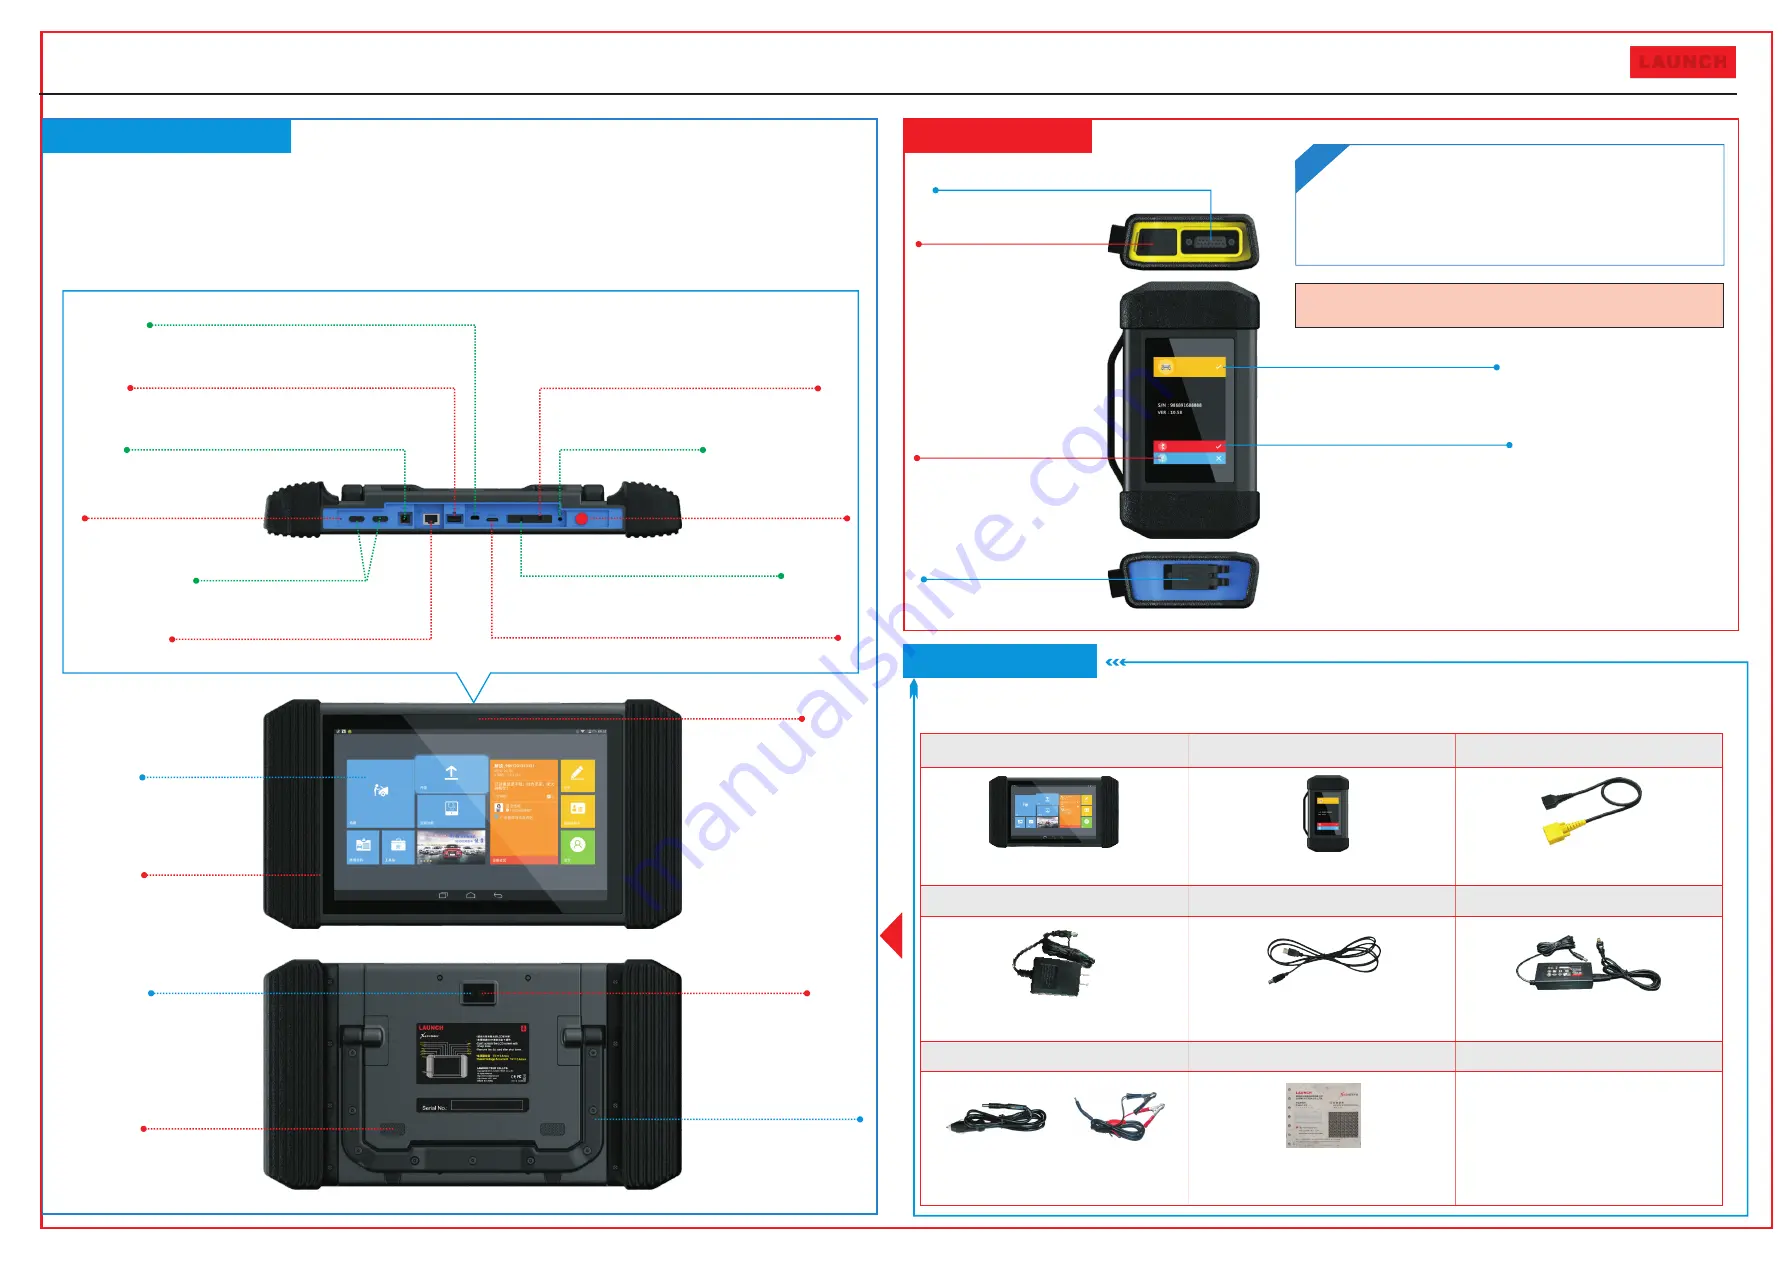
X-431 PAD IV is a new sophisticated Android-based diagnostic tool developed by LAUNCH. Utilizing higher hardware
configuration and user-friendly interface, it inherits LAUNCH’s advanced diagnosing technology by covering a wide range of
vehicles, featuring powerful functions, and providing precise test result.
In addition to traditional diagnosis, X-431 PAD IV also supports the quick vehicle VIN(Vehicle Identification Number) scanning
technology, remote diagnosis(making remote request established easier and getting repair job fixed faster), diagnostics forum(a
platform for technicians to share repair skills and technical exchange), repair data(abundant repair information for quick retrieval
and reference), one-click update and add-on modules, such as oscilloscope, ignition, sensor and battery test etc.
Power/Screen lock key
Headphone
jack
TF
card
slot
(To insert a TF card for memory extension.)
HDMI
port
(To connect an external projector or monitor with HDMI interface)
Ethernet port
(To connect Ethernet cable for wired network)
Volume
+/-
keys
(To
adjust
the
volume
)
Reserved jack
Reset hole
(To reset the X-431 PAD IV)
DC
-
IN
jack
(To connect the included power adaptor)
USB2
port
(To connect USB devices or add-on modules)
USB1
port
(For connecting it to VCI module to perform diagnosis)
Front camera
Touch
Screen
Rear camera
Adjustable kickstand
Audio speaker
Camera Flash
Accessory
Checklist
X-431 PAD IV tablet
HD IV module
Diagnostic cable
Power
adaptor
USB
cable Power adaptor for VCI module
Password envelope Diagnostic connector kit
(A tablet for showing test results.)
(A device for accessing vehicle data.)
(To connect the VCI module to the vehicle’s
DLC.)
(To supply power to the X-431 PAD IV tablet.)
(To connect the
HD IV
module and
X-431 PAD IV to perform vehicle diagnosis.)
(To supply power to the VCI module
through AC outlet.)
(For connecting the diagnostic cable and
non-16pin vehicle DLC.)
Common accessories for each X-431 PAD IV are same, but for different destinations, the accessories of X-431 PAD IV may vary.
Please consult from the local agency or check the packing list supplied with X-431 PAD IV together.
work comfortable at your desk,
or hang it on automotive parts)
(Flip out it to any angle and
HD IV Module
DC-IN
power
jack
Status of vehicle connection
Status of Bluetooth communication
Diagnostic socket
(For connecting the diagnostic cable.)
Status of USB connection
USB port
(For connecting the power
adaptor or cigarette lighter/battery
clamps cable to obtain power.
For details on connection, please
refer to Section “Preparation &
Connection” in this Quick Start
Guide.)
(When the module is connected
to the tablet via USB cable,
“ ” appears.)
(If the module is disconnected from
the vehicle’s DLC, it will display “ ”.)
(Once the module is in USB mode,
it will display “ ”.)
(For connecting it to the
tablet to perform diagnosis.)
P
ro
fi
le
Note: Remember to remove the diagnostic cable or adaptor cable from the
DLC if it keeps idle or unused.
The HD IV module works as a vehicle communication
interface device, which is designed to read the vehicle data
and then send it to X-431 PAD IV tablet via Bluetooth
communication and USB connection. The module comes
loaded with a 4" display screen, enabling you to easily identify
the working status of the module and X-431 PAD IV tablet.
Microphone
(To supply power to the VCI module through
connection to cigarette lighter receptacle/
vehicle’s battery.)
(A piece of paper bearing S/N and Activation
Code, which is needed for your registration.)
Cigarette lighter&Battery clamps cable
LAUNCH
Technical parameters:
Working voltage
:
9
-
36V
Working temp.
:-
10
℃-
55
℃
Communication via
:
1) Bluetooth or 2) USB cable
How to supply power to the VCI module?
1
)
.
Via
power
adaptor
:
Plug one end of the included power adaptor to
the DC-IN jack of the module, and the other end to the AC outlet.
2
)
.
Via
cigarette
lighter
cable
/
battery
clamps
cable
:
Plug one end of
the cigarette
lighter
/
battery
clamps
cable to the DC-IN jack of the
module, and the other end to the cigarette
receptacle
/
vehicle
'
s
battery.
Optional
½öÓÃÓÚÆÀ¹À¡£
°æȨËùÓÐ (c) by Foxit Software Company, 2004
ÓÉ Foxit PDF Editor ±à¼-
Optional
½öÓÃÓÚÆÀ¹À¡£
°æȨËùÓÐ (c) by Foxit Software Company, 2004
ÓÉ Foxit PDF Editor ±à¼-
(spare)
Optional
½öÓÃÓÚÆÀ¹À¡£
°æȨËùÓÐ (c) by Foxit Software Company, 2004
ÓÉ Foxit PDF Editor ±à¼-
(spare)
½öÓÃÓÚÆÀ¹À¡£
°æȨËùÓÐ (c) by Foxit Software Company, 2004
ÓÉ Foxit PDF Editor ±à¼-
(Optional)
(Optional)
(Optional)


