background image


EPG & Scheduling 


The EPG is an on-screen TV guide that shows scheduled programs up to seven days in advance for every 
tuned channel. 


Press the EPG button on the Remote Control to access the guide. 


Use the LEFT and RIGHT buttons to change the channel. 


Use the UP and DOWN button to scroll through the EPG and highlight the program you are 
interested in. The program information is displayed on the right side of the window. If 
more than one page of information is available use the YELLOW or BLUE buttons to display 
the different pages. 


Once you have found a program that you are interested in you can set a reminder to view 
the program or record it if you are not going to be available to watch it. 


Press the OK button to Book or Schedule and program. 

 
Use the UP and DOWN buttons to select the option to change and the use then the LEFT or RIGHT 
button to change it. All fields will default to the details of the program that you have selected. 
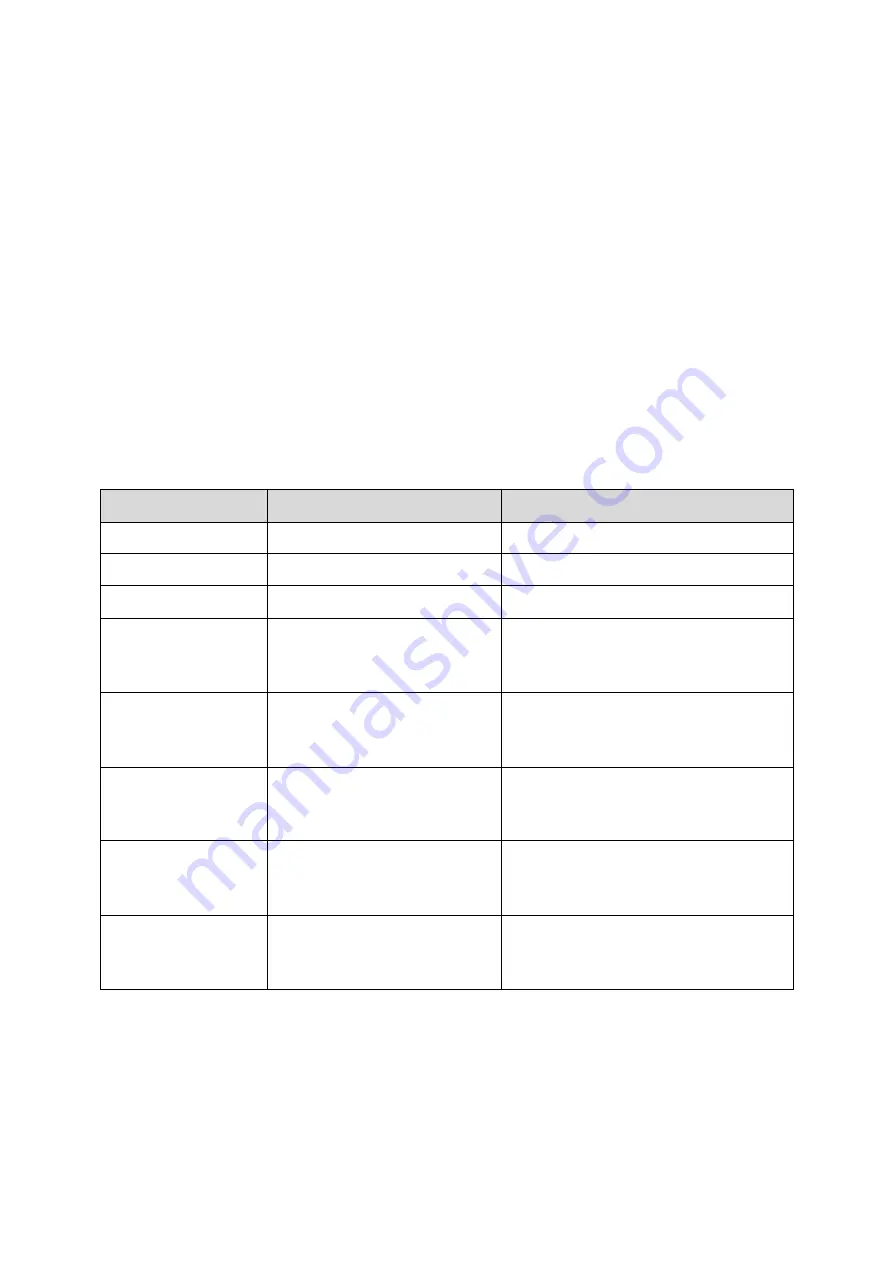
 

SELECTION


OPTION


DESCRIPTION


CHANNEL TYPE


TV / RADIO


Choose between TV and Radio


CHANNEL NO


Available Channels


Change the channel to book 

CHANNEL NAME


Default


As per Broadcast or edited.


START DATE


Set the date of the booking to 
commence (MM/DD/YY)


Use the LEFT/RIGHT Button to select the 
field to change and use the numeric pad 
to enter the new number.


START TIME


Set the Start Time


Use the LEFT/RIGHT Button to select the 
field to change and use the numeric pad 
to enter the new number.


END TIME


Set the End Time


Use the LEFT/RIGHT Button to select the 
field to change and use the numeric pad 
to enter the new number


REPEAT


ONCE / DAILY / WEEKLY


Select whether you wish to have the 
booking repeat every day, every week on 
the same day or just once.


MODE


VIEW / RECORD


Select to View the program or record it. 
Recording requires a USB device with 
enough available space for the recording.


To accept all details as displayed please use the OK button on the remote. Or change the options as 
described below. 
 
Once a Booking has been made the Schedule screen will be shown with all bookings displayed. 
 

Содержание STB-7000

Страница 1: ...Set Top Box HD Media Player STB 7000 User Manual Please read carefully before use...

Страница 2: ...onnection 6 Connection Method 1 Composite 6 Connection Method 2 HDMI 6 Audio Connection 6 FIRST TIME INSTALLATION 6 OSD Language 6 Country 6 Channel Search 6 BASIC OPERATION 7 Channel Selection 7 Volu...

Страница 3: ...ion 14 Recall List 14 USB 14 Multimedia 14 Photo Configure 14 Movie Configuration 15 PVR Configuration 15 Record Device 15 Format 15 MULITMEDIA PLAYBACK 16 Music 16 Photo 16 PVR 16 GENERAL INFORMATION...

Страница 4: ...lling them from the plug and not the cord Using this device near other electronic devices may cause interference When recording images or video using this product please be respectful or the Copyright...

Страница 5: ...2 SET TOP BOX Front Panel Rear Panel Item Description Item Description 1 Antenna In 4 Video Output 2 Antenna Loop Through 5 Audio Left Right output 3 HDMI Output 6 Audio Left Right output...

Страница 6: ...AVOURITES 3 SUBTITLES 4 NUMERIC KEYS 5 MENU 6 OK BUTTON 7 EPG 8 PAGE UP DOWN 9 VOLUME UP DOWN 10 REWIND FAST FOREWARD 11 PREVIOUS NEXT 12 PLAY 13 PAUSE 14 RECORD 15 TIMESHIFT 16 ZOOM 17 ASPECT 18 POWE...

Страница 7: ...e Viewing mode Press to Zoom in on Image ASPECT In DTV mode press to change to different Aspect Ratios POWER ON OFF Places the STB into Standby mode or wakes it up TELETEXT Streaming information on yo...

Страница 8: ...off at the main power outlet 2 Connect the Antenna cable to the ANT In socket 3 Choose the best connection method for your Equipment There are 2 possible connection methods and the type that you choos...

Страница 9: ...ed to the power and to the TV and after all audio connections have been made properly switch on TV Press Power button to switch the Set Top Box STB unit on If you are using the unit for the first time...

Страница 10: ......

Страница 11: ...ess again to unlock LOCKED channels will require the password to be viewed DELETE BLUE Use the UP and DOWN buttons to select the channel to DELETE and then press the BLUE button Press OK to confirm or...

Страница 12: ...gram that you have selected SELECTION OPTION DESCRIPTION CHANNEL TYPE TV RADIO Choose between TV and Radio CHANNEL NO Available Channels Change the channel to book CHANNEL NAME Default As per Broadcas...

Страница 13: ...NNEL NAME Sort the channels in ascending order ONID Sort the channels according to ONID SERVICE ID Sort the channels according to the station LCN Set LCN to ON or OFF Picture The Picture menu allows y...

Страница 14: ......

Страница 15: ...time that the STB will automatically turn off from the last input from the remote control Options are 1 to 12 hours set in 1 hour increments OFF disables the Sleep feature Option OSD Language Sets th...

Страница 16: ...red consumers System The menu provides options to adjust the system settings Parental Guidance Select the parental level you desire for disc with lock out function or multiple rating levels Note This...

Страница 17: ...edia When a USB device is attached you can select from the Music Photo or Movie options in this menu using the RIGHT LEFT keys and OK to select If a USB device is not connected the warning message Not...

Страница 18: ...to enter the PVR Configuration Sub menu Record Device This screen Display information about the connected USB device including Device File System Total space on device Free Space on Device This featu...

Страница 19: ...t contains the picture files to view Select the file and press the OK button to view an individual image or press the PLAY button to begin a Slide Show of all images in the current folder Movie In the...

Страница 20: ...eature Use the REV and FWD buttons to fast forward or Rewind the vision Press the YELLOW button to enter a specific time to jump to Press the STOP to end the time shifting and then press the OK button...

Страница 21: ...ectly Check power source if fitted or reconnect Movie Payback out of sync Faulty file Check file to ensure not encoding issue File is too large for STB Re encode file at lower resolution and or data r...

Страница 22: ...the fault and refund or replace the product as per their store refund or warranty policy Step 2b If your place of purchase cannot be contacted then you can contact Laser Customer Service with details...

Отзывы: