background image

40 


Explosion Proof Network IP Camera User Manual 


5.4.3


Setting / Calling a Patrol


Note:


No less than 2 presets have to be configured before you set a patrol. 


Steps:


1.


Click  

  to enter the patrol configuration interface. 


2.


Select a path No., and click  

  to add the configured presets. 


3.


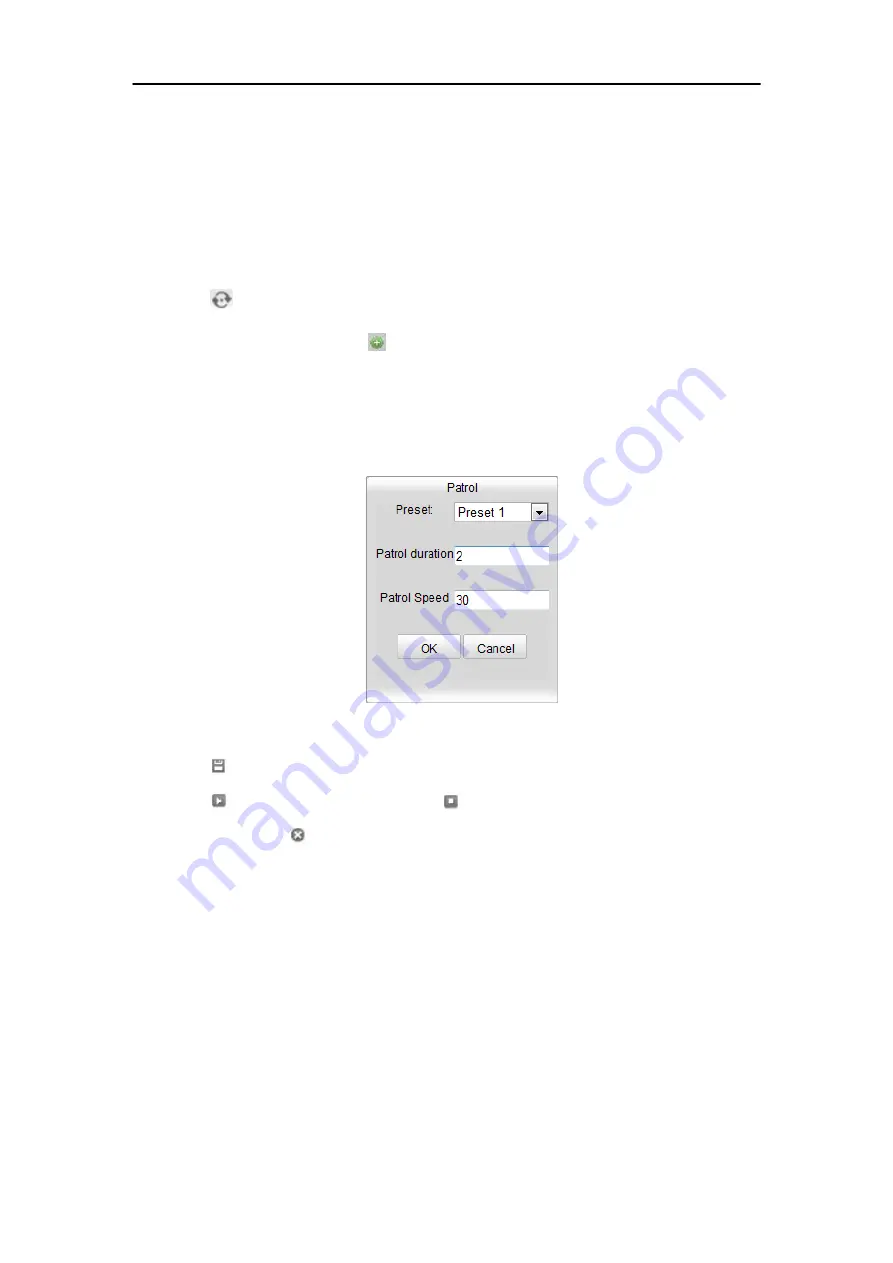
Select the preset, and input the patrol duration and patrol speed. 


4.


Click OK to save the first preset. 


5.


Follow the steps above to add the other presets. 


Figure 5-6 Add Patrol Path 


6.


Click 

  to save a patrol. 


7.


Click 

  to start the patrol, and click  

  to stop it. 


8.


(Optional) Click 

  to delete a patrol. 

Содержание ATEX-EXPCMR-IP-POE-2MPIR-108D

Страница 1: ...stallation Make sure that the dev Check the specification of the products for the installation environment ice is in good condition and all the assembly parts are included Make sure that the wall or t...

Страница 2: ...procedure To Activate the camera a Click on the camera entry in the Online Devices list to select it The Network Parameters and other device information will appear in the right column b Enter a stro...

Страница 3: ...st performance Iris Mode Exposure Time Value ranges from 1 3 to 1 100 000 s The nominal value is 1 150 Adjust it according to the lightening condition Gain Set the gain to show the optimal brightness...

Страница 4: ...on Unattended baggage detection Object removal detection Camera EXPCMR IP POE 2MP IR 108D Line Crossing Detection Intrusion Detection supported Unattended Baggage Object Removal Face Detectionn Human...

Страница 5: ...1 Explosion Proof Network IP Camera User Manual USER MANUAL Explosion Proof Network IP Camera EXPCMR IP POE 2MP IR 108D...

Страница 6: ...s of the enclosure This will reveal the cameras internals Feed your supplied Ethernet cable through one end of the camera Find the female RJ45 keystone jack inside and attach the male end of your supp...

Страница 7: ...ed if any of these cautions are neglected Warnings Follow these safeguards to prevent serious injury or death Cautions Follow these precautions to prevent potential injury or material damage Warnings...

Страница 8: ...e it to high electromagnetic radiation To avoid heat accumulation good ventilation is required for a proper operating environment Keep the camera away from water and any liquid during installation Whi...

Страница 9: ...INTENTIONALLY LEFT BLANK PAGE BREAK PAGE BREAK...

Страница 10: ...Chapter 4 Wi Fi Settings 26 4 1 Configuring Wi Fi Connection in Manage and Ad hoc Modes 26 4 2 Easy Wi Fi Connection with WPS function 31 4 3 IP Property Settings for Wireless Network Connection 33 C...

Страница 11: ...nd Audio Settings 65 6 4 1 Configuring Video Settings 65 6 4 2 Configuring Audio Settings 68 6 4 3 Configuring ROI Encoding 68 6 4 4 Display Information on Stream 70 6 4 5 Configuring Target Cropping...

Страница 12: ...n 107 6 7 VCA Configuration 109 6 7 1 BehaviorAnalysis 109 6 7 2 Face Capture 116 6 7 3 Heat Map 119 6 7 4 People Counting 122 Chapter 7 Storage Settings 126 7 1 Configuring NAS Settings 126 7 2 Confi...

Страница 13: ...the Camera 155 12 7 2 Restoring Default Settings 155 12 7 3 Exporting Importing Configuration File 156 12 8 RS 232 Settings 157 12 9 RS 485 Settings 158 12 10 Service Settings 159 Appendix 160 Append...

Страница 14: ...and above version Vista Win7 Server 2003 Server 2008 32bits CPU Intel Pentium IV 3 0 GHz or higher RAM 1G or higher Display 1024 768 resolution or higher Web Browser Internet Explorer 6 0 and above v...

Страница 15: ...a LAN Local Area Network please refer to Section 2 1 Setting the Network Camera over the LAN If you want to set the network camera via a WAN Wide Area Network please refer to Section 2 2 Setting the N...

Страница 16: ...use the camera Activation via Web Browser Activation via SADP and Activation via Client Software are all supported Activation via Web Browser Steps 1 Power on the camera and connect the camera to the...

Страница 17: ...password regularly especially in the high security system resetting the password monthly or weekly can better protect your product 4 Confirm the password 5 Click OK to save the password and enter the...

Страница 18: ...acters in order to increase the security of your product And we recommend you reset your password regularly especially in the high security system resetting the password monthly or weekly can better p...

Страница 19: ...n via Client Software The client software is versatile video management software for multiple kinds of devices Get the client software from the supplied disk or the official website and install the so...

Страница 20: ...ion Proof Network IP Camera User Manual Figure 2 6 Control Panel 2 Click the Device Management icon to enter the Device Management interface as shown in the figure below Figure 2 7 Device Management I...

Страница 21: ...sword of your own choosing using a minimum of 8 characters including upper case letters lower case letters numbers and special characters in order to increase the security of your product We recommend...

Страница 22: ...IP address modification 2 2 Setting the Network Camera over the WAN Purpose This section explains how to connect the network camera to the WAN with a static IP or a dynamic IP 2 2 1 Static IP Connecti...

Страница 23: ...5 Visit the network camera through a web browser or the client software over the internet Figure 2 10 Accessing the Camera through Router with Static IP Connecting the network camera with static IP d...

Страница 24: ...setting interface of the router 7 Visit the camera via the applied domain name Connecting the network camera via a modem Purpose This camera supports the PPPoE auto dial up function The camera gets a...

Страница 25: ...ing DDNS Settings for detailed configuration 3 Visit the camera via the applied domain name Private Domain Name Resolution Steps Figure 2 14 Private Domain Name Resolution 1 Install and run the IP Ser...

Страница 26: ...he default IP address is 192 168 1 64 If the camera is not activated please activate the camera first according to Chapter 3 1 or Chapter 3 2 4 Select English as the interface language on the top righ...

Страница 27: ...the live video and operating the camera Please follow the installation prompts to install the plug in Figure 3 2 Download and Install Plug in Figure 3 3 Install Plug in 1 Figure 3 4 Install Plug in 2...

Страница 28: ...by Client Software The product CD contains the iVMS 4200 client software You can view the live video and manage the camera with the software Follow the installation prompts to install the software The...

Страница 29: ...25 Explosion Proof Network IP Camera User Manual Figure 3 6 iVMS 4200 Main View Note For detailed information about the software please refer to the user manual of the iVMS 4200...

Страница 30: ...able for the cameras with the built in Wi Fi module 4 1 Configuring Wi Fi Connection in Manage and Ad hoc Modes Before you start A wireless network must be configured Wireless Connection in Manage Mod...

Страница 31: ...ireless network connection you set on the router Wireless Connection in Ad hoc Mode If you choose the Ad hoc mode you don t need to connect the wireless camera via a router The scenario is the same as...

Страница 32: ...the SSID and connect Security Mode Description Figure 4 6 Security Mode You can choose the Security Mode as not encrypted WEP WPA personal WPA enterprise WPA2 personal and WPA2 enterprise WEP mode Fig...

Страница 33: ...ype The key types available depend on the access point being used The following options are available HEX Allows you to manually enter the hex key ASCII In this method the string must be exactly 5 cha...

Страница 34: ...r the password of the network PEAP Version Select the PEAP version used at the access point Label Select the label used by the access point EAPOL version Select version 1 or 2 depending on the version...

Страница 35: ...tween the device and the wireless router The WPS makes it easy to add new devices to an existing network without entering long passphrases There are two modes of the WPS connection the PBC mode and th...

Страница 36: ...Push the WPS button to enable the function on the camera If there is not a WPS button on the camera you can also click the virtual button to enable the PBC function on the web interface 5 Click Connec...

Страница 37: ...PIN code field 3 Click Connect Or You can generate the PIN code on the camera side And the expired time for the PIN code is 120 seconds 1 Click Generate 2 Enter the code to the router in the example...

Страница 38: ...twork TCP IP Or Configuration Basic Configuration Network TCP IP 2 Select the NIC as wlan Figure 4 12 TCP IP Settings 3 Customize the IPv4 address the IPv4 Subnet Mask and the Default Gateway The sett...

Страница 39: ...work camera to enter the live view page or you can click Live View on the menu bar of the main page to enter the live view page Descriptions of the live view page Camera Model Figure 5 1 Live View Pag...

Страница 40: ...selectable And for Non IE user webcomponents quick time VLC or MJPEG is selectable if they are supported by the web browser Live View Window Display the live video Toolbar Operations on the live view...

Страница 41: ...set on the Configuration Local Configuration page To configure remote scheduled recording please refer to Section 7 2 Note The captured image will be saved as JPEG file or BMP file in your computer 5...

Страница 42: ...mouse in the relative positions For the cameras which support lens movements only the direction buttons are invalid Table 5 2 Descriptions of PTZ Control Panel Icon Description Zoom in out Focus near...

Страница 43: ...set Note Up to 16 presets can be configured for the Network Mini PT Camera Calling a Preset This feature enables the camera to point to a specified preset scene manually or when an event takes place F...

Страница 44: ...patrol configuration interface 2 Select a path No and click to add the configured presets 3 Select the preset and input the patrol duration and patrol speed 4 Click OK to save the first preset 5 Foll...

Страница 45: ...ured using the web browser and thus the saving paths of them are on the PC running the browser Steps 1 Enter the Local Configuration interface Configuration Local Configuration Figure 6 1 Local Config...

Страница 46: ...he image format for picture capture Record File Settings Set the saving path of the recorded video files Valid for the record files you recorded with the web browser Record File Size Select the packed...

Страница 47: ...on Basic Configuration System Time Settings Or Configuration Advanced Configuration System Time Settings Select the Time Zone Figure 6 2 Time Settings Select the Time Zone of your location from the dr...

Страница 48: ...k NTP software can be used to establish a NTP server for time synchronization Synchronizing Time Synchronization Manually Enable the Manual Time Sync function and then click to set the system time fro...

Страница 49: ...6 Both versions may be configured simultaneously without conflicting to each other and at least one IP version should be configured Steps 1 Enter TCP IP Settings interface Configuration Basic Configur...

Страница 50: ...he multicast group address Before utilizing this function you have to enable the Multicast function of your router A reboot is required for the settings to take effect 6 3 2 Configuring Port Settings...

Страница 51: ...ngs 2 Check the Enable PPPoE checkbox to enable this feature 3 Enter User Name Password and Confirm password for PPPoE access Note The User Name and Password should be assigned by your ISP For your pr...

Страница 52: ...ngly recommend the use of strong passwords for all functions and network devices The password should be something of your own choosing using a minimum of 8 characters including upper case letters lowe...

Страница 53: ...ser Name and Password registered on the DynDNS website 5 Click Save to save the settings IP Server Steps Figure 6 10 DynDNS Settings 1 Enter the Server Address of the IP Server 2 Click Save to save th...

Страница 54: ...s the server address NO IP Steps 1 Choose the DDNS Type as NO IP Figure 6 12 NO IP Settings 2 Enter the Server Address as www noip com 3 Enter the Domain name you registered 4 Enter the Port number if...

Страница 55: ...NMP software And you also need to use the different version according to the security level you required SNMP v1 provides no security and SNMP v2 requires password for access And SNMP v3 provides encr...

Страница 56: ...version checkbox to enable the feature 3 Configure the SNMP settings Note The settings of the SNMP software should be the same as the settings you configure here 4 Click Save to save and finish the s...

Страница 57: ...53 Explosion Proof Network IP Camera User Manual Purpose...

Страница 58: ...nd network devices The password should be something of your own choosing using a minimum of 8 characters including upper case letters lower case letters numbers and special characters in order to incr...

Страница 59: ...alarm DSCP and Management DSCP The valid value range of the DSCP is 0 63 The bigger the DSCP value is the higher the priority is Note DSCP refers to the Differentiated Service Code Point and the DSCP...

Страница 60: ...ote The wireless dial function requires the support of the camera 1 Click the Wireless Dial tab to enter the Wireless Dial configuration interface 2 Check the checkbox of Enable to enable the wireless...

Страница 61: ...rity of your product Proper configuration of all passwords and other security settings is the responsibility of the installer and or end user 3 Select the network mode from the drop down list Auto 3G...

Страница 62: ...lso manually connect disconnect the wireless network 5 Set the white list Figure 6 19 Dial Status 1 Check the checkbox of Enable SMS Alarm The mobile phone number on the white list can receive the ala...

Страница 63: ...a message to the mobile phone for test 5 Click Save to save the settings 6 3 10Email Sending Triggered by Alarm Purpose The system can be configured to send an Email notification to all designated rec...

Страница 64: ...ce Configuration Advanced Configuration Network Email Figure 6 22 Email Settings 3 Configure the following settings Sender The name of the email sender Sender s Address The email address of the sender...

Страница 65: ...omething of your own choosing using a minimum of 8 characters including upper case letters lower case letters numbers and special characters in order to increase the security of your product Proper co...

Страница 66: ...Click Save to save the settings 6 3 12Configuring FTP Settings Purpose You can configure the FTP server related information to enable the uploading of the captured pictures to the FTP server The captu...

Страница 67: ...to use the Device Name Device Number or Device IP for the name of the directory and when the Child Directory is selected you can use the Camera Name or Camera No as the name of the directory Upload t...

Страница 68: ...4HTTPS Settings Purpose HTTPS provides authentication of the web site and associated web server that one is communicating with which protects against Man in the middle attacks Perform the following st...

Страница 69: ...ertificate 1 Click Create button to enter the creation interface Figure 6 27 Create Self signed Certificate 2 Enter the country host name IP validity and other information 3 Click OK to save the setti...

Страница 70: ...ed valid certificate import the certificate to the device 4 There will be the certificate information after you successfully create and install the certificate Figure 6 28 Installed Certificate 5 Clic...

Страница 71: ...can customize the following parameters for the selected main stream or sub stream Video Type Select the stream type to video stream or video audio composite stream The audio signal will be recorded o...

Страница 72: ...stream or third stream H 264 MJPEG and MPEG4 are selectable Note The video encoding type varies according to different camera platforms For some certain cameras H 265 is supported while MPEG4 is not P...

Страница 73: ...sampling rate and audio stream bitrate are configurable for PCM the sampling rate can be set Audio Input MicIn and LineIn are selectable for the connected microphone and pickup respectively Input Volu...

Страница 74: ...igure 6 31 Region of Interest Settings Configuring Fixed Region for ROI Steps 1 Enter the ROI settings interface Configuration Advanced Configuration Video Audio ROI 2 Check the checkbox of Enable und...

Страница 75: ...st Note To enable face tracking function the face detection function should be supported and enabled 3 Check the checkbox of Enable License Plate Tracking and then the captured license plate picture i...

Страница 76: ...Steps 1 Enter the Target Cropping settings interface Configuration Advanced Configuration Video Audio Target Cropping 2 Check the checkbox of Enable Target Cropping to enable the function 3 Set Third...

Страница 77: ...lay parameters vary according to the different camera model Please refer to the actual interface for details Steps 1 Enter the Display Settings interface Configuration Basic Configuration Image Displa...

Страница 78: ...the default value is 50 Sharpness describes the edge contrast of the image which ranges from 1 100 and the default value is 50 Exposure Settings If the camera is equipped with the fixed lens only Man...

Страница 79: ...ers Day Night Switch Select the day night switch mode and configure the smart IR settings from this option Figure 6 35 Day Night Switch Day night auto schedule and triggered by alarm input are selecta...

Страница 80: ...f IR LED Small distance value indicates the object is near the IR camera and the device adjusts the IR LED to lower power to avoid overexposure large distance value indicates the object is far away an...

Страница 81: ...d OFF are selectable Rotate To make a complete use of the 16 9 aspect ratio you can enable the rotate function when you use the camera in a narrow view scene When installing turn the camera to the 90...

Страница 82: ...ay Night Scheduled Switch Configuration Interface Steps 1 Click the time line to select the start time and the end time of the switch 2 Click Common tab to configure the common parameters applicable t...

Страница 83: ...onding checkbox to select the display of camera name date or week if required 3 Edit the camera name in the text field of Camera Name 4 Select from the drop down list to set the time format date forma...

Страница 84: ...OSD position Figure 6 40 Adjust OSD Location 7 Click Save to activate the above settings 6 5 3 Configuring Text Overlay Settings Purpose You can customize the text overlay Steps 1 Enter the Text Over...

Страница 85: ...gs Note Up to 8 text overlays are configurable 6 5 4 Configuring Privacy Mask Purpose Privacy mask enables you to cover certain areas on the live video to prevent certain spots in the surveillance are...

Страница 86: ...bles a certain enterprise or users to overlay their logo on the image Note The picture must be in RGB24 bmp format and the maximum size of the picture is 128 128 Steps 1 Enter the Picture Overlay Sett...

Страница 87: ...n as the alarm is triggered Click for help when you configure the intelligent functions including face detection audio exception detection intrusion detection defocus detection scene change detection...

Страница 88: ...Note Select Disable for rules if you don t want the detected objected displayed with the rectangles Select disable from Configuration Local Configuration Live View Parameters rules Figure 6 44 Enable...

Страница 89: ...ming schedule 2 Choose the day you want to set the arming schedule 3 Click to set the time period for the arming schedule 4 Optional After you set the arming schedule you can copy the schedule to othe...

Страница 90: ...an exception or alarm signal to remote management software when an event occurs Send Email Send an email with alarm information to a user or users when an event occurs Note To send the Email when an e...

Страница 91: ...or more external alarm outputs when an event occurs Note To trigger an alarm output when an event occurs please refer to Section 6 6 4 Configuring Alarm Output to set the related parameters Expert Con...

Страница 92: ...teps 1 Draw the detection area as in the normal configuration mode Up to 8 areas are supported 2 Select Auto Switch for Switch Day and Night Settings Figure 6 49 Day Night Auto Switch 3 Select the are...

Страница 93: ...cursor to adjust the sensitivity and proportion of object on the area for the selected area in the daytime 6 Slide the cursor to adjust the sensitivity and proportion of object on the area for the sel...

Страница 94: ...the setting of the arming schedule for motion detection Refer to Task 2 Set the Arming Schedule for Motion Detection in Section 6 6 1 5 Check the checkbox to select the linkage method taken for the v...

Страница 95: ...heck the checkbox to select the linkage method taken for the alarm input Refer to Task 3 Set the Alarm Actions for Motion Detection in Section 6 6 1 5 You can also choose the PTZ linking for the alarm...

Страница 96: ...ect after alarm occurs 4 Click Edit to enter the Edit Schedule Time interface The time schedule configuration is the same as the settings of the arming schedule for motion detection Refer to Task 2 Se...

Страница 97: ...rared sensor Alarm or Emergency Alarm Wireless Alarm Purpose When wireless alarm signal is sent to the camera from the detector such as the wireless door contact the wireless alarm is triggered and a...

Страница 98: ...field of view The heat energy dissipated by a person or any other warm blooded creature such as dogs cats etc can be detected Steps 1 Enter the PIR Alarm Settings interface Configuration Advanced Con...

Страница 99: ...ase of an emergency Note The remote control is required for the Emergency Alarm Go to Configuration Advanced Configuration System Remote Control to study the remote control first Steps 1 Enter the Eme...

Страница 100: ...ttings interface Configuration Advanced Configuration Smart Event Audio Exception Detection 2 Check the checkbox of Audio Loss Exception to enable the audio loss detection function 3 Check the checkbo...

Страница 101: ...8 Click Save to save the settings Figure 6 58 Configuring Audio Exception Detection 6 6 8 Configuring Defocus Detection Purpose The image blur caused by defocus of the lens can be detected and some ce...

Страница 102: ...Note Scene change detection function varies according to different camera models Steps 1 Enter the Scene Change Detection settings interface Configuration Advanced Configuration Smart Event Scene Chan...

Страница 103: ...tection settings interface Configuration Advanced Configuration Smart Event Face Detection 2 Check the checkbox of Enable Face Detection to enable the function 3 Optional Check the checkbox of Enable...

Страница 104: ...annel and Trigger Alarm Output 7 Click Save to save the settings Figure 6 61 Configuring Face Detection 6 6 11Configuring Line Crossing Detection Purpose Line crossing detection function detects peopl...

Страница 105: ...rections as A B A B and B A A B Only the arrow on the B side shows when an object going across the plane with both direction can be detected and alarms are triggered A B Only the object crossing the c...

Страница 106: ...Note Intrusion detection function varies according to different camera models Steps 1 Enter the Intrusion Detection settings interface Configuration Advanced Configuration Smart Event Intrusion Detect...

Страница 107: ...gger the alarm Percentage Range 1 100 Percentage defines the ratio of the in region part of the object which can trigger the alarm For example if the percentage is set as 50 when the object enters the...

Страница 108: ...t for detection settings 4 Click the Draw Area button to start the region drawing 5 Click on the live video to specify the four vertexes of the detection region and right click to complete drawing 6 C...

Страница 109: ...camera models Steps 1 Enter the Region Exiting Detection settings interface Configuration Advanced Configuration Smart Event Region Exiting Detection 2 Check the checkbox of Enable Region Exiting Dete...

Страница 110: ...inkage methods for region exiting detection including Notify Surveillance Center Send Email Upload to FTP Trigger Channel and Trigger Alarm Output 10 Click Save to save the settings Figure 6 65 Config...

Страница 111: ...ion Threshold Range 5s 20s the threshold for the time of the objects left over in the region If you set the value as 10 alarm is triggered after the object is left and stay in the region for 10s Sensi...

Страница 112: ...e Object removal detection function varies according to different camera models Steps 1 Enter the Object Removal Detection settings interface Configuration Advanced Configuration Smart Event Object Re...

Страница 113: ...milarity degree of the background image Usually when the sensitivity is high a very small object taken from the region can trigger the alarm 7 Repeat the above steps to configure other regions Up to 4...

Страница 114: ...play Target info on Alarm Picture There will be a frame on the target on the uploaded alarm picture if the checkbox is checked Display Rule info on Alarm Picture The captured target and the configured...

Страница 115: ...ight viewing angle and horizon ratio of the camera manually Draw on Live View Video Click Draw Verification Line Horizontal Vertical to draw a horizontal vertical line in the live view and input the a...

Страница 116: ...ion Up to 4 shield regions are supported Steps 1 Click Shield Region tab to enter the shield region configuration interface 2 Click Draw Area Draw area by left click end points in the live view window...

Страница 117: ...save the settings Rule The behavior analysis supports a series of behaviors including line crossing detection intrusion region entrance and region exiting etc Note Please refer to each chapter for det...

Страница 118: ...n you have to draw a line and select the crossing direction which is bidirectional A to B or B to A For other events such as intrusion region entrance region exiting etc you have to left click on the...

Страница 119: ...ue the easier a target be recognized and the higher the misinformation is The default value of 3 is recommended Background Update Rate 0 4 It refers to the speed of the new scene replaces the previous...

Страница 120: ...mum value and maximum value will trigger the alarm Notes Camera calibration has to be configured if you select the filter by actual size The length of the maximum size should be longer than the length...

Страница 121: ...arm Picture There will be a frame on the target on the uploaded alarm picture if the checkbox is checked Display VCA info on Stream The green frames will be displayed on the target if in a live view o...

Страница 122: ...h the area drawing Notes Polygon area 4 10 sides sides is supported If the live view is stopped there is no way to draw the configured area 4 Click Save to save the settings Advanced Configuration Con...

Страница 123: ...kbox to enable the face exposure Reference Brightness 0 100 The reference brightness of a face in the face exposure mode If a face is detected the camera adjusts the face brightness according to the v...

Страница 124: ...is a graphical representation of data represented by colors The heat map function of the camera usually be used to analyze the visit times and dwell time of customers in a configured area Heat Map Co...

Страница 125: ...ters for drawn area Detection Sensitivity 0 100 It refers to the sensitivity of the camera identify a target The over high sensitivity may cause the misinformation It is recommended you set the sensit...

Страница 126: ...age method by checking the checkbox of notify the surveillance center 8 Click Save to save the settings Heat Map Statistics Steps 1 Click Heat Map Statistics to enter the data statistics interface 2 S...

Страница 127: ...r the installation is completed which may cause the inaccuracy of the data in some degree 6 7 4 People Counting People Counting function helps to calculate the number of people entered or exited a cer...

Страница 128: ...ple entered and exited is displayed on the live video 5 Set the detection line An orange line called detection line can be set on the live video and the people entering or exiting through the line wil...

Страница 129: ...to enter the data statistics interface 2 Select the report type by clicking the drop down menu Daily report weekly report monthly report and annual report are selectable 3 Select the Statistics Type a...

Страница 130: ...Network IP Camera User Manual Figure 6 77 Statistics Result Note It is recommended that you do not adjust the electronic lens after the installation is completed which may cause the inaccuracy of the...

Страница 131: ...disk should be available within the network and properly configured to store the recorded files log files etc Steps 1 Add the network disk 1 Enter the NAS Network Attached Storage Settings interface...

Страница 132: ...o increase the security of your product Proper configuration of all passwords and other security settings is the responsibility of the installer and or end user 4 Click Save to add the network disk 2...

Страница 133: ...d after insert it to the camera please refer to the steps of NAS disk initialization 7 2 Configuring Recording Schedule Purpose There are two kinds of recording for the cameras manual recording and sc...

Страница 134: ...ou set to start recording before the scheduled time or the event For example if an alarm triggers recording at 10 00 and the pre record time is set as 5 seconds the camera starts to record at 9 59 55...

Страница 135: ...ord If you want to configure the all day recording please check the All Day checkbox If you want to record in different time sections check the Customize checkbox Set the Start Time and End Time Note...

Страница 136: ...et the Alarm Type and check the checkbox of Trigger Channel in the Linkage Method of Alarm Input Settings interface For detailed information please refer to Section 6 6 3 Record Triggered by Motion Al...

Страница 137: ...ave the settings 7 3 Configuring Snapshot Settings Purpose You can configure the scheduled snapshot and event triggered snapshot The captured picture can be stored in the SD card if supported or the n...

Страница 138: ...face Please refer to Section 6 3 12 Configuring FTP Settings for more details to configure FTP parameters 2 Check the Enable Timing Snapshot checkbox Upload event triggered snapshots to FTP Steps 1 Co...

Страница 139: ...unction varies according to different camera models The video files recorded in lite storage mode will be played back in full frame rate 25fps 30fps and thus the playback process is speeded up to the...

Страница 140: ...interface Configuration Advanced Configuration Storage Cloud Storage 2 Check the checkbox of Enable Cloud Storage 3 Input the IP address and port of the storage server 4 Input the user name password a...

Страница 141: ...ll passwords and other security settings is the responsibility of the installer and or end user 5 Input picture storage pool ID of the server 6 Optional You can click Test to test the cloud storage se...

Страница 142: ...ction is supported by some certain non iDS camera models Compared with the people counting function supported by the iDS camera the counting function of non iDS camera does not require for calibration...

Страница 143: ...e should cover the whole entrance exit 6 Click the Reset Counter button and the number of the people entered and exited will be cleared to zero 7 Click Edit to set the arming schedule 8 Check the chec...

Страница 144: ...139 Explosion Proof Network IP Camera User Manual export the data in an excel file Figure 8 2 Statistics Result...

Страница 145: ...ries according to different camera models Steps Configuring the Detection Settings 1 Select the detection type from the list Vehicle Detection and Mixed traffic Detection are selectable Note Reboot th...

Страница 146: ...to save the settings Note The time of each period cannot be overlapped 8 Check the checkbox to select the linkage method Notify surveillance center and upload to FTP are selectable Notify Surveillance...

Страница 147: ...palette 3 Select the information for the text overlay including camera No camera info device No capture time plate No vehicle color etc You can also click the up and down direction buttons to adjust t...

Страница 148: ...143 Explosion Proof Network IP Camera User Manual Figure 9 3 Overlay Content Settings...

Страница 149: ...iles stored in the network disks or SD cards Steps 1 Click Playback on the menu bar to enter playback interface Figure 10 1 Playback Interface 2 Select the date and click Search Figure 10 2 Search Vid...

Страница 150: ...ons Note You can choose the file paths locally for downloaded playback video files and pictures in Local Configuration interface Please refer to Section 6 1 for details Drag the progress bar with the...

Страница 151: ...u start Please configure network storage for the camera or insert a SD card in the camera Steps 1 Click Log on the menu bar to enter log searching interface Figure 11 1 Log Searching Interface 2 Set t...

Страница 152: ...147 Explosion Proof Network IP Camera User Manual 4 To export the log files click Save log to save the log files in your computer...

Страница 153: ...admin password Steps 1 Click Add to add a user 2 Input the User Name select Level and input Password Notes Up to 31 user accounts can be created Different level user owns different permissions Operato...

Страница 154: ...ation field you can check or uncheck the permissions for the new user 4 Click OK to finish the user addition Modifying a User Steps Figure 12 2 Add a User 1 Left click to select the user from the list...

Страница 155: ...u want to delete and click Delete 2 Click OK on the pop up dialogue box to delete the user 12 2Authentication Purpose You can specifically secure the stream data of live view Steps 1 Enter the Authent...

Страница 156: ...ilable for the anonymous user Steps 1 Enter the Anonymous Visit interface Configuration Advanced Configuration Security Anonymous Visit Figure 12 5 Anonymous Visit 2 Set the Anonymous Visit permission...

Страница 157: ...have a higher expectation of privacy 12 4IPAddress Filter Purpose This function makes it possible for access control Steps 1 Enter the IP Address Filter interface Configuration Advanced Configuration...

Страница 158: ...ing Delete an IP Address Left click an IP address from filter list and click Delete Delete all IP Addresses Click Clear to delete all the IP addrsses 5 Click Save to save the settings 12 5Security Ser...

Страница 159: ...minutes or reboot the device first before retry 12 6Viewing Device Information Enter the Device Information interface Configuration Basic Configuration System Device Information or Configuration Advan...

Страница 160: ...Maintenance Or Configuration Advanced Configuration System Maintenance 2 Click Reboot to reboot the network camera Figure 12 12 Reboot the Device 12 7 2Restoring Default Settings Steps 1 Enter the Mai...

Страница 161: ...t of cameras needing configuring Steps 1 Enter the Maintenance interface Configuration Basic Configuration System Maintenance or Configuration Advanced Configuration System Maintenance 2 Click Export...

Страница 162: ...rs can be configured by using software such as HyperTerminal The serial port parameters must be the same as the serial port parameters of the camera Transparent Channel Connect a serial device directl...

Страница 163: ...PTZ of the camera The configuring of the PTZ parameters should be done before you control the PTZ unit Steps 1 Enter RS 485 Port Setting interface Configuration Advanced Configuration System RS485 Fig...

Страница 164: ...settings interface Service settings refer to the hardware service the camera supports and it varies according to the different cameras For the cameras support IR LED ABF Auto Back Focus Auto Defog or...

Страница 165: ...can also modify the basic network information of the devices using this software Search active devices online Search online devices automatically After launch the SADP software it automatically searc...

Страница 166: ...n the device list and the network parameters of the device will be displayed in the Modify Network Parameters panel on the right side 2 Edit the modifiable network parameters e g IP address and port n...

Страница 167: ...User Manual of Network Camera 162 Figure A 1 2 Modify Network Parameters...

Страница 168: ...the LAN parameters of the router as in the following figure including IP address and subnet mask settings Figure A 2 2 Set the LAN parameters 3 Set the port mapping in the virtual severs of Forwarding...

Страница 169: ...camera at 192 168 1 23 2 Map the port 81 8001 555 and 8201 for the network camera at 192 168 1 24 3 Enable ALL or TCP protocols 4 Check the Enable checkbox and click Save to save the settings Figure A...

Отзывы: