


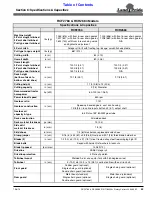


Section 5: Maintenance & Lubrication
RCF2784 & RCR2684 S/N Rotary Cutters 326-364M
36
7/26/19
Maintenance
Proper servicing and adjustments are key to the long life
of any implement. With careful inspection and routine
maintenance, you can avoid costly downtime and repair.
Check all bolts and pins after using the unit for several
hours and on a regular basis thereafter to ensure they are
tight and secured. Replace worn, damaged or illegible
safety labels by obtaining new labels from your Land
Pride Dealer.
DANGER
!
To avoid serious injury or death:
•
Always disconnect driveline from power take-off shaft
before servicing underside of cutter. The tractor can be
started with power take-off engaged.
•
Always secure equipment with solid, non-concrete supports
WARNING
!
To avoid serious injury or death:
•
Do not operate cutter with blades that are out-of-balance,
•
Do not attempt to straighten a bent blade or weld on a
•
Do not alter implement or replace parts on the implement
•
Buildup of debris around moving components and
•
Improper oil level can cause bearing failure and be a fire
hazard. Maintain proper gearbox oil level to avoid serious
injury and property damage.
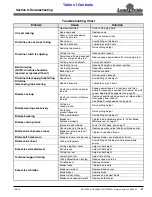
Section 5:
Maintenance & Lubrication
Driveline Slip-Clutch
The drive-train is protected from shock loads with a four
plate slip-clutch. The slip-clutch must be capable of
slippage during operation. Always do a
operation at the beginning of each season and after long
periods of inactivity to remove any oxidation that may
have accumulated on the friction surfaces. Repeat
instructions below when moisture
and/or condensation seizes the inner friction plates.
WARNING
!
To avoid serious injury or death:
Always follow “Tractor Shutdown Procedure” provided in
this manual before dismounting the tractor.
Clutch Run-In
Refer to Refer to Figure 5-1:
Clutch
Figure 5-1
1.
Using a pencil or other marker, scribe a line across the
exposed edges of the clutch plates and friction
discs.
2.
Carefully loosen each of the 8 spring retainer nuts by
exactly 2 revolutions. It will be necessary to hold hex
end of retainer bolt in order to count the exact
number of revolutions.
3.
Start tractor and engage power take-off drive for 2-3
seconds to permit slippage of the clutch surfaces.
Disengage power take-off, then re-engage a second
time for 2-3 seconds. Disengage power take-off, shut
off tractor, and remove key. Wait for all components to
stop before dismounting from tractor.
4.
Inspect clutch and ensure that the scribed markings
made on the clutch plates have changed position.
Slippage has not occurred if any two marks on the
friction disc and plate are still aligned. A clutch that
has not slipped must be disassembled to separate
the friction disc plates. See
5.
Tighten each of the 8 spring retainer nuts on the
clutch housing exactly 2 revolutions to restore the
clutch to the original setting pressure.
6.
The clutch should be checked during the first hour of
cutting and periodically each week. An additional set
of scribe marks can be added to check for slippage.
See Figure 5-3 on page 37 to adjust spring length.
13693