


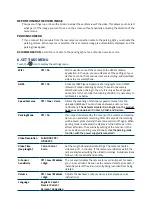

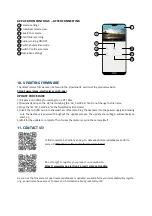


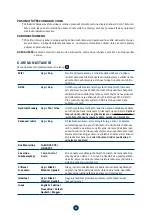


automatic Display
Brightness
manual / automatic
Manual or automatic adjustment of camera display brightness.
When the manual option is selected, a brightness bar appears
on the main screen. To adjust the brightness, touch the + and -
buttons.
lCD power save
off / 1 min / 2 min
/ 3 min
Sets the screen to turn off automatically when the camera is not
being operated. The time interval is 1–3 minutes, or the power
save mode can be switched off completely. LCD auto power off
functions even when the camera is recording. Touch to reactivate
the display.
Exposure
-2 / -1 / 0 / 1 / 2
Adjusts the camera exposure to optimize video brightness.
key sound
off / on
Allows you to switch on or off the key sound and the welcome
tone.
show Date
off / on
Sets whether to display date on the video.
show speed
off / on
Sets whether to display speed on the video.
show gps
off / on
Sets whether to display GPS coordinates on the video.
time settings
Sets the current date and time. If you have a GPS module co-
nnected to the camera, the date and time will be set automati-
cally. Press the Set Time / Date button to enter the settings and
use the arrows to set the individual sections (day, month, year,
hours, minutes and seconds). You must confirm each setting
with OK.
time zone
In this setting you can change the time zone.
speed Units
km/h / mph
Sets the speed unit in the camera.
voice Control
Allows you to turn off the Voice Control function.
reset settings
Allows you to reset the camera settings to factory settings.
Format Card
This will delete all photos and videos on the camera. Attention,
this includes all protected files!
Fw version
Learn about the currently installed firmware version.
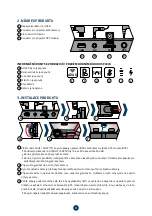
7. aDas CaliBratioN
For proper operation, the ADAS must be calibrated directly in a lane with the horizontal markings defining
the lane. For safety reasons, we recommend that your passenger assists you or you can calibrate it in a
stopped car on an empty road so that you do not limit or endanger yourself or the surrounding traffic. Never
operate the camera whilst driving!
When ADAS is on, the calibration icon appears on the left side of the main screen display. After pressing and
confirming the selection, the display shows calibration lines.
To calibrate, position the camera lens so that the lateral calibration lines overlap with the road lane lines and
the calibration cross points to the road horizon. When the camera determines that the calibration has been
successful, it displays a message.
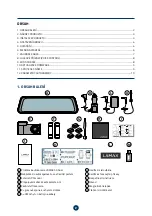
Содержание S9 DUAL
Страница 2: ...EN User manual S9 DUAL MIRROR DASHCAM ...
Страница 15: ...CS Uživatelská příručka S9 DUAL MIRROR DASHCAM ...
Страница 28: ...DE Benutzerhandbuch S9 DUAL MIRROR DASHCAM ...
Страница 42: ...SK Používateľská príručka S9 DUAL MIRROR DASHCAM ...
Страница 55: ...PL Instrukcja obsługi S9 DUAL MIRROR DASHCAM ...
Страница 68: ...HU Felhasználói kézikönyv S9 DUAL MIRROR DASHCAM ...