THE AI & IOT CAMERA COMPANY
myTeam
Sharer
P/N: MTS-100SY
User manual
Concepted & designed in EU I Copyright © 2017 All rights reserved - www.laiatech.com
1
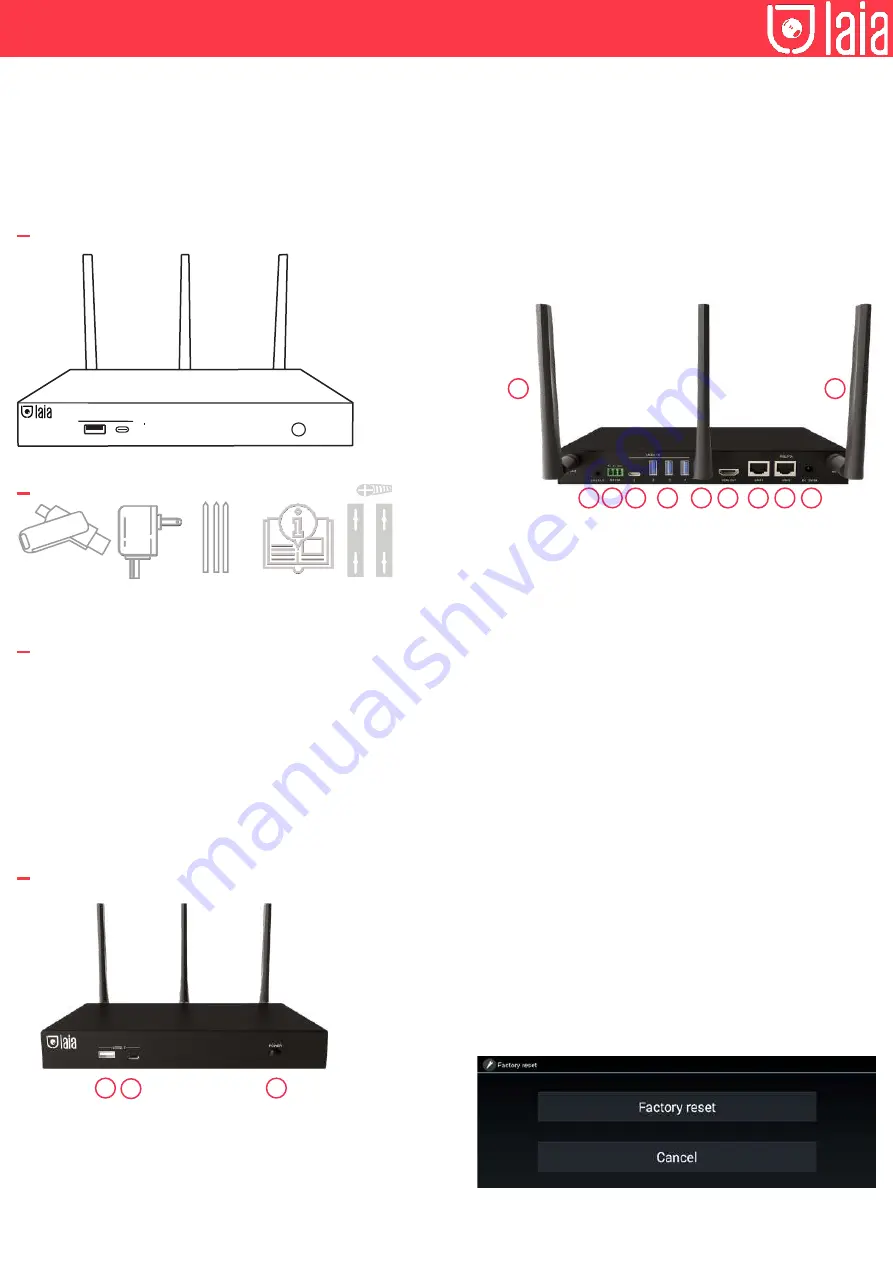
Know your product
2
What’s in the box?
USB port
The USB port is used to update the myTeam Sharer software, pair the
transceiver to the base unit, connect a mouse to create/update Launcher
by pressing “Download”, hide SSID, PASS, Wifi IP and Lan IP by pressing
“Info”, check the security level and control the source device when screen
sharing via the transceiver.
USB-C port
The USB-C port is used to pair the transceiver with the base unit.
Attachment points
The fixing points are located on the bottom of the base unit.
myTeam Sharer is a device designed for presentations and remote work,
allowing you to connect cameras, microphone systems and speakers as
well as the screen to your own computer, completely wirelessly.
myTeam Sharer supports native mirroring protocols such as AirPlay,
Miracast or Chromecast, Plug&Play connection for USB-A and USB-C
dongle transceivers and Windows App for wireless connection (available
for Mac soon).
The device is compatible with leading video conferencing platforms
such as Zoom, goFacing or Microsoft Teams and is secure with its data
encryption and dual network.
1. Audio Output:
2-channel analog audio output, Connect a 3.5mm mini-
jack PC connector from this jack to the line-in jack of an audio system.
2. RS-232:
3-pin terminal (included) for receiving and sending RS-232
commands.
3. USB 3.0 type-C port:
For connecting the USB camera and the USB
audio conferencing system, as well as for pairing the transceivers,
connecting a touch screen, a mouse and for local firmware update via USB
stick.
4. USB 3.0 type-A port:
For connecting the USB camera and the USB
audio conferencing system, as well as for pairing the transmitters,
connecting a touch screen, a mouse and for local firmware update via USB
stick.
5. Reset:
Reset to factory settings.
6. HDMI output:
Connection for HD or 4K display with HDMI 2.0 port.
7. Ethernet Port 1:
100Mbps. Connection for Ethernet cable.
8. Ethernet Port 2:
1Gbps. Connection for Ethernet cable. Supports PoE.
9. Power socket:
Connect the power adapter to this socket and to the
mains.
10. Antenna Attachment Point:
Antenna connection (WLAN antennas
included)
Factory Reset
Turn on the device and when the main screen is displayed, press the reset
button on the back of the base unit for at least 2 seconds. Press the button
with a pointed object such as a paper clip until the “factory reset” page
appears. The device will reset after 3 seconds to the factory settings.
If the image does not appear, press and hold the reset button until the top
LED lights up, to execute the factory reset.
Note:
Resetting the device will delete any previously set settings and
adjustments. These will be lost and you will need to reconfigure them
again. After resetting to factory settings, all transceivers must be paired
again with the base device.
3
Product features
4
Base unit
1. Front USB 2.0 type-A connector:
USB port for transceiver pairing,
mouse control etc...
2. Front USB 2.0 type-C connector:
USB-C port for transceiver pairing.
3. On/Off button:
Turn on/off the device.
Note:
Front USB-A and USB-C ports cannot be used simultaneously,
USB-C port is prior to USB-A port.
x1 Power
cable
x1 myTeam/
mini dongle
x3 Antennas
USB 2.0
Power
x1 Quick
guide
x2 Wall
mounting
su x4
fixing screws
2
1
3
10
1
2
3
4
5
6
7
8
9
10


