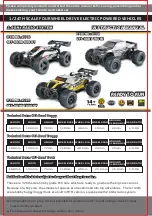
manualshive.com logo in svg
background image

Содержание ONYX 2WD

Страница 1: ......

Страница 2: ......

Страница 3: ...Terms of Use Safety Precautions What s in the Box Quick Start Getting up to Speed Operation and Troubleshooting Replacement Parts Anatomy of the Onyx CE Compliance FCC WARRANTY 4 5 6 8 9 10 16 17 20 2...

Страница 4: ...all the necessary setup and operating procedures that will allow you to unlock the performance potential that LAEGENDARY engineers designed into your model Also be sure to read and follow the precauti...

Страница 5: ...the assembly installation or use of their products or any accessory or chemical required to use their products By the act of operating using the product the user accepts all resulting liability and r...

Страница 6: ...any other source of ignition If a battery gets hot to the touch during the charging process disconnect the battery from the charger and discontinue charging immediately ALWAYS unplug the charger and...

Страница 7: ...abels preventing you from properly identifying the battery type and specifications ALWAYS use the included battery safety bag while charging transporting and storing your batteries IMPORTANT POINTS TO...

Страница 8: ...teries in the model when it is not in use Never store the vehicle with batteries in the model as this can cause a fire leading to property damage serious personal injury or even death Do not continue...

Страница 9: ...om What s in the box WHAT S IN THE BOX Remote control 2 USB chargers Plug Adaptor Dual Battery Connector Wrench Tool 2 Batteries Battery Strap Battery Safety Bag TOP DESIGN MAY VARY DEPENDING ON THE M...

Страница 10: ...properly attached remove the protection film from the body before turning on the truck 1 USB Charger Lights Indicator a The power light turns solid red when plugged in the outlet b The green light fla...

Страница 11: ...ttery in the battery slot Connect the battery connector Do not force it It only goes one way 4 Replace the battery cover to the bottom of the car and close the battery compartment door INSTALL LED WIR...

Страница 12: ...connector Connect the dual battery connector to the RC vehicle Place the batteries and the dual battery connector in the RC vehicle battery compartment and secure them with the battery strap 2 3 4 1...

Страница 13: ...ing the cover off in the direction of the arrow Figure 1 2 Install 3 x 1 5V AA batteries not included in correct polarities Figure 2 3 Slide back the battery cover Figure 3 NOTICE 1 When installing ba...

Страница 14: ...input current higher than 4A When the input current is higher than 4A the USB charger will enter into the protection mode and all the lights will turn off TIGHTEN THE WHEEL Tighten the wheel nuts bef...

Страница 15: ...Speed Mode 1 Turn on the power switch on the transmitter red LED will turn solid and green LED will flash 2 When pairing successful with the car green LED will turn solid Green LED will flash when po...

Страница 16: ...e LED on the car will turn solid When the chassis switch is turned on and the front tires are not straight use the ST TRIM to adjust the position when the car oversteers to the left ST TRIM should be...

Страница 17: ...any such damages The customer will be responsible for any replacements and additional accessories if needed 4 ALWAYS start with low speed or the vehicle may slip or run on curves as shown on Pic 1 NE...

Страница 18: ...the wires connecting the servo and the ESC then pair the car with the transmitter again This is to check the defective part if the car pairs with the remote then the servo might be the problem 6 Serv...

Страница 19: ...1 Tighten the locknuts Part Number ON 1021 that are holding the wheels in place 2 Check for any missing pieces like hub hex with shafts Part Number ON 1022 and or rear dog bone Part Number ON 2002 If...

Страница 20: ...determine which is defective Replacement batteries and chargers can be purchased through our website www laegendary com Rebinding the remote control with the car Turn on the remote control first and w...

Страница 21: ...y Specifications No ON 1003 Round headed screw 1x4 3 x 31PMHO Product Name Remarks Quantity Specifications No ON 1004 Round headed screw 1x10 2 5 x 6 x 5PWMHC Product Name Remarks Quantity Specificati...

Страница 22: ...emarks Quantity Specifications No ON 1018 Short metal ball head 1x4 Product Name Remarks Quantity Specifications No ON 1015 Countersunk head screw 1x10 2 x 10KBHO Product Name Remarks Quantity Specifi...

Страница 23: ...ations No ON 2002 Rear dog bone 1x2 Product Name Remarks Quantity Specifications No ON 2006 Rear lower arms 1x2 Product Name Remarks Quantity Specifications No ON 2003 Oil filled metal shocks 1x2 Prod...

Страница 24: ...ctronic speed controller 1x1 Product Name Remarks Quantity Specifications No ON 3005 Servo steering 1x1 Product Name Remarks Quantity Specifications No ON 2013 Rear transmission cup 1x2 Product Name R...

Страница 25: ...ENDARY com Replacement Parts No ON 5005 Battery bag 1x1 Product Name Remarks Quantity Specifications No ON 5002 Car shell 1x1 Green Black Product Name Remarks Quantity Specifications No ON 5000 Front...

Страница 26: ...009 USB charger 1x1 Product Name Remarks Quantity Specifications 26 www LAEGENDARY com Replacement Parts No ON 5013 Hexagon nut wrench 1x1 Product Name Remarks Quantity Specifications No ON 5006 Plug...

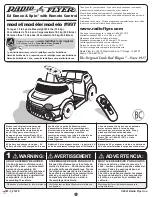
Страница 27: ...Anatomy of the ONYX...

Страница 28: ...1 7 O N 1 0 1 7 O N 1 0 1 7 ON 2009 ON 1011 ON 1005 ON 10 11 ON 10 08 ON 2 00 7 ON 20 05 ON 1008 O N 1 0 0 9 O N 1 00 9 ON 1018 ON 1018 ON 1007 ON 4008 ON 5014 ON 2003 ON 1020 ON 1020 ON 2012 ON 1019...

Страница 29: ...ON 1005 ON 10 11 ON 2 00 5 ON 2 00 7 ON 10 08 ON 3 00 3 ON 1011 ON 3005 ON 3005 ON 20 10 ON 2010 ON 4006 ON 5000 ON 2003 ON 2012 ON 1020 ON 1020 ON 1019 ON 1022 ON 10 18 ON 10 18 ON 1018 ON 1013 ON 1...

Страница 30: ...30 www LAEGENDARY com Anatomy of the ONYX ON 1007 ON 1007 ON 1007 ON 1007 ON 4000 ON 4000 ON 1001 ON 1001 ON 4003 ON 1000 ON 1000 ON 1000 ON 1006 ON 1006 ON 1005 ON 1005 ON 4007 ON 3005 ON 1000...

Страница 31: ...31 www LAEGENDARY com Anatomy of the ONYX ON 1007 ON 1007 ON 1007 ON 1000 ON 1000 ON 4002 ON 4001 ON 1000 ON 1000 ON 1000 ON 1000 ON 1007 ON 5008 O N 3 0 0 2 ON 1007...

Страница 32: ...the ONYX ON 1008 ON 1009 ON 1018 ON 1018 ON 1020 ON 1020 ON 2011 ON 1019 ON 1022 ON 2015 ON 2011 ON 1009 ON 2003 ON 2008 ON 2013 ON 2002 ON 3000 ON 1003 ON 2006 ON 1002 ON 3004 ON 1008 ON 4005 ON 1009...

Страница 33: ...the ONYX ON 1009 ON 2011 ON 1019 ON 1022 ON 1020 ON 2015 ON 1020 ON 1018 ON 1018 ON 2011 ON 2003 ON 2008 ON 2002 ON 2013 ON 1011 ON 2010 ON 2010 ON 2000 ON 4006 ON 1011 ON 1003 ON 2006 ON 1002 ON 1009...

Страница 34: ...ly approved by the party responsible for compliance could void the user s authority to operate the equipment NOTE This equipment has been tested and found to comply with the limits for a Class B digit...

Страница 35: ...e from your RC truck The bodyshell is not just for looks it is also designed to protect vital areas of the running gear and electronics from damage LAEGENDARY DOES NOT operate a new for old warranty o...

Страница 36: ...Check out our entire RC collection at www laegendary com...

Страница 37: ......

Страница 38: ......

Страница 39: ......

Страница 40: ......

Отзывы: