6.0 HOW TO PREPARE AND FIX THE ACTUATOR
Before fixing the actuator and arms, first make sure that the relative bearing structure is strong and secure, that the door has
adequate hinges, that it is not subjected to friction that could prevent the system from operating correctly and that the points
where the arm is fixed to the wing are strong enough.
If necessary, these points must be reinforced in an adequate way (additional plates, stronger hinges, etc.).
The door needs a floor stop to keep it open so as to prevent the mechanisms from being damaged if it is pulled violently open
by hand. The floor stop is not supplied with the actuator and must be procured by the installer.
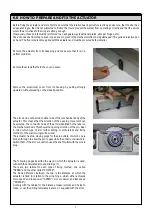
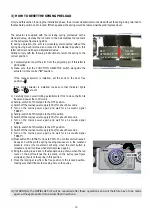
The arm can be connected to either side of the mechanical body of the
actuator. This means that the direction of the opening movement can
be selected. The connection side of the arm is identified by the label on
the mechanical body. This shows the opening direction of the pin. Bear
in mind which type of arm (either sliding or articulated) and fixing
method (on the wall or wing) will be used.
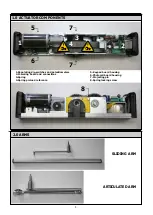
The actuator has two closing plugs for the pin outlets, of which one is
broken through to allow the pin to pass while the other remains whole.
Switch them if the arm connection uses the shaft outlet with the whole
plug.
Remove the aluminium cover from its housing by pulling strongly
upwards, without pressing on the sides if possible.
Remove the actuator from its wrapping and make sure that it is in a
perfect condition.
Remove the screws that hold the cover in place.
7
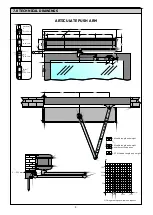
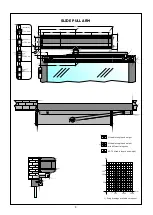
The following pages describe the ways in which the actuator is used,
with both the articulated arm and sliding arm.
There are two tables for each type of fixing method, one called
“SPEED” and the other called “POWER”.
The basic difference between the two is the distance at which the
actuator is fixed in relation to the wing hinge, which either achieves
more speed and less power (”SPEED”) or more power and less speed
(”POWER”).
Comply with the tables for the distance measurements and holes to
make, or use the drilling templates in scale 1:1 supplied with the arms.
Содержание NEPTIS/LE
Страница 4: ...MECHANICAL SECTION NEPTIS LE 550 110 120 Nepti N e p t i S ...
Страница 14: ...notes ...
Страница 15: ...ELECTRONIC SECTION NEPTIS LE Nepti N e p t i S ...
Страница 38: ...notes ...
Страница 39: ......


