background image

KLS12 manual

www.kystar.com.cn

10

Save mode, mode 1 - mode 32

Expert mode

Step 1:

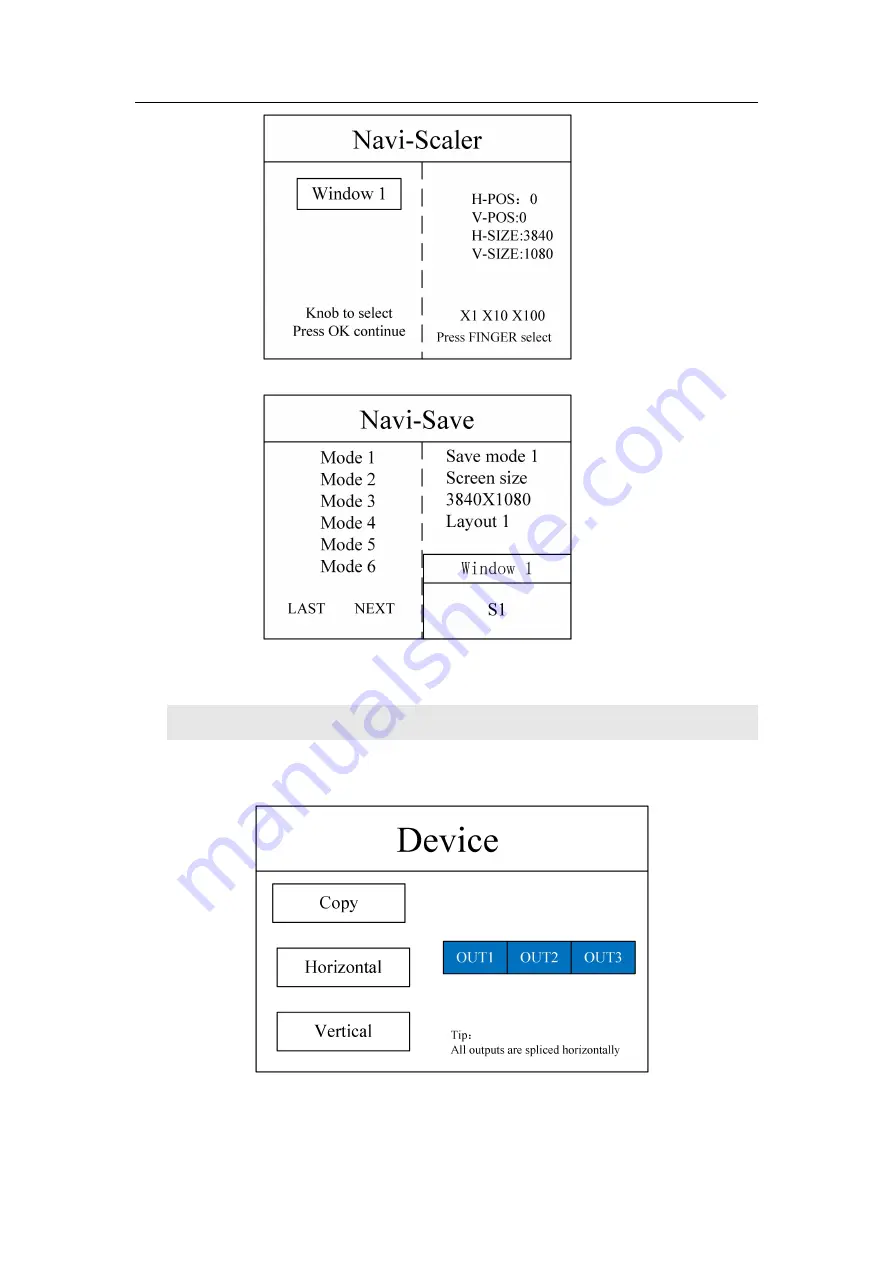
Click "MENU" to enter the main menu interface, no need to set in "Device Mode", the

default horizontal splicing

Step 2:

Set the screen parameters, the horizontal size and vertical size in the screen parameters are

set to the number of points of the LED screen

Содержание KLS12

Страница 1: ...KLS12 Twelve ports 2 in 1 video controller version v1 1 Release Date October 2021 Manual ...

Страница 2: ...Version record version number Change details release time V1 0 first release 2021 08 02 V1 1 Modify the cover 2021 10 25 ...

Страница 3: ...le for non professionals to operate and debug please use under the guidance of professionals 3 this equipment is not suitable for non professionals to operate and debug please use under the guidance of professionals 4 Do not insert anything into the vent hole of the device to avoid damage or accidents to the device 5 It is not appropriate to place the device on a heat sink or other high temperatur...

Страница 4: ...IRING AND INSTALLATION 7 WIRING DIAGRAM 7 INSTALLATION STEP 7 VII EQUIPMENT COMMISSIONING 8 NAVIGATION MODE 8 EXPERT MODE 10 VIII FUNCTION INTRODUCTION 14 KEY FUNCTION 14 COMMON FUNCTIONS 15 ADVANCED MENU 17 IX SOFTWARE DEBUG 18 1 SOFTWARE CONNECT 18 2 EXPERT DEBUG 18 3 RECEIVING CARD PARAMETER SETTINGS 19 4 SCREEN CONNECTION 20 X FAQ 21 ...

Страница 5: ...nal acquisition card is poor which causes great loss to the clarity of the picture while converting the signal format 3 The large LED screen control system can only capture the corresponding points of the large LED screen for display while in some customer sites it is necessary to display any size or complete computer desktop screen at will 4 The large LED screen control system can only capture th...

Страница 6: ...iagonal up and down screen circular cut out cut in diamond cut out cut in comb shaped switching Support signal source hot backup Can set input and output signals monitor mode EDID configuration management Supports reading modification and customization of EDID Extended Display Identification Data Support one click black screen static function Black edge removal cutting function solve the black edg...

Страница 7: ...ving card with a maximum load of 7 8 million HDMI MONITOR 1 Support resolution 1920 1080 60Hz Control port type quantity Specification USB Type B 1 USB CFG interface used to connect PC upper computer control RJ11 RS 232 1 The data transfer rate is 1200 2400 4800 9600 19200 38400 57600 115200 BT RJ 45 1 100M used to connect to PC upper computer control Whole machine specification Input power 100 24...

Страница 8: ...KLS12 manual www kystar com cn 4 IV Working sketch LED screen Desktop computer laptop camera DVD ...

Страница 9: ...u interface for device debugging 6 INFO Information query button query the real time status of the input signal 7 WIN Window information button display the picture signal source of the picture and the signal source of switching the picture 8 S1 S6 Signal source button the main menu interface represents the input source behind the device and the parameter input interface represents digital 1 5 and ...

Страница 10: ...r software through the USB port 4 DVI 1 DVI signal input interface such as desktop computer 5 DVI 3 DVI signal input interface such as desktop computer 6 DVI 2 DVI signal input interface such as desktop computer 7 DVI 4 DVI signal input interface such as desktop computer 8 DP DP signal input interface 9 HDMI HDMI input interface such as laptop 10 HDMI Monitor HDMI monitor 11 LAN1 4 Network port ou...

Страница 11: ... computer to the USB CFG control port of the device through the USB control cable and connect the output network port of the two in one controller to the receiving card 3 After making sure that the wiring is correct power on and open the gold card debugging software The software can correctly identify the model of the sending card and the number of receiving cards and the debugging can be done nor...

Страница 12: ...essor automatically enters the navigation mode when it is powered up or Click Enter Navigation Mode lick Basic Settings to enter the screen parameter setting interface screen resolution click OK to complete the parameter settings Note You can directly enter by click the number keys or set parameters through the knob and select the step size through the finger keys Navigation mode select Multi scre...

Страница 13: ...KLS12 manual www kystar com cn 9 Select window layout Layout1 Layout2 Layout3 Layout4 Select the win signal source and use the knob to select the signal source input Set window parameters ...

Страница 14: ...t mode Step 1 Click MENU to enter the main menu interface no need to set in Device Mode the default horizontal splicing Step 2 Set the screen parameters the horizontal size and vertical size in the screen parameters are set to the number of points of the LED screen ...

Страница 15: ... Step 3 set the screen layout optional layout 1 layout 2 layout 3 select the corresponding screen layout according to the customer s project requirements Note This step can be skipped for single screen as long as the number of screens is consistent with the project requirements for multi screen the inconsistent layout can be set by the following operations Step 4 Click OK to return to the main men...

Страница 16: ... signal source picture needs to be completely displayed on the large screen if you only need to capture a certain signal source in the multi picture you only need to set the picture of the signal source horizontal size or vertical size A value of 0 indicates that no local interception is performed in this direction Step 6 Click MENU to return to the main menu interface select Save Settings enter t...

Страница 17: ...ave it to other modes After the equipment is debugged the saved data can be called according to different scenarios in later use There are two types of mode calls 1 To call through the shortcut keys just click the front panel keys M1 M6 this method is convenient to use when there are few mode scenes 2 Called via user mode within the main menu Click MENU and select User Mode to enter the user mode ...

Страница 18: ... interface is as follows red means the signal is lost green means the signal is normal WIN window button click this button to enter the window information interface and you can select the signal source for each window under this interface The following takes 3 windows as an example click the WIN button to enter the screen switching interface and display the current signal sources of the three wind...

Страница 19: ...switching effects switching time cutout settings transparency settings intelligent hot backup OSD settings EDID multi level cascade still picture preview settings K HDR Common Functions 1 Sending card Brightness Adjust the brightness of the device sending card 0 255 levels brightness adjustment 2 Processor brightness The device supports 0 255 level brightness adjustment and the brightness of all s...

Страница 20: ...cy settings This product can adjust the transparency of the picture and can even achieve point by point adjustment making the application scene more colorful 9 Intelligent hot backup The user can specify a backup signal for the source If the current signal fails the system will automatically detect it and call it immediately Its backup signal if the signal returns to normal the system can intellig...

Страница 21: ... hot backup EDID still picture preview settings K HDR Refer to the frequently used functions in this chapter 3 Factory Erase all data and restore to default state After this operation the data cannot be recovered The operation must be performed with caution and the on site configuration data should be backed up in advance 4 Support Query the device firmware version number and device IP address and...

Страница 22: ...nection 1 software connect Use USB serial cable to connect after opening the software the software interface recognizes that the model of the sending card is KLS8Pro and the number of receiving cards detected is the actual number of on site loads 2 expert debug Sending device parameter setting set the width and height in the software according to the actual width and high resolution of the screen ...

Страница 23: ...nal or keep the last frame when there is no signal Effect debugging Debug data clock frequency and multiplier debug refresh to 1920 PWM chip debug gray clock frequency refresh to 3840 Effective means to improve the display effect 1 Increase the data clock the frequency is not affected by other parameters which is the first condition if there is a blurry screen reduce it one by one try to adjust th...

Страница 24: ...lay connection Used to individually adjust the load and location information for each receiving card For alien items Save to file save the display connection kcfg file separately Hub offset Set the offset of the HUB port select receiving card click port offset to set Debugging Tips Select the network port directly change the width and height of all cards in the network port Click the number before...

Страница 25: ...ocessor receiving card and large LED screen A The DVI VGA output port of the graphics card is connected to the DVI IN VGA IN input of the video processor the network port output of the video processor is connected to the terminal receiving card behind the screen through a network cable the receiving card connection control The respective part of the screen body is connected to the entire large scr...

Страница 26: ... DVI port of the graphics card has no data output Setup steps Turn off the power supply of video processor reinsert the line from video card to video processor ATI graphics card reads and replicates automatically NVIDIA graphics card needs to enter the graphics card control center and set up multiple display double screen replicate mode Connection problems When the signal line interface contacts b...

Отзывы: