M98
●
P.1
P.2-P.9
Internal Organ Anatomical Model
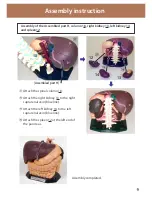
Assembly instruction
InstructionManual
Contents
“ECHO-ZOU”
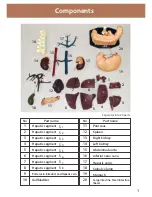
Components
Страница 1: ...M98 P 1 P 2 P 9 Internal Organ Anatomical Model Assembly instruction Instruction Manual Contents ECHO ZOU Components ...
Страница 2: ......
Страница 3: ... 20 parts Large intestine Small intestine base Hepatic segment Hepatic segment Hepatic segment Hepatic segment Hepatic segment Hepatic segment Hepatic segment Hepatic segment Portal vein Bile duct and Hepatic vein Gallbladder Pancreas Spleen Right kidney Left kidney Abdominal aorta Inferior vena cava Hepatic veins Spinal column Stomach No No Part name Part name ...
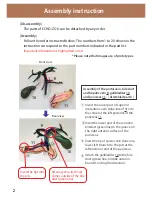
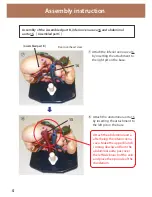
Страница 4: ...ighlighted in red Please note that images are of prototypes Insert the tips into the pits Arteria cystica red line comes outside of the bile duct green line Insert the lower part of superior mesenteric vein blue line of 9 in to the corner at the left posterior of the pancreas 11 Insert the lower part of the common bileduct green line to the groove on the right anterior surface of the pancreas Inse...
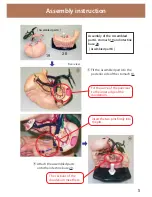
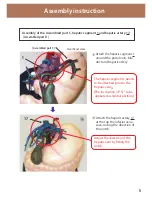
Страница 5: ... the assembled parts onto the intestine base 20 Assembled part A Assembly of the Assembled part A stomach 19 and intestine base 20 Assembled part B Rear view Fit the curve of the pancreas to the inner edge of the duodenum Insert the two pins firmly into the pits The sections of the duodenum meet here ...
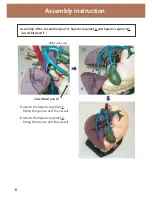
Страница 6: ...nferior vena cava 16 by inserting the attachment to the right pit on the base Attach the abdominal aorta 15 by inserting the attachment to the left pit on the base Attach the abdominal aorta after fixing the inferior vena cava Make the upper blanch coming downward from the abdominal aorta pass over the leftside branch of the vein and place the tip inside of the duodenum ...
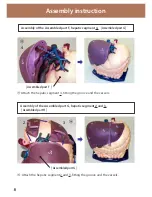
Страница 7: ...the hepatic segment 1 around the portal vein bile duct and hepatic artery Attach the hepatic artery 17 at the top the inferior vena cava noting the direction of the notch The hepatic segment 1 needs to be attached prior to the hepatic vein The inscription of S1 to be appeared as normal position Adjust the direction of the hepatic vein by fitting the notch ...
Страница 8: ... hepatic segment 6 and hepatic segment 7 Assembled part E Assembled part D Assembly instruction Right side view Attach the hepatic segment 7 fitting the groove and the vessels Attach the hepatic segment 6 fitting the groove and the vessels ...
Страница 9: ...hepatic segment 5 and hepatic segment 8 Assembled part F Assembled part E Assembly instruction Rear overhead view Attach the hepatic segment 5 fitting the groove and the vessels Attach the hepatic segment 8 fitting the groove and the vessels ...
Страница 10: ... part G Assembled part F Assembled part G Assembly of the Assembled part G hepatic segment 2 and 3 Assembled part H Assembly instruction Attach the hepatic segment 4 fitting the groove and the vessels Attach the hepatic segment 2 and 3 fitting the groove and the vessels ...
Страница 11: ...y 14 and spleen12 Assembled part H Assembly instruction Assembly completed Attach the spinal column 18 Attach the right kidney 13 to the right suprarenal vein blue line Attach the left kidney 14 to the left suprarenal vein blue line Attach the spleen 12 at the left end of the pancreas ...
Страница 12: ...2016 05 World Wide Kyoto Kagaku America Inc ...