background image

5-19

Operation on the Machine > Frequently-Used Sending Method

6

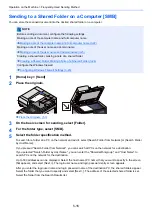
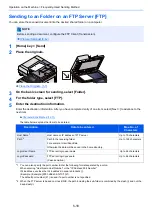
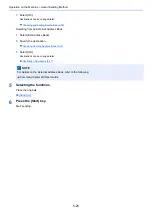
Check the status.

1

Check the information.

Change if needed.

2

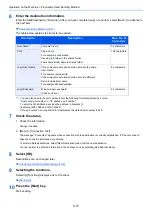
[Menu] > [Connection Test]

The message "Connected" appears when connection with the destination is correctly established. screen appears. If 
"Cannot connect" appears, check the information you entered.

To enter multiple destinations, select [Next Destination] and enter the next destination.

You can register the entered information in the Address Book by selecting [Add Address Book].

7

Select [OK].

Destinations can be changed later.

 Checking and Editing Destinations (5-30)

8

Selecting the functions.

Selecting [Functions] displays a list of other functions.

[Send] (xii)

9

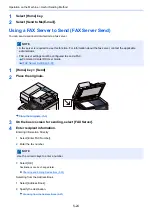
Press the [Start] key.

Start sending.

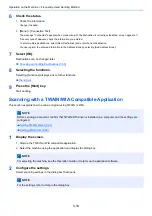
Scanning with a TWAIN/WIA Compatible Application

This section explains how to scan an original using TWAIN or WIA.

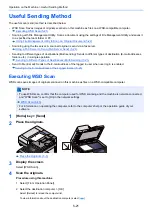
1

Display the screen.

1

Start up the TWAIN or WIA compatible application.

2

Select the machine using the application and display the dialog box.

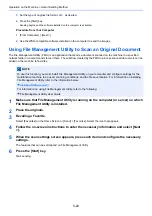
2

Configure the settings.

Select scanning settings in the dialog box that opens.

NOTE

Before sending a document, confirm that TWAIN/WIA driver is installed on a computer and the settings are 
configured.

Setting TWAIN Driver (2-37)

Setting WIA Driver (2-39)

NOTE

For selecting the machine, see the Operation Guide or Help for each application software.

NOTE

For the settings, refer to Help in the dialog box.

Содержание Ecosys M812cidn

Страница 1: ...ECOSYS M8124cidn ECOSYS M8130cidn OPERATION GUIDE PRINT COPY SCAN FAX...

Страница 2: ...e of our own brand supplies Please use our genuine toner containers which have passed rigorous quality control testing The use of non genuine toner containers may cause failure We will not be liable f...

Страница 3: ...nstructions Regarding the Disconnection of Power 1 7 Compliance and Conformity 1 8 Other precautions for users in California the United States 1 8 Warranty the United States and Canada 1 9 Legal Restr...

Страница 4: ...g the Security by the Administrator 2 41 Command Center RX 2 42 Accessing Command Center RX 2 42 Changing Security Settings 2 43 Changing Device Information 2 44 Setting SMTP and E mail 2 45 Migrating...

Страница 5: ...ettings 3 46 Adding Shortcuts 3 46 Edit the shortcut 3 46 Deleting a Shortcut 3 47 Using Document Boxes 3 48 What is Custom Box 3 48 What is Job Box 3 48 What is Removable Memory Box 3 49 The F Code B...

Страница 6: ...iting Destinations 5 30 Confirmation Screen of Destinations 5 30 Recall 5 31 How to Use the FAX Function 5 32 Basic Operation for Document Box 5 33 Box List Operations 5 33 Document List Operations 5...

Страница 7: ...nce 6 20 Hue Adjustment 6 21 Sharpness 6 22 Contrast 6 23 Background Density Adj 6 24 Saturation 6 25 Prevent Bleed through 6 26 Zoom 6 27 Combine 6 29 Margin 6 31 Duplex 6 32 Continuous Scan 6 35 Aut...

Страница 8: ...8 24 Document Box 8 25 FAX 8 26 Application 8 27 Internet 8 28 Address Book One Touch 8 29 User Login Job Accounting 8 30 Printer 8 31 System Network 8 34 Date Timer Energy Saver 8 58 Adjustment Maint...

Страница 9: ...ssing 9 46 Registering User Property for an Unknown ID User 9 46 10 Maintenance 10 1 Regular Maintenance 10 2 Cleaning Glass Platen 10 2 Cleaning Slit Glass 10 2 Consumable Replacement and Replenishme...

Страница 10: ...cations 12 9 Starting Application Use 12 9 Checking Details of Application 12 10 Character Entry Method 12 11 Entry Screens 12 11 Entering Characters 12 12 Paper 12 14 Paper Specifications 12 14 Paper...

Страница 11: ...10 ID Card Copy Use this when you want to copy a driver s license or an insurance card When you scan the front and back of the card both sides will be combined and copied onto a single sheet 6 3 Origi...

Страница 12: ...age 6 25 Margin Add margins white space In addition you can set the margin width and the back page margin 6 31 Continuous Scan Scans a large number of originals in separate batches and then produce as...

Страница 13: ...es on a WSD compatible computer WSD Scan 5 21 Functions Description Reference Page Color Selection Select the color mode setting 6 19 File Format Specify the image file format Image quality level can...

Страница 14: ...m to reduce or enlarge the image 6 27 Continuous Scan Scans a large number of originals in separate batches and then produce as one job 6 35 File Name Entry Adds a file name 6 38 E mail Subject Body A...

Страница 15: ...different sizes 6 7 Storing Size Select size of image to be stored 6 52 Original Image Select original image type for best results 6 17 Sharpness Adjusts the sharpness of image outlines 6 22 Contrast...

Страница 16: ...a document from the box once printing is complete 3 50 Functions Description Reference Page Paper Output Specify the output tray 6 15 Staple Staples the finished documents 6 12 Margin Add margins whit...

Страница 17: ...r FAX Operation Guide Functions Description Reference Page File Format Specify the image file format Image quality level can also be adjusted 6 43 File Separation Creates several files by dividing sca...

Страница 18: ...ngle proof print of multiple print job and holds printing of the remaining copies 5 42 5 43 Function key Description Reference Page File Format Specify the image file format Image quality level can al...

Страница 19: ...thru Hides back side image bleed through when scanning a thin paper original 6 26 Skip Blank Page When there are blank pages in a scanned document this function skips the blank pages and scans only pa...

Страница 20: ...nts 6 12 Margin Add margins white space Set the margin width In addition you can set the margin width and the back page margin 6 31 EcoPrint EcoPrint saves toner when printing 6 18 Job Finish Notice S...

Страница 21: ...Description Reference Page Original Size Specify the original size to be scanned FAX Operation Guide Original Orientation Select the orientation of the original document top edge to scan correct dire...

Страница 22: ...ress Box Polling Box Function key Description Reference Page Sub Address Box Operate the sub address box FAX Operation Guide Function key Description Reference Page Polling Box Operate the polling box...

Страница 23: ...splays the Sending Job Log screen 7 7 Storing Job Log Displays the Storing Job Log screen 7 7 FAX Job Log Displays the FAX Job Log screen FAX Operation Guide Scanner Displays the original scanning sta...

Страница 24: ...nection status of the Wi Fi Direct is displayed 7 11 Wireless Network The connection status of the Wireless Network Interface Kit is displayed 7 11 Wi Fi The connection status of the Wi Fi is displaye...

Страница 25: ...vailable than on the Status Page Service personnel usually print the service status pages for maintenance purpose 8 5 Accountin g Report Print Accounting Report 8 5 Sub Address Box List Printing a Sub...

Страница 26: ...destinations whenever a set number of jobs has been logged 8 7 Destina tion Set the destination to which log histories are sent Only E mail address can be set 8 7 Job Log Subject Set the subject auto...

Страница 27: ...size 8 13 Media Type Setting Select weight for each media type 8 14 Default Paper Source Select the default paper source from Cassette 1 3 and multi purpose tray 8 13 Paper Selection Set the default...

Страница 28: ...or mode setting at copy 8 16 Color Select Send Store Set the default color mode send store setting 8 16 Original Image Copy Set the default original document type for copying 8 16 Original Image Sendi...

Страница 29: ...n sending the scanned originals by E mail 6 48 FTP Encrypted TX Set the document encryption default at send 6 49 JPEG TIFF Print Select the image size resolution when printing JPEG or TIFF file 6 55 X...

Страница 30: ...nd White setting is used for printing once the color toner runs out 8 19 Measurement Select inch or metric for the unit for paper dimensions 8 20 Low Toner Alert Set the amount of remaining toner to n...

Страница 31: ...tion of the paper 8 23 System Menu Settings Description Reference Page Dest Check before Send Select whether to display the confirmation screen of destinations after pressing the Start key when perfor...

Страница 32: ...ted after they have been saved for a set time 8 25 Storage Media Select which storage media to use 8 25 Polling Box Configure settings for Polling Box FAX Operation Guide FAX Memory RX Box Configure s...

Страница 33: ...Configure settings for One Touch Key 3 37 Address Book Defaults Sort Select the default sort setting of the address for the address book 8 29 Address Book Type This procedure can be used to filter na...

Страница 34: ...Authorization Select whether or not to use Local Authorization 9 17 User Account Lockout Settings Lockout Select whether or not account lockout policy is enabled 9 6 Lockout Policy Specify the conditi...

Страница 35: ...e counts by account 9 43 Accounting List You can register edit or delete accounts 9 46 Default Setting Apply Limit This specifies how the machine behaves when the counter has reached the limit of rest...

Страница 36: ...this waiting time 8 31 LF Action Set the line feed action when the machine receives the line feed code character code 0AH 8 31 CR Action Set the character return action when the machine receives the...

Страница 37: ...twork Wi Fi Select whether or not Wi Fi is enabled 8 41 Available Network Wired Network Select whether or not Wired Network is enabled 8 41 IPSec Select whether to use IPSec 8 41 Protocol Settings Net...

Страница 38: ...o receive documents using RAWPort 1 8 45 ThinPrint Select whether to use ThinPrint 8 46 Enhanced WSD Set whether to use our proprietary web services 1 8 47 Enhanced WSD over SSL Set whether to use our...

Страница 39: ...ice This locks and protects the USB interface connector USB Device 8 52 USB Storage This locks and protects the USB memory slot 8 52 Option Interface Slot 1 and 2 This locks and protects the optional...

Страница 40: ...e changed after restarting the device or network 2 In Security Settings set Restart Network to On 3 After changing the setting restart the network or turn the machine OFF and then ON Changing Device I...

Страница 41: ...Select whether to use the Sleep mode for the following functions individually 8 58 Sleep Timer Set amount of time before entering Sleep 8 59 Energy Saver Recovery Level Select the method of recovery...

Страница 42: ...y when sending images or storing them in the Document Box 8 61 Toner Save Level EcoPrint Copy Select the default Toner Save Level EcoPrint at the time of copying 8 61 Printer Select the default Toner...

Страница 43: ...his information before using your machine Safety Precautions 1 1 To prepare the device for use including setting up cable connections and installing software refer to the following Installing and Sett...

Страница 44: ...a time Mixed Size Originals It is useful when preparing conference materials You can set the different sized originals at one time so you don t need to reset the originals regardless of size Mixed Siz...

Страница 45: ...sides of the paper You can also print multiple originals onto one sheet Combine 6 29 Duplex 6 32 Skip blank pages when printing Skip Blank Page When there are blank pages in a scanned document this f...

Страница 46: ...Security 8 55 Prevent loss of finished documents Private Print Temporarily saving print jobs in the main unit document box and outputting them when in front of the device can prevent documents from be...

Страница 47: ...USB memory It is useful when you need to print documents outside your office or you cannot print documents from your PC You can print the document from the USB memory by plugging it directly into the...

Страница 48: ...ails on modes that can be selected when sending storing refer to the information below Color Selection 6 19 Color mode Description Reference image Reference page Before After Auto Color Automatically...

Страница 49: ...sely Emphasize or blur the image outline Example Emphasize the image outlines Sharpness 6 22 Adjust the difference between dark and light parts of the image Contrast 6 23 Darken or lighten the backgro...

Страница 50: ...thoughtfully Machine s Operation Guide this Guide Explains how to load paper and perform copy print and scan operations and indicates default settings and other information Use the fax functions FAX...

Страница 51: ...agement Utility User Guide Explains how to use File Management Utility to set various parameters and send and save scanned documents Adjust the print or scan position PRESCRIBE Commands Command Refere...

Страница 52: ...hine such as placing originals making copies sending documents and using document boxes 6 Advanced Setting of Functions Explains convenient functions that are available on the machine 7 Managing Jobs...

Страница 53: ...fer to Click an item in the Table of Contents to jump to the corresponding page Click to move from the current page to the previously displayed page This is convenient when you want to return to the p...

Страница 54: ...n the horizontal orientation In addition the following icons are used to indicate original and paper placement orientations on the touch panel 1Original paper sizes that can be used vary depending on...

Страница 55: ...precautions for users in California the United States 1 8 Warranty the United States and Canada 1 9 Legal Restriction on Copying Scanning 1 10 EK1 ITB 2000 1 10 Legal Information 1 10 Energy Saving Co...

Страница 56: ...erformed Specifics of the required action are indicated inside the symbol Please contact your service representative to order a replacement if the safety warnings in this Operation Guide are illegible...

Страница 57: ...Avoid poorly ventilated locations If the floor is delicate against casters when this machine is moved after installation the floor material may be damaged During copying some ozone is released but th...

Страница 58: ...contact a physician If you do happen to get toner in your eyes flush them thoroughly with water If there is any remaining tenderness contact a physician If toner does happen to get on your skin wash w...

Страница 59: ...n the protective housing and external cover In the normal operation of the product by user no radiation can leak from the machine This machine is classified as Class 1 laser product under IEC EN 60825...

Страница 60: ...CDRH Act A laser product related act was implemented on Aug 2 1976 by the Center for Devices and Radiological Health CDRH of the U S Food and Drug Administration FDA This act prohibits the sale of la...

Страница 61: ...isolation device Other switches on the equipment are only functional switches and are not suitable for isolating the equipment from the power source Attention Le d branchement de la fiche secteur est...

Страница 62: ...The use of a non shielded interface cable with the referenced device is prohibited CAUTION The changes or modifications not expressly approved by the party responsible for compliance could void the u...

Страница 63: ...oved This warranty gives the Customer specific legal rights The Customer may also have other rights which vary from state to state or province to province Neither the seller nor any other person is au...

Страница 64: ...roduction of all or part of this guide without the prior written consent of Copyright owner is prohibited Regarding Trade Names PRESCRIBE and ECOSYS are registered trademark of Kyocera Corporation KPD...

Страница 65: ...oftware as part of its firmware You can get the source code and you are permitted to copy redistribute and modify it under the terms of GPL LGPL OpenSSL License Copyright c 1998 2006 The OpenSSL Proje...

Страница 66: ...he package Redistribution and use in source and binary forms with or without modification are permitted provided that the following conditions are met 1 Redistributions of source code must retain the...

Страница 67: ...ts that for ninety 90 days after delivery the Software will perform in accordance with Monotype Imaging published specifications and the diskette will be free from defects in material and workmanship...

Страница 68: ...ERS AND CONTRIBUTORS AS IS AND ANY EXPRESS OR IMPLIED WARRANTIES INCLUDING BUT NOT LIMITED TO THE IMPLIED WARRANTIES OF MERCHANTABILITY AND FITNESS FOR A PARTICULAR PURPOSE ARE DISCLAIMED IN NO EVENT...

Страница 69: ...ion submitted means any form of electronic verbal or written communication sent to the Licensor or its representatives including but not limited to communication on electronic mailing lists source cod...

Страница 70: ...ARTICULAR PURPOSE You are solely responsible for determining the appropriateness of using or redistributing the Work and assume any risks associated with Your exercise of permissions under this Licens...

Страница 71: ...here energy consumption is reduced after a certain amount of time elapses since the device was last used as well as a Sleep where printer and fax functions remain in a waiting state but power consumpt...

Страница 72: ...o a single sheet of paper as a 2 sided print it is possible to lower the amount of paper used Duplex 6 32 Printing in duplex mode reduces paper consumption and contributes to the conservation of fores...

Страница 73: ...tiatives or carrying recognized ecolabels which meet EN 12281 2002 or an equivalent quality standard be used This machine also supports printing on 64 g m2 paper Using such paper containing less raw m...

Страница 74: ...nt function that automatically activates energy saving mode when the machine is idle for a certain period of time Although it takes the machine a slight amount of time to return to READY mode when in...

Страница 75: ...NERGY STAR Program Energy Star ENERGY STAR Program We have determined as a participating company in the International Energy Star Program that this product is compliant with the standards laid out in...

Страница 76: ...o only The operation of this equipment is subject to the following two conditions 1 it is possible that this equipment or device may not cause harmful interference and 2 this equipment or device must...

Страница 77: ...numbers Contents of email messages Illegal Intrusion A third party with malicious intent may gain unauthorized access to personal or company networks and conduct the following illegal actions Extracti...

Страница 78: ...utomatic control equipment If this product is used in devices that are directly related to service including airplanes trains ships and automobiles or this product is used in applications requiring hi...

Страница 79: ...nergy Saver function 2 22 Low Power Mode 2 22 Energy Saver Recovery Level 2 22 Sleep 2 23 Auto Sleep 2 23 Sleep Rules models for Europe 2 23 Sleep Level Energy Saver models except for Europe 2 24 Quic...

Страница 80: ...2 2 Installing and Setting up the Machine Uninstalling Applications 2 55...

Страница 81: ...e Exterior 1 Document Processor 2 Platen 3 Original Size Indicator Plates 4 Optical Lock Cover 5 Slit Glass 6 Operation panel 7 Inner Tray 8 Front Cover 9 Cassette 1 10 Power switch 11 USB Memory Slot...

Страница 82: ...s 16 Original table 17 Cleaning Cloth Compartment 18 Toner Container Black 19 Toner Container Magenta 20 Toner Container Cyan 21 Toner Container Yellow 22 Waste Toner Box 23 Paper Width Guide 24 Paper...

Страница 83: ...g up the Machine Part Names Connectors Interior Part Names Connectors Interior 1 USB Interface Connector B1 2 Network Interface Connector 3 Option Interface Slot 2 4 Option Interface Slot 1 5 Cassette...

Страница 84: ...e Part Names With Optional Equipments Attached Part Names With Optional Equipments Attached 1 Support Tray 2 Finisher Tray 3 Top cover 4 Staple Cover 5 Staple Cartridge Holder 6 Bridge Unit Cover 7 Ca...

Страница 85: ...evices Prepare the cables necessary to suit the environment and purpose of the machine use When Connecting the Machine to the PC via USB When Connecting the Machine to the PC or Tablet by network cabl...

Страница 86: ...g the Network FAX refer to the FAX Opera tion Guide Connection Environment Function Necessary Cable Connect a LAN cable to the machine Printer Scanner Network FAX 1 LAN cable 10BASE T 100BASE TX 1000B...

Страница 87: ...Network Settings Network settings 2 13 Connecting USB Cable 1 Connect the cable to the machine 1 Connect the USB cable to the USB interface connector located on the left side of the body 2 Connect the...

Страница 88: ...an extended period e g overnight turn it off at the main power switch If the machine will not be used for an even longer period of time e g vacation remove the power plug from the outlet as a safety p...

Страница 89: ...ork configuration and energy saving functions as needed The Machine Setup Wizard is launched when the equipment is turned on for the first time after being installed Also configure the following setti...

Страница 90: ...nfiguration refer to the following Date Timer Energy Saver 8 58 The correct time can be periodically set by obtaining the time from the network time server Command Center RX User Guide Item Descriptio...

Страница 91: ...e set by using Command Center RX For the optional IB 50 the connection can be set by using the dedicated Web page Command Center RX User Guide IB 50 Operation Guide Setting the Connection by Using the...

Страница 92: ...dress DHCP Off IP Address Enter the address Subnet Mask Enter the subnet mask in decimal representation 0 to 255 Default Gateway Enter the address Auto IP Off NOTE When using the Auto IP enter 0 0 0 0...

Страница 93: ...5 Configuring Connections on the Web Page For the IB 36 the connection can be set from the Command Center RX Command Center RX User Guide For the IB 51 the connection can be set by using the dedicated...

Страница 94: ...and computer is generated automatically 2 Insert the DVD 3 Display the screen 4 Select Maintenance 5 Wi Fi Setup Tool OK NOTE Installation on Windows must be done by a user logged on with administrato...

Страница 95: ...he network is configured Wireless LAN Connection by Using Wi Fi Direct 1 Display the screen System Menu Counter key System Network Enter a login user name and password Login Network Wi Fi Direct Setti...

Страница 96: ...stom as device discovery method Specify the IP address or host name to search the machine 4 Select the machine Next NOTE Installation on Windows must be done by a user logged on with administrator pri...

Страница 97: ...work Restart Network 4 Specify the machine name from the computer or handheld device If a confirmation message appears on the operation panel of the machine select Yes The network between this machine...

Страница 98: ...stem Menu Counter key System Network Network Restart Network 4 Home Wi Fi Direct 5 Press the push button on the computer or handheld device and select Push Button on the screen of operation panel simu...

Страница 99: ...hine The configuration methods are as follows Configuring Settings Using a Web Page Settings can be configured from Command Center RX Command Center RX User Guide Configuring the Connection from the O...

Страница 100: ...es while the machine is in Sleep the machine automatically wakes up and starts printing To resume perform one of the following actions Press any key on the operation panel Touch the touch panel Open t...

Страница 101: ...Place originals in the document processor The machine will be ready to operate within the following time ECOSYS M8124cidn within 15 1 seconds ECOSYS M8130cidn within 17 6 seconds Note that ambient env...

Страница 102: ...re than Quick Recovery mode and allows Sleep Mode to be set separately for each function The ID card cannot be recognized To change the preset sleep time refer to the following To resume select the En...

Страница 103: ...function is displayed when DHCP is set to On 1 Display the screen System Menu Counter key Quick Setup Wizard NOTE The default settings of the machine can be changed in System Menu For settings that ar...

Страница 104: ...If you experience difficulty configuring the settings refer to the following Help Screen 3 13 Item Description End Exits the wizard Settings configured so far are applied Previous Returns to the previ...

Страница 105: ...re are some restrictions on the machine features and option features that can be used with this driver FAX Driver This makes it possible to send a document created in a computer software application a...

Страница 106: ...e following Install using Custom Install 2 30 1 Insert the DVD 2 Display the screen NOTE Installation on Windows must be done by a user logged on with administrator privileges If the Welcome to the Fo...

Страница 107: ...choices and click OK IMPORTANT If Wi Fi or Wi Fi Direct is enabled be sure to specify the IP address for the port name Installation may fail if the host name is specified NOTE The machine cannot be de...

Страница 108: ...f you are installing the TWAIN driver continue by configuring the following Setting TWAIN Driver 2 37 Install using Custom Install Instructions are based on interface elements as they appear in Window...

Страница 109: ...to specify the IP address for the port name Installation may fail if the host name is specified NOTE The machine cannot be detected unless it is on If the computer fails to detect the machine verify...

Страница 110: ...stalled 4 Click Install When you click Install a screen asking for your cooperation with data collection will be displayed Select one of the answer choices and click OK NOTE To install Status Monitor...

Страница 111: ...print a test page click the Print a test page checkbox and select the machine Click Finish to exit the wizard If a system restart message appears restart the computer by following the screen prompts...

Страница 112: ...oftware Place a check in the check box of the software to be deleted 3 Finish uninstalling If a system restart message appears restart the computer by following the screen prompts This completes the s...

Страница 113: ...printer driver installation If a USB connection is used the machine is automatically recognized and connected If an IP connection is used the settings below are required NOTE Installation on Mac OS m...

Страница 114: ...lect Default click the item that appears in Name and then select the driver 3 Select the options available for the machine 4 The selected printer is added NOTE When using an IP connection click IP and...

Страница 115: ...in the search list TWAIN Driver setting screen appears 2 Click Add 2 Configure the settings NOTE In Windows 7 select Start button on the Windows All Programs Kyocera and then TWAIN Driver Setting 1 En...

Страница 116: ...2 38 Installing and Setting up the Machine Installing Software 3 Finish registering NOTE Click Delete to delete the added machine Click Edit to change names...

Страница 117: ...nd then the Scanners and Cameras screen appears 2 Select the same name as this machine from WIA Drivers and click Properties 2 Configure the settings NOTE In Windows 7 click Start button on the Window...

Страница 118: ...d on the Driver Software Installation screen the installation is completed Installation is complete when Your devices are ready to use is displayed on the Driver Software Installation screen In Window...

Страница 119: ...red I want to Function Name Reference page Restrict the users of the machine User Login 9 3 Authentication Security 9 6 Auto Panel Reset 8 58 ID Card Settings 1 9 26 Restrict the basic functions that...

Страница 120: ...ation menu The factory default setting for the default user with administrator privileges is shown below Upper case and lower case letters are distinguished case sensitive Login User Name Admin Login...

Страница 121: ...ft of the screen Changing Security Settings 1 Display the screen 1 Launch your Web browser NOTE If the screen There is a problem with this website s security certificate is displayed configure the cer...

Страница 122: ...leges The factory default setting for the default user with administrator privileges is shown below Upper case and lower case letters are distinguished case sensitive Login User Name Admin Login Passw...

Страница 123: ...r Name Admin Login Password Admin 4 From the Device Settings menu click System 2 Specify the host name Enter the device information and then click Submit Setting SMTP and E mail By configuring the SMT...

Страница 124: ...reen 1 Launch your Web browser 2 In the address or location bar enter the machine s IP address or the host name Click in the following order to check the machine s IP address and the host name Device...

Страница 125: ...Setting up the Machine Command Center RX 2 Configure the Settings Set SMTP E mail TX to On in the Send Protocols 3 Display the screen Display the E mail Settings screen From the Function Settings men...

Страница 126: ...n you only enable the function of sending e mail from the machine Set the following items if you want to enable the function of receiving e mail on the machine Command Center RX User Guide Check Inter...

Страница 127: ...or migrated using KYOCERA Net Viewer on the included DVD For details on operating the KYOCERA Net Viewer refer to the following KYOCERA Net Viewer User Guide Backing Up Address Book Data to PC 1 Laun...

Страница 128: ...m Overwrite settings on target device and then click Next 6 Select the model you want to back up and click Next NOTE If the Admin Login screen appears enter the Admin Login and Login Password and then...

Страница 129: ...ure to select XML File 9 After saving the file always click Cancel to close the screen Please note that selecting Finish will write the data to the machine s Address Book Writing Address Book Data to...

Страница 130: ...ion device group and click Next 4 Select Device Address Book and click Next 5 Select Create from file and remove the checkmark from Overwrite settings on target device and then click Next Selecting th...

Страница 131: ...the Machine Migrating the Address Book 6 Click Browse and select the backup Address Book file and then click Next 7 Click Finish The write process of the Address Book data starts 8 Once the write proc...

Страница 132: ...f the application begins Depending on the application being installed the installation may take some time Once the installation ends the original screen reappears NOTE You can install applications and...

Страница 133: ...ion on the selected application by selecting 2 Select Yes in the confirmation screen NOTE If the user authentication screen appears enter your login user name and login password and select Login For t...

Страница 134: ...d Folder Access Permissions 3 23 Creating a Shared Folder Making a Note of a Shared Folder 3 24 Sharing File and Printers 3 27 Configuring Windows Firewall Settings 3 28 Adding a Destination 3 32 Addi...

Страница 135: ...Box Polling Box and FAX Memory Receive Box are for storing FAX data 3 49 Using Machine Operations to Create a New Custom Box 3 49 Using Command Center RX to Create a New Custom Box 3 51 Edit the cust...

Страница 136: ...ory general purpose item 7 Attention indicator Lights or blinks when an error occurs and a job is stopped 8 Start key Starts copying and scanning operations and processing for setting operations 9 Sto...

Страница 137: ...n F1 Function Key 1 Copy F2 Function Key 2 Send F3 Function Key 3 FAX option 1 Display a screen System Menu Counter key Common Settings Function Key Assignment 2 Configure the settings 1 Select the fu...

Страница 138: ...screen 5 24 FAX 1 Displays the FAX screen FAX Operation Guide Custom Box 2 Displays the Custom Box screen 3 48 Job Box Displays the Job Box screen 5 40 Removable Memory Displays the Removable Memory...

Страница 139: ...depending on the status 2 Desktop Displays function Registered function to favorites are also displayed Icons that are not displayed on the first page will appear by changing the page 3 Screen switchi...

Страница 140: ...creen If an error occurs the icon will show screen appears Once the error clears the display will return to normal 5 Task Screen Displays the Task screen 6 Logout Logout This is displayed when user lo...

Страница 141: ...actory default login user name and login password are set as shown below Login user name ECOSYS M8124cidn 2400 ECOSYS M8130cidn 3000 Login Password ECOSYS M8124cidn 2400 ECOSYS M8130cidn 3000 Item Des...

Страница 142: ...Custom Box screen 3 48 Job Box 1 Displays the Job Box screen 3 48 Removable Memory 1 Displays the Removable Memory screen 3 49 Polling Box 2 Displays the polling box FAX Operation Guide FAX Memory RX...

Страница 143: ...ill return to normal Device Information Displays the Device Information screen Allows you to check system and network information as well as options that are used 3 11 Language Displays the Language s...

Страница 144: ...selected Tab Display Identification Wired Network You can check ID information such as the model name serial number host name and location and the IP address Wi Fi 1 You can check ID information such...

Страница 145: ...a key that you wish to use is grayed out the settings of the previous user may still be in effect In this case select the Reset key and try again If the key is still grayed out after the Reset key is...

Страница 146: ...ons and how to use them 1 Display the Paper Selection screen Paper Selection 6 5 2 Display the help screen 1 Shows the help title 2 Displays information about functions and machine operation 3 Closes...

Страница 147: ...lt login user name and login password are set as shown below Login user name ECOSYS M8124cidn 2400 ECOSYS M8130cidn 3000 Login password ECOSYS M8124cidn 2400 ECOSYS M8130cidn 3000 You will be unable t...

Страница 148: ...cation Logout key to return to the login user name login password entry screen Users are automatically logged out in the following circumstances When the machine enters the sleep state When the auto p...

Страница 149: ...y Counter Printed Pages Print Coverage 2 The selected Last Page or Last Job data is displayed Last Page The data of the last printed page is displayed Last Job The data of the last printed job is disp...

Страница 150: ...ay or cassettes back in the paper storage bag Leaving paper in the cassette for a long time may cause a discoloration of paper by heat from the cassette heater If the machine will not be used for a pr...

Страница 151: ...II 8K 16K R 16K Plain Preprinted Bond Recycled Vellum Rough Letterhead Color Prepunched Thick High Quality Custom 1 to 8 500 sheets 80 g m2 Loading in the Cassettes 1 to 3 3 19 2 Cassette 2 3 Cassett...

Страница 152: ...to 3 1 Pull the cassette completely out of the machine 2 Adjust the paper length guide to the paper size required NOTE Do not pull out more than one cassette at a time NOTE To use 11X17 Ledger paper...

Страница 153: ...IMPORTANT Load the paper with the print side facing up After removing new paper from its packaging fan the paper before loading it in the multi purpose tray Precaution for Loading Paper 3 17 Before lo...

Страница 154: ...u Counter key Cassette MP Tray Settings Cassette 1 9 Configure the settings Select the paper size and paper type Cassette 1 to 3 8 9 NOTE If the size label is required please contact your dealer or ou...

Страница 155: ...right click PC and the select Properties Or right click the Window icon and select System 2 Check the status Check the computer name and full computer name Screen example Computer name PC4050 Full com...

Страница 156: ...smith Domain Name ABCDNET Configuring Shared Folder Access Permissions If there is a workgroup item in System Properties configure the settings below to limit folder access to a specific user or group...

Страница 157: ...the document in the destination computer NOTE If there is a workgroup in System Properties configure the settings below to limit folder access to a specific user or group 1 Select Settings in charms...

Страница 158: ...computer For example create a folder with the name scannerdata on the desktop 2 Configure permission settings 1 Right click the scannerdata folder and click Share and Advanced sharing Click the Advan...

Страница 159: ...rst dot in the full computer name that you made a note of does not appear in From this location click the Locations button select the text after the dot and click the OK button Example abcdnet com Mak...

Страница 160: ...he user does not appear on Group or user names click Edit button to add user in a similar way of configuration of permission settings 4 Make sure that checkmarks appear on Allow checkbox for the Modif...

Страница 161: ...Security and then Windows Firewall NOTE Log on to Windows with administrator privileges NOTE In Windows Vista from Start button on the Windows select Control Panel Security and then Turn Windows Firew...

Страница 162: ...reparation for Sending a Document to a Shared Folder in a PC 2 Add a port 1 Select Advanced settings 2 Select Inbound Rules 3 Select New Rules 4 Select Port NOTE In Windows Vista Exceptions tab Add Po...

Страница 163: ...s and enter 445 then click Next 6 Select Allow the connection and click the Next button 7 Make sure all checkboxes are selected and click the Next button NOTE In Windows Vista use Name to assign a nam...

Страница 164: ...3 31 Preparation before Use Preparation for Sending a Document to a Shared Folder in a PC 8 Enter Scan to SMB in Name and click Finish 1 2 1 2...

Страница 165: ...address FTP server folder path computer folder path FAX No etc Maximum number of addresses 200 1 Display a screen System Menu Counter key Address Book One Touch Address Book Individual 2 Add the name...

Страница 166: ...n that appears select the host name computer name and then select Next NOTE You can enter up to 128 characters For details on entering characters refer to the following Character Entry Method 12 11 NO...

Страница 167: ...roup name or user name To check the connection to the specified computer select Menu Connection Test If the connection fails check the entries you made Item Description Max No of Characters Host Name...

Страница 168: ...If you have more destinations to add repeat Steps 2 to 4 5 Select End 6 If you want to specify an address number select Address Number NOTE Before adding a group in the Address Book the contacts to b...

Страница 169: ...ss For details on how to edit refer to the information below Registering a contact address 3 32 3 Save Yes Register the changed destination Editing a Group 1 Select for the destination you want to edi...

Страница 170: ...ents 100 1 Display the screen System Menu Counter key Address Book One Touch One Touch Key NOTE Destinations can be sorted or searched by destination name or address number Checking and Editing Destin...

Страница 171: ...creen 1 System Menu Counter key Address Book One Touch One Touch Key 2 Select a One Touch Key number 001 to 100 to edit For direct entry of a One Touch Key number select the Quick No Search key 2 Chan...

Страница 172: ...Key number 001 to 100 to edit For direct entry of a One Touch Key number select the Quick No Search key 2 Delete the Registered Information Select Yes The data registered in the One Touch Key is dele...

Страница 173: ...Network Example 1 https 192 168 48 21 for IP address Example 2 https MFP001 if the host name is MFP001 3 Log in with administrator privileges The factory default setting for the default user with adm...

Страница 174: ...lder on a computer or to the FTP folder You can configure destination color and other settings as indicated by the instructions that appear Transmission Function Wizard Mode Destination New folder Col...

Страница 175: ...figure destination color and other settings as indicated by the instructions that appear Transmission Function Wizard Mode Destination Address Book Color Full Color Document Name Entry Initial default...

Страница 176: ...function transmission function FAX function send destination and or other settings to be added to Favorites 1 Display a screen 1 Home key Send 2 This configures send function and or destination settin...

Страница 177: ...lect Favorites or select the key of a favorite If you selected the key of a favorite that favorite will be recalled If you selected Favorites proceed with the following steps 2 Select the key of the f...

Страница 178: ...rite 1 Place the originals Start key Editing a Favorite You can use the procedure in this section to modify favorite numbers favorite names and sharing settings Use the procedure below to edit favorit...

Страница 179: ...he name Next Up to 24 characters can be entered Character Entry Method 4 Select Register The shortcut is registered Edit the shortcut 1 Display the screen The steps below can be performed while the Co...

Страница 180: ...Number or Name Modify settings OK 4 Save Yes Deleting a Shortcut 1 Display a screen The steps below can be performed while the Copy Send FAX or Document Box screen is displayed Functions Add Edit Shor...

Страница 181: ...Box 5 36 Deleting Documents in a Custom Box 5 37 Sending Documents in a Custom Box 5 37 What is Job Box Job Box refers collectively to the Private Print Stored Job Box and Quick Copy Proof and Hold Bo...

Страница 182: ...e screen 1 Home key Custom Box 2 Menu Add NOTE The optional FAX Kit is required to use the F Code Box Polling Box and FAX Memory Receive Box are for storing FAX data NOTE To use Custom Box an optional...

Страница 183: ...word of up to 16 characters in both Password and Confirm Password This can be set if Shared is selected in Permission Usage Restriction The usage for a box can be restricted To enable a capacity restr...

Страница 184: ...ddress and the host name On the MFP Home screen Device Information Identification Network Example 1 https 192 168 48 21 for IP address Example 2 https MFP001 if the host name is MFP001 3 From the Docu...

Страница 185: ...each item refer to the information below Using Machine Operations to Create a New Custom Box 3 49 NOTE When you have logged in as a user you can only edit a box whose owner is set to that user When y...

Страница 186: ...ay a screen 1 Home key Custom Box 2 Delete the box 1 Menu Delete 2 Select the box you want to delete 3 Select Yes NOTE When you have logged in as a user you can only delete a box whose owner is set to...

Страница 187: ...om a Computer 4 10 Storing Data in Machine Memory and Printing Data in Machine Memory 4 11 On the computer specify the document box and save the job 4 11 Using Command Center RX to Print a Job Stored...

Страница 188: ...rious layouts including booklet printing combine mode poster printing and scaling Finishing tab This tab lets you configure settings related to finishing of printed media Imaging tab This tab lets you...

Страница 189: ...Settings Screen 2 Profiles Printer driver settings can be saved as a profile Saved profiles can be recalled at any time so it s a convenient practice to save frequently used settings 3 Reset Click to...

Страница 190: ...learn about print settings open the printer driver print settings screen and display Help as explained below 1 Click the button in the upper right corner of the screen 2 Click the item you want to kn...

Страница 191: ...as they appear in Windows 8 1 For the settings refer to the following Printer Driver User Guide 1 In charms on Desktop click Settings Control Panel and then Devices and Printers 2 Right click the prin...

Страница 192: ...Configure the settings 1 Select the machine from the Name menu and click the Properties button 2 Select the Basic tab NOTE To print the document from applications install the printer driver on your co...

Страница 193: ...of the machine register the paper size in the Basic tab of the print settings screen of the printer driver The registered size can be selected from the Print size menu Instructions are based on inter...

Страница 194: ...2 Click the Page Sizes button 3 Click the New button 4 Enter the paper size 5 Enter the name of the paper 6 Click the Save button 7 Click the OK button 8 Click the OK button 3 Display the print settin...

Страница 195: ...size menu and select the paper size registered in step 2 To print on the special paper such as thick paper or transparency click Media Type menu and select the media type 4 Select the paper source in...

Страница 196: ...s printing do the following 1 Double click the printer icon displayed on the taskbar at the bottom right of the Windows desktop to display a dialog box for the printer 2 Click the file for which you w...

Страница 197: ...int job will be saved in the Job Box memory and printing can be executed at the machine Follow the work flow below when using Document Boxes 1 On the computer specify the document box and save the job...

Страница 198: ...a Custom Box A document stored in a Custom Box can be printed from Command Center RX 1 Display the screen 1 Launch your Web browser 2 In the address or location bar enter the machine s IP address or t...

Страница 199: ...he Document Box menu click Custom Box 4 Click the number or name of the Custom Box in which the document is stored 2 Print the document 1 Select the document you wish to print Select the checkbox of t...

Страница 200: ...nd select Exit in the menu to exit the Status Monitor Exit automatically The Status Monitor automatically shuts down after 7 minutes if it is not being used Status Monitor Display The status of the pr...

Страница 201: ...is displayed Select a job on the job list and it can be canceled using the menu displayed with a right click Paper Tray Status Tab Information is displayed about the paper in the printer and about th...

Страница 202: ...mmand Center RX If the printer is connected to a TCP IP network and has its own IP address use a web browser to access the Command Center RX to modify or confirm the network settings This menu is not...

Страница 203: ...1 Select Enable event notification If this setting is set to Off then the Status Monitor will not start up even when printing is executed 2 Select an event to use with the text to speech function in A...

Страница 204: ...d FAX Server Send 5 24 Canceling Scanning 5 26 Destination Operations 5 27 Choosing from the Address Book 5 27 Choosing from the External Address Book 5 29 Choosing from the One Touch Key 5 29 Choosin...

Страница 205: ...nts Stored in the Proof and Hold Box 5 43 Printing Documents in Custom Box 5 43 Printing from the Handheld Device 5 45 Printing by AirPrint 5 45 Printing by Google Cloud Print 5 45 Printing by Mopria...

Страница 206: ...lace the two sided originals Placing Originals on the Platen You may place books or magazines on the platen in addition to ordinary sheet originals 1 Put the scanning side facedown 2 Align it flush ag...

Страница 207: ...m Originals with adhesive tape or glue Originals with cut out sections 1 Put the scanning side facedown 2 Align it flush against the original size indicator plates with the back left corner as the ref...

Страница 208: ...rumpled paper 1 Adjust the original width guides IMPORTANT Before loading originals be sure that there are no originals left on the original eject table Originals left on the original eject table may...

Страница 209: ...For details on Original Orientation refer to the following Original Orientation 6 9 IMPORTANT Confirm that the original width guides exactly fit the originals If there is a gap readjust the original...

Страница 210: ...er 104 7 g m2 25 sheets A4 or smaller plain paper 80 g m2 recycled paper or color paper 25 sheets Hagaki Cardstock 20 sheets Envelope DL Envelope C5 Envelope 10 Commercial 10 Envelope Monarch Youkei 4...

Страница 211: ...n panel Multi Purpose Tray 8 10 IMPORTANT When loading the paper keep the print side facing down Curled paper must be uncurled before use When loading paper into the multi purpose tray check that ther...

Страница 212: ...ki Return postcard 2 Hagaki Cardstock 3 Banker Envelope Open the flap 4 Pocket Envelope Close the flap IMPORTANT Use unfolded Oufuku hagaki Return postcard How to load envelopes orientation and facing...

Страница 213: ...al without entering the license key 3 Select Yes 3 Press the Home screen application icon to start up Select the application icon The application will start up NOTE If the user authentication screen a...

Страница 214: ...w detailed information on the selected application by selecting 2 Select Yes NOTE If the user authentication screen appears enter your login user name and login password and select Login For this you...

Страница 215: ...ing Functions Copy x 4 Use the numeric keys to enter the copy quantity Specify the desired number up to 999 5 Press the Start key Copying starts NOTE This function allows you to reserve the next job d...

Страница 216: ...g Jobs 1 Select the Stop key with the copy screen displayed 2 Cancel a job When there is a job is being scanned The copy job is canceled When there is a job printing or on standby Canceling job screen...

Страница 217: ...nned Document via E mail 5 14 Send to Folder SMB Stores a scanned original image in a shared folder of any PC Sending to a Shared Folder on a Computer SMB 5 16 Send to Folder FTP Stores a scanned orig...

Страница 218: ...e next destination Number of allowable E mail address entries 100 To add the entered mail address to the Address Book selecting Menu Back You can also replace the information for a previously register...

Страница 219: ...to 500 addresses can be displayed Select the host name PC name that you want to specify in the screen that appears and select Next The login user name and login password entry screen appears After you...

Страница 220: ...tly established If Cannot connect appears check the information you entered To enter multiple destinations select Next Destination and enter the next destination You can register the entered informati...

Страница 221: ...en entering Host Name Host Number or the IP Address Port Number IPv6 address enclose the IPv6 address in square brackets Example Example 2001 db8 a0b 12f0 1 21 The default port number 21 is used if a...

Страница 222: ...Selecting the functions Selecting Functions displays a list of other functions Send xii 9 Press the Start key Start sending Scanning with a TWAIN WIA Compatible Application This section explains how t...

Страница 223: ...Operation on the Machine Frequently Used Sending Method 3 Place the originals Place the Originals 5 3 4 Scan the originals Click the Scan button This scans the original and stores the data on the comp...

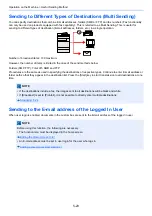
Страница 224: ...Sending to Different Types of Destinations Multi Sending 5 23 Send to Me E mail Sends to the E mail address of the logged in user when user login is enabled Sending to the E mail address of the Logged...

Страница 225: ...ing on the computer or server on which File Management Utility is installed 2 Place the originals 3 Recalling a Favorite Select Favorites on the Home Screen or Send Favorites Select the icon that appe...

Страница 226: ...ifying the destinations of respective types Continue to enter E mail address or folder path so that they appear in the destination list Press the Start key to start transmission to all destinations at...

Страница 227: ...formation Directly 1 Select Enter FAX Number 2 Enter the fax number 3 Select OK Destinations can be changed later Checking and Editing Destinations 5 30 Selecting from the Address Book 1 Select Addres...

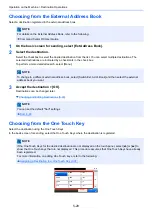
Страница 228: ...Address Book 1 Select Ext Address Book 2 Specify the destination Choosing from the Address Book 5 27 3 Select OK Destinations can be changed later Destination Operations 5 27 5 Selecting the functions...

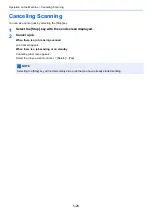
Страница 229: ...the Stop key with the send screen displayed 2 Cancel a job When there is a job is being scanned Job Cancel appears When there is a job sending or on standby Canceling job screen appears Select the job...

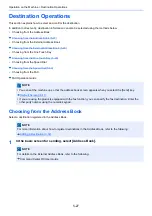
Страница 230: ...the Speed Dial 5 30 Choosing from the FAX FAX Operation Guide Choosing from the Address Book Select a destination registered in the Address Book 1 In the basic screen for sending select Address Book...

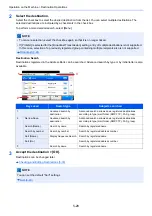
Страница 231: ...ions is not supported In this case selection of a previously registered group containing multiple recipients also is not supported Broadcast 8 24 Keys used Search type Subjects searched 1 Advanced sea...

Страница 232: ...the basic screen for sending select the One Touch Keys where the destination is registered NOTE For details on the External Address Book refer to the following Command Center RX User Guide NOTE To cha...

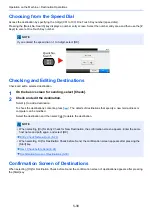
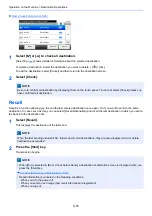
Страница 233: ...nations that specify a new mail address or computer can be modified Select the destination and then select to delete the destination Confirmation Screen of Destinations When selecting On for Destinati...

Страница 234: ...s the destination of the last send 2 Press the Start key Transmission begins NOTE Be sure to confirm all destination by displaying them on the touch panel You cannot select Check unless you have confi...

Страница 235: ...ine How to Use the FAX Function How to Use the FAX Function On products with a FAX function it is possible to use the FAX function The optional FAX Kit is required in order to make use of fax function...

Страница 236: ...perations search for a Document Box search box name box number change the sorting sequence of display items box name box number owner register a new box modify or delete a box 3 This displays detailed...

Страница 237: ...tures that can be set refer to the following Store File xiv 3 Press the Start key The original is scanned and the data is stored in the specified Custom Box Moving Documents in Custom Box This functio...

Страница 238: ...t to copy by selecting the checkbox The document is marked with a checkmark 2 Menu Move Copy Copy to Another Custom Box 3 Select the copy destination 4 Copy Yes The selected document is copied Copying...

Страница 239: ...elect the documents in the list that you wish to join by selecting the checkbox The document is marked with a checkmark You can join up to 100 documents 2 Arrange the documents in the order they will...

Страница 240: ...play the screen 1 Home key Custom Box Select the box 2 Send Start 1 Select the document in the list that you want to send by selecting its checkbox The document is marked with a checkmark NOTE After j...

Страница 241: ...ts in the custom box are sent to the E mail address of the logged in user NOTE Depending on the settings the address book screen may appear NOTE For information about registering a shortcut or recalli...

Страница 242: ...e document data to be scanned from Document List Enter the document data name in the Search Name to find the data having the same document data name or the document data name with the same beginning C...

Страница 243: ...he print job or after the power switch is turned off 1 Display the screen 1 Home key Job Box 2 Select Private Print Stored Job 3 Select the creator of the document 2 Print the document 1 Select the do...

Страница 244: ...tor of the document 2 Print the document 1 Select the document to print Print 2 Specify the number of copies to print as desired 3 Select OK Printing starts Deleting the Documents Stored in the Stored...

Страница 245: ...rint the document 1 Select the document to print Print 2 Specify the number of copies to print as desired 3 Select OK Printing starts Deleting the Documents Stored in the Quick Copy Box 1 Display the...

Страница 246: ...he screen 1 Home key Job Box 2 Select Quick Copy Proof and Hold 3 Select the creator of the document 2 Print the document 1 Select the document to print Print 2 Specify the number of copies to print a...

Страница 247: ...ings used at the time of printing when the document was saved select Print As Is Select OK to start printing Printing begins If you need to change the print settings select Print after Change Settings...

Страница 248: ...a Mopria is a standard on printing function included in Android 4 4 or later products Mopria Print Service needs to be installed and enabled in advance For details on how to use refer to a Web site of...

Страница 249: ...Printing from the Handheld Device Printing with NFC When the Delete after Print and Wi Fi Direct has been configured in advance the network between this machine and handheld device will be configured...

Страница 250: ...DF file Version 1 7 or older TIFF file TIFF V6 TTN2 format JPEG file format XPS file format OpenXPS file format Encrypted PDF file In addition you can store scanned image files in USB memory connected...

Страница 251: ...luding the root folder 2 Select 3 Set the type of original file format etc as desired For the features that can be set refer to the following Store File xvii 4 Press the Start key The original is scan...

Страница 252: ...1 Select the folder that contains the file to be printed The machine will display documents in the top 3 folder levels including the root folder NOTE USB memory can also be removed after checking the...

Страница 253: ...Removable USB Memory 2 Select the file to be printed Print 3 Change the number of copies duplex printing etc as desired For the features that can be set refer to the following Print xix 4 Press the S...

Страница 254: ...Sharpness 6 22 Contrast 6 23 Background Density Adj 6 24 Saturation 6 25 Prevent Bleed through 6 26 Zoom 6 27 Combine 6 29 Margin 6 31 Duplex 6 32 Continuous Scan 6 35 Auto Image Rotation 6 36 Job Fi...

Страница 255: ...in This Chapter Icons in This Chapter On pages that explain a convenient function the modes in which that function can be used are indicated by icons Printing Sending Storing Copy Custom Box USB Memor...

Страница 256: ...nctions ID Card Copy ID Card Copy Use this when you want to copy a driver s license or an insurance card When you scan the front and back of the card both sides will be combined and copied onto a sing...

Страница 257: ...standard sizes Metric A3 A4 R A4 A5 R A5 A6 R B4 B5 R B5 B6 R B6 Folio 216 x 340 mm Select from the Metric standard sizes Others 8K 16K R 16K Hagaki Cardstock Oufuku Hagaki Return postcard Custom 1 S...

Страница 258: ...tching the size of the original is selected automatically To select Multipurpose Tray press Paper Settings and specify the paper size and the media type NOTE Specify in advance the size and type of th...

Страница 259: ...ry Metric X 148 to 432 mm in 1 mm increments Y 98 to 297 mm in 1 mm increments Enter the size not included in the standard size 1 When you have selected Size Entry use or the numeric keys to set the s...

Страница 260: ...are as follows B4 and B5 A3 and A4 Ledger and Letter A4 R and Folio Legal and Letter R Item Available settings Description Mixed Size Originals Off Configure the settings Scans and copies multiple she...

Страница 261: ...Example B4 and B5 NOTE When mixing the original sizes as using the following combination make sure to set Auto Detect Original Size to On for Folio A4 R and Folio Auto Detect Original Size 8 12 Loadi...

Страница 262: ...he document s original orientation must be set Zoom Duplex Margin Combine Stapling Option 2 sided Book Original Select original orientation from Top Edge on Top Top Edge on Left Setting Items Image To...

Страница 263: ...tput Without Document Finisher Option When offset is used the paper of each set or each page is offset when output NOTE When offset is used without a Document Finisher an additional paper feed unit is...

Страница 264: ...6 11 Advanced Setting of Functions Collate Offset Offset Each Page Each page is offset Offset Each Set Offset Each Set...

Страница 265: ...elect the staple position For details on original orientation and staple position refer to the following Original Orientation and Staple Position 6 13 1 staple Top Right 2 staples Left 2 staples Top 2...

Страница 266: ...sizes have the same width as shown in the combinations below the output can be stapled A3 and A4 B4 and B5 Ledger and Letter Legal and Letter R Original Orientation Top Edge on Top Top Edge on Left Im...

Страница 267: ...ple 8K and 16K NOTE Number of sheets that can be stapled up to 25 sheets When performing Mixed Size Stapling refer to the following Mixed Size Originals 6 7 A3 A4 B4 B5 Ledger Letter B5 Ledger Letter...

Страница 268: ...Setting Items Description Inner Tray 1 Outputs to the Inner Tray of the machine Job Separator Tray Delivery to the job separator tray Item Description Finisher Tray 1 Delivery to the tray of the optio...

Страница 269: ...6 16 Advanced Setting of Functions Density Density Adjust density Value 4 to 4 Lighter to Darker Copy Send Custom Box USB Memory...

Страница 270: ...d text and photo documents Photo Best for photos taken with a camera Text Best for documents that are mostly text Graphic Map Best for graphics and maps Printer Output Best for documents printed on th...

Страница 271: ...d Setting of Functions EcoPrint EcoPrint EcoPrint saves toner when printing Use this function for test prints or any other occasion when high quality print is not required Value Off On Copy Custom Box...

Страница 272: ...s in full color B W 1 Prints documents in black and white Item Description Auto Color Gray Automatically recognizes whether the document is color or black and white and scan color documents in Full Co...

Страница 273: ...th of cyan magenta yellow and black Example Item Description Off On Cyan Use the and keys which are at both sides of the color to be adjusted cyan magenta yellow black to adjust each color Magenta Yel...

Страница 274: ...more creative copies The following settings can be set Item Description Off All Adjust hue for all colors Use the and keys to adjust the hue Individual Select individual colors to adjust the hue Sele...

Страница 275: ...e up of patterned dots such as magazine photos in which moire 1 patterns appear edge softening and weakening of the moire effect can be obtained by setting the sharpness toward Blur 1 Patterns that ar...

Страница 276: ...rast Contrast You can adjust the contrast between light and dark areas of the image Item Description 1 to 4 Higher Increases the sharpness of colors 1 to 4 Lower Creates smoother colors Copy Send Cust...

Страница 277: ...trusive select Auto If Auto does not remove the background color select Manual and adjust the background color density Setting Items Description Off Does not adjust the ground color Auto Automatically...

Страница 278: ...the color saturation of the image NOTE This feature is used with full color and auto color Saturation is disabled if Auto Color detects black and white originals Item Description 1 to 3 Grayish Resul...

Страница 279: ...6 26 Advanced Setting of Functions Prevent Bleed through Prevent Bleed through Hides background colors and image bleed through when scanning thin original Value Off On Copy Send Custom Box USB Memory...

Страница 280: ...select or to enter the any magnification Model Zoom Level Original Copy Model Zoom Level Original Copy Metric Models 400 Max 200 A5 A3 141 A4 A3 A5 A4 127 Folio A3 106 11x15 A3 100 90 Folio A4 75 11x...

Страница 281: ...toring Item Description 100 Reproduces the original size Auto Reduces or enlarges original to sending storing size NOTE To reduce or enlarge the image select the paper size sending size or storing siz...

Страница 282: ...ngle sheet 4 in 1 Prints a four sheet original on a single sheet Others Combine Off 2 in 1 L to R T to B 2 in 1 R to L B to T 4 in 1 Right then Down 4 in 1 Left then Down 4 in 1 Down then Right 4 in 1...

Страница 283: ...in 1 Right then Down Left then Down Down then Right Down then Left NOTE The paper sizes supported in Combine mode A3 A4 R A4 A5 R B4 B5 R B5 Folio 216 340mm Ledger Letter R Letter Legal Statement R Of...

Страница 284: ...d to adjust the L R 18 18 and T B 18 18 margin values You can enter numeric values using the Keys T B 18 18 Back Page Auto For duplex copying press Back Page and then and select Auto or Manual An appr...

Страница 285: ...on the back sides are rotated 180 degrees Copies can be bound on the top edge facing the same orientation when turning the pages Copies each side of a two sided original onto two individual sheets The...

Страница 286: ...d from right to left NOTE The original sizes supported in Book to One sided mode A3 A4 R A5 R B4 B5 R Ledger Letter R and 8K The paper sizes supported in Book to One sided mode A4 B5 Letter and 16K Bo...

Страница 287: ...original with the default setting For the default settings refer to the following 2 sided 1 sided 2 sided 2 sided Others Duplex 1 sided 1 sided 1 sided 2 sided 2 sided 1 sided 2 sided 2 sided Book 1...

Страница 288: ...s a large number of originals in separate batches and then produce as one job Originals will be scanned continuously until you select Finish Scan Select On to use continuous scanning Value Off On Copy...

Страница 289: ...sizes of the original and the loaded paper matches but the orientations are different Value Off On NOTE You can select whether to rotate the image automatically in the default settings Auto Image Rot...

Страница 290: ...ttings refer to the following Command Center RX 2 42 E mail can be sent to a single destination Item Description Off Disables the function Job Finished Only To add a new destination select Menu Add Ad...

Страница 291: ...check a job history or job status using the file name date and time or job number specified here Enter the file name and select OK Maximum number of characters Up to 32 To add date and time select Da...

Страница 292: ...y The suspended job resumes after the other job is finished Value Off On NOTE This function is not available if current job was an override Priority override may not be available depending on the stat...

Страница 293: ...eed to check for blank pages in the document Item Description Off Everything including blank pages is scanned Configure the settings Blank Pages Ruled Lines Blank pages and pages that include ruled li...

Страница 294: ...rientation of the originals either Top Edge on Top or Top Edge on Left Then select OK Book 1 Binding Binding Left Binding Right Select the binding orientation of originals Others 2 sided Book Original...

Страница 295: ...egal Statement 11x15 Oficio II Select from the Inch series standard sizes Metric A3 A4 A5 A6 B4 B5 B6 Folio 216 340 mm Select from the Metric series standard sizes Others 8K 16K Hagaki Cardstock Oufuk...

Страница 296: ...cess level for displaying printing and editing PDF s by assigning a secure password Item Available settings Description High Comp PDF Performs processing using High Compression PDF format TIFF Perform...

Страница 297: ...nt document you can specifically limit the operation Printing Allowed Not Allowed Allowed Restricts printing of the PDF file Changes Allowed Not Allowed Disables the change to the PDF file Commenting...

Страница 298: ...ion Changes Allowed Not Allowed Disables the change to the PDF file Inserting Deleting Rotating Pages Can only insert delete and rotate the pages of the PDF file Commenting Can only add commenting Any...

Страница 299: ...several files by dividing scanned original data page by page and sends the files Value Off Each Page Select Each Page to set File Separation NOTE A three digit serial number such as abc_001 pdf abc_0...

Страница 300: ...scanning resolution Value 600 600 dpi 400 400 dpi Ultra 300 300 dpi 200 400 dpi Super 200 200 dpi Fine 200 100 dpi Normal NOTE The larger the number the better the image resolution However better res...

Страница 301: ...E mail Subject Body Adds subject and body when sending a document Select Subject Body to enter the E mail subject body NOTE The maximum number of characters that can be entered are as shown below Sub...

Страница 302: ...ncryption secures the document transmission Value Off On NOTE Click Security Settings and then Network Security in the Command Center RX Be sure that SSL of Secure Protocol Settings is On and one or m...

Страница 303: ...6 50 Advanced Setting of Functions Delete after Printed Delete after Printed Automatically delete a document from the box once printing is complete Value Off On Custom Box...

Страница 304: ...6 51 Advanced Setting of Functions Delete after Transmitted Delete after Transmitted Automatically deletes a document from the box once transmission is complete Value Off On Custom Box...

Страница 305: ...Statement 11x15 Oficio II Select from the Inch series standard sizes Metric A3 A4 A5 A6 B4 B5 B6 Folio 216 340 mm Select from the Metric series standard sizes Others 8K 16K Hagaki Cardstock Oufukuhag...

Страница 306: ...ing a document processor Value Off On 1 1 600 mm 63 if fax functions are used NOTE Long originals are sent in black and white or Grayscale Only a single side of a long original cannot Originals of up...

Страница 307: ...ncrypted PDF Password Encrypted PDF Password Enter the preassigned password to print the PDF data Enter the Password and select OK NOTE For details on entering the password refer to the following Char...

Страница 308: ...int Select the image size when printing JPEG or TIFF files Item Description Paper Size Fits the image size to the selected paper size Image Resolution Prints at resolution of the actual image Print Re...

Страница 309: ...6 56 Advanced Setting of Functions XPS Fit to Page XPS Fit to Page Reduces or enlarges the image size to fit to the selected paper size when printing XPS file Value Off On USB Memory...

Страница 310: ...Job Status Screen 7 4 Store Job Status Screen 7 5 Scheduled Job Status Screen 7 5 Checking Detailed Information of Jobs 7 6 Checking Job Histories 7 7 Available Job History Screens 7 7 Displaying the...

Страница 311: ...ncel key 2 Select the job to check details Select either of Print Job Status Send Job Status Store Job Status or Scheduled Job to check the status Print Job Status Screen 7 3 Send Job Status Screen 7...

Страница 312: ...Job name or file name 4 Select the key of the job whose detailed information you want to display Checking Detailed Information of Jobs 7 6 5 Status Status of job Number of Sheets Printed Total Number...

Страница 313: ...o display Checking Detailed Information of Jobs 7 6 5 Status Status of job InProcess The status before starting sending such as during scanning originals Sending Sending Waiting Waiting Sending Cancel...

Страница 314: ...hecking Detailed Information of Jobs 7 6 5 Status Status of job InProcess The status before starting to save such as during scanning originals Storing Storing Data Canceling Canceling the job Pause Pa...

Страница 315: ...iled information select Close 3 Destination Destination Either destination name FAX number or No of broadcast items 4 Select the job whose detailed information you want to display from the list and pr...

Страница 316: ...using Command Center RX or KYOCERA Net Viewer Command Center RX KYOCERA Net Viewer User Guide You can show the job log of all users or only your own job log Display Status Log 8 21 This setting can al...

Страница 317: ...formation of the selected job is displayed 2 To exit from the detailed information select Close Sending the Log History You can send the log history by E mail You can either send it manually as needed...

Страница 318: ...key 2 Select Pause All Print Jobs on the printing jobs status screen Printing is paused When resuming the printing of jobs that have been paused select Resume All Print Jobs Canceling a Job A job in...

Страница 319: ...formation such as paper jam out of toner or out of paper and status such as waiting or printing are displayed FAX Memory RX Box FAX Operation Guide This displays information document name file size et...

Страница 320: ...tatus The network connection status appears Option Network Connection Status The connection status of an optional network interface kit appears Wi Fi Direct Shows the connection status of Wi Fi Direct...

Страница 321: ...1 Select the Status Job Cancel key 2 Select the item you want to check 2 Check the status The items you can check are described below Toner Status The amount of toner remaining is shown in levels And...

Страница 322: ...guage 8 4 Report 8 5 Counter 8 8 Cassette MP Tray Settings 8 9 Common Settings 8 11 Home 8 22 Copy 8 23 Send 8 24 Document Box 8 25 FAX 8 26 Application 8 27 Internet 8 28 Address Book One Touch 8 29...

Страница 323: ...nd exits NOTE If the login user name entry screen appears during operations log in by referring to the machine s Operation Guide for Administrator User Name and Password The factory default login user...

Страница 324: ...ic fax settings FAX functions are available only on products with the fax function installed FAX Operation Guide Energy Saver Setup Configures energy saver function settings 1 Sleep Mode Sleep Timer S...

Страница 325: ...em Menu Language Language Menu Transition System Menu Counter key Language Set the language to be displayed on the machine screen Item Description Language Set the language to use for the touch panel...

Страница 326: ...List Prints the font list allowing you to check the font samples installed in the machine Network Status Prints the network status allowing you to check the information including network interface fi...

Страница 327: ...he information including optional network interface firmware version network address and protocol NOTE This function is displayed when the optional Network Interface Kit or Wireless Network Interface...

Страница 328: ...ations whenever a set number of jobs has been logged Value Off On NOTE If On is selected specify the number of job histories to be automatically sent The setting range is 1 to 16 Destination This spec...

Страница 329: ...d Pages Print Coverage 2 The selected Last Page or Last Job data is displayed Last Page The data of the last printed page is displayed Last Job The data of the last printed job is displayed NOTE The p...

Страница 330: ...electable Size Type PaperSize Auto Paper size is automatically detected and selected Values Metric Inch Metric Available options are as follows Values A3 A4 R A4 A5 R B4 B5 R B5 Folio 216 x 340 mm inc...

Страница 331: ...m special standard sizes and custom sizes Values 8K 16K R 16K ISO B5 Envelope 10 Envelope 9 Envelope 6 Envelope Monarch Envelope DL Envelope C5 Envelope C4 Hagaki Cardstock Oufuku hagaki Return postca...

Страница 332: ...r start up default screen Value Home Copy Send FAX 1 Custom Box 2 Job Box Removable Memory Sub Address Box 1 Polling Box 1 FAX Memory RX Box 1 Favorites 3 Status Check Item Description Buzzer Set opti...

Страница 333: ...11 69 in 0 01 increments X Length Y Width Auto Detect Original Size Automatically detect the original size Select Metric when automatically detecting the originals in centimeter sizes Select Inch whe...

Страница 334: ...sheet or paper feeder 500 sheet x 2 is installed Cassette 3 When a paper feeder 500 sheet x 2 is installed Paper Selection Set whether the machine automatically selects the paper source or paper is f...

Страница 335: ...irmation screen for the paper setting when a new paper is set for each cassette Value On Off NOTE Cassette 2 to Cassette 3 are displayed when the following optional paper feeder is installed Cassette...

Страница 336: ...3 Custom 1 8 Normal 2 Cardstock Heavy 3 Item Description Duplex Permit Duplex printing allowed Prohibit Duplex printing not allowed Name Change names for Custom 1 8 Names should be not more than 16 ch...

Страница 337: ...or Selection Send Store Set the default color mode send store setting Value Auto Color Gray Auto Color B W Full Color Grayscale Black White Original Image Copy Set the default original document type f...

Страница 338: ...obs Additional information such as Date and Time and Job No can also be set Value File Name Up to 32 characters can be entered Additional Info None Date and Time Job No Job No Date and Time Date and T...

Страница 339: ...sed PDF files Value Compression Ratio Priority Standard Quality Priority Detect Items to Skip Copy Select the default Skip Blank Page settings Copy Value Blank Pages Ruled Lines Blank Pages Only Blank...

Страница 340: ...ing is displayed NOTE Requires the optional Document Finisher Stapling Limit Error Set what to do when stapling capacity is exceeded during printing Value Ignore Printing continues without stapling Di...

Страница 341: ...ue mm inch Item Description Low Toner Alert Set the amount of remaining toner to notify the administrator when to order a toner when the toner is running low This notification is used for event report...

Страница 342: ...essage Item Description Offset One Page Documents Set whether one page documents are sorted Value Off On NOTE This function is displayed when an optional Document Finisher is installed Item Descriptio...

Страница 343: ...8 22 System Menu Home Home Menu Transition System Menu Counter key Home Configure settings for Home screen Editing the Home Screen 3 8...

Страница 344: ...fy the paper size to be used for a case where the original is too small to be detected in the Auto Paper Selection mode Value Default Paper Source A4 R A4 A5 R A6 R B5 R B5 B6 R Letter R Letter Statem...

Страница 345: ...On is selected select from among the following for the forwarding rule FAX 1 E mail Folder SMB Folder FTP Destination Set the destination to which the original is forwarded One destination can be set...

Страница 346: ...tain free space on the box you can set the maximum number of stored jobs Value number between 0 and 300 NOTE When 0 is set Quick Copy cannot be used Deletion of Job Retention This setting specifies th...

Страница 347: ...8 26 System Menu FAX FAX Menu Transition System Menu Counter key FAX This configures fax function settings FAX Operation Guide...

Страница 348: ...8 27 System Menu Application Application Menu Transition System Menu Counter key Application Configure settings for Application Application 2 54...

Страница 349: ...same proxy server is used for all protocols If you do not want to use the same proxy server select Off Value Off On HTTP Proxy Server Set a proxy server HTTP Value Enter the proxy address and port num...

Страница 350: ...dress Book Defaults 1 Appears only when an External The Address Book can be used Edit Restriction Menu Transition System Menu Counter key Address Book One Touch Edit Restriction Print List Menu Transi...

Страница 351: ...Login Job Accounting Menu Transition System Menu Counter key User Login Job Accounting Configure settings for machine management Overview of User Login Administration 9 3 User Login Job Accounting 9 2...

Страница 352: ...problem Value Off On Override A4 Letter Select whether to treat A4 size and Letter which are similar in size as the same size when printing Value Off A4 and Letter are not regarded as the same in size...

Страница 353: ...tray Always If there is paper in the MP tray then the paper feed will be from the MP tray regardless of what is set in the printer driver Paper Feed Mode While printing from the computer select how to...

Страница 354: ...try using thicker paper Printing Job Terminator You can select the condition which regarded as a job termination if the print job could not be processed until the end due to your environment and the...

Страница 355: ...Interface Kit is an option for some models Contact your dealer or our sales or service representatives for detail IB 36 Wireless Network Interface Kit 12 3 Item Description Wi Fi Direct Select whethe...

Страница 356: ...nt that supports the automatic wireless network setup connection settings can be configured by Quick Setup Available Network Displays access points to which the machine can connect Select a desired ac...

Страница 357: ...od The setting values vary depending on the Network Authentication setting When Network Authentication is set to Open Value Disable WEP WEP Key Up to 26 characters WEP Key Index 0 to 3 When Network Au...

Страница 358: ...e IP address Value NOTE When DHCP is set to On this function will be grayed out and the value cannot be entered Subnet Mask Set the IP subnet mask Value NOTE When DHCP is set to On this function will...

Страница 359: ...28 Default Gateway 128 bits address is expressed in eight groups consisting of four digit hexadecimal digits The groups are separated by colon NOTE This function is displayed when IPv6 is set to On To...

Страница 360: ...Off On Auto IP Select whether to use Auto IP Value Off On IP Address Set the IP address Value NOTE When DHCP is set to On this function will be grayed out and the value cannot be entered Subnet Mask S...

Страница 361: ...rated by colon NOTE This function is displayed when IPv6 is set to On To enter Default Gateway set RA Stateless to Off RA Stateless Select whether to use RA Stateless Value Off On NOTE This function i...

Страница 362: ...rk IPSec Item Description Protocol Settings Select whether to use Bonjour Value Off On Available Network Wi Fi Direct Select whether or not each network is enabled Value Disable Enable NOTE This setti...

Страница 363: ...ing is displayed when the Protocol Settings setting is On Available Network Wi Fi Available Network Wired Network SMTP E mail TX Select whether to send E mail using SMTP Value Off On POP3 E mail RX Se...

Страница 364: ...n Available Network Wi Fi Available Network Wired Network DSM Scan Select whether to use DSM scan 1 Value Off On LDAP Select whether to use LDAP Value Off On SNMP Protocol Settings Select whether to c...

Страница 365: ...ailable Network Wi Fi Available Network Wired Network IPP Protocol Settings Selects whether to receive documents using IPP To use the IPP protocol set IPP to On and set SSL to Off In addition select N...

Страница 366: ...er used The default port number is 4000 Value 1 to 32767 NOTE This setting is displayed when the Protocol Settings setting is On Available Network Wi Fi Direct Select whether or not each network is en...

Страница 367: ...to 32767 NOTE This setting is displayed when the Protocol Settings setting is On Thin Print over SSL To use the Thin Print over SSL protocol set Thin Print Over SSL and SSL to On Value Off On NOTE Wh...

Страница 368: ...it also requires a certificate for SSL the default certificate is the self certificate of the machine Available Network Wi Fi Direct Select whether or not each network is enabled Value Disable Enable...

Страница 369: ...i Fi Available Network Wired Network Item Description SSL Select whether to use SSL for communication Value Off On IPP Security Select the IPP security level This setup is available when SSL is On Val...

Страница 370: ...he proxy for connection to the Internet from an application Value Off On Use Same Proxy Set whether the same proxy server is used for all protocols Value Off On HTTP Proxy Server Set a proxy server HT...

Страница 371: ...Use NetWare to receive documents Network Interface Kit Operation Guide Value Off On AppleTalk Selects whether to receive documents using AppleTalk 1 Value Off On LAN Interface Select the LAN interfac...

Страница 372: ...inal Starts connection using the PIN code of the access point Enter the PIN code of the access point Custom Setup The detailed settings for wireless LAN can be changed Network Name SSID Set the SSID S...

Страница 373: ...e operating as a client or with an external Address Book Value Wi Fi Wired Network Optional Network NOTE Wi Fi is displayed when the Wireless Network Interface Kit IB 36 is installed Optional Network...

Страница 374: ...lue Low This mode is used during maintenance Do not use normally High This is the security setting we recommend Use this setting normally Very High In addition to High setting this setting disables th...

Страница 375: ...tion RAM Disk Setting This creates a RAM disk and specifies its capacity Creating a RAM disk enables printing of print data from the Job Box Value RAM Disk Setting Off On Ram Disk Size The size settin...

Страница 376: ...delete all the data stored in the SSD Overwrite all the data stored in the SSD when disposing of the machine IMPORTANT If you accidentally turn the power switch off during initialization the SSD migh...

Страница 377: ...on user list address book Document Box registered by the user etc Account information of job accounting Network certificates Initial screen on machine changed by service representative FAX 1 Fax setti...

Страница 378: ...ffix and domain name to be attached to a destination NOTE For information about the fax server contact the fax server administrator File Format Set the default type of the files Value PDF TIFF XPS Add...

Страница 379: ...t If you select a region that utilizes summer time configure settings for summer time Setting Date and Time 2 12 Auto Panel Reset If no jobs are run for a certain period of time automatically reset se...

Страница 380: ...r Recovery Level Select the method of recovery from energy saver Value Full Recovery This mode enables the use of all functions immediately However this mode saves less energy Normal Recovery In this...

Страница 381: ...the optional fax function is installed Interrupt Clear Timer Set the period after which the machine reverts to Normal mode when it has been set to Interrupt Copy mode and then left unused Value 5 to...

Страница 382: ...hen documents are sent or saved in a document box Value 3 Lower 2 1 0 Normal 1 2 3 Higher Background Density Adj Darkens or lightens overall background density adjustment Copy Auto Darkens or lightens...

Страница 383: ...Drum Refresh Remove image blur and white dots from the printout It takes about 1 to 2 minutes The time required may vary depending on the operating environment Drum Refresh 11 32 NOTE Drum Refresh can...

Страница 384: ...s 9 23 ID Card Settings 9 26 PIN Code Authorization 9 26 Using User Login Administration 9 28 Login Logout 9 28 User Login Job Accounting 9 29 Enabling Job Accounting 9 30 Job Accounting Access 9 30 S...

Страница 385: ...9 2 User Authentication and Accounting User Login Job Accounting Registering User Property for an Unknown ID User 9 46...

Страница 386: ...access is administered on this machine Enter a correct login user name and password for user authentication to login Access are in three levels User Administrator and Machine Administrator The securi...

Страница 387: ...ary to manage the users that use TWAIN for scanning Managing the Users to Use TWAIN for Scanning 9 14 To Manage the Users to Use WIA for Scanning WIA driver settings on the PC are necessary to manage...

Страница 388: ...l Authentication User authentication based on user properties on the local user list stored in the machine Network Authentication User authentication based on Authentication Server Use a user property...

Страница 389: ...ileges The factory default login user name and login password are set as shown below Login User Name ECOSYS M8124cidn 2400 ECOSYS M8130cidn 3000 Login Password ECOSYS M8124cidn 2400 ECOSYS M8130cidn 3...

Страница 390: ...or User Name DeviceAdmin Login User Name ECOSYS M8124cidn 2400 ECOSYS M8130cidn 3000 Login Password ECOSYS M8124cidn 2400 ECOSYS M8130cidn 3000 Access Level Machine Administrator Administrator User Na...

Страница 391: ...to be registered Item Descriptions User Name Enter the name displayed on the user list up to 32 characters Login User Name Enter the login user name to login up to 64 characters The same login user n...

Страница 392: ...t where the user belongs The user who registered his her account name can login without entering the account ID User Login Job Accounting 9 29 NOTE Select Name or ID from the Sort to sort the account...

Страница 393: ...printer The relevant print functions are as follows Printing from Document Box Printing from removable memory Printing from PC Copy Select whether or not to reject usage of copy functions Copy Full C...

Страница 394: ...login settings To configure simple login settings select Yes If you select No you will return to the user list screen For the procedure for configuring simple login settings refer to the following Si...

Страница 395: ...changed the users can check the present status 1 Display the screen System Menu Counter key User Property 2 Change the user properties Change or add information as needed Adding a User Local User Lis...

Страница 396: ...when Local Authorization is set to On Group Authorization is set to On or Guest Authorization Setting is set to On Authorization Rules shows the account name set for the logged in user and the usage...

Страница 397: ...must be entered each time a printing is attempted Validate user name computer or prompt for login user name When printing the Windows user name is searched in the Login user names and printing is pos...

Страница 398: ...essary in the WIA driver Instructions are based on interface elements as they appear in Windows 8 1 1 Display the screen 1 Click Search in charms and enter View scanners and cameras in the search box...

Страница 399: ...machine to be used as the FAX Driver and select Printing preferences from the resulting pull down menu 3 Click FAX TX Setting in the Printing Preferences window 2 Configure the settings 1 Select User...

Страница 400: ...NOTE When using Local Authorization the user authentication type must be set to Local Authentication Enabling User Login Administration 9 5 NOTE If the user authentication screen appears enter your lo...

Страница 401: ...up to 32 characters Next NOTE If the user authentication screen appears enter your login user name and login password and select Login For this you need to log in with administrator privileges The fac...

Страница 402: ...lows Printing from Document Box Printing from removable memory Printing from PC Printer Full Color Select whether or not to reject usage of full color print functions for the printer The relevant prin...

Страница 403: ...t Authorization Set User Login Administration must be enabled in User Login Settings Enabling User Login Administration 9 5 NOTE If the user authentication screen appears enter your login user name an...

Страница 404: ...ccount where the user belongs If the user does not belong to any account select Other Account Authorization Rules Set usage authority for each user The items you can restrict the access level with are...

Страница 405: ...login password and select Login For this you need to log in with administrator privileges The factory default login user name and login password are set as shown below Login User Name ECOSYS M8124cidn...

Страница 406: ...ling Simple Login Select whether or not simple login is enabled 1 Display the screen 1 System Menu Counter key User Login Job Accounting 2 User Login Settings Simple Login Settings Simple Login 2 Conf...

Страница 407: ...information you want to modify NOTE If the user authentication screen appears enter your login user name and login password and select Login For this you need to log in with administrator privileges T...

Страница 408: ...for whom a domain is set in network authentication select the Domain Name and select the domain where the user is registered Select Next 4 Enter the user name to be displayed select Next 5 Password L...

Страница 409: ...nction does not appear when the user logs in as a network authentication user NOTE If the user authentication screen appears enter your login user name and login password and select Login For this you...

Страница 410: ...ure the settings 1 Select Off or On 2 Select OK NOTE If the user authentication screen appears enter your login user name and login password and select Login For this you need to log in with administr...

Страница 411: ...unting Login Logout If user login administration is enabled the login user name and login password entry screen appears each time you use this machine Login If the login user name entry screen appears...

Страница 412: ...e Scan Job Account by Using WIA To manage the scan job account by using WIA you need to configure the WIA driver settings on the computer connected to the machine Job Accounting for Scan Using WIA 9 3...

Страница 413: ...set as shown below Login User Name ECOSYS M8124cidn 2400 ECOSYS M8130cidn 3000 Login Password ECOSYS M8124cidn 2400 ECOSYS M8130cidn 3000 NOTE To disable job accounting select Off When the display ret...

Страница 414: ...stricting the Use of the Machine 9 32 4 Select Save A new account is added on the Account List Item Description Account Name Maximum number of characters that can be entered Up to 32 Account ID Input...

Страница 415: ...s follows Printing from Document Box Printing from removable memory Printing from PC Printer Full Color Limits the number of sheets used for color printing The relevant print functions are as follows...

Страница 416: ...er reaches its limit Subsequently Printing scanning of the job continues but the subsequent job will be rejected Alert Only Job continues while displaying an alert message NOTE If the user authenticat...

Страница 417: ...of jobs to be printed from the PC on the network you need configure the following settings by using the printer driver on the PC Instructions are based on interface elements as they appear in Windows...

Страница 418: ...ID and validate A screen for entering the Account ID will be displayed when attempting a printing The Account ID stored in the Account ID list needs to be entered The Account ID must be entered each t...

Страница 419: ...for Scan Using WIA To manage the number of jobs scanned by using WIA you need to configure the following settings by using the WIA Driver on the computer Instructions are based on interface elements...

Страница 420: ...nfigure the following settings by using the FAX Driver on the computer Instructions are based on interface elements as they appear in Windows 8 1 1 Display the screen 1 From the desktop click Settings...

Страница 421: ...be used to specify an account ID to use the same Account ID for every FAX job If this option is selected the user does not have to enter the Account ID for each FAX job Prompt for Account ID A screen...

Страница 422: ...in Job Accounting 2 Job Accounting Settings Default Setting Default Counter Limit NOTE If the user authentication screen appears enter your login user name and login password and select Login For this...

Страница 423: ...for copying Copy Full Color Sets the default restriction on the number of sheets used for full color copying Printer Total Sets the default restriction on the number of sheets used for printing The r...

Страница 424: ...User Login Job Accounting 2 Job Accounting Settings Total Job Accounting or Each Job Accounting 2 Configure the settings The table below lists the item you can view NOTE If the user authentication scr...

Страница 425: ...number of pages printed The relevant print functions are as follows Printing from Document Box Printing from removable memory Printing from PC Copy Printer B W Displays the total number of pages used...

Страница 426: ...the count 2 Select for the user whose information you want to modify 3 Select the function to check the count The results will be displayed 4 Confirm the count and select End Print Accounting Report T...

Страница 427: ...System Menu Counter key User Login Job Accounting 2 Job Accounting Settings Default Setting Copy Printer Count 2 Configure the settings 1 Select Total or Individual 2 Select OK Login Logout Job Accou...

Страница 428: ...in user name and password appears Enter a login user name and password to login If the user has already registered the account information the account ID entry would be skipped Adding a User Local Use...

Страница 429: ...ure the settings Select Reject or Permit Registering User Property for an Unknown ID User When registering user property for an unknown ID user you can check the user on the Job Status screen or Job L...

Страница 430: ...Password ECOSYS M8124cidn 2400 ECOSYS M8130cidn 3000 Item Description User Name Enter the user name up to 32 characters Account Name Register an account for the unknown ID user User Login Job Account...

Страница 431: ...explains the following topics Regular Maintenance 10 2 Cleaning Glass Platen 10 2 Cleaning Slit Glass 10 2 Toner Container Replacement 10 4 Waste Toner Box Replacement 10 7 Loading Paper 10 9 Staple C...

Страница 432: ...h moistened with alcohol or a mild detergent Cleaning Slit Glass When using the original feeder clean the slit glass surface and the reading guide with the provided cleaning cloth 1 Take out the clean...

Страница 433: ...10 3 Maintenance Regular Maintenance 2 Clean the slit glass and the reading guide...

Страница 434: ...is low Replace when empty 1 Open the front cover 2 Remove the toner container NOTE For the toner container always use a genuine toner container Using a toner container that is not genuine may cause i...

Страница 435: ...e Consumable Replacement and Replenishment 3 Put used toner containers into the plastic waste bag 4 Remove the new toner container from the box 5 Tap the toner container IMPORTANT Do not touch the poi...

Страница 436: ...over IMPORTANT Insert the toner container as far as it will go NOTE If the front cover does not close check that the new toner container is installed correctly Return the used toner container to your...

Страница 437: ...low will appear when the waste toner box is full Replace the waste toner box Check the waste toner box 1 Open the front cover 2 Remove the Waste Toner Box 3 Put used toner containers into the plastic...

Страница 438: ...ove the new Waste Toner Box 5 Install the Waste Toner Box 6 Close the front cover NOTE Return the used waste toner box to your dealer or service representative The collected waste toner box will be re...

Страница 439: ...e cassette number Add paper in Multi Purpose tray Loading in the Cassettes 1 to 3 3 19 Loading Paper in the Multi Purpose Tray 5 7 NOTE When On is selected for the Show Paper Setup Message the paper s...

Страница 440: ...her The message shown below will appear when staples run out When this happens replace the staple cartridge Staple is empty 1 Open the Staple Cover of the Document Finisher 2 Remove the Staple Cartrid...

Страница 441: ...10 11 Maintenance Consumable Replacement and Replenishment 4 Install the Staple Cartridge Holder 5 Close the staple cover...

Страница 442: ...Calibration 11 30 Perform the laser scanner cleaning 11 30 Tone Curve Adjustment 11 30 Drum Refresh 11 32 Clearing Paper Jams 11 33 Jam Location Indicators 11 33 Remove any jammed paper in the Multip...

Страница 443: ...olving If a problem occurs with your machine look into the checkpoints and perform procedures indicated on the following pages If the problem persists contact your Service Representative NOTE When con...

Страница 444: ...on the platen place them face down and align them with the original size indicator plates 5 3 When placing originals in the document processor place them face up 5 4 Check that the settings of the app...

Страница 445: ...the IP address private address of the other network which can not access coexists The number of host name and domain name which can be used with the machine is one respectively Configure the network...

Страница 446: ...been entered properly Check the login password 5 16 Have exceptions for Windows Firewall been configured properly Configure exceptions for Windows Firewall properly 3 28 Do the time settings for the e...

Страница 447: ...0 4 Is EcoPrint mode enabled Select EcoPrint Off 6 18 Run Drum Refresh 11 32 Make sure the paper type setting is correct for the paper being used 8 9 The white portion of printed images look gray as a...

Страница 448: ...djustment For the adjustment method contact your Service Representative Printouts have vertical lines Is the slit glass dirty Clean the slit glass 10 2 Dirt on the top edge or back of the paper Is the...

Страница 449: ...em Menu Counter key Adjustment Maintenance Service Setting Altitude Adjustment and set to an elevation one level higher than the current setting The altitude is 1 500 m or higher and dots appear in th...

Страница 450: ...to the paper tray Load color copy paper into the paper tray Run Calibration 11 30 Run Tone Curve Adjustment 11 30 When making copies Adjust the color balance 6 20 When printing from a computer Adjust...

Страница 451: ...staples are depleted the machine will stop and the location of staple depletion will be indicated on the screen Leave the machine on and follow the instruction to replace the staple case Select Contin...

Страница 452: ...with the server Cannot connect This appears when the Wi Fi or Wi Fi Direct connection did not complete Check the settings and check the signal conditions Cannot duplex print on the following paper Di...

Страница 453: ...s the ID card may not be compatible with this product Change it to another ID card 9 9 Cannot recognize Make sure your ID card has been registered 9 26 Cannot staple at the specified position Have you...

Страница 454: ...the network and SMB settings The network cable is connected The hub is not operating properly The server is not operating properly Host name and IP address Port number 2 7 Is the account information...

Страница 455: ...nceled Select End Incorrect Login User Name or Password The login user name or password was incorrect when processing the job externally The job is canceled Select End Inner tray is full of paper Remo...

Страница 456: ...Press Continue to print send or store the scanned pages Press Cancel to cancel printing sending or storing Memory card error An error has occurred on the memory card Job is canceled Select End The err...

Страница 457: ...l Memory setting contact your administrator 8 53 MK near end It is almost time to replace the parts Obtain the maintenance kit container Contact your Service Representative Error Message Checkpoints C...

Страница 458: ...maintain its quality Please wait 11 32 Preparing The machine is under the adjustment to maintain its quality Please wait Error Message Checkpoints Corrective Actions Reference Page RAM disk error An e...

Страница 459: ...it is damaged Connect a compatible removable memory 7 10 Removable Memory is full Job is canceled Select End Insufficient free space in the removable memory Delete unnecessary files Remove originals...

Страница 460: ...g the Optional Memory setting contact your administrator 8 53 Scheduled sending jobs exceeded The number of jobs has exceeded the limit set for delayed transmission Select End The job is canceled Wait...

Страница 461: ...ructions on the screen Error Message Checkpoints Corrective Actions Reference Page The cover is open Is there any cover which is open Close the cover indicated on the screen Is the top cover of the do...

Страница 462: ...chine continues printing in black and white by selecting Print in Black and White of Color Toner Empty Action 10 4 Toner is low C M Y K Replace when empty It is almost time to replace the toner contai...

Страница 463: ...mail Check the following on the Command Center RX SMTP login user name and login password POP3 login user name and login password E mail size limit 2 45 Failed to send via FTP Check the FTP settings L...

Страница 464: ...following of the SMTP server Is SMTP over SSL available Is the encryption available Refer to the Command Center RX User Guide Failed to send via FTP Check the following of the FTP server Is FTPS avail...

Страница 465: ...e hub is not operating properly The server is not operating properly 2204 Failed to send the e mail Check the e mail size limit of the SMTP settings on the Command Center RX 2 45 3101 Failed to send t...

Страница 466: ...Color Registration Perform the color registration 11 25 Tone Curve Adjustment Adjust the tone curve of the printed image 11 30 Drum Refresh Remove image blur and white dots from the printout 11 32 Ca...

Страница 467: ...nt side facing up After removing new paper from its packaging fan the paper before loading it in the multi purpose tray Precaution for Loading Paper 3 17 Before loading the paper be sure that it is no...

Страница 468: ...n 1 As shown in the illustration place the printed side down on the platen with the edge with the arrows toward the back 2 Select Start to scan the chart When scanning is finished color printing posit...

Страница 469: ...3 5 are printed IMPORTANT Load the paper with the print side facing up After removing new paper from its packaging fan the paper before loading it in the multi purpose tray Precaution for Loading Pape...

Страница 470: ...lect Color Registration OK 3 Select Start of the chart to be corrected 4 Select or to enter the values read from the chart Select OK Select to increase the value from 0 to 9 To decrease select By sele...

Страница 471: ...anner Cleaning begins Tone Curve Adjustment After prolonged use or from the effects of surrounding temperature or humidity the density of printed images may differ from the original If that is the cas...

Страница 472: ...nted side down on the platen with the edge with the arrows toward the back and close the original holder IMPORTANT Load the paper with the print side facing up After removing new paper from its packag...

Страница 473: ...Select Start 2 As shown in the illustration place the printed side down on the platen with the edge with the arrows toward the back and close the original holder 3 Select Start The pattern is read and...

Страница 474: ...cause Hold to become selected Selecting Hold displays the status screen which you can use to check the status of jobs 6 Selecting Display Error returns to paper jam guidance Paper Jam Location Indica...

Страница 475: ...ose Tray 1 Remove any jammed paper 2 Remove all the paper 3 Reload the paper 6 Cassette 3 11 36 7 Document Finisher 11 39 9 Bridge Unit 11 40 8 SpecificationsDocument Processor 11 41 CAUTION Do not re...

Страница 476: ...mmed paper in Right Cover 1 1 Open Right Cover 1 2 Remove any jammed paper 3 Open the fuser cover a and remove any jammed paper CAUTION The fixing unit is extremely hot Take sufficient care when worki...

Страница 477: ...Remove any jammed paper in Cassette 1 2 and 3 Here we ll explain the procedures for Cassette 1 as an example CAUTION Do not reuse jammed papers If the paper tears during removal be sure to remove any...

Страница 478: ...move any jammed paper 3 Push Cassette 1 back in Remove any jammed paper in Right Cover 2 3 CAUTION Do not reuse jammed papers If the paper tears during removal be sure to remove any loose scraps of pa...

Страница 479: ...11 38 Troubleshooting Clearing Paper Jams 1 Open Right Cover 3 2 Remove any jammed paper 3 Open Right Cover 2 4 Remove any jammed paper...

Страница 480: ...paper in the Document Finisher 1 Remove any jammed paper 2 Open the top cover CAUTION Do not reuse jammed papers If the paper tears during removal be sure to remove any loose scraps of paper from ins...

Страница 481: ...any jammed paper in the Bridge Unit 1 Open the Bridge Unit cover and remove any jammed paper CAUTION Do not reuse jammed papers If the paper tears during removal be sure to remove any loose scraps of...

Страница 482: ...mmed paper in the Document Processor 1 Remove the originals from the Original Table 2 Open the front cover and remove any jammed paper CAUTION If the paper tears during removal be sure to remove any l...

Страница 483: ...11 42 Troubleshooting Clearing Paper Jams 3 Open Reverse Unit C and remove any jammed paper 4 Turn dial B clockwise to feed jammed paper and remove it 5 Push the top cover C B...

Страница 484: ...Staple Jam Clearing a Staple Jam Clearing a staple jam of the Document Finisher 1 Open the staple cover of the Document Finisher 2 Remove the Staple Cartridge Holder 3 Remove the jammed staple 4 Inst...

Страница 485: ...11 44 Troubleshooting Clearing a Staple Jam 5 Close the staple cover...

Страница 486: ...12 9 Starting Application Use 12 9 Checking Details of Application 12 10 Character Entry Method 12 11 Entry Screens 12 11 Entering Characters 12 12 Specifications 12 21 Machine 12 21 Copy Functions 1...

Страница 487: ...ional Equipment Overview of Optional Equipment The following optional equipment is available for the machine 1 PF 470 2 PF 471 3 DF 470 9 IB 50 8 HD 6 HD 7 10 IB 51 6 Fax System 13 7 Expansion Memory...

Страница 488: ...AN interface card which supports the wireless LAN specifications IEEE802 11n max 65 Mbps and IEEE802 11 g b In addition network printing is possible without using the wireless LAN router because Wi Fi...

Страница 489: ...electrostatic charge touch a water tap or some metal object to discharge it from your body before loading the expansion memory If possible you should wear an anti static wristband or take other anti s...

Страница 490: ...e Expansion Memory that has been installed remove the machine s right cover Carefully press the two stoppers of the socket and then remove the Expansion Memory from the socket Checking Expansion Memor...

Страница 491: ...Hard Disk installed in the machine received data can be rasterized and stored on this Hard Disk Installation of an SSD enables use of Document Box functions Using Document Boxes 3 48 Installing the SS...

Страница 492: ...12 7 Appendix Optional Equipment 3 Install the SSD 1 Remove the SSD from its package 2 Insert straight into the Option Interface Slot 3 Fix it with the 2 screws...

Страница 493: ...ecifications IEEE802 11n Max 300 Mbps and 11 g b The IB 51 provides support for AppleTalk Netware and similar conventional protocols Only supports minimum function of standard utilities The IB 51 setu...

Страница 494: ...Security Kit Card Authentication Kit 1 ThinPrint Option 1 NOTE Restrictions such as the number of times the application can be used during the trial period differ depending on the application If you...

Страница 495: ...xtend the trial period select Print after Change Settings Yes NOTE If the user authentication screen appears enter your login user name and login password and select Login For this you need to log in...

Страница 496: ...the character to enter 3 Cancel Select to cancel entered characters and return to the screen before the entry was made 4 Back Select to return to the previous screen 5 OK Next Select to save the ente...

Страница 497: ...select the cursor key and scroll the screen to view other numbers or symbols to enter Input Limit Back Next Cancel AB Del 2 32 ABC A a Q W E R T Y U I O P A S D F G H J K L _ Z X C V B N M Add Name I...

Страница 498: ...12 13 Appendix Character Entry Method 3 Register the characters you entered Select Next The entered characters are registered Input Limit Symbol Del 8 32 Back Next Cancel Add Name List A 1...

Страница 499: ...re not responsible for the problems occurred from the use of paper that does not conform to our specifications Paper Appropriate Paper This section describes guidelines for choosing paper Condition Av...

Страница 500: ...relative humidity causes paper to become damp making the edges expand so it appears wavy Low relative humidity causes paper to lose moisture making the edges tighten and weakening print contrast Wavy...

Страница 501: ...following types of paper even if it conforms to the basic specifications When you use these kinds of paper purchase a small amount first as a sample to test Glossy paper Watermarked paper Paper with a...

Страница 502: ...g these paper and media choose those that are designed specifically for copiers or page printers such as laser printers Use the multi purpose tray for transparencies envelopes cardstocks and label pap...

Страница 503: ...ble trouble Labels consist of three layers as shown in the illustration The adhesive layer contains materials that are easily affected by the force applied in the machine The carrier sheet bears the t...

Страница 504: ...n do not use the type of envelope in which the adhesive is exposed after the top layer is peeled off Serious damage may be caused if the paper covering the adhesive comes off in the machine Do not use...

Страница 505: ...surface of the base paper with a coating that provides higher printing quality than plain paper Coated paper is used for particularly high quality printing The surface of high quality or medium qualit...

Страница 506: ...tter Legal Statement Executive Oficio II Folio 216 340 mm 8K 16K Multi Purpose Tray A4 A5 A6 B5 B6 Folio 216 340 mm Letter Legal Statement Executive Oficio II 16K B5 ISO Envelope 10 Envelope 9 Envelop...

Страница 507: ...0 to 90 5 F Humidity 10 to 80 Altitude 3 500 m 11 482 ft maximum Brightness 1 500 lux maximum Dimension W D H without Document Processor 23 23 23 23 29 65 590 590 753 mm Weight ECOSYS M8124cidn Approx...

Страница 508: ...sheets min 30 sheets min A4 R Letter R 21 sheets min 21 sheets min A3 Ledger 15 sheets min 15 sheets min B4 Legal 15 sheets min 15 sheets min B5 30 sheets min 30 sheets min B5 R 21 sheets min 21 shee...

Страница 509: ...R2 Windows Server 2012 R2 Windows Server 2016 Mac OS X 10 5 or more Interface USB Interface Connector 1 Hi Speed USB Network interface 1 10 BASE T 100 BASE TX 1000 BASE T IPv6 IPv4 IPSec 802 3a suppor...

Страница 510: ...per Paper weight 60 to 163 g m2 Media types Plain Recycled Material Dimensions W D H 23 23 x 23 19 x 13 86 590 589 352 mm Weight Approx 45 9 lb Approx 20 8 kg Item Description Paper Supply Method Fric...

Страница 511: ...sheets Paper weight 90 g m2 or less Media types Plain Recycled Preprinted Bond Color Prepunched Letterhead High Quality Rough Custom 1 to 8 Dimensions W D H 16 38 x 20 51 x 10 85 416 x 521 x 275 5 mm...

Страница 512: ...or a specific period In Sleep mode power consumption is kept to a minimum Bonjour Bonjour also known as zero configuration networking is a service that automatically detects computers devices and serv...

Страница 513: ...mode are thus lighter than normal Emulation The function to interpret and execute other printers page description languages The machine emulates operation of PCL6 KPDL3 PostScript 3 compatible Enhance...

Страница 514: ...s Windows as a standard protocol for file sharing and printing services Outline font With outline fonts character outlines are represented with numerical expressions and fonts can be enlarged or reduc...

Страница 515: ...capacity total number of prints and scans and paper source settings Subnet Mask The subnet mask is a way of augmenting the network address section of an IP address A subnet mask represents all networ...

Страница 516: ...and OCR software USB Universal Serial Bus 2 0 A USB interface standard for Hi Speed USB 2 0 The maximum transfer rate is 480 Mbps This machine is equipped with USB 2 0 for high speed data transfer WIA...

Страница 517: ...Staple Jam of the Inner Finisher 11 43 Clearing Paper Jams Bride Unit 11 40 Jam Location Indicators 11 33 Multi Purpose Tray 11 34 Original Feeder Reverse Automatic 11 41 Right Cover 1 11 35 Right Co...

Страница 518: ...Screen 7 7 Document Box Custom Box 3 48 External Memory Box 3 49 Job Box 3 48 Document Box Settings 8 31 Document Box Removable Memory Custom Box 8 25 Polling Box 8 25 Document Name Entry Default 8 17...

Страница 519: ...8 41 J Job Available Status 7 2 Canceling 7 9 Checking History 7 10 Checking Status 7 2 Detailed Information 7 6 Detailed Information of Histories 7 8 Displaying Status Screens 7 2 Pause and Resumpti...

Страница 520: ...l Size 6 4 Original Stopper 5 6 Original width guides 2 4 Original Paper Settings 8 12 Outline font 12 29 Output Stopper 3 22 P Panel Reset Timer 8 58 Paper 5 9 Cassette 8 9 Handling Precautions 3 4 3...

Страница 521: ...12 30 SMTP Mail Send Protocol Settings 8 42 SNMP Protocol Settings 8 43 SNMPv3 Protocol Settings 8 43 Sort Offset Default 8 16 Sound 8 11 Specifications 12 21 Document Finisher 12 25 SSD Initializatio...

Страница 522: ...stration Adding a User 9 7 Enabling 9 5 FAX 9 16 Group Authorization 9 17 Guest Authorization Settings 9 20 IC Card Settings 9 26 Local Authorization 9 17 Login 3 14 Logout 3 15 Modifying User Informa...

Страница 523: ......

Страница 524: ...yron Avenue Takapuna Auckland New Zealand Phone 64 9 415 4517 Fax 64 9 415 4597 KYOCERA Document Solutions Asia Limited 13 F Mita Centre 552 566 Castle Peak Road Tsuen Wan New Territories Hong Kong Ph...

Страница 525: ...k No 6 Mecidiyek y 34394 i li stanbul Turkey Phone 90 212 356 7000 Fax 90 212 356 6725 is a trademark of KYOCERA Corporation KYOCERA Document Solutions Deutschland GmbH Otto Hahn Strasse 12 40670 Meer...

Страница 526: ...2017 10 2P3KDEN002...

Отзывы: