background image

DOWNTOWN 125i

By KWANG YANG Motor Co., Ltd.

1st Edition, April 2009

All rights reserved. Any reproduction or

unauthorized use without the written

permission of KWANG YANG Motor Co., Ltd.

is expressly prohibited.

T100-LFA7-A2

Cortesia de/ Courtesy of: www.batmotos.com

Cortesia de/ Courtesy of: www.batmotos.com

Содержание Downtown 125i 2009

Страница 1: ...tion April 2009 All rights reserved Any reproduction or unauthorized use without the written permission of KWANG YANG Motor Co Ltd is expressly prohibited T100 LFA7 A2 Cortesia de Courtesy of www batmotos com Cortesia de Courtesy of www batmotos com ...

Страница 2: ...ons start with an assembly or system illustration and troubleshooting for the section The subsequent pages give detailed procedures for the section KWANG YANG MOTOR CO LTD QUALITY TECHNOLOGY DEPT EDUCATION SECTION TABLE OF CONTENTS GENERAL INFORMATION 1 EXHAUST MUFFLER FRAME COVERS 2 INSPECTION ADJUSTMENT 3 LUBRICATION SYSTEM 4 ENGINE REMOVAL INSTALLATION 5 CYLINDER HEAD VALVES 6 CYLINDER PISTON 7...

Страница 3: ...erial Number ENGINE SERIAL NUMBER 1 1 1 GENERAL INFORMATION 1 SPECIFICATIONS SERVICE PRECAUTIONS TORQUE VALUES SPECIAL TOOLS 1 12 LUBRICATION POINTS 1 14 DOWNTOWN 125i Cortesia de Courtesy of www batmotos com Cortesia de Courtesy of www batmotos com ...

Страница 4: ...ke 0 10 mm clearance Exhaust 0 10 mm Idle speed rpm 1850rpm Lubrication type Forced pressure Wet sump Oil pump type Inner outer rotor type Oil filter type Full flow filtration Oil capacity 1 2 L Exchanging capacity 1 0 L Cooling Type Liquid cooling Tires Engine Lubrication System Air cleaner type No Paper element wet Fuel capacity 12 5 L Throttle type Butterfly type Type ECU Spark plug NGK CR7E Sp...

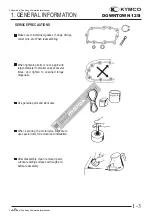
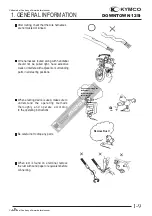
Страница 5: ...s When servicing the motorcycle be sure to use special tools for removal and installation After diassembly clean removed parts Lubricate sliding surfaces with engine oil before reassembly Make sure to install new gasket O rings circlips cotter pins etc When reassembling 1 GENERAL INFORMATION 3 DOWNTOWN 125i Cortesia de Courtesy of www batmotos com Cortesia de Courtesy of www batmotos com ...

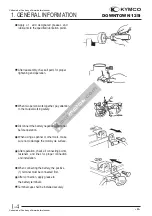
Страница 6: ...o the mutual working safety When using a spanner or other tools make sure not to damage the motorcycle surface After operation check all connecting points fasteners and lines for proper connection and installation When connecting the battery the positive terminal must be connected first After connection apply grease to the battery terminals Terminal caps shall be installed securely DOWNTOWN 125i C...

Страница 7: ...stalled securely When taking out the connector the lock on the connector shall be released before operation Hold the connector body when connecting or disconnecting it Do not pull the connector wire Check if any connector terminal is bending protruding or loose 1 GENERAL INFORMATION 5 DOWNTOWN 125i Cortesia de Courtesy of www batmotos com Cortesia de Courtesy of www batmotos com ...

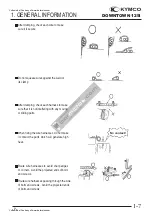
Страница 8: ...tor cover for proper coverage and installation Insert the terminal completely Check the terminal cover for proper coverage Do not make the terminal cover opening face up Secure wire harnesses to the frame with their respective wire bands at the designated locations Tighten the bands so that only the insulated surfacescontactthewireharnesses 1 GENERAL INFORMATION 6 DOWNTOWN 125i Cortesia de Courtes...

Страница 9: ...arts When fixing the wire harnesses do not make it contact the parts which will generate high heat Route wire harnesses to avoid sharp edges or corners Avoid the projected ends of bolts and screws Route wire harnesses passing through the side of bolts and screws Avoid the projected ends of bolts and screws 1 GENERAL INFORMATION 7 DOWNTOWN 125i Cortesia de Courtesy of www batmotos com Cortesia de C...

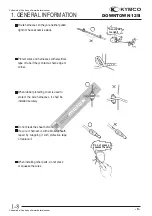
Страница 10: ...corner When rubber protecting cover is used to protect the wire harnesses it shall be installed securely Do not break the sheath of wire If a wire or harness is with a broken sheath repair by wrapping it with protective tape or replace it When installing other parts do not press or squeeze the wires 1 GENERAL INFORMATION 8 DOWNTOWN 125i Cortesia de Courtesy of www batmotos com Cortesia de Courtesy...

Страница 11: ...a testing device is used make sure to understand the operating methods thoroughly and operate according to the operating instructions Be careful not to drop any parts When rust is found on a terminal remove the rust with sand paper or equivalent before connecting 1 GENERAL INFORMATION 9 After routing check that the wire harnesses are not twisted or kinked DOWNTOWN 125i Cortesia de Courtesy of www ...

Страница 12: ...gine oil to the specified points Use designated engine oil for lubrication Apply grease for lubrication Transmission Gear Oil 90 Use special tool Caution Warning Special Engine Oil Grease Gear Oil 1 GENERAL INFORMATION 10 DOWNTOWN 125i Cortesia de Courtesy of www batmotos com Cortesia de Courtesy of www batmotos com ...

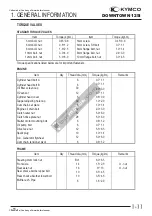
Страница 13: ...cap Cam chain set plate Engine oil drain bolt Clutch outer nut Clutch drive plate nut Starter motor mounting bolt Oil pump bolt Drive face nut Spark plug A C Generator flywheel Cam chain tensioner pivot 6 6 30 12 6 30 6 12 12 28 6 6 12 10 12 6 FRAME Item Qty Thread dia mm Torque kgf m Remarks Steering stem lock nut Front axle Rear axle nut Rear shock absorber upper bolt Rear shock absorber lower b...

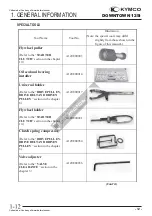
Страница 14: ...iversal holder Refer to the DRIVE PULLEY DRIVE BELT AND DRIVEN PULLEY section in the chapter 8 A120E00017 Flywheel holder Refer to the STARTER CLUTCH section in the chapter 10 A120E00021 Clutch spring compressor Refer to the DRIVE PULLEY DRIVE BELT AND DRIVEN PULLEY section in the chapter 8 A120E00034 Valve adjuster Refer to the VALVE CLEARANCE section in the chapter 3 A120E00036 Cont d DOWNTOWN 1...

Страница 15: ... STEM section in the chapter 15 A120F00023 Lock nut wrench Refer to the STEERING STEM section in the chapter 15 A120F00002 Bottom Ball Race Remove special tool Top Ball Cone Race Remove special tool Refer to the STEERING STEM section in the chapter 15 A120F00009 Bottom Ball Race Install special tool Top Ball Cone Race Install special tool Refer to the STEERING STEM section in the chapter 15 A120F0...

Страница 16: ...R L side oil seal Starter reduction gear engaging part Countershaft gear engaging part Final gear engaging part Bearing movable part O ring face Oil seal lip Genuine KYMCO Engine Oil SAE15W 40 API SJ Engine Oil Starter idle gear Friction spring movable part shaft movable part Shaft movable grooved part High temperature resistant grease A C generator connector Transmission case breather tube Adhesi...

Страница 17: ..._________________________________________________________________________________ __________________________________________________________________________________ EXHAUST MUFFLER FRAME COVERS __________________________________________________________________________________ SERVICE INFORMATION 2 1 TROUBLESHOOTING 2 1 FASTENER REMOVAL AND REINSTALLATION 2 2 FRAME COVERS REMOVAL INSTALLATION 2 3 E...

Страница 18: ...esses according to the Cable Harness Routing TORQUE VALUES Exhaust muffler pipe nuts 1 8 2 2 kgf m Exhaust muffler brake RR Frok 3 2 3 8 kgf m RR Engine case 3 0 4 0 kgf m TROUBLESHOOTING Noisy exhaust muffler Damaged exhaust muffler Exhaust muffler joint air leaks Lack of power Caved exhaust muffler Clogged exhaust muffler Exhaust muffler air leaks Cortesia de Courtesy of www batmotos com Cortesi...

Страница 19: ... the center piece stick out toward the head so that the pawls close Insert the fastener into the installation hole Push in the head of center piece until it becomes flush with the fastener outside face To prevent the pawl from damage insert the fastener all the way into the installation hole Cortesia de Courtesy of www batmotos com Cortesia de Courtesy of www batmotos com ...

Страница 20: ...se order of removal LUGGAGE BOX Unlock the seat with the ignition key Open the seat Remove four bolts and the fastener on the right side of luggage box then lift luggage box Disconnect the luggage box light connector then remove the luggage box Installation is in the reverse order of removal Luggage Box Light Connector Cortesia de Courtesy of www batmotos com Cortesia de Courtesy of www batmotos c...

Страница 21: ... Remove the center cover Installation is in the reverse order of removal Remove four bolts and then remove the rear carrier Center Cover During removal do not pull the joint claws forcedly to avoid damage Cortesia de Courtesy of www batmotos com Cortesia de Courtesy of www batmotos com ...

Страница 22: ... upper handlebar cover Remove the four screws then remove the bottom handlebar cover Disconnect the throttle cable refer to the THROTTLE BODY TPS section then pull the throttle cable out from the lower cover Remove the lower cover Installation is in the reverse order of removal Cortesia de Courtesy of www batmotos com Cortesia de Courtesy of www batmotos com ...

Страница 23: ...2 EXHAUST MUFFLER FRAME COVERS 2 6 DOWNTOWN 125i WINDSHIELD WINDSHIELD GARNISH Remove five bolts and windshield garnish Cortesia de Courtesy of www batmotos com Cortesia de Courtesy of www batmotos com ...

Страница 24: ...center cover Remove the front cover Installation is in the reverse order of removal FRONT COVER Remove the small front cover black screw Remove the small front cover black Remove two nuts Remove eight screws from the inner cover Remove the front cover Cortesia de Courtesy of www batmotos com Cortesia de Courtesy of www batmotos com ...

Страница 25: ...val FRONT FENDER Remove four screws screws and front fender Installation is in the reverse order of removal RIGHT LEFT FOOT SKIRT Remove the six screws attaching to the right or left skirt Installation is in the reverse order of removal During removal do not pull the joint claws forcedly to avoid damage Cortesia de Courtesy of www batmotos com Cortesia de Courtesy of www batmotos com ...

Страница 26: ...he reverse order of removal REAR FENDER Remove the body cover and then the rear fender Installation is in the reverse order of removal BODY COVER Remove the rear center cover Remove the right and left foot skirts Remove the rear carrier Remove six screws and two nuts then remove the body cover Cortesia de Courtesy of www batmotos com Cortesia de Courtesy of www batmotos com ...

Страница 27: ...r of removal TIRE FENDER Remove the body cover Remove four bolts attaching to the tire fender Installation is in the reverse order of removal FLOORBOARD Remove the body cover Remove the right left skirt Remove two screws Taillight Connector Cortesia de Courtesy of www batmotos com Cortesia de Courtesy of www batmotos com ...

Страница 28: ...LER FRAME COVERS 2 11 DOWNTOWN 125i Remove eight bolts then remove the floorboard UNDER COVER Remove four bolts Remove the under cover Cortesia de Courtesy of www batmotos com Cortesia de Courtesy of www batmotos com ...

Страница 29: ...ect the speedometer wires Disconnect the DC power connectors Remove one screws Remove the ignition key garnish Remove three screws from the inner cover then remove the handler panel Installation is in the reverse order of removal Speedometer Wires DC power Connectors Cortesia de Courtesy of www batmotos com Cortesia de Courtesy of www batmotos com ...

Страница 30: ...ver Remove the front lower cover Remove the floorboard Remove four bolts and front glove box one screw Remove two fastener bolts then remove the fuel tank fill cap Remove the inner cover 3 1 2 2 4 5 6 Cortesia de Courtesy of www batmotos com Cortesia de Courtesy of www batmotos com ...

Страница 31: ...5i EXHAUST MUFFLER REMOVAL Disconnect the O2 heater O2 sensor connector Remove the two exhaust pipe joint nuts Remove three muffler mount bolts and muffler and gasket Cortesia de Courtesy of www batmotos com Cortesia de Courtesy of www batmotos com ...

Страница 32: ...xhaust muffler and three mounting bolt Install and tighten the two exhaust pipe joint nuts to the specified torque Torque 20 N m 2 kgf m Tighten the three mounting bolts Torque 35 N m 3 5 kgf m Remove the coolant tank cover Gasket Cortesia de Courtesy of www batmotos com Cortesia de Courtesy of www batmotos com ...

Страница 33: ...TION ADJUSTMENT __________________________________________________________________________________ SERVICE INFORMATION 3 1 MAINTENANCE SCHEDULE 3 2 FUEL LINE 3 4 THROTTLE OPERATION 3 4 ENGINE OIL 3 5 TRANSMISSION OIL 3 11 AIR CLEANER 3 12 SPARK PLUG 3 13 VALVE CLEARANCE 3 14 IDLE SPEED 3 15 CYLINDER COMPRESSION 3 16 DRIVE BELT 3 16 CLUTCH SHOE WEAR 3 17 HEADLIGHT AIM 3 17 COOLANT 3 18 BRAKE FLUID ...

Страница 34: ...orage area SPECIFICATIONS Throttle grip free play 2 6 mm Spark plug DINK 125 NGK DPR7EA9 DOWNTOWN125 i NGK CR7E Spark plug gap 0 6 0 7 mm Valve clearance IN 0 1 mm EX 0 1 mm Idle speed 1850 rpm Cylinder compression 15 kg cm Engine oil capacity At disassembly 1 2L At change 1 0L Gear oil capacity At disassembly 0 13L At change 0 12L Coolant capacity Reserve tank capacity 0 49 liter Radiator capacit...

Страница 35: ...keep your scooter in peak operating condition Maintenance work should be performed in accordance with standards and specifications of KYMCO by properly trained and equipped technicians Your KYMCO dealer meets all of these requirements Should be serviced by your KYMCO dealer unless the owner has the proper tools and service data and is mechanically qualified In the interest of safety we recommend t...

Страница 36: ...R R 10 15 20 25 30 36 0 6 3 6 9 12 15 18 R R R I I I I I C I I I I I I R I R I 1 I I I I R R R R R R OIL STRAINER SCREEN FREQUENCY ITEM WHICHEVER COMES FIRST NOTE MONTH X 1000 km X 1000 mi ODOMETER READING NOTE 1 BRAKE PAD WEAR BRAKE SYSTEM BRAKE LIGHT SWITCH NUTS BOLTS FASTENERS WHEELS TIRES STEERING BEARINGS I I I I I I HEADLIGHT AIM CLUTCH SHOE WEAR BRAKE FLUID REFER TO PAGE I I I I I I I I I I...

Страница 37: ... OPERATION Check the throttle grip for smooth movement Measure the throttle grip free play Free Play 2 6 mm Major adjustment of the throttle grip free play is made with the adjusting nut at the throttle body side Adjust by loosening the lock nut and turning the adjusting nut Cortesia de Courtesy of www batmotos com Cortesia de Courtesy of www batmotos com ...

Страница 38: ...e maintained between the upper and lower level marks on the oil filler cap dipstick 1 Start the engine and let it idle for a few minutes 2 Stop the engine and put the scooter on its center stand on level ground 3 After a few minutes remove the oil filler cap dipstick wipe it clean and reinsert the oil filler cap dipstick without screwing it in Remove the oil filler cap dipstick The oil level shoul...

Страница 39: ...ner to your local recycling center or service station for reclamation Do not throw it in the trash or pour it on the ground or down a drain Used engine oil may cause skin cancer if repeatedly left in contact with the skin for prolonged periods Although this is unlikely unless you handle used oil on a daily basis it is still advisable to thoroughly wash your hands with soap and water as soon as pos...

Страница 40: ... the crankcase with the recommended grade oil and install the oil filler cap Oil capacity after draining 1 0 L 0 95 US qt 0 8 lmp qt 6 Start the engine and let it idle for 2 3 minutes 7 Stop the engine and check that the oil level is at the upper level mark on the oil filler cap dipstick with the scooter upright on firm level ground Make sure there are no oil leaks Let the engine and exhaust syste...

Страница 41: ...that the oil strainer screen sealing rubber and drain plug O ring are in good condition 5 Install the oil strainer screen spring and oil strainer screen cap Oil strainer screen cap torque 15N m 1 5 kgf m 6 Fill the crankcase with the recommended grade oil and install the oil strainer screen cap Oil capacity after draining 1 0 L 7 Start the engine and let it idle for 2 3 minutes 8 Stop the engine a...

Страница 42: ...in pan under the crankcase Remove three bolts and then remove the oil filter cap 2 and O ring 3 The spring 4 will come out when the filter cap is removed Let the engine oil drain out 3 Remove and discard the oil filter 5 4 Check that the O ring is in good condition Let the engine and exhaust system cool before working in those areas Do not remain the rubber seal on the oil filter in the oil filter...

Страница 43: ...city after draining 1 0 L 8 Start the engine and let it idle for 2 3 minutes 9 Stop the engine and check that the oil level is at the upper level mark on the oil filler cap dipstick with the scooter upright on firm level ground Make sure there are no oil leaks Make sure the rubber seal on the oil filter facing the left crankcase Rubber Seal Cortesia de Courtesy of www batmotos com Cortesia de Cour...

Страница 44: ...wheel and drain the oil After draining the oil completely install the oil drain bolt with a new sealing washer and tighten it Torque 13 N m 1 3 kgf m 5 Fill the transmission case with recommended oil Recommended transmission oil SAE 90 Oil capacity at draining 0 12 L 6 Install the transmission oil filler bolt with a new sealing washer and tighten it Torque 13 N m 1 3 kgf m 1 2 Cortesia de Courtesy...

Страница 45: ... cleaner element then remove and discard this air cleaner element 4 The new air cleaner element installation is in the reverse order of removal Use the KYMCO genuine air cleaner element or an equivalent air cleaner element specified for your model Using the wrong KYMCO air cleaner element or a non KYMCO air cleaner element which is not of equivalent quality may cause premature engine wear or perfo...

Страница 46: ...park plug cleaner or a wire brush Specified Spark Plug NGK CR7E Measure the spark plug gap Spark Plug Gap 0 6 0 7 mm Torque 0 9 kgf m 9 N m Gap Wear Fouling Deposits Cracks Damage Deformation 0 6 0 7mm When installing first screw in the spark plug by hand and then tighten it with a spark plug wrench Cortesia de Courtesy of www batmotos com Cortesia de Courtesy of www batmotos com ...

Страница 47: ...e so that the T mark on the flywheel aligns with the index mark on the left crankcase cover The punch mark on the camshaft should face upward as shown If the punch mark on the camshaft are facing downward turn the crankshaft one full turn 180 and the punch mark are facing upward Inspect and adjust valve clearance while the engine is cold below 35 Timing hole cap Crankshaft hole cap Punch Mark Cort...

Страница 48: ... clearance Install the removed parts in the reverse order of removal IDLE SPEED Warm up the engine before this operation Start the engine and connect a tachometer Turn the throttle stop screw 1 to obtain the specified idle speed Idle Speed DINK 125 1700 rpm DOWNTOWN125i 1850 rpm When the engine misses or run erratic adjust the pilot screw 2 It is not necessary to adjust idle speed for DOWNTOWN125i...

Страница 49: ...n is low check for the following Leaky valves Valve clearance too small Leaking cylinder head gasket Worn pistons Worn piston cylinder If the compression is high it indicates that carbon deposits have accumulated on the combustion chamber and the piston head DRIVE BELT Remove the left crankcase cover Inspect the drive belt for cracks or excessive wear Replace the drive belt with a new one if neces...

Страница 50: ...Y section in the chapter 8 HEADLIGHT AIM Remove the front cover Place the scooter on a level surface Adjust the headlight beam adjuster A clockwise rotation moves the beam up and counterclockwise rotation moves the beam down Adjust the headlight beam horizontally by turning the horizontal beam adjuster A clockwise rotation moves the beam toward the right side of the rider Horizontally Adjusting Sc...

Страница 51: ...ition If the coolant level is below the LOWER level mark 3 remove screw 4 and reserve tank lid 5 and reserve tank cap 6 and add coolant mixture until it reaches the upper level mark 2 Always add coolant to the reserve tank Do not attempt to add coolant by removing the radiator cap If the reserve tank is empty or if coolant loss is excessive check for leaks and see your KYMCO dealer for repair Cort...

Страница 52: ...m a sealed container or an equivalent Other checks Make sure there are no fluid leaks Check for deterioration or cracks in the hoses and fittings BRAKE PAD WEAR Brake pad wear depends upon the severity of usage the type of riding and road conditions Generally the pads will wear faster on wet and dirty roads Inspect the pads at each regular maintenance interval Front brake Rear brake Check the cuto...

Страница 53: ...lity of the scooter Under inflated tires make smooth cornering difficult and overinflated tires decrease the amount of tire in contact with the ground which can lead to skids and loss of control Be sure that the tire pressure is within the specified limits at all times Tire pressure should only be adjusted when the tires are cold Cold inflation tire pressure 1 Rider 75 kg 2 Riders 150 kg Front 2 0...

Страница 54: ...re shock absorber assembly for oil leaks looseness or damage Jack the rear wheel off the ground and move the rear wheel sideways with force to see if the engine hanger bushings are worn Replace the engine hanger bushings if there is any looseness Rear suspension adjustment Cortesia de Courtesy of www batmotos com Cortesia de Courtesy of www batmotos com ...

Страница 55: ... freedom of movement Check the side stand ignition cut off system 1 Place the scooter on its center stand 2 Put the side stand up and start the engine 3 Lower the side stand The engine should stop as you put the side stand down If the side stand system does not operate as described see your KYMCO dealer for service Side stand up Side stand down Cortesia de Courtesy of www batmotos com Cortesia de ...

Страница 56: ..._________________________ __________________________________________________________________________________ __________________________________________________________________________________ LUBRICATION SYSTEM __________________________________________________________________________________ LUBRICATION SYSTEM DIAGRAM 4 1 SERVICE INFORMATION 4 2 TROUBLESHOOTING 4 2 OIL PUMP 4 3 4 Cortesia de Cour...

Страница 57: ...ION SYSTEM 4 1 DOWNTOWN 125i LUBRICATION SYSTEM DIAGRAM Oil Pump Oil Strainer Screen Crankshaft Rocker Arm Shaft Oil Filter Screen Cortesia de Courtesy of www batmotos com Cortesia de Courtesy of www batmotos com ...

Страница 58: ...eck each part for oil leaks SPECIFICATIONS Unit mm Standard Inner rotor to outer rotor clearance 0 15 Outer rotor to pump body clearance 0 15 0 2 Rotor end to pump body clearance 0 04 0 09 ENGINE OIL At disassembly 1 2 liter Engine Oil Capacity At change 1 0 liter Recommended Oil SAE15W40 API SJ TROUBLESHOOTING Oil level too low Poor lubrication pressure Natural oil consumption Oil level too low O...

Страница 59: ...move the bolt and then oil separator cover Pry the snap ring off and remove the oil pump driven gear then remove the oil pump drive chain Remove the two oil separator bolts to remove the oil pump Oil Separator Cover Oil Pump When removing and installing the oil pump be careful not to allow dust or dirt to enter the engine Cortesia de Courtesy of www batmotos com Cortesia de Courtesy of www batmoto...

Страница 60: ...e pump drive chain and driven gear then set the snap ring securely on the pump shaft Install the oil separator cover properly Oil Separator Pump Drive Chain Snap Ring Arrow Mark Make sure the pump shaft rotates freely and arrow on the oil pump is upside Fit the tab of the separator cover into the slit in the separator Snap Ring Cortesia de Courtesy of www batmotos com Cortesia de Courtesy of www b...

Страница 61: ... disassemble the oil pump as shown ASSEMBLY Install the outer rotor inner rotor and pump shaft into the pump body There is one punch mark on the surface of the inner rotor and outer rotor The mark is upside Insert the pump shaft by aligning the flat on the shaft with the flat in the inner rotor Install the dowel pin Cortesia de Courtesy of www batmotos com Cortesia de Courtesy of www batmotos com ...

Страница 62: ...________________________________ __________________________________________________________________________________ __________________________________________________________________________________ ENGINE REMOVAL INSTALLATION __________________________________________________________________________________ SERVICE INFORMATION 5 1 ENGINE REMOVAL INSTALLATION 5 2 ENGINE HANGER 5 8 5 Cortesia de Co...

Страница 63: ...ll the cooling system with coolant and be sure to bleed air from the water jacket Start the engine to check for coolant leaks Before removing the engine the rear brake caliper must be removed first Be careful not to bend or twist the brake fluid tube SPECIFICATIONS Engine oil capacity at disassembly 1 2 L 1 27 US qt at change 1 0 L 1 06 US qt Coolant capacity Radiator capacity 0 87 liter Reserve t...

Страница 64: ...Remove a bolt from fuel hose guide C Disconnect the fuel hose D from fuel injector Disconnect the WTS connector E from WTS Disconnect the coolant temperature sensor connector F from coolant temperature sensor Disconnect the fuel injector connector G Disconnect the output water hose H Disconnect the air bleed hose I A B C D E F G I H Cortesia de Courtesy of www batmotos com Cortesia de Courtesy of ...

Страница 65: ...e hose clamps Remove the two bolts 2 then remove the rear brake caliper Disconnect the alternator connector 3 Disconnect the ignition pulse generator connector 4 Release the rubber cap and remove the terminal screw 5 to disconnect the start motor cable from the start motor 1 2 4 3 5 Cortesia de Courtesy of www batmotos com Cortesia de Courtesy of www batmotos com ...

Страница 66: ...nd engine ground cable Remove the two nuts 7 then remove the intake manifold from cylinder head Remove the bolt 8 then remove the thermostat from cylinder head Remove the spark plug cap Cortesia de Courtesy of www batmotos com Cortesia de Courtesy of www batmotos com ...

Страница 67: ...ION 5 5 DOWNTOWN 125i Disconnect the lower radiator hose from lower radiator pipe Remove the right and left rear shock absorber lower mount bolts Cortesia de Courtesy of www batmotos com Cortesia de Courtesy of www batmotos com ...

Страница 68: ...ne mount nut Pull out the engine mount bolt Remove the engine from the frame At removing the engine be careful not to catch your hand or finger between the engine hanger and crankcase Cortesia de Courtesy of www batmotos com Cortesia de Courtesy of www batmotos com ...

Страница 69: ...olts to the specified torque Torque 4 0kgf m 40N m Install the rear brake caliper and tighten the mount bolts to the specified torque Torque 3 2 kgf m 32 N m 23 lbf ft After installation inspect and adjust the following Throttle grip free play Fill the cooling system with coolant and start the engine to bleed air from the system API ABV Reset Refer to chapter14 page 17 Cortesia de Courtesy of www ...

Страница 70: ...and collar Remove the engine from frame INSTALLATION Installation is in the reverse order of removal Tighten the engine hanger mount bolts to the specified torque engine side Torque 5 kgf m 50 N m Tighten the engine mount bolt nut to the specified torque frame side Torque 5 kgf m 50 N m 36 lbf ft Be careful to put the engine down Cortesia de Courtesy of www batmotos com Cortesia de Courtesy of www...

Страница 71: ..._________________________________________________________________________________ __________________________________________________________________________________ CYLINDER HEAD VALVES __________________________________________________________________________________ SCHEMATIC DRAWING 6 1 SERVICE INFORMATION 6 2 TROUBLESHOOTING 6 3 CYLINDER HEAD COVER 6 4 CAMSHAFT HOLDER 6 5 CAMSHAFT 6 8 CYLINDER...

Страница 72: ...6 CYLINDER HEAD VALVES 6 1 DOWNTOWN 125i SCHEMATIC DRAWING Cortesia de Courtesy of www batmotos com Cortesia de Courtesy of www batmotos com ...

Страница 73: ...removal mark and arrange the removed parts in order When assembling install them in the reverse order of removal SPECIFICATIONS Unit mm Item Standard IN 0 1 EX 0 1 Cylinder head compression pressure 15kg cm Cylinder head warpage IN 25 965 Camshaft cam height EX 25 810 IN 10 0 10 015 Valve rocker arm I D EX 10 0 10 015 Valve rocker arm shaft IN 9 972 9 987 O D EX 9 972 9 987 IN 4 975 4 970 Valve st...

Страница 74: ...sion too low Incorrect valve clearance adjustment Abnormal noise Burned or bend valves Incorrect valve clearance adjustment Incorrect valve timing Sticking valve or broken valve spring Broken valve spring Damaged or worn camshaft Poor valve and seat contact Worn cam chain tensioner Leaking cylinder head gasket Worn camshaft and rocker arm Warped or cracked cylinder head Poorly installed spark plug...

Страница 75: ...ON Install a new cylinder head cover O ring and install the cylinder head cover Install and tighten the cylinder head cover bolts to the specified torque in a crisscross pattern Torque 0 8 0 9kgf m Be sure to install the O ring into the groove properly Cortesia de Courtesy of www batmotos com Cortesia de Courtesy of www batmotos com ...

Страница 76: ...ove the sprocket fixed nut then remove the sprocket Remove the camshaft gear bolt INSTALLATION Install the camshaft gear bolt and holder washers and nuts Tighten four cylinder head nuts to the specified torque Torque 0 7 1 1 kgf m Holder nuts 1 0 1 4 kgf m Cam shaft set plate 1 8 2 2 kgf m Cylinder head M8X1 25 Install the camshaft holder with the EX mark face exhaust valve side Apply engine oil t...

Страница 77: ... contact surface and adjuster surface for wear pitting scratches blue discoloration If any defects are found replace the rocker arm shaft with a new one then inspect lubrication system Rocker Arm Shafts Camshaft Holder Rocker Arm Shafts Rocker Arm Bore Contact Surface Adjuster Surface If the valve rocker arm contact surface is worn check each cam lobe for wear or damage Cortesia de Courtesy of www...

Страница 78: ...tall the rocker arms and shafts into the camshaft holder Rocker Arm Shafts Install the exhaust valve rocker arm shaft on the EX side of the camshaft holder Clean the intake valve rocker arm shaft off any grease before installation Cortesia de Courtesy of www batmotos com Cortesia de Courtesy of www batmotos com ...

Страница 79: ... facing up and the location is the top dead center on the compression stroke Remove the tensioner sealing bolt and spring Remove the two bolts from cam chain tensioner and then remove the tensioner and gasket Remove the camshaft gear and bolt Remove the camshaft from the cylinder head Tensioner Sealing Bolt Round Hole Camshaft Cortesia de Courtesy of www batmotos com Cortesia de Courtesy of www ba...

Страница 80: ...any defects are found replace the camshaft with a new one then inspect lubrication system Check each camshaft bearing for play or damage Replace the camshaft assembly with a new one if the bearings are noisy or have excessive play Camshaft Bearings Cortesia de Courtesy of www batmotos com Cortesia de Courtesy of www batmotos com ...

Страница 81: ...mshaft gear facing up and align the punch marks on the camshaft gear with the cylinder head surface Position the intake and exhaust cam lobes down and install the cam chain onto the camshaft gear Install the rocker arms shafts fixed bolt Install the camshaft gear Bolt Punch Marks Cam shaft Round Hole Camshaft Gear Cortesia de Courtesy of www batmotos com Cortesia de Courtesy of www batmotos com ...

Страница 82: ...and valves using a valve spring compressor Special tool Valve Spring Compressor A120E00040 Valve Spring Compressor Be sure to compress the valve springs with a valve spring compressor Mark all disassembled parts to ensure correct reassembly Valves Cortesia de Courtesy of www batmotos com Cortesia de Courtesy of www batmotos com ...

Страница 83: ...ts are found replace the valve with a new one Service limits IN 0 08 mm EX 0 1 mm Valve spring Measure the free length of the inner and outer valve springs Exhaust Port Combustion Chamber Be careful not to damage the cylinder head mating surface If the stem to guide clearance exceeds the service limits replace the cylinder head is necessary Cortesia de Courtesy of www batmotos com Cortesia de Cour...

Страница 84: ...des Install the valve springs and retainers Compress the valve springs using the valve spring compressor then install the valve cotters Special tool Valve Spring Compressor A120E00040 Tap the valve stems gently with a plastic hammer for 2 3 times to firmly seat the cotters Valve Spring Compressor Plastic Hammer Cylinder Head Be sure to install the new oil seals When assembling a valve spring compr...

Страница 85: ...________________________ __________________________________________________________________________________ __________________________________________________________________________________ CYLINDER PISTON __________________________________________________________________________________ SCHEMATIC DRAWING 7 1 SERVICE INFORMATION 7 2 TROUBLESHOOTING 7 3 CYLINDER AND PISTON 7 4 7 Cortesia de Courte...

Страница 86: ...7 CYLINDER PISTON 7 1 DOWNTOWN 125i SCHEMATIC DRAWING Cortesia de Courtesy of www batmotos com Cortesia de Courtesy of www batmotos com ...

Страница 87: ...arpage Cylindricity Cylinder True roundness Ring to groove Top 0 015 0 055 clearance Second 0 015 0 055 Top 0 10 0 25 Ring end gap Second 0 10 0 25 Oil side rail 0 2 0 7 Piston O D 52 37 52 39 Piston O D measuring position 9 mm from bottom of skirt Piston to cylinder clearance 0 01 0 04 Piston piston ring Piston pin hole I D 15 002 15 008 Piston pin O D 14 994 15 Piston to piston pin clearance 0 0...

Страница 88: ...ion Excessive smoke from exhaust muffler Worn or damaged cylinder and piston rings Worn or damaged piston rings Worn stuck or broken piston rings Worn or damaged cylinder and piston Compression too high Abnormal noisy piston Excessive carbon build up in combustion Worn cylinder piston and piston rings chamber or on piston head Worn piston pin hole and piston pin Incorrectly installed piston Cortes...

Страница 89: ...olts washers 2 Remove the cylinder Remove the cylinder gasket 4 and dowel pins 3 Clean any gasket material onto the cylinder surface Remove the piston pin clip Press the piston pin out of the piston and remove the piston Place a clean shop towel in the crankcase to keep the piston pin clip from falling into the crankcase 3 4 Cortesia de Courtesy of www batmotos com Cortesia de Courtesy of www batm...

Страница 90: ...e to move in their grooves without catching Push the ring until the outer surface of the piston ring is nearly flush with the piston and measure the ring to groove clearance Insert each piston ring into the bottom of the cylinder squarely Measure the piston ring end gap Use the piston head to push each piston ring into the cylinder Do not damage the piston ring by spreading the ends too far Cortes...

Страница 91: ...ston pin Measure the piston O D at the point A from the bottom and 90 to the piston pin hole Service Limit 15 04 mm 0 6016 in Service Limit 0 02 mm 0 0008 in 10 mm A Cortesia de Courtesy of www batmotos com Cortesia de Courtesy of www batmotos com ...

Страница 92: ... Take the maximum reading to determine the cylinder wear Measure the piston to cylinder clearance Take a maximum reading to determine the clearance Measure the taper and out of round at three levels in an X and Y axis Take the maximum reading to determine them Measure the connecting rod small end I D vi Measure the connecting rod to piston pin clearance TOP MIDDLE BOTTOM Cortesia de Courtesy of ww...

Страница 93: ...he markings facing up Do not confuse the top and second rings To install the oil ring install the oil ring then install the side rails Stagger the piston ring end gaps 120 degrees apart from each other Stagger the side rail end gaps as shown Be careful not to damage the piston and rings Intake Side Guide Exhaust Side Guide Cortesia de Courtesy of www batmotos com Cortesia de Courtesy of www batmot...

Страница 94: ...n hole Install the piston with the IN mark face intake side and piston pin Place a clean shop towel over the crankcase prevent the clip from falling into the crankcase Install the new pin clip Install the dowel pins and gasket Make sure that the piston pin clips are seated securely Do not align the piston pin clip end gap with the piston cut out Gasket Dowel pins Cortesia de Courtesy of www batmot...

Страница 95: ...ough the cylinder and install the cylinder over the piston Install the cylinder head and camshaft holder has installed refer to the CYLINDER HEAD section in the chapter 6 Connect the water hose Be careful not to damage the piston rings and cylinder walls Cortesia de Courtesy of www batmotos com Cortesia de Courtesy of www batmotos com ...

Страница 96: ..._ __________________________________________________________________________________ __________________________________________________________________________________ DRIVE AND DRIVEN PULLEYS __________________________________________________________________________________ SCHEMATIC DRAWING 8 1 SERVICE INFORMATION 8 2 TROUBLESHOOTING 8 3 LEFT CRANKCASE COVER 8 4 DRIVE PULLEY DRIVE BELT AND DRIVE...

Страница 97: ...8 DRIVE AND DRIVEN PULLEYS 8 1 DOWNTOWN 125i SCHEMATIC DRAWING Cortesia de Courtesy of www batmotos com Cortesia de Courtesy of www batmotos com ...

Страница 98: ...IFICATIONS Unit mm Item Standard Movable drive face bushing I D 24 011 24 052 Drive face collar O D 23 960 23 974 Clutch outer I D 130 130 2 Driven face O D 33 965 33 985 Movable driven face I D 34 34 025 Weight roller O D 17 920 18 080 TORQUE VALUES Drive face nut 5 5 6 5 kgf m Clutch outer nut 5 0 6 0 kgf m Clutch plate comp 5 0 6 0 kgf m SPECIAL TOOLS Bearing installer A120E00014 Universal hold...

Страница 99: ...er Worn drive belt Worn drive belt Broken ramp plate Weak driven face spring Worn or damaged clutch lining Worn weight roller Broken driven face spring Faulty driven face Engine stalls or motorcycle creeps Broken clutch weight spring Cortesia de Courtesy of www batmotos com Cortesia de Courtesy of www batmotos com ...

Страница 100: ...ts and then remove the left crankcase cover Remove the gasket and dowel pins INSTALLATION Install the dowel pins and gasket Install the left crankcase cover Install and tighten ten bolts diagonally to specified torque Dowel Pins Cortesia de Courtesy of www batmotos com Cortesia de Courtesy of www batmotos com ...

Страница 101: ...120E00017 Remove the drive pulley face and washer Hold the clutch outer with the universal holder and remove the clutch outer nut Special tool Universal Holder A120E00017 Remove the clutch outer driven pulley assembly and drive belt together Drive Pulley Face Universal Holder Clutch Outer Driven Pulley Assembly Drive Belt Nut Ratchet Nut Universal Holder Cortesia de Courtesy of www batmotos com Co...

Страница 102: ...on or abnormal or excessive wear Replace a new belt at every 20000KM Clutch out inspection Inspect the clutch outer for wear or damage Measure the clutch outer I D Service Limit 130 5 mm 5 22 in Movable Drive Face Assembly Use specified genuine parts for replacement Cortesia de Courtesy of www batmotos com Cortesia de Courtesy of www batmotos com ...

Страница 103: ...together Use the special tool to hold clutch outer then tighten the nut to the specified torque Torque 5 0 6 0kgf m 50 60N m Special tool Universal holder A120E00017 A Movable Drive Face Assembly Boss Clutch Outer Driven Pulley Assembly Drive Belt Nut Universal Holder The drive belt should be installed so that the arrows on the drive belt periphery point in the normal turning direction if the driv...

Страница 104: ...e specified torque Torque DINK 200i 5 8 kgf m 58 N m 42 lbf ft 5 5 6 5 kgf m 55 65 N m Special tool Universal holder A120E00017 Noted There is a washer between the drive pulley face and nut don t forget to mount it when installation Drive Pulley Face Universal Holder Nut Ratchet Cortesia de Courtesy of www batmotos com Cortesia de Courtesy of www batmotos com ...

Страница 105: ... 9 DOWNTOWN 125i DRIVE PULLEY DISASSEMBLY Remove the drive face boss Remove the ramp plate Take out six weight rollers Ramp Plate Weight Roller Boss Cortesia de Courtesy of www batmotos com Cortesia de Courtesy of www batmotos com ...

Страница 106: ... Service limit 19 8 mm 0 792 in Movable drive face Slide pieces Drive pulley face Check the movable drive face splines for wear cracks or damage Check the ramp plate for cracks or damage Check the movable drive face and drive pulley face cracks or damage Ramp Plate Cortesia de Courtesy of www batmotos com Cortesia de Courtesy of www batmotos com ...

Страница 107: ...s slide pieces ramp plate and drive face boss Install the weight rollers Install the slide pieces and ramp plate Remove any excess grease Weight Roller Ramp Plate The direction of all weight rollers is the same The thin side is towards to clockwise Cortesia de Courtesy of www batmotos com Cortesia de Courtesy of www batmotos com ...

Страница 108: ...8 DRIVE AND DRIVEN PULLEYS 8 12 DOWNTOWN 125i Install the drive face boss Boss Cortesia de Courtesy of www batmotos com Cortesia de Courtesy of www batmotos com ...

Страница 109: ... compressor Special tool Clutch Spring Compressor A120E00034 Set the tool in a vise and remove the clutch drive plate nut Remove the clutch weight Be sure to use a clutch spring compressor to avoid spring damage Clutch spring compressor Lock Nut Wrench Cortesia de Courtesy of www batmotos com Cortesia de Courtesy of www batmotos com ...

Страница 110: ...then remove the movable driven face Remove the needle bearing from driven face Remove the snap ring then remove the bearing from driven face Movable Driven Face Guide Pins Rollers Needle Bearing Bearing Snap Ring Driven Face Dust Seal Dust Seal O ring Spring Collar Spring Cortesia de Courtesy of www batmotos com Cortesia de Courtesy of www batmotos com ...

Страница 111: ...t Check guide pins and rollers for wear or damage If any scratches or d amage is found then replace as a set Check the spring for damage Measure the spring free length Ser Check the clutch shoe for heat damage Measure the clutch shoe thickness Service limit A 2 mm 0 08 in Guide Pins Grooves Cortesia de Courtesy of www batmotos com Cortesia de Courtesy of www batmotos com ...

Страница 112: ...n face grooves Install the movable driven face onto the driven face Install the guide rollers and guide roller pins Filling 5 g of grease to each guide groove Install the guide pins rollers Install spring collar Use the special tool to install spring and clutch then install and tighten the nut to the specified torque Torque 5 5 6 5m 55 65N m Special tool Clutch Spring Compressor A120E00034 Apply g...

Страница 113: ..._______________ __________________________________________________________________________________ __________________________________________________________________________________ FINAL REDUCTION __________________________________________________________________________________ SCHEMATIC DRAWING 9 1 SERVICE INFORMATION 9 2 TROUBLESHOOTING 9 2 FINAL REDUCTION 9 3 BEARING REPLACEMENT 9 7 9 Cortesi...

Страница 114: ...9 FINAL REDUCTION 9 1 DOWNTOWN 125 i SCHEMATIC DRAWING Cortesia de Courtesy of www batmotos com Cortesia de Courtesy of www batmotos com ...

Страница 115: ...90 Oil Capacity At disassembly 0 13L At change 0 12L TORQUE VALUES Transmission case cover bolt 1 0 1 4kgf m SPECIAL TOOLS Oil seal and bearing installer A120E00014 Bearing puller A120E00037 TROUBLESHOOTING Engine starts but motorcycle fail to move Damaged transmission Seized or burnt transmission Abnormal noise Worn seized or chipped gears Worn bearing Oil leaks Oil level too high Worn or damaged...

Страница 116: ...r to the DRIVE PULLEY DRIVE BELT AND DRIVEN PULLEY section in the chapter 8 Remove nine bolts attached the transmission case cover then remove the transmission case cover Remove the dowel pins and gasket Remove the final gear and shaft then remove the countershaft Gasket Drive shaft Dowel Pins Countershaft Final gear Cortesia de Courtesy of www batmotos com Cortesia de Courtesy of www batmotos com...

Страница 117: ...damage Inspect the final gear and final gear shaft for wear damage or seizure Check the driveshaft for wear or damage Check the left crankcase bearings for excessive play and inspect the oil seal for wear or damage Cortesia de Courtesy of www batmotos com Cortesia de Courtesy of www batmotos com ...

Страница 118: ...INSTALLATION Install the final gear and final gear shaft Install the Countershaft Install the driveshaft Drive Shaft Bearing Final Shaft Bearing Countershaft Bearing Drive Shaft Bearing Final Gear Shaft Bearing Countershaft Bearing Driveshaft Final Gear Shaft Final Gear Countershaft Cortesia de Courtesy of www batmotos com Cortesia de Courtesy of www batmotos com ...

Страница 119: ...Install and tighten the nine bolts to the specified torque in a crisscross pattern in 2 or 3 steps Torque 1 0 1 4kgf m Fill the transmission case with the specified oil refer to the TRANSMISSION OIL section in the chapter 3 Dowel pins Cortesia de Courtesy of www batmotos com Cortesia de Courtesy of www batmotos com ...

Страница 120: ...puller A120E00037 Install the new bearings or new oil seal into the transmission case cover by using the special tool Special tool Oil seal and bearing installer A120E00014 TRANSMISSION CASE Remove the all transmission gears Remove the transmission case bearings by using the special tool Special tool Bearing puller A120E00037 Cortesia de Courtesy of www batmotos com Cortesia de Courtesy of www bat...

Страница 121: ...aller A120E00014 After installation fill the transmission case with the specified oil Specified gear oil SAE90 Oil capacity At disassembly 0 13 L At change 0 12L Install and tighten the oil check bolt Torque 0 8 1 2kgf m Start the engine and check for oil leaks Drain Bolt Oil Filler Bolt Cortesia de Courtesy of www batmotos com Cortesia de Courtesy of www batmotos com ...

Страница 122: ...______________ __________________________________________________________________________________ __________________________________________________________________________________ A C GENERATOR STARTER CLUTCH __________________________________________________________________________________ SCHEMATIC DRAWING 10 1 SERVICE INFORMATION 10 2 TROUBLESHOOTING 10 2 ALTERNATOR STATOR 10 3 STARTER CLUTCH ...

Страница 123: ...10 A C GENERATOR STARTER CLUTCH 10 1 DOWNTOWN 125i SCHEMATIC DRAWING Cortesia de Courtesy of www batmotos com Cortesia de Courtesy of www batmotos com ...

Страница 124: ...container before removing the right crankcase cover When the right crankcase cover is installed fill with the recommended engine oil and coolant Then bleed air from the water jacket SPECIFICATIONS Engine oil SAE 15W 40 API SJ Oil capacity at change 1 0 L Coolant distilled water coolant concentrate Coolant capacity 0 87L SPECIAL TOOLS Flywheel puller A120E00003 Flywheel holder A120E00021 TORQUE VAL...

Страница 125: ...r connectors Remove ten bolts attached the right crankcase cover and then remove the cover Remove two dowel pins and gasket Remove two pulse coil mount screws Remove three stator mount bolts grommet and the stator attached the right crankcase cover Pulser Coil Dowel Pins Gasket Stator Cortesia de Courtesy of www batmotos com Cortesia de Courtesy of www batmotos com ...

Страница 126: ...bolts to the specified torque Torque 1 kgf m Apply sealant to the grommet seating surface and install it to the cover groove properly Install the pulse coil and tighten mount screws securely Clean the mating surfaces of the right crankcase and cover Pulser Coil Stator Dowel Pins Gasket Cortesia de Courtesy of www batmotos com Cortesia de Courtesy of www batmotos com ...

Страница 127: ...H 10 5 DOWNTOWN 125i Install the dowel pins and gasket Install the right crankcase cover and tighten the bolts in a crisscross pattern in 2 or 3 steps Cortesia de Courtesy of www batmotos com Cortesia de Courtesy of www batmotos com ...

Страница 128: ... remove the flywheel nut Special tool Flywheel holder A120E00021 Remove the flywheel by using the special tool Special tool Flywheel puller A120E00003 Remove the reduction gear shaft and reduction gear Reduction Gear Shaft Flywheel Nut Flywheel Holder Flywheel Puller Cortesia de Courtesy of www batmotos com Cortesia de Courtesy of www batmotos com ...

Страница 129: ...ockwise smoothly but the gear should not turn counterclockwise Remove the starter driven gear by turning the driven gear Check the starter driven gear teeth for wear or damage Service limit 41 mm 1 64 in Service limit 20 15 mm 0 806 in Check the starter reduction gear teeth and shaft for wear or damage Starter Driven Gear Starter Driven Gear Starter Idle Gear Shaft Cortesia de Courtesy of www batm...

Страница 130: ...uction gear and shaft to the right crankcase Install the flywheel onto the crankshaft by aligning the key on the crankshaft with the groove in the flywheel Groove Flywheel Key Starter Driven Gear Reduction Gear Shaft Before installation check and make sure that the inside the flywheel is not contaminated Cortesia de Courtesy of www batmotos com Cortesia de Courtesy of www batmotos com ...

Страница 131: ...wheel nut Torque 5 0 6 0 kgf m Special tool Flywheel holder A120E00021 Install the dowel pins and gasket Install the right crankcase cover and tighten the bolts in a crisscross pattern in 2 or 3 steps Flywheel Nut Flywheel Holder Cortesia de Courtesy of www batmotos com Cortesia de Courtesy of www batmotos com ...

Страница 132: ...___________ __________________________________________________________________________________ __________________________________________________________________________________ CRANKCASE CRANKSHAFT __________________________________________________________________________________ SCHEMATIC DRAWING 11 1 SERVICE INFORMATION 11 2 TROUBLESHOOTING 11 2 CRANKCASE SEPARATION 11 3 CRANKCASE ASSEMBLY 11 4...

Страница 133: ...11 CRANKCASE CRANKSHAFT 11 1 DOWNTOWN 125i SCHEMATIC DRAWING Cortesia de Courtesy of www batmotos com Cortesia de Courtesy of www batmotos com ...

Страница 134: ...ing the crankcase Cylinder head Cylinder piston chapter 7 Drive and driven pulley chapter 8 A C generator starter clutch chapter 10 Rear wheel rear shock absorber chapter 16 Starter motor chapter 19 Oil pump chapter 4 SPECIFICATIONS Unit mm Item Standard Connecting rod big end side clearance 0 15 0 35 Crankshaft Connecting rod big end radial clearance 0 0 008 TORQUE VALUES Crankcase bolt 1 0 kgf m...

Страница 135: ...t crankcase down and remove the right crankcase from the left crankcase Remove the gasket and dowel pins Remove the crankshaft from the left crankcase Bolt Never use a driver to pry the crankcase mating surfaces apart Left Crankcase Crankshaft Bolts Right Crankcase Left Crankcase Left Crankcase Cortesia de Courtesy of www batmotos com Cortesia de Courtesy of www batmotos com ...

Страница 136: ...E ASSEMBLY Clean off all gasket material from the crankcase mating surfaces Install a new oil seal into the left crankcase Oil Seal Left Crankcase Oil Seal Left Crankcase Avoid damaging the crankcase mating surfaces Cortesia de Courtesy of www batmotos com Cortesia de Courtesy of www batmotos com ...

Страница 137: ...nkshaft and onto the left crankcase Install and tighten the right and left crankcase attaching bolts Torque 1 kgf m Bolts Install the right crankcase squarely and do not tap it with an iron or plastic hammer Avoid damaging the oil seal Apply grease to the lip of the oil seal Bolts Cortesia de Courtesy of www batmotos com Cortesia de Courtesy of www batmotos com ...

Страница 138: ...stall the cam chain Install the cam chain tensioner slipper Install and tighten the cam chain tensioner slipper bolt Torque 1 0kgf m Cam Chain Tensioner Slipper Bolt Cortesia de Courtesy of www batmotos com Cortesia de Courtesy of www batmotos com ...

Страница 139: ...______________________________________________ __________________________________________________________________________________ COOLING SYSTEM __________________________________________________________________________________ SERVICE INFORMATION 12 1 TROUBLESHOOTING 12 1 COOLING SYSTEM TESTING 12 3 COOLANT REPLACEMENT 12 4 RADIATOR 12 7 FAN MOTOR 12 9 FAN MOTOR SWITCH 12 10 WATER PUMP 12 11 WATE...

Страница 140: ...g the system check for leaks with a cooling system tester SPECIAL TOOL Mechanical seal driver TORQUE VALUES Water pump impeller 1 2 kgf m 12 N m 9 lbf ft Left hand threads Water pump cover bolt 1 0 kgf m 10 N m 7 lbf ft TROUBLESHOOTING Engine temperature too high Coolant leaks Faulty temperature gauge or thermosensor Faulty pump mechanical water seal Faulty radiator cap Deteriorated O rings Faulty...

Страница 141: ...53 1 051 1 051 1 049 1 047 1 045 1 043 1 041 1 038 1 035 1 032 35 1 063 1 062 1 060 1 058 1 056 1 054 1 052 1 049 1 046 1 043 1 040 40 1 072 1 070 1 068 1 066 1 064 1 062 1 059 1 056 1 053 1 050 1 047 45 1 080 1 078 1 076 1 074 1 072 1 069 1 056 1 063 1 062 1 057 1 054 50 1 086 1 084 1 082 1 080 1 077 1 074 1 071 1 068 1 065 1 062 1 059 55 1 095 1 093 1 091 1 088 1 085 1 082 1 079 1 076 1 073 1 07...

Страница 142: ...d hoses and check for leaks Repair or replace components if the system will not hold the specified pressure for at least six seconds Radiator Cap Cap Tester Pressure CapTester Removing the radiator cap while the engine is hot can cause the coolant to spray out seriously scalding you Always let the engine and radiator cool down before removing the radiator cap Excessive pressure can damage the cool...

Страница 143: ...ineral water with the antifreeze Recommended mixture 1 1 Distilled water and antifreeze REPLACEMENT AIR BLEEDING Remove the front cover refer to the FRAME COVERS REMOVAL INSTALLATION section in the chapter 2 Remove the radiator cap 1 Remove the drain bolt 2 and drain the coolant from the system When filling the system or reserve tank with coolant checking the coolant level place the scooter in a v...

Страница 144: ...tank lid 4 Remove the reserve tank cap 5 and drain the coolant from the reserve tank Reinstall and tighten the drain bolt securely Fill the reserve tank to the upper level line 6 3 4 5 F L Cortesia de Courtesy of www batmotos com Cortesia de Courtesy of www batmotos com ...

Страница 145: ...the engine and let it idle for 2 3 minutes 2 Snap the throttle three to four times to bleed air from the system 3 Stop the engine and add coolant to the proper level if necessary Reinstall the radiator cap 4 Check the level of coolant in the reserve tank and fill to the upper level if it is low 1 Cortesia de Courtesy of www batmotos com Cortesia de Courtesy of www batmotos com ...

Страница 146: ...leed hose 2 Remove the nut 3 Loosen the hose bands then disconnect the input radiator hose 4 and output radiator hose 5 from the radiator Disconnect the thermal switch connectors 6 Disconnect the fan motor connector 7 3 1 2 5 4 6 7 Cortesia de Courtesy of www batmotos com Cortesia de Courtesy of www batmotos com ...

Страница 147: ... 125 i Remove three nuts 10 and then remove the radiator from frame INSTALLATION Installation is in the reverse order of removal Refill the coolant 10 Cortesia de Courtesy of www batmotos com Cortesia de Courtesy of www batmotos com ...

Страница 148: ...three mounting bolts 1 and then remove the fan motor 2 INSPECTION Check the fan motor to operate using an available battery INSTALLATION Installation is in the reveres order of removal Fan Motor Battery 2 1 Cortesia de Courtesy of www batmotos com Cortesia de Courtesy of www batmotos com ...

Страница 149: ...f the thermal switch operating temperature is not within the specified range replace the thermal switch with a new one OFF ON Over 88 92 C ON OFF Lower 88 92 C INSTALLATION Change a new O ring Tighten the cooling fan motor switch to specified torque Torque 1 8 kgf m 18 N m 13 lbf ft Handle the cooling fan motor switch carefully as it is vulnerable to impact 1 Replace the O ring a new one Do not us...

Страница 150: ...coolant leakage If the mechanical seal is leaking remove the right crankcase cover and replace the mechanical seal WATER PUMP IMPELLER REMOVAL Drain the coolant Remove the coolant inlet hose and outlet hose Right Crankcase Cover Water Pump Outlet Hose Inlet Hose Cortesia de Courtesy of www batmotos com Cortesia de Courtesy of www batmotos com ...

Страница 151: ...nspect the mechanical water seal and seal washer for wear or damage Impeller Left Hand Threads Mechanical Seal Seal Washer Porcelain Water Pump Cover Bolts The impeller has left hand threads The mechanical seal and seal washer must be replace as a set Impeller Cortesia de Courtesy of www batmotos com Cortesia de Courtesy of www batmotos com ...

Страница 152: ...e from the right crankcase cover Remove five bolts attaching the water pump assembly Remove the water pump assembly gasket and dowel pins Remove the water pump shaft clip and water pump shaft Water Pump Shaft Cortesia de Courtesy of www batmotos com Cortesia de Courtesy of www batmotos com ...

Страница 153: ...assembly WATER PUMP IMPELLER INSTALLATION When the mechanical seal is replaced a new seal washer must be installed to the impeller Water Pump Assembly Mechanical Seal Seal Washer Porcelain Impeller When installing the water pump assembly aligning the groove on the water pump shaft with the tab on the oil pump shaft Cortesia de Courtesy of www batmotos com Cortesia de Courtesy of www batmotos com ...

Страница 154: ...f ft Install two dowel pins and a new gasket Install the water pump cover and tighten the 4 bolts Torque 1 kgf m 10 N m 7 lbf ft Impeller Left Hand Threads Dowel Pins Water Pump Cover Bolt The impeller is with left hand threads Gasket Cortesia de Courtesy of www batmotos com Cortesia de Courtesy of www batmotos com ...

Страница 155: ...eater Gradually raise oil temperature while reading the thermometer in the pan and the ohmmeter connected If the resistance measured is out of specification replace the temperature gauge with a new one Temperature Standard resistance 50ºC 133 9 178 9 Ω 100ºC 26 29 3 Ω Sensor Thermometer Handle the water temperature sensor carefully as it is vulnerable to impact Do not allow the water temperature s...

Страница 156: ...e water temperature sensor Torque 0 8 kgf m 8 N m 5 8 lbf ft Connect the sensor connectors After the water temperature sensor has been installed fill coolant and perform air bleeding Cortesia de Courtesy of www batmotos com Cortesia de Courtesy of www batmotos com ...

Страница 157: ...from the thermostat housing Remove the mounting bolt 2 and the thermostat housing attaching the cylinder head INSTALLATION The installation sequence is the reverse of removal After the water thermostat has been installed fill coolant and perform air bleeding 1 Bolts Cortesia de Courtesy of www batmotos com Cortesia de Courtesy of www batmotos com ...

Страница 158: ...5 i DISASSEMBLY Remove two screws and separate the thermostat housing halves Remove the thermostat from the thermostat housing Thermostat Screws Thermostat Cortesia de Courtesy of www batmotos com Cortesia de Courtesy of www batmotos com ...

Страница 159: ...mm 0 14 in minimum ASSEMBLY Thermostat assembly is in the reverse order of disassembly Thermostat Housing Thermostat Thermometer Do not let the thermostat touch the pan as it will give a false reading Replace the thermostat if the valve stays open at room temperature Test the thermostat after it is opened for about 5 minutes and holds the temperature at 70 Cortesia de Courtesy of www batmotos com ...

Страница 160: ...art No 3620A LEB2 E00 KEY FUNCTION ModelNo DownButton DTCindicator Failurecodes EnterorExit Powerindicator UPButton Adjust TPIandABVresetfunction 3 4 5 6 7 8 9 10 DATAAnalyze DTCInspect ECUVersion 6 7 8 9 10 1 2 3 4 5 Cortesia de Courtesy of www batmotos com Cortesia de Courtesy of www batmotos com ...

Страница 161: ...C Inspection Precedure 13 2 13 5 13 6 DTC Clear Procedure DTC Clear Procedure Data Analysis 13 1 13 Fi DIAGNOSTIC TOOL OPERATION DOWN TOWN 125i Diagnostic Standard Specifications Diagnostic Standard Specifications 13 9 Cortesia de Courtesy of www batmotos com Cortesia de Courtesy of www batmotos com ...

Страница 162: ...tery 13 2 Diagnostic Tool Connector Pressthe Enter button Checkthesoftwareversion Press the Enter button and then turn to the first page Pressthe Down buttontoentertheDTCInspect 13 Fi DIAGNOSTIC TOOL OPERATION DOWN TOWN 125i Cortesia de Courtesy of www batmotos com Cortesia de Courtesy of www batmotos com ...

Страница 163: ...n Pressthe Enter button Displaywhat sDTCnumberonthisDTC List RefertoDTCsummarylist Press the Enter button and then turn to the previouspage 13 Fi DIAGNOSTIC TOOL OPERATION DOWN TOWN 125i Cortesia de Courtesy of www batmotos com Cortesia de Courtesy of www batmotos com ...

Страница 164: ...utton and then turn to the previouspage Pressthe UP button Press the Enter button and then turn to the first page 13 Fi DIAGNOSTIC TOOL OPERATION DOWN TOWN 125i Cortesia de Courtesy of www batmotos com Cortesia de Courtesy of www batmotos com ...

Страница 165: ...he Down button Pressthe Enter button TheDTCindicatorislightingatthattime ClearingDTCcompleteduntiltheDTC indicatorisoff 13 Fi DIAGNOSTIC TOOL OPERATION DOWN TOWN 125i Cortesia de Courtesy of www batmotos com Cortesia de Courtesy of www batmotos com ...

Страница 166: ...PSposition TPIidle adaptedvoltageandTPIWOTadapted Throttlegripfullyopened Refertostandardspecifications Pressthe Down buttontoenterpage03 Thefigureincludesengineworking temperature atmospherepressureand Manifoldpressure Refertostandardspecificationsonpage18 9 Pressthe Down buttontoenterpage04 13 Fi DIAGNOSTIC TOOL OPERATION DOWN TOWN 125i Cortesia de Courtesy of www batmotos com Cortesia de Courte...

Страница 167: ...ingconditionand O2 correction Refertostandardspecifications Pressthe Down buttontoenterpage06 Thefigureincludesrollovervoltage Refertostandardspecifications Pressthe Down buttontoenterpage07 Thefigureincludes ECU counterhours Pressthe UP buttontothefirstpage 13 Fi DIAGNOSTIC TOOL OPERATION DOWN TOWN 125i Cortesia de Courtesy of www batmotos com Cortesia de Courtesy of www batmotos com ...

Страница 168: ...fthenkeyswitchon Completed theTPI ABVresetoperate Pressthe Enter button Need to make TPI ABV reset to operate after changing new ECU and clean THROTTLE BODY and changing the engine department product let ECU set up and set up initially 13 8 Cortesia de Courtesy of www batmotos com Cortesia de Courtesy of www batmotos com ...

Страница 169: ...ltage V 0 1V O2sensorheater Y es no Y ES O2 sensorcorrect 20 IDLE CO 0 4 1 2 EngineSpeedIDLE rpm 1850 100rpm MAPSam ple kPa 48 60kpa Injectionduration m s 1 6 2 7ms Ign Advance 3 20BTDC Ign Dwellduration m s 1 9 2 6ms AirTem p C environ temp 2 C EngineTem p C 80 C O2sensorvoltage V 0 1V O2sensorheater Y es no Y ES O2 sensorcorrect 20 IDLE CO 0 4 1 2 80 90 C IDLE Throttlefully IDLE Throttlefully 3 ...

Страница 170: ... 2 SERVICE INFORMATION 14 3 TROUBLESHOOTING 14 4 CHECK ENGINE LAMP CELP 14 5 HOW TO SHOW THE FAILURE CODE 14 6 CELP FAILURE CODES CHART 14 7 MAINTAINING BY CHECKING COMPONENT 14 11 MAINTAINING SPECIAL NOTICE 14 16 MAINTAINING RESET 14 17 DIAGNOSTIC RECORD SHEET 14 18 14 Cortesia de Courtesy of www batmotos com Cortesia de Courtesy of www batmotos com ...

Страница 171: ...14 1 SYSTEM DIAGRAM 進氣壓力及 大氣壓力感 知器 曲軸感知器 感知器 含氧 O2 感知器 CPS T MAP TPS WTS O2 Voltage 進氣壓力及大氣壓力 感知器 感知器 INJECTOR ABV KEY OFF INDUCTIVE IGNITION COIL ECU FUEL PUMP KEY ON 曲軸感知器 ROLL Cortesia de Courtesy of www batmotos com Cortesia de Courtesy of www batmotos com ...

Страница 172: ...1 Inductive ignition coil 02 Fuel pump 03 ECU 04 Fuel injector 05 WTS sensor 06 T MAP sensor 07 ABV 08 TPS 09 Roll sensor Angle detect sensor 10 CPS 11 O2 O2 HT sensor 09 10 11 04 05 06 07 08 03 01 02 Cortesia de Courtesy of www batmotos com Cortesia de Courtesy of www batmotos com ...

Страница 173: ...e 2 075 10 KΩ 20 30 C Throttle position sensor voltage Idle 0 0 23 0 05V Throttle fully 90 3 27V over Fuel pump resistance 20 C 68 F F about 1100Ω E about 100Ω O2 sensor heater resistance 6 7 9 5Ω Air Fuel 14 7 Rich 0 7V O2 sensor Voltage Air Fuel 14 7 Lean 0 18V Item Standard Crank position sensor Pulser resistance 20 C 68 F 95 144Ω Inductive ignition coil resistance 20 C 68 F 0 55 0 75Ω Roll sen...

Страница 174: ...y and poor Faulty fuel pump operating system fuel economy Clogged fuel filter fuel pump Pinched or clogged fuel hose Clogged fuel injector Faulty fuel injector Faulty spark plug or wrong type Cut by ECU due to angle detect sensor or incorrect function Engine stall hard to start rough idling Intake air leak Fuel contaminated deteriorated Pinched or clogged fuel hose Idle speed misadjusted Cortesia ...

Страница 175: ... priority grade let user to know what kind of trouble was happened z Priority grade 1 CELP blinks continuously This is the most emergent situation like engine over heat User better slow down the riding and go to dealer for checking z Priority grade 2 CELP lights all the time It means components get trouble or circuit something wrong Do the further check to find out the failure code to know which p...

Страница 176: ...ther higher number one after four seconds All the failure codes would be shown repeatedly How To Reset Failure Code z After repairing the trouble you should clear the failure code or it will still exist in the ECU memory When you maintain this vehicle next time it will show again and you get confuse z Turn switch on The CELP will be lighted for two seconds then off z The CELP begins to blink to sh...

Страница 177: ...if the connector of crankshaft position sensor is loosen 2 Check if the Rotor is align with Crankshaft position sensor during the crankshaft running 3 P1120 Throttle position sensor setting value problem 2 1 Make sure if the connector of Throttle position sensor is connected correctly 2 Check if the Throttle position sensor is adjusted 4 P1121 Throttle position sensor output range problem 2 1 Make...

Страница 178: ...ic circuit malfunction 2 1 Check if the connector of Inlet air temperature sensor loosen 2 Check if the resistance of sensor is normal 8 P0410 Idle air valve or electric circuit malfunction 2 1 Check if the connector of Idle air valve loosen 2 Check if the resistance of valve is normal 9 P0505 Idle speed volume control range bl 2 1 Check if the opening angle is over 180 for Idle air valve 2 Check ...

Страница 179: ... if the belt of CVT is broken 14 P1560 Sensor don t receive power source from ECU 2 1 Check if ECU output DC5V to sensor 2 Check if the power source of all sensor is DC5V 3 Replace a new ECU if the CELP still blinks even the output power source of ECU is normal 15 P0700 Engine starting speed exceed CVT speed limited 2 1 Check if the throttle wire locked 2 Check if the position of throttle screw is...

Страница 180: ...r or electric circuit malfunction 2 1 Check if the sensor installation direction is correct 2 Check if voltage of sensor is fit in specification 3 Check if ECU pin is broken 23 P0136 O2 sensor malfunction 1 1 Check if the connector of sensor is loosen 2 Check if ECU pin is broken 24 P0141 O2 sensor heater malfunction 1 1 Check if the connector of sensor is loosen 2 Check if ECU pin is broken 3 Che...

Страница 181: ...g Component ECU Engine Control Unit Outlook checking Voltage inspection Connect the meter probe to the F4 R W wire and the meter probe to the H4 G B wire to measure the voltage MAP content edition issue no Cortesia de Courtesy of www batmotos com Cortesia de Courtesy of www batmotos com ...

Страница 182: ...he red black wire and the meter probe to the green wire to measure the voltage from the ECU input to fuel pump unit Standard 8 16 V Battery volt Measure the resistance of the fuel pump to see if it is short circuit or not Cortesia de Courtesy of www batmotos com Cortesia de Courtesy of www batmotos com ...

Страница 183: ...t normal Standard 101 3 3 kpa see level The ambient pressure drop about 12Kpa at the altitude every raised TPS Throttle Position Sensor Connect the PDA or KYMCO Fi diagnostic tool Into the Data Analyze item Check if the TPS position data is malfunction Key switch ON but engine is not start If data was incorrect Idle and throttle fully It is possible TPS is not normal Standard Idle 0 voltage 0 23V ...

Страница 184: ... to the V G wire and the meter probe to the G L wire to measure the voltage Standard 5 0 25 V Measure the resistance of the WTS Standard 20 C 68 F 2 075 10 kΩ INJECTOR Measure the resistance of the Injector Standard 20 C 68 F 10 6 15 9Ω Cortesia de Courtesy of www batmotos com Cortesia de Courtesy of www batmotos com ...

Страница 185: ...e pin Standard 20 C 68 F 6 7 9 5Ω Connect the PDA or KYMCO Fi diagnostic tool Into the Data Analyze item Check Page 05 Key switch ON then start engine until O2 heater activation is ON If data was incorrect It is possible O2 sensor is not normal 0 1 ON Cortesia de Courtesy of www batmotos com Cortesia de Courtesy of www batmotos com ...

Страница 186: ...ormal situation you have to key off and key on the switch then it can be restarted Standard Normal 0 4 1 4V OVER 65 3 7 4 4 V Maintaining Special Notice Never adjust those two TP screws those were adjusted to be the best condition by KYMCO if change this condition it may cause instable riding TP screws Cortesia de Courtesy of www batmotos com Cortesia de Courtesy of www batmotos com ...

Страница 187: ...ABV Initialization Method After replacing throttle body or engine overhauled It will change the efficiency of air intake so must be do the TPI ABV initialization process When the vehicle is started turn off the ignition and Key On again do not start the engine Use test rod or wire clip short Reset pink wire to short with negative of battery or the earthing of frame to complete TPI ABV resetting Pr...

Страница 188: ...50 100 rpm MAPSample kPa 48 60 kpa Injection duration ms 1 6 2 7 ms Ign Advance 3 20 BTDC Ign Dwell duration ms 1 9 2 6 ms Air Temp C environ temp 2 C Engine Temp C 80 C O2 sensor voltage V 0 1 V O2 sensor heater Yes no YES O2 sensor correct 20 IDLE CO 0 4 1 2 Repair description Repair Process Report Version DEC 11 2008 The ambient pressure drop about 12 kpa at the altitude every 1000m raised DOWN...

Страница 189: ..._________________________________________________________ __________________________________________________________________________________ HANDLEBAR FRONTWHEEL FRONTBRAKE FRONTSHOCKABSORBER STEERINGSTEM __________________________________________________________________________________ SERVICE INFORMATION 15 1 TROUBLESHOOTING 15 2 HANDLEBAR 15 3 FRONT WHEEL 15 7 FRONT BRAKE FLUID 15 11 FRONT BRAK...

Страница 190: ... 077 1 0784 Brake caliper cylinder I D 27 27 05 1 08 1 082 TORQUE VALUES Handlebar lock nut 45 N m 4 5 kgf m Steering stem lock nut 63 N m 6 3 kgf m Steering stem pinch bolt 27 N m 2 7 kgf m Front axle 20 N m 2 0 kgf m Master cylinder reservoir cover screw 1 6N m 0 16 kgf m Master cylinder holder bolt 12 N m 1 2 kgf m Brake lever pivot bolt 2 N m 0 2 kgf m Brake lever pivot nut 10 N m 1 kgf m Brak...

Страница 191: ... tightened axle nut Uneven front shock absorbers Soft front shock absorber Bent front fork Weak shock springs Bent front axle or uneven tire Insufficient damper oil Poor brake performance Front shock absorber noise Worn brake pads Slider bending Contaminated brake pad surface Loose fork fasteners Deformed brake disk Lack of lubrication Air in brake system Deteriorated brake fluid Worn brake master...

Страница 192: ...e chapter 2 Remove the two bolts 1 and disconnect the brake light switch wire 2 then remove the rear brake master cylinder Remove the two bolts 3 and disconnect the brake light switch wire 4 then remove the front brake master cylinder Remove the handlebar lock nut 5 and take out the bolt 6 Remove the handlebar and collar 7 1 3 4 2 6 7 5 Cortesia de Courtesy of www batmotos com Cortesia de Courtesy...

Страница 193: ...dlebar onto the steering stem and install the handlebar collar lock nut and bolt Tighten the bolt to the specified torque Torque 4 5 kgf m 45 N m 32 lbf ft Install the front and rear master cylinders and connect the brake light switch wires Cortesia de Courtesy of www batmotos com Cortesia de Courtesy of www batmotos com ...

Страница 194: ...EMBLY Remove two screws 1 attaching right handlebar switch Disconnect the throttle cable 2 attaching the throttle grip Remove the right headlight switch Remove two screws 3 and then remove the turn light switch 1 2 3 Cortesia de Courtesy of www batmotos com Cortesia de Courtesy of www batmotos com ...

Страница 195: ...Lubricate the throttle grip front end with grease and then connect the throttle cable to the throttle grip Install and tighten the two screws Align the pin on the turn light switch with the hole on the handlebar Align the pin on the headlight switch with the hole on the handlebar Cortesia de Courtesy of www batmotos com Cortesia de Courtesy of www batmotos com ...

Страница 196: ...BER STEERING STEM 15 7 Downtown 125i FRONT WHEEL REMOVAL Jack the scooter front wheel off the ground Remove the bolt then pull out the axle Remove the front wheel and collar Cortesia de Courtesy of www batmotos com Cortesia de Courtesy of www batmotos com ...

Страница 197: ...SORBER STEERING STEM 15 8 Downtown 125 i INSTALLATION Apply grease to the collar 1 then install the collar onto the wheel Install the speedometer speed wheel sensor 2 1 2 Cortesia de Courtesy of www batmotos com Cortesia de Courtesy of www batmotos com ...

Страница 198: ... they turn smoothly and quietly Also check if the outer race fits tightly in the hub Replace the bearings if the races do not turn smoothly quietly or if they fit loosely in the hub Remove the front wheel bearing 3 by using the special tool Special tool Bearing puller A120E00037 Remove the distance collar from wheel 1 2 3 3 Cortesia de Courtesy of www batmotos com Cortesia de Courtesy of www batmo...

Страница 199: ...ASSEMBLY Install the front wheel bearing 5 by using the special tool Special tool Bearing installer A120E00014 Install the distance collar Install the front wheel bearing 5 by using the special tool Special tool Bearing installer A120E00014 Apply grease to the collar then install the collar onto the wheel 5 5 Cortesia de Courtesy of www batmotos com Cortesia de Courtesy of www batmotos com ...

Страница 200: ...follow the manufacturer s operating instructions A contaminated brake disc or pad reduces stopping power Discard contaminated pads and clean a contaminated disc with a high quality brake degreasing agent Do not allow foreign material to enter the system when filling the reservoir Avoid spilling brake fluid on painted plastic or rubber parts Place a rag over these parts whenever the system is servi...

Страница 201: ...draining Make sure that the master cylinder parallel to the ground before removing the reservoir cover Remove the two screws 1 Remove the reservoir cover diaphragm plate and diaphragm Connect a bleed hose to the bleed valve 1 Cortesia de Courtesy of www batmotos com Cortesia de Courtesy of www batmotos com ...

Страница 202: ... brake to prevent air from being pumped into the system When using a brake bleeding tool follow the manufacture s operating instructions Pump the brake bleeder and loosen the front caliper bleed valve Add fluid when the fluid level in the master cylinder is low to prevent drawing air into the system Repeat the above procedures until no air bubbles appear in the brake hose Close the front caliper b...

Страница 203: ...ake lever slowly until the bleed valve has been closed Add fluid when the fluid level in the master cylinder is low to prevent drawing air into the system 3 Repeat the steps 1 2 until there are no air bubbles in the bleed hose After bleeding air completely tighten the bleed valve to the specified torque Torque 6 N m 0 6 kgf m 4 3 lbf ft Fill the reservoir to the casting ledge with DOT 4 brake flui...

Страница 204: ...NT BRAKE PAD BRAKE PAD REPLACEMENT Remove the pad pins 1 Remove two caliper mounting bolts 2 then remove the caliper Remove the brake pads 3 Always replace the brake pads in pairs to ensure even disc pressure 1 2 3 Cortesia de Courtesy of www batmotos com Cortesia de Courtesy of www batmotos com ...

Страница 205: ...hing the pads against the pad spring to align the pad pin holes in the pads and caliper Install the front caliper onto the fork leg and then install and tighten the new two caliper mounting bolts to the specified torque Torque 35 N m 3 5 kgf m Tighten the pad pins to the specified torque Torque 18 N m 1 8 kgf m 13 lbf ft Cortesia de Courtesy of www batmotos com Cortesia de Courtesy of www batmotos...

Страница 206: ...BER STEERING STEM 15 17 Downtown 125i BRAKE DISC INSPECTION Visually inspect the brake disc for damage or cracks Measure the brake disc thickness Service limits 3 mm 0 12 in Cortesia de Courtesy of www batmotos com Cortesia de Courtesy of www batmotos com ...

Страница 207: ...unting bolts 2 and then remove the right front shock absorber Remove two mounting bolts 3 and then remove the left front shock absorber INSTALLATION Installation is in the reverse order of removal INSPECTION Inspect the following items and replace if necessary Front shock absorber tube bending damage or wear Weak front shock absorber spring Damper and damper rod bending Oil seal damage or wear STE...

Страница 208: ...se and speed wheel Sensor connector Hold the steering stem top cone race and remove the steering stem lock nut by using the special tool Special tool Lock nut wrench A120F00002 Remove the top cone race and washer remove the steering stem Special tool Lock nut wrench A120F00023 Top Cone Race Lock Nut Wrench Cortesia de Courtesy of www batmotos com Cortesia de Courtesy of www batmotos com ...

Страница 209: ...balls Remove the upper ball race by using a chisel if necessary Remove the bottom balls Remove the bottom ball race by using a pipe if necessary Remove the bottom cone race by using a chisel if necessary Bottom Cone Race Ball Bottom Ball Race Top Ball Cone Race Bottom Balls Be careful not to damage the steering stem Cortesia de Courtesy of www batmotos com Cortesia de Courtesy of www batmotos com ...

Страница 210: ...ering stem Apply grease to the top cone race and install it Tighten the top cone race and then turn the steering stem right and left several times to make steel balls contact each other closely Special tool Lock nut wrench A120F00023 Install the steering stem lock nut and tighten it to the specified torque by using the special tool while holding the top cone race Torque 7 kgf m 70 N m Special tool...

Страница 211: ...ING STEM 15 22 Downtown 125 i Top Ball Cone Race Remove special tool Bottom Ball Race Remove special tool Bottom Ball Race Install special tool Top Ball Cone Race Install special tool Cortesia de Courtesy of www batmotos com Cortesia de Courtesy of www batmotos com ...

Страница 212: ..._______________________________________________________________________________ ________________________________________________________________________________ REARBRAKE REARFORK REARWHEEL REARSHOCKABSORBER _________________________________________________________________________________________ SCHEMATIC DRAWING 16 1 SERVICE INFORMATION 16 2 TROUBLESHOOTING 16 2 REAR BRAKE 16 3 REAR FORK 16 6 RE...

Страница 213: ...16 REAR BRAKE REAR FORK REAR WHEEL REAR SHOCK ABSORBER 16 1 DOWNTOWN 125i SCHEMATIC DRAWING Cortesia de Courtesy of www batmotos com Cortesia de Courtesy of www batmotos com ...

Страница 214: ...uffler lock bolt 35 N m 3 5 kgf m Exhaust muffler pipe nut 20 N m 2 kgf m Rear axle nut 120 N m 12 kgf m Rear shock absorber lower mount bolt 40N m 4 kgf m Rear shock absorber upper mount bolt 40N m 4 kgf m Rear brake caliper holder bolt 27 N m 2 7 kgf m TROUBLESHOOTING Rear wheel wobbling Poor brake performance Bent rim Air in brake system Faulty tire Deteriorated brake fluid Axle not tightened p...

Страница 215: ...ake caliper INSPECTION Inspect the brake pads and brake disk Measure the brake disk thickness Visually check the brake pad thickness DISASSEMBLY Remove two brake pads dowel pins and three bolts from the brake caliper Remove the brake pads When removing the brake fluid tube use shop towels to cover plastic parts and coated surfaces to avoid damage Fluid Tube Bolt Bolts Brake Caliper Brake Disk Brak...

Страница 216: ...n through the brake fluid inlet opening and place a towel under the caliper to avoid contamination caused by the removed piston Check the piston cylinder for scratches or wear and replace if necessary Check the caliper cylinder for scratches or wear and measure the cylinder bore Compressed Air Cortesia de Courtesy of www batmotos com Cortesia de Courtesy of www batmotos com ...

Страница 217: ... two spring plates onto the groove of the caliper Install two brake pads Spring Plate Longer Shorter Caliper Inside Caliper Outside Make sure the spring plate next to the brake pad dowel pin orientation Brake pads Cortesia de Courtesy of www batmotos com Cortesia de Courtesy of www batmotos com ...

Страница 218: ...ve the right rear shock absorber lower mount bolt Remove the rear axle nut and remove the collar Remove the rear fork The installation sequence is the reverse of removal Turn the inner race of each bearing with your finger to see if they turn smoothly and quietly Also check if the outer race fits tightly in the hub Replace the bearings if the races do not turn smoothly quietly or if they fit loose...

Страница 219: ...ear shock absorber lower mount bolt 35 45N m Rear axle nut 120N m REAR SHOCK ABSORBER REMOVAL Remove the met in box and carrier Remove the body cover center cover and rear fender A together Remove the right left rear shock absorber upper and lower mount bolts Remove the right and left rear shock absorbers INSTALLATION Install the rear shock absorbers in the reverse Rear Axle Collar Rear Brake Disk...

Страница 220: ...HOCK ABSORBER 16 8 DOWNTOWN 125 i INSTALLATION Install the rear suspension in the reverse order of removal Torque Upper Mount Bolt 40 N m Lower Mount Bolt 40 N m Cortesia de Courtesy of www batmotos com Cortesia de Courtesy of www batmotos com ...

Страница 221: ...______________________________________________________________________ __________________________________________________________________________________ BATTERY CHARGING SYSTEM __________________________________________________________________________________ CHARGING SYSTEM LAYOUT 17 1 CHARGING CIRCUIT 17 1 SERVICE INFORMATION 17 2 TROUBLESHOOTING 17 3 BATTERY 17 4 CHARGING VOLTAGE INSPECTION 17...

Страница 222: ...17 BATTERY CHARGING SYSTEM 17 1 DOWNTOWN125i CHARGING SYSTEM LAYOUT ACG BATTERY REGULATOR RECTIFIER Cortesia de Courtesy of www batmotos com Cortesia de Courtesy of www batmotos com ...

Страница 223: ...is insufficient Recharging a new battery will prolong its service life Inspect the charging system according to the sequence specified in the Troubleshooting It is not necessary to check the MF battery electrolyte or fill with distilled water Check the load of the whole charging system Do not quick charge the battery Quick charging should only be done in an emergency Remove the battery from the mo...

Страница 224: ...ion Fuse burned out Loose connection or short circuit in Faulty ignition switch ignition system Low power Charging system failure Weak battery Loose broken or shorted wire or connector Loose battery connection Faulty regulator rectifier Charging system failure Faulty A C generator Faulty regulator rectifier Cortesia de Courtesy of www batmotos com Cortesia de Courtesy of www batmotos com ...

Страница 225: ...ut to expose the terminal leads 5 Disconnect the negative terminal lead 3 from the battery first then disconnect the positive terminal lead 4 6 Remove the battery from the battery box Battery installation Install in the reverse order of the removal When install the battery first connect the positive cable and then negative cable to avoid short circuit 3 4 Cortesia de Courtesy of www batmotos com C...

Страница 226: ...ive terminal Connect the charger negative cable to the battery negative terminal Charging current time Standard 1 2A 5 10h Quick 5A 1h Quick charging should only be done in an emergency slow charging is preferred For battery charging do not exceed the charging current and time specified on the battery Using excessive current or extending the charging time may damage the battery Turn the power ON O...

Страница 227: ...egative terminals or cable With the headlight on and turned to the high beam position restart the engine Measure the voltage on the multimeter when the engine runs at 5000 min rpm Standard Measure charging voltage 14 5 0 5 V Do not disconnect the battery or any cable in the charging system without first switching off the ignition switch Failure to follow this precaution can damage the tester or el...

Страница 228: ...in the chapter 2 Disconnect the regulator rectifier connectors 1 Check the connector for loose contacts of corroded terminals Measure the voltage between the Red White wire terminal and ground There should be same with battery voltage at all times Regulator Rectifier Regulator Rectifier Cortesia de Courtesy of www batmotos com Cortesia de Courtesy of www batmotos com ...

Страница 229: ...ll times Measure the resistance between each Yellow wire terminals Standard 0 4 0 6 Ω 20ºC 68ºF Disconnect the regulator rectifier connector Check for continuity between each Yellow wire terminal regulator rectifier side and ground There should be no continuity Cortesia de Courtesy of www batmotos com Cortesia de Courtesy of www batmotos com ...

Страница 230: ...he FRAME COVERS REMOVAL INSTALLATION section in the chapter 2 Disconnect the regulator rectifier connectors 1 Remove the two bolts 2 attaching regulator rectifier 3 Installation is in the reverse order of removal 2 3 1 Cortesia de Courtesy of www batmotos com Cortesia de Courtesy of www batmotos com ...

Страница 231: ...__________________ __________________________________________________________________________________ __________________________________________________________________________________ IGNITION SYSTEM __________________________________________________________________________________ IGNITION SYSTEM LAYOUT 18 1 SERVICE INFORMATION 18 2 TROUBLESHOOTING 18 3 IGNITION COIL INSPECTION 18 4 18 Cortesia ...

Страница 232: ...18 IGNITION SYSTEM 18 1 DOWNTOWN 125 i IGNITION SYSTEM LAYOUT Roll sensor ECU Ignition coil ACG Cortesia de Courtesy of www batmotos com Cortesia de Courtesy of www batmotos com ...

Страница 233: ...ge the ignition control module or ECU Always turn off the ignition switch before servicing A faulty ignition system is often related to poor connections Check those connections before proceeding Make sure the battery is adequately charged Using the starter motor with a weak battery results in a slower engine cranking speed as well as no spark at the spark plug Use a spark plug of the correct heat ...

Страница 234: ...itch or ignition switch wire Faulty engine stop switch or ignition switch Loose or poorly connected ignition control module connectors Open circuit or poor connection in ground wire of the ignition control module Faulty ignition pulse generator Faulty ignition control module PEAK VOLTAGE IS NORMAL BUT NO SPARK JUMPS AT THE PLUG Faulty spark plug or leaking ignition coil secondary current Faulty ig...

Страница 235: ...tly in the cylinder Disconnect the spark plug cap 2 from the spark plug Turn the ignition switch to ON and engine stop switch ON and side stand is up Connect the multimeter probe to the black wire and the multimeter to the body ground Check for initial voltage at this time The battery voltage should be measured If the initial voltage cannot be measured check the power output circuit 2 1 Cortesia d...

Страница 236: ...e FRAME COVERS REMOVAL INSTALLATION section in the chapter 2 Disconnect the ignition pulse generator connector 1 Measure the pulse generator resistance between the Green White wire and Blue Yellow wire Standard 96 144Ω 20ºC 68ºF Cortesia de Courtesy of www batmotos com Cortesia de Courtesy of www batmotos com ...

Страница 237: ...OVAL INSTALLATION section in the chapter 2 Disconnect the spark plug cap attaching the spark plug 1 Disconnect the ignition coil connector 2 Remove two bolts 3 attaching the ignition coil 4 Installation is in the reverse order of removal 1 2 3 4 Cortesia de Courtesy of www batmotos com Cortesia de Courtesy of www batmotos com ...

Страница 238: ..._________________________________________________________________________________ __________________________________________________________________________________ STARTING SYSTEM __________________________________________________________________________________ STARTING SYSTEM LAYOUT 19 1 STARTING CIRCUIT 19 1 SERVICE INFORMATION 19 2 TROUBLESHOOTING 19 2 STARTER MOTOR 19 3 STARTER RELAY INSPECT...

Страница 239: ...19 STARTING SYSTEM 19 1 DOWNTOWN 125 i STARTING SYSTEM LAYOUT Battery Start relay Start motor Cortesia de Courtesy of www batmotos com Cortesia de Courtesy of www batmotos com ...

Страница 240: ...N m TROUBLESHOOTING Starter motor can not working Lack of power Fuse burned out Weak battery Weak battery Loose wire or connection Faulty ignition switch Foreign matter stuck in starter motor Faulty starter clutch or gear Faulty front or rear stop switch Faulty starter relay Starter motor rotates but engine does Poorly connected broken or shorted wire not start Faulty starter motor Faulty starter ...

Страница 241: ...rminal 3 If the starter motor fail to work the starter motor is faulty REMOVAL Turn the ignition switch turned to OFF position Release the rubber cap 1 and remove the terminal screw 2 to disconnect the start motor cable from the start motor Remove two mounting bolts 3 then remove the start motor 1 2 3 1 2 3 Cortesia de Courtesy of www batmotos com Cortesia de Courtesy of www batmotos com ...

Страница 242: ...tor groove Install the starter motor into the crankcase Install the two mounting bolts and engine ground cable then tighten the bolts securely Connect the start motor cable to motor terminal with the terminal screw and tighten it securely 1 Cortesia de Courtesy of www batmotos com Cortesia de Courtesy of www batmotos com ...

Страница 243: ...move the nuts 2 then disconnect the start motor cable battery positive cable and harness wire Disconnect the start relay connector 3 and then remove start relay Connect a fully charged 12 V battery positive wire to the relay switch Yellow Red wire terminal and negative wire to the Green Yellow wire terminal There should be continuity between the cable terminals while the battery is connected and n...

Страница 244: ...________________________________________________________ __________________________________________________________________________________ LIGHTS METERS SWITCHES __________________________________________________________________________________ SERVICE INFORMATION 20 1 BULB REPLACEMENT 20 2 BRAKE LIGHT SWITCH 20 6 IGNITION SWITCH 20 6 HANDLEBAR SWITCH 20 7 LUGGAGE BOX LIGHT SWITCH 20 9 FUEL PUMP ...

Страница 245: ...prevent its early failure Be sure to install the dust cover after replacing the bulb Check the battery condition before performing any inspection that requires proper battery voltage A continuity test can be made with the light switches installed on the scooter Route the wires and cables properly after servicing each component A halogen head light bulb becomes very hot while the head light is turn...

Страница 246: ... front cover refer to the FRAME COVERS REMOVAL INSTALLATION section in the chapter 2 Remove the bulb socket 1 Remove the bulb 2 and replace with a new one Installation is in the reverse order of removal 2 1 Cortesia de Courtesy of www batmotos com Cortesia de Courtesy of www batmotos com ...

Страница 247: ...he headlight connector 1 from the headlight bulb 2 Install a new bulb in the headlight case Install the headlight and connect the headlight connector A halogen headlight bulb becomes very hot while the headlight is ON and remain for a while after it is turned OFF Be sure to let it cool down before servicing 1 2 Cortesia de Courtesy of www batmotos com Cortesia de Courtesy of www batmotos com ...

Страница 248: ... socket 1 then remove the front turn signal light Push and turn the bulb counterclockwise to remove it then replace with a new one Installation is in the reverse order of removal TAILLIGHT BRAKE LIGHT REAR TURN SIGNAL LIGHT Remove the seat and luggage box then remove the light bulb socket 1 Bulb Cortesia de Courtesy of www batmotos com Cortesia de Courtesy of www batmotos com ...

Страница 249: ...t then replace with a new one Installation is in the reverse order of removal Taillight Brake light Push and turn the bulb counterclockwise to remove it then replace with a new one Installation is in the reverse order of removal Bulb Bulb Cortesia de Courtesy of www batmotos com Cortesia de Courtesy of www batmotos com ...

Страница 250: ...nt or rear brake lever squeezed and there should be no continuity with the front or rear brake lever is released IGNITION SWITCH INSPECTION Remove the front cover refer to the FRAME COVERS REMOVAL INSTALLATION section in the chapter 2 Disconnect the ignition switch connector 2 and check the ignition switch 1 for continuity at the switch side connector terminals Continuity should exist between the ...

Страница 251: ...ion in the chapter 2 Right handlebar switch Disconnect the right handlebar switch connector and check for continuity for switch side connector terminals Continuity should exist between the color code wires as follows Engine Stop Switch Lighting Switch Starter Switch Cortesia de Courtesy of www batmotos com Cortesia de Courtesy of www batmotos com ...

Страница 252: ...ebar switch connector and check for continuity for switch side connector terminals Continuity should exist between the color code wires as follows Dimmer Switch Horn Switch Turn Signal light Switch Passing Switch Cortesia de Courtesy of www batmotos com Cortesia de Courtesy of www batmotos com ...

Страница 253: ...r 2 Disconnect the luggage box light switch connector 2 and check the luggage box light switch 1 for continuity between the switch terminals There should be no continuity with the luggage box light switch pushed and there should be continuity with the luggage box light switch is released 2 1 Cortesia de Courtesy of www batmotos com Cortesia de Courtesy of www batmotos com ...

Страница 254: ...p connector Be sure to relieve the fuel pressure before removing fuel pump or fuel hose Remove the six nuts 1 and fuel unit connector 2 then remove the fuel hose 3 Take out the fuel pump 4 Check the fuel pump O ring 5 Replace a new one If was damage 1 2 3 4 5 Cortesia de Courtesy of www batmotos com Cortesia de Courtesy of www batmotos com ...

Страница 255: ...n the Yellow White and Blue White terminals of the fuel unit connector Standard at 20 C 68 F Float at full position About1100 Ω Float at empty position About100 Ω E F Before performing the following test operate the turn signals to determine that the battery circuit is normal Cortesia de Courtesy of www batmotos com Cortesia de Courtesy of www batmotos com ...

Страница 256: ...the side stand retracted There should be continuity between the Yellow Black and Green with the side stand applied REMOVAL Disconnect the side stand switch connector Remove the bolt 1 and side stand switch attaching the side stand INSTALLATION Installs the side stand switch aligning the groove on the switch with the pin on the side stand stay Install and tighten the side stand switch bolt securely...

Страница 257: ...tors 1 from the horn Connect a 12 V battery to the horn terminals The horn is normal if it sounds when the 12 V battery is connected across the horn terminals REMOVAL INSTALLATION Disconnect the horn connectors from the horn Remove the bolt 2 and horn Installation is in the reverse order of removal 1 2 Cortesia de Courtesy of www batmotos com Cortesia de Courtesy of www batmotos com ...

Отзывы: