7 | Tutorial – Soldering or unsoldering a component
Task 6 “Inspection”
7.12 Task 6 “Inspection”
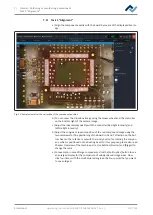
a) Check the position of the component based on the displayed live image.
Alignment
Desoldering
Alignment
Release
Inspection
Provide
Inspection
Soldering
Complete
Parameters
Next
Back
Split optics
White light intensity
RPC camera light intensity
Automatic brightness
b) For example, in case of large components, in order to see an enlarged compar-
ison of widely spaced image areas, click button [Split optics]. Now click four
times with the small blue rectangle on the four points that you want to see en-
larged.
ð
A split screen view will be displayed.
a) You can zoom the Visionbox image using the mouse wheel and the controller
on the bottom right of the camera image.
– [White light intensity ]: this adjusts the brightness of the white PCB lighting.
– [Automatic brightness]: When activated, the image of the optional RPC camera
is automatically adjusted after changing the camera lighting brightness or am-
bient light.
– The RPC camera lighting is adjusted by the controller below it.
a) Click the button
to switch the live image of the RPC camera to full-screen
display. The zoom controller allows further zooming. Use the left mouse button
to move the image section. Close the full-screen display by clicking the small
red circle button in the upper right corner.
b) If the component is correctly positioned, follow the next work step.
Ersa GmbH
Operating_instructions HR 500 DE 3BA00246-01 | Rev. 1
112 / 124
Содержание HR 500
Страница 2: ......
Страница 6: ......
Страница 20: ...2 Technical data PC system requirements Ersa GmbH Operating_instructions HR 500 DE 3BA00246 01 Rev 1 20 124 ...


