


15
ENG
Index
Page
Description of the appliance
15
Instructions for use
15
Programming timer
15
Cleaning and maintenance 16
Problem solving 16
Sizes and specifications
17
Accessories supplied
18
Installation
18
Active charcoal filters
18
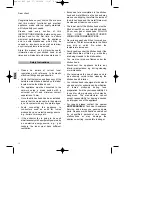
A
An electronic programmer device with
TOUCH CONTROL technology to
control speed, light, programming and
power indicators in use as well as filter
saturation.
B
Metal filters.
C
Lamp with two bulbs - 20 W (G-4).
D, E
Vertically adjustable tubecovers.
Switch on the extractor fan a few minutes
before you start to cook in order to ensure that
a steady air flow has been established before
fumes appear.
Allow the extractor fan to run for several
minutes after you have finished cooking
(between 3 to 5 minutes) in order to expel all
the grease from the outlet duct. This prevents
the return of grease, smoke and smells.
Proceed as follows:
1) Turn the kitchen hood on and choose the
required speed. Press "timer". Suction
indicators 1, 2 and 3 will start to flash.
2) Select the required time by pressing the
increase and decrease speed selectors.
There is a variation of 10 in 10 minutes.
(Min.= 10 min.; Max.= 30 min.)
3) Once the required time has been selected,
press "timer" again to memorise the
program. The speed indicator in use will
start to flash.
4) Intensive suction cannot be programmed
as it has a set length of 10 minutes.
Clean the filters when the saturation indicator lights
up. (See page 16, Filter cleaning section).
Once you have cleaned the filters, and with the
hood turned off, press the increase and decrease
speed buttons at the same time for 3 seconds and
the indicator will switch itself off.
Instructions for use
Description of the appliance
Programming timer
You may control the kitchen hood by
operating the controls as shown in the
diagram.
Minimum speed
Medium speed
Maximum speed
Extra fan
Filter saturation
indicators
Timer
Reduce speed
Increase speed
On-Off
Power indicator
Filter saturation indicators
Manual KDT.qxd 17/06/2004 13:47 Page 15


