Kuma Stoves K-SEQ Скачать руководство пользователя страница 16


16

4.


To replace the glass it may be helpful to remove the door from the stove and place on a clean soft 
work area.  Remove the retaining ring screws and retaining ring, remove the glass and dispose of 

properly, CAUTION: BROKEN GLASS WILL BE SHARP.  Clean the door thoroughly where the new 
piece of glass will install.  Set the new piece of glass into the door and replace the retaining ring and 
screws.  Be careful to tighten the screws evenly, uneven pressure can break the glass.  Tighten the 
screws just enough to hold the glass firmly, overtightening can cause uneven pressure and can break the 
glass. 


Brick replacement – As needed 

1.


Bricks should be inspected and replaced if necessary at least once a year.  Cracked bricks are fine as 
long as they remain in place.  


Clean and inspect stove – Every year 

1.


Your stove should be fully cleaned and inspected once a year.  This is a great time to inspect the bricks, 
gaskets, catalyst and the rest of the stove for signs of abnormal wear.  Start by shoveling all the ashes 
out of the stove.  Use a shop vac to clean the hard to reach places. 

2.


Your catalytic combustors performance should be closely inspected at least 3 times during the heating 
season. To check the performance of your catalytic follow these steps: 

a.


With a flashlight, visually inspect the catalyst for physical deterioration.  If catalysts are 
crumbling or falling apart they must be replaced.  Removal of catalyst for inspection is not 
recommended unless stove performance has noticeably decreased.  

b.


Light the stove in accordance with the instructions in section 4 

c.


With the bypass rod pulled out (towards yourself), go outside and observe the emissions 
leaving the chimney. 

d.


Push in the bypass rod and again observe the emissions leaving the chimney.  

e.


 Significantly more smoke should be seen when the bypass rod is pulled out.  Significantly 
less smoke should be seen when the bypass rod is pushed in.  Be careful not to confuse smoke 
with steam from wet wood. 

 
Replace catalyst – Every 7-10 years or as needed 

1.


If you have determined that the catalyst needs to be replaced contact you nearest dealer for parts and 
service.  Use the parts list in section 8 for ordering a replacement catalyst. 

2.


Replacement Steps: 

a.


Remove stove pipe or pull out insert to gain access to the stove flue. (If removing insert is not 
practical you can access baffle fasteners through the stove door. Instructions for this follow in 
parenthesis in step b.)  

b.


Remove bypass rod by removing the pin that drops into the hex shaft. To remove drop in pin 
you will first remove the cotter pin at the bottom side of  drop in pin. Pull the drop in pin up 
and out. Pull the damper rod all the way out of the stove. (Instructions for doing this job 
through door: Pull damper rod out until it hits stop. You will not be able to see fasteners and 
will have to do this job by feel. Reach through the stove door, up the rear of the baffle and 
then towards the front of stove until you find hex shaft that is bolted to damper plate. Feel 
along hex shaft until you find pins. Remove the small retaining pin at the bottom of drop in 
pin then pull up on the drop in pin. Remove damper rod from stove.                                                                          

c.


Set a bottle jack underneath the center of the baffle and jack it up applying a small amount of 
pressure to the baffle.  Lubricate and remove the 4 main baffle bolts using a 9/16” socket with 
a 6” extension.  Slowly lower the jack balancing the baffle as it comes down.  The baffle is 
fairly heavy; use proper lifting techniques.   

d.


Carefully remove the baffle from the stove. 
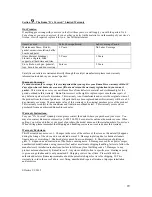
e.


Lift off the baffle clips and remove the catalytic hold down clamp noting the location of the 
gaskets. Slide the catalytics out. 

f.


Install the new cataytic combustors in the same location. (approximately 1” from the face of 
the baffle). Cut and use the gasket provided to achieve a snug fit. 

g.


Replace the catalytic hold down clamp, re-gasket the top and sides of the clamp to achieve a 
snug fit.  Re-install the baffle clips. 

h.


Re-install the entire baffle system in the same manner that it was removed using the bottle 
jack.  


3.


If the steel baffle is warped or degraded, the entire baffle system  with the catalytics and gasketing 
pre-installed  may be ordered. Contact you dealer. 

Содержание K-SEQ

Страница 1: ...KUMA STOVES Rathdrum ID USA MODEL K SEQ Sequoia Tested to UL1482 Report 123 S 04 2 Testing performed by Omni Test Laboratories INSTALLATION AND OPERATING INSTRUCTIONS SAVE THESE INSTRUCTIONS Rev 4 18 12 ...

Страница 2: ...with a quality product that will last a lifetime If you ever have a problem with your stove we will do what is needed to get it resolved and keep you warm You may have noticed a portion of the Bible enclosed in your owner s packet It is a small gift for you Our faith in Jesus Christ is very important to us and we have that faith because there is hope in heaven That hope comes from the message of t...

Страница 3: ...ailure to properly install and maintain your wood stove can result in an unsafe condition Contents Section 1 Safety Precautions Section 2 Catalyst Information Section 3 1 Free Standing Installation Instructions Section 3 2 Insert Installation Instructions Section 4 Wood Burning Operation Instructions Section 5 Maintenance Section 6 Installation Clearances and Diagrams Section 7 Troubleshooting Sec...

Страница 4: ...4 ...

Страница 5: ...5 Section 1 Safety Precautions ...

Страница 6: ...professional advice We recommend having existing chimneys cleaned and inspected by a qualified professional prior to the installation of your new Stove 10 NOTE ALL MINIMUM CLEARANCE REQUIREMENTS TO COMBUSTIBLES Installation must comply with minumum clearances as listed in this manual see section 6 11 Do not operate this stove with the door in the open position 12 This stove must be connected to a ...

Страница 7: ...7 at www nfpa org or call them toll free at 1 800 344 3555 Your local building dept may also have information regarding NFPA code 211 EXCERPT FROM NFPA 211 ...

Страница 8: ...be stem must be 3 16 diameter and between 4 and 5 in length Condar brand model 3 12 1 Optional Probe installation To install the probe remove the metal button on the top plate of the stove near the flue Insert the probe through the top plate and into the firebox Reading the Probe Follow the instructions in section 4 to build and maintain a fire During normal operation see section 4 the probe shoul...

Страница 9: ...flashing 4 If possible survey the attic area above and around the location of the chimney Be sure there are no major obstructions such as plumbing heating ducts electrical wires phone cables etc Also check the crawl space below and around the stove location for the same obstructions STEP 2 Installing the chimney Use only 8 Class A solid fuel chimney that has been U L safety tested for wood stoves ...

Страница 10: ...anada the hearth must be at least 54 deep For Canadian clearances refer to the listing tag on the back of the stove STEP 4 Setting the stove and connecting to the chimney 1 Attach the legs before setting the stove on the hearth Once the legs are attached set it gently on the hearth using cardboard to protect the hearth 2 Position the stove on the hearth according to the clearances shown on the dia...

Страница 11: ...e it cleaned and inspected by your dealer or a chimney professional Use and install liner kits that are approved to UL 1777 only Tools and materials Required 1 7 16 wrench 2 Flat blade screwdriver 3 KA SEQSURR Fireplace surround kit 4 Bricks or a metal roller to level stove in fireplace you may use the leveling bolts provided in the fireplace surround kit for most applications 5 Unfaced fiberglass...

Страница 12: ...et the insert on the hearth using a dolly Make sure the dolly is rated to carry at least 515 lbs and has a strap to secure the stove to the dolly 6 Insert the unit way into the fireplace then use a roller or unscrew the leveling bolts to level the stove 7 Carefully slide the insert all the way to the back wall of the fireplace Make sure you do not bend the leveling bolts while sliding the stove Yo...

Страница 13: ...e pulled all the way out towards yourself during start up It should remain open long enough to achieve a medium to high burn rate about 15 20 minutes It may also be necessary to crack the door to allow extra air during start up never leave the stove unattended with the door open Usually a normal fire start up to produce a good coal bed will produce sufficient temperatures to begin catalytic combus...

Страница 14: ...ate draft Additional instructions and information 1 Build your fires directly on the firebrick Using a grate will allow too much air to the coal bed and will result in incomplete combustion of the wood Using a grate can also leave charred pieces of wood after the fire has gone out 2 Use only the best grade of dry wood available Wood should be seasoned for 1 full year prior to being used Split wood...

Страница 15: ...the creosote is not removed on a regular basis a chimney fire can occur which can damage the chimney and or stove Therefore the importance of regular chimney maintenance cannot be emphasized enough Gasket Replacement Every year or as needed 1 Gaskets need to be checked at least once a year The gaskets on your stove are designed to keep unwanted air out of the firebox Neglecting these gaskets can c...

Страница 16: ... as needed 1 If you have determined that the catalyst needs to be replaced contact you nearest dealer for parts and service Use the parts list in section 8 for ordering a replacement catalyst 2 Replacement Steps a Remove stove pipe or pull out insert to gain access to the stove flue If removing insert is not practical you can access baffle fasteners through the stove door Instructions for this fol...

Страница 17: ...17 Catalyst replacement diagram Baffle clip Hold down clamp Catalytic Bypass plate Baffle Bypass rod ...

Страница 18: ...s diagram for the following installations 1 Residential installation with the stove in a corner using double wall pipe For single wall pipe refer to figure 2 Hearth ALL CLEARANCES SHOWN IN INCHES ALL CLEARANCES ARE MINIMUMS HEARTH CLEARANCES SHOWN IN 19 19 10 10 8 8 8 18 ...

Страница 19: ...e following installation 1 Residential installation with the stove in a corner using single wall pipe For double wall pipe refer to figure 1 Hearth ALL CLEARANCES SHOWN IN INCHES ALL CLEARANCES ARE MINIMUMS HEARTH CLEARANCES SHOWN IN 24 24 15 15 8 8 8 18 ...

Страница 20: ...llowing installations 1 Residential installation with the stove on a sraight wall using double wall pipe For single wall pipe refer to figure 4 ALL CLEARANCES SHOWN IN INCHES ALL CLEARANCES ARE MINUMUMS HEARTH CLEARANCES SHOWN IN Hearth 16 13 10 27 8 8 8 18 ...

Страница 21: ...llowing installations 1 Residential installation with the stove on a straight wall using single wall pipe For double wall pipe refer to figure 3 ALL CLEARANCES SHOWN IN INCHES ALL CLEARANCES ARE MINIMUMS HEARTH CLEARANCES SHOWN IN Hearth 25 18 15 36 8 8 8 18 ...

Страница 22: ... diagram for the following installations 1 Installation into a masonry fireplace ALL CLEARANCES SHOWN IN INCHES ALL CLEARANCES ARE MINIMUMS 18 20 30 Combustible Mantle Option 1 Leveling bolts Option 2 Roller Chimney liner 18 30 8 ...

Страница 23: ...ibles must be maintained per manufacturer s instructions on chimney pipe and stove pipe connectors This stove is not approved for installation in manufactured mobile homes rain cap 3 minimum 2 minimum 10 Roof brace Residential Home Installation Residential Home Installation Storm collar 8 Chimney Sections Attic Insulation Shield Support Box Cross Framing 2 MINIMUM air space around chimney 2 MINIMU...

Страница 24: ...nstallation Use this diagram for the installation of your stove into an alcove All other hearth section 2 and stove clearance requirements section 6 must be maintained 62 Minimum Opening 90 Minimum Height 36 Maximum Depth ...

Страница 25: ...25 Sequoia dimensional drawings 7 Recessed Flue 8 30 22 75 32 5 10x14 75 22 5 10 ...

Страница 26: ...d air 2 Chimney and or the chimney cap needs to be cleaned Your chimney should be checked and cleaned if necessary every few months Even a small amount of build up can cause a draft restriction for example inch of build up on the side wall of an 8 chimney reduces the effective area of the chimney by about 20 Pay close attention to the chimney cap especially if it has a screen Screened chimney caps...

Страница 27: ...ir supply to the stove If ash has built up around the air sliders clean with a brush and or slight air pressure 6 Atmospheric conditions Occasionally barometric episodes occur that affect draft thereby affecting stove performance If your stove has been working fine and performance drops suddenly this is most likely the cause and will usually go away within a few days 7 Your fuel load may be too sm...

Страница 28: ...firebrick 2 KR DOORGASKET Replacement door gasket includes glue 3 KR DOORPIN3 Set of 2 door pins 4 KR GLASS2 Replacement glass includes gasket 5 KR GLASSGASKET Replacement glass gasket 6 KR GLASSRETAIN2 Glass retaining ring includes new screws 7 KR SEQBAFFLE Sequoia baffle No catalytic bypass plate or rod 8 KR SEQBAFFLESET Includes baffle catalytic bypass rod and plate 9 KR SEQBRICKSET Sequoia fir...

Страница 29: ...may also contact Kuma stoves directly at 1 888 714 5294 or contact us online at kumastoves com When calling you will need to have your proof of purchase the model name and the serial number of your stove When calling please remember that shipping and handling costs are not covered under this warranty Warranty Exclusions This Warranty does not cover 1 Changes in the color of the surface of the stov...

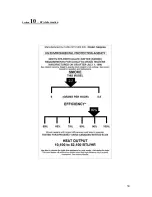
Страница 30: ...30 Section 10 EPA Information ...

Отзывы: