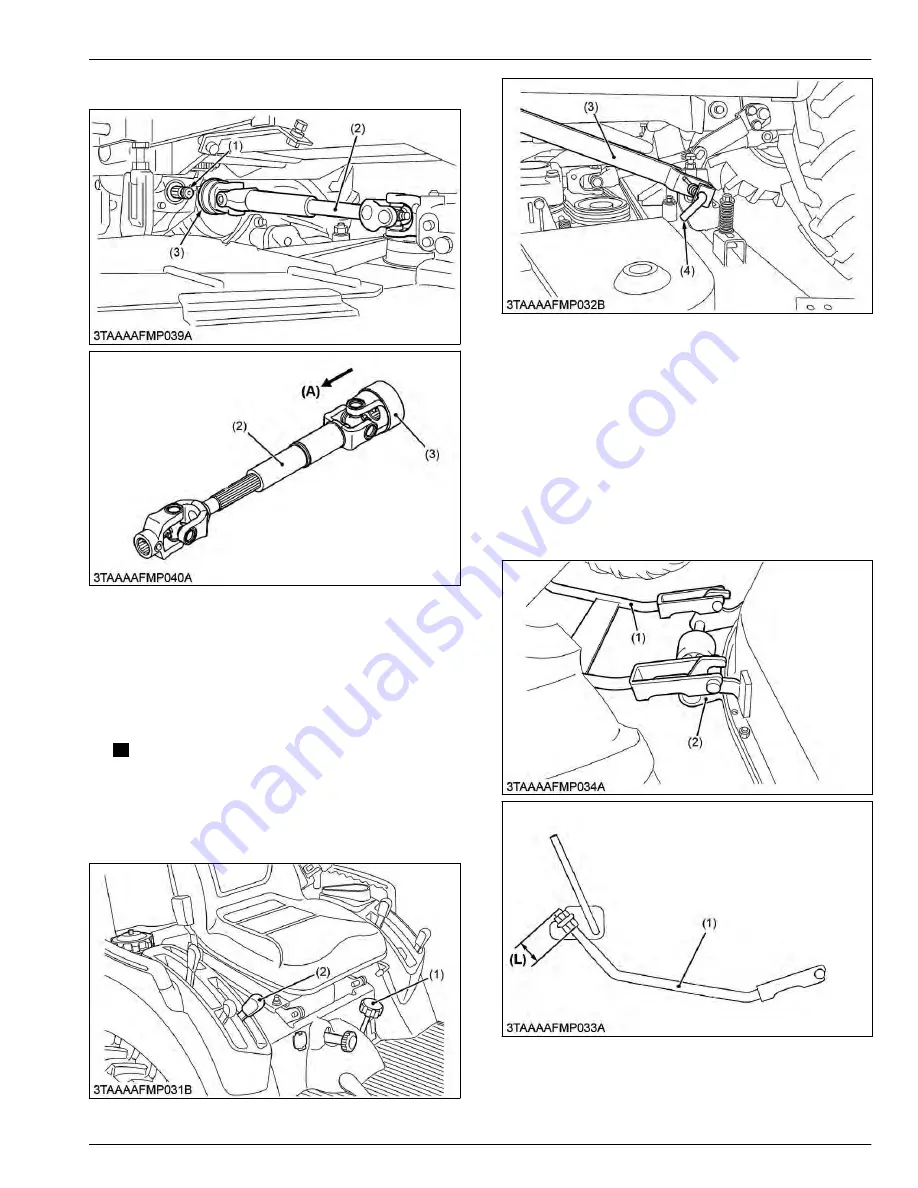
4.3 Installing universal joint
(1) Mid-PTO shaft
(2) Universal joint
(3) Coupler
(A) Tug
1. Pull back the coupler (3) of the universal joint (2).
2. Push the universal joint (2) onto the mid-PTO shaft
(1), until the coupler locks.
3. Slide the universal joint back and forward to make
sure the universal joint is locked securely.
IMPORTANT
• Finally, tug on the universal joint to make
sure it is locked on the PTO shaft.
4.4 Mounting rear link
(1) Cutting height control dial
(2) Hydraulic control lever
(3) Rear link
(4) L pin
1. Set the cutting height control dial (1) to zero inch
position.
2. Operate the tractor's hydraulic control lever (2)
forward to lower the mower rear links (3). Attach the
rear links (3) to the mower with the L pins (4).
4.5 Mounting front link
1. Hook the front link (1) to the front bracket groove (2)
as shown in the figure.
(1) Front link
(2) Front bracket groove
(L) Adjusting length
SERVICING
4. Setting up mower [RCK48-18BX, RCK54-23BX, and RCK60B-23BX]
9. MOWER
BX1880,BX2380,BX2680,RCK60B-23BX,RCK54-23BX,RCK48-18BX,RCK60D-26BX,RCK54D-26BX
9-9
KiSC issued 03, 2019 A
Содержание ,RCK60B-23BX
Страница 19: ...1 INFORMATION KiSC issued 03 2019 A ...
Страница 42: ...2 GENERAL KiSC issued 03 2019 A ...
Страница 111: ...3 ENGINE KiSC issued 03 2019 A ...
Страница 190: ...4 TRANSAXLE KiSC issued 03 2019 A ...
Страница 255: ...5 FRONT AXLE KiSC issued 03 2019 A ...
Страница 274: ...6 STEERING KiSC issued 03 2019 A ...
Страница 291: ...7 HYDRAULIC SYSTEM KiSC issued 03 2019 A ...
Страница 344: ...8 ELECTRICAL SYSTEM KiSC issued 03 2019 A ...
Страница 399: ...9 MOWER KiSC issued 03 2019 A ...


