background image

3

WORK

17

400318-01

Repeatedly press the button

briefly until

H

appears at the bottom right of the

display.

Press the button

for 2

3 seconds.

The Setup menu is displayed and the active functions are shown.

Info

If no button is pressed for 10

12 seconds, the settings are automatically

stored.
If no button is actuated for 20 seconds or there is no signal from the wheel
speed sensor, then the settings are automatically stored and the Setup
menu is closed.

Repeatedly press the button

briefly until the desired function flashes.

The selected function flashes.

Activating the function

Press the button .

The symbol continues to appear in the display and the next function
appears.

Deactivating a function

Press the button .

The symbol disappears in the display and the next function appears.

3.18.3

Setting the clock

Condition

The motorcycle is stationary.

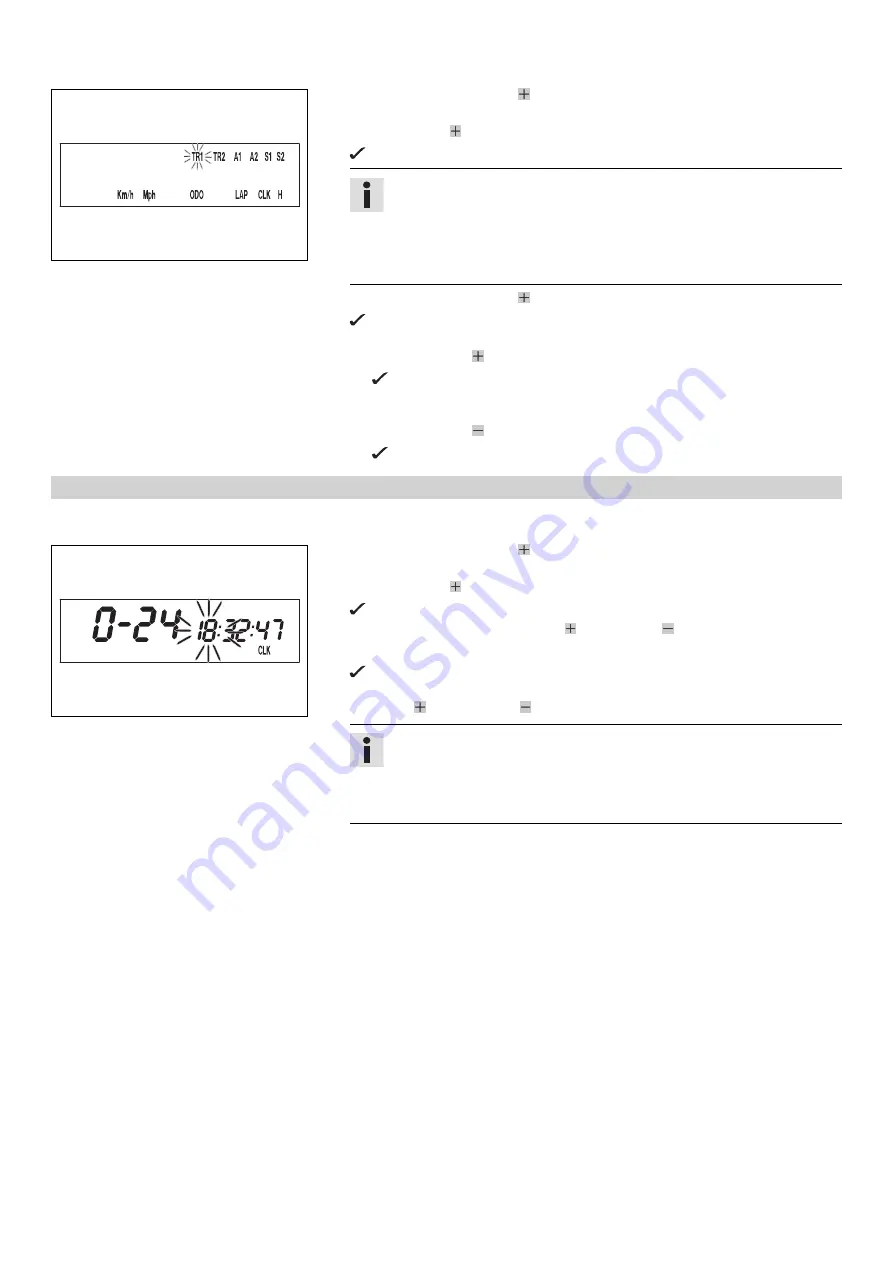
400330-01

Repeatedly press the button

briefly until

CLK

appears at the bottom right of the

display.

Press the button

for 2

3 seconds.

The hour display flashes.

Set the hour display with the button

and/or button .

Wait 3

5 seconds

The next segment of the display flashes and can be set.

You can set the following segments in the same way as the hours by pressing
the button

and the button .

Info

The seconds can only be set to zero.
If no button is actuated for 15

-20 seconds or there is no signal from the

wheel speed sensor, then the settings are automatically stored and the
Setup menu is closed.

Содержание 350 EXC-F AUS 2014

Страница 1: ...SETUP INSTRUCTIONS 2014 350 EXC F EU 350 EXC F SIX DAYS EU 350 EXC F AUS 350 EXC F USA 350 XCF W USA 350 XCF W SIX DAYS USA Art no 3213134en ...

Страница 2: ......

Страница 3: ...the right to modify or delete technical specifica tions prices colors forms materials services designs equipment etc without prior notice and without specifying reasons to adapt these to local conditions as well as to stop production of a particular model without prior notice KTM accepts no liability for delivery options deviations from illustrations and descriptions as well as misprints and other...

Страница 4: ...page reference more information is provided on the specified page Indicates information with more details or tips Indicates the result of a testing step Denotes a voltage measurement Denotes a current measurement Denotes a resistance measurement 1 2 Formats used The typographical formats used in this document are explained below Proprietary name Identifies a proprietary name Name Identifies a prot...

Страница 5: ...ng over To avoid damaging the motorcycle during the setup leave the protective film on the vehicle until you have finished Remove the separate enclosure and unpack it Check that the scope of delivery is complete on the basis of the enclosed packing list C00105 01 Have a lift stand available Lift stand 54829055000 Together with an assistant take the vehicle off the palette Position the vehicle on a...

Страница 6: ... supports in the required position Mount and tighten screws 2 Guideline Screw handlebar holder M10 40 Nm 29 5 lbf ft Loctite 243 Info Position the left and right handlebar supports evenly C00108 10 Position the handlebar Info Make sure the cables and wiring are positioned correctly Position the handlebar clamps Mount and tighten the screws evenly Guideline Screw handlebar clamp M8 20 Nm 14 8 lbf f...

Страница 7: ...ll switch bl with the yellow and white cables Position the speedometer and connector board Mount and tighten screws Guideline Remaining screws chassis M6 10 Nm 7 4 lbf ft C00523 10 Position the controls on the right half of the handlebar Info The routing of the cables can be seen in the figure C00524 10 Position the controls on the left half of the handlebar Info The figure shows how to route the ...

Страница 8: ...ble colors Connect plug in connection of the left turn signal using the violet and brown cable colors 401382 01 All EXC F models Mount the turn signal switch Install the front fender p 11 Refit the headlight mask with the headlight p 9 Install the front wheel p 10 Correctly mount the fuel tank breather 601710 01 Secure the handlebar cushion with two cable binders 101019 01 Mount the footrests with...

Страница 9: ...g and goggles Avoid contact with battery acid and battery gases Keep sparks and open flames away from the battery Only charge in well ventilated rooms In the event of skin contact rinse with large amounts of water If battery acid gets in the eyes rinse with water for at least 15 minutes and con tact a physician Fill the battery Info Read the notes in the battery package Charge the battery p 12 Ins...

Страница 10: ...may roll away or fall over Always place the vehicle on a firm and even surface B01506 10 Remove the motorcycle from the lift stand Remove the lift stand To park the motorcycle press the side stand 1 to the ground with your foot and lean the motorcycle on it Info When you are riding the side stand must be folded up and secured with the rubber band 3 3 Removing headlight mask with headlight B01560 1...

Страница 11: ...tance B 5 cm 2 in Position the vehicle vertically a distance A away from the wall Guideline Distance A 5 m 16 ft The rider now sits down on the motorcycle Switch on the low beam Check the headlight setting The boundary between light and dark must be exactly on the lower mark for a motorcycle with driver If the light dark border does not meet specifications Adjust the headlight range p 9 3 6 Adjust...

Страница 12: ...ing efficiency due to oil or grease on the brake discs Always keep the brake discs free of oil and grease and clean them with brake cleaner when necessary 101388 11 Check the wheel bearing for damage and wear If the wheel bearing is damaged or worn Change the wheel bearing Clean and grease shaft seal rings 1 and bearing surface A of the spacers Long life grease p 21 Insert the spacers 101386 11 Po...

Страница 13: ...dlight mask with the headlight p 9 Check the headlight setting p 9 3 10 Removing the seat 101346 10 Remove screw 1 Lift up the seat at the rear pull it back and then remove it from above 3 11 Mounting the seat B01526 01 Hook in the front of the seat at the collar sleeve of the fuel tank lower it at the rear and simultaneously push it forward Make sure that the seat is correctly locked in Mount and...

Страница 14: ... at least 15 minutes and contact a physician Warning Environmental hazard The battery contains elements that are harmful to the environment Do not discard batteries with the household waste Dispose of faulty batteries in an environmentally compatible manner Give the battery to your authorized KTM dealer or dispose of it at a collection point for used batteries Warning Environmental hazard Hazardou...

Страница 15: ...Fire hazard Fuel is highly flammable Never refuel the vehicle near open flames or burning cigarettes and always switch off the engine first Be careful that no fuel is spilt especially on hot vehicle components Clean up spilt fuel immediately The fuel in the fuel tank expands when warm and may emerge if overfilled Follow the instructions on refueling Warning Danger of poisoning Fuel is poisonous an...

Страница 16: ...Immediately clean contaminated areas on the skin with soap and water If fuel is swallowed contact a physician immediately Change clothing that is contaminated with fuel Note Material damage Premature clogging of the fuel filter In some countries and regions the available fuel quality and cleanliness may not be sufficient This will result in problems with the fuel system Only refuel with clean fuel...

Страница 17: ...Adjusting the speedometer functions Info When the vehicle is delivered only the SPEED H and SPEED ODO display modes are activated Condition The motorcycle is stationary 400318 01 Press the button briefly and repeatedly until H appears at the bottom right of the display Press the button for 3 5 seconds The Setup menu is displayed and the activated functions are shown Change to the desired function ...

Страница 18: ...ting kilometers or miles Info If you change the unit the value ODO is retained and converted accordingly The values TR1 TR2 A1 A2 and S1 are cleared when the unit of measure is changed Condition The motorcycle is stationary 400329 01 Repeatedly press the button briefly until H appears at the bottom right of the display Press the button for 2 3 seconds The Setup menu is displayed and the active fun...

Страница 19: ...to appear in the display and the next function appears Deactivating a function Press the button The symbol disappears in the display and the next function appears 3 18 3 Setting the clock Condition The motorcycle is stationary 400330 01 Repeatedly press the button briefly until CLK appears at the bottom right of the display Press the button for 2 3 seconds The hour display flashes Set the hour dis...

Страница 20: ...ll SIX DAYS models M8 15 Nm 11 1 lbf ft Screw bottom triple clamp EXC F EU EXC F AUS EXC F USA XCF W M8 15 Nm 11 1 lbf ft Screw chain sliding piece M8 15 Nm 11 1 lbf ft Screw engine brace M8 33 Nm 24 3 lbf ft Screw fork stub M8 15 Nm 11 1 lbf ft Screw front brake caliper M8 25 Nm 18 4 lbf ft Loctite 243 Screw handlebar clamp M8 20 Nm 14 8 lbf ft Screw side stand attachment M8 45 Nm 33 2 lbf ft Loc...

Страница 21: ...4 TECHNICAL DATA TIGHTENING TORQUES FOR CHASSIS 19 Screw front wheel spindle M24x1 5 45 Nm 33 2 lbf ft ...

Страница 22: ...95 RON 95 PON 91 Guideline Only use unleaded super fuel that matches or is equivalent to the specified fuel grade Fuel with an ethanol content of up to 10 E10 fuel is safe to use Info Do not use fuel containing methanol e g M15 M85 M100 or more than 10 ethanol e g E15 E25 E85 E100 ...

Страница 23: ...6 AUXILIARY SUBSTANCES 21 Long life grease Guideline KTM recommends Motorex products Supplier Motorex Bike Grease 2000 ...

Страница 24: ... 3213134en 3213134en 08 2013 KTM Sportmotorcycle AG 5230 Mattighofen Austria http www ktm com Photo Mitterbauer KTM ...

Отзывы: