Tel:
+44 (0)1274 657 088
Fax:
+44 (0)1274 657 087
Web:
www.cromptonlamps.com
Images are for information only. Phoebe LED shall not be held liable for improper operation of the luminaire
in circumstances where procedures and specifications have not been followed correctly. Crompton Lamps Limited 2020
30mm
30mm
95mm
175mm
Driver
23mm
Environmental Protection
Waste electrical products should not be
disposed of with household waste. Please
recycle where facilities exist.
Check with your Local Authority or retailer for
recycling advice.
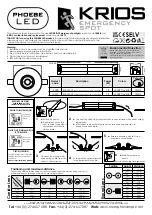
THANK YOU for buying this PHOEBE LED product.
To help ensure this luminaire gives complete satisfaction
please only use it according to the following instructions, and then pass the instructions to the
appropriate person for retention and future reference.
This instruction sheet is relevant to Phoebe
LED KRIOS Emergency Spotlight
product code
14008
and
KRIOS corridor lens head replacement
product code
14015
Warning
1. Installation only to be carried out by a qualified electrician
2. Please ensure mounting surface is suitable
3. Pre-cut hole before installation, (see below chart for hole diameter)
4. Do not operate if product is damaged
5. IP20 suitable for indoors use only
Product
code
Description
Power
(W)
Colour
Cutout ø
14008
Krios Spot
(round lens Head complete with driver)
1.8
6000K Daylight
70mm
14015
Krios Spot
(replacement head with corridor lens)
1.8
6000K Daylight
70mm
1
a.
Switch off power
b.
Prepare cut-out hole in
your surface to specified
dimensions as stated in
above table.
4
Push back the spring clips and
insert luminaire into recess.
BEFORE YOU START
PLEASE READ ALL THE
INSTRUCTIONS CAREFULLY
ONLY ONCE INSTALLATION
IS COMPLETE
Turn power
back on at
the mains
CIRCUIT TESTINg
For high voltage circuit insulation
testing disconnect mains input
supply first
(Do not circuit test using a Megger)
Turn power
off at the
mains
PRIOR TO INSTALLATION
To 240V Mains
2
a.
Connect the driver to mains electricity in accordance with current wiring
regulations.
b.
Insert driver in situe within the recess ensuring the pre-wired male
connector is accessible.
3
Connect the male push fit
connecting cable from the
driver to the luminaire.
5
a.
Ensure luminaire is a flush fit and
has plenty of ventilation.
6
a.
Switch power on at
circuit.
24hrs Initial charge time required.
Positioning and maximum distance
Follow the guideline tables below for recommended spacing between fittings which will
provide adequate lighting coverage in cases of emergency.
2.8 m
0.9 m
7.1 m
2.2 m
20.8 m
3 m
0.9 m
7.1 m
2.2 m
21.4 m
4 m
0.9 m
7.2 m
2.4 m
19.8 m
5 m
1 m
5.9 m
3 m
20.6 m
Corridor Lens
Position
Height Distance
2.8 m
11.2 m
3 m
11.4 m
4 m
12.1 m
5 m
12.3 m
6 m
11.9 m
7 m
11 m
2.8 m
4.5 m
3 m
4.5 m
4 m
4.5 m
5 m
4.2 m
6 m
3.4 m
7 m
2.3 m
Round Lens


