background image

16

EN

your MissionNANO™.

3)  Lift the rear of MissionNANO™ to access the underside.
4)  Open the protective rubber cover under MissionNANO™ to access the USB port.
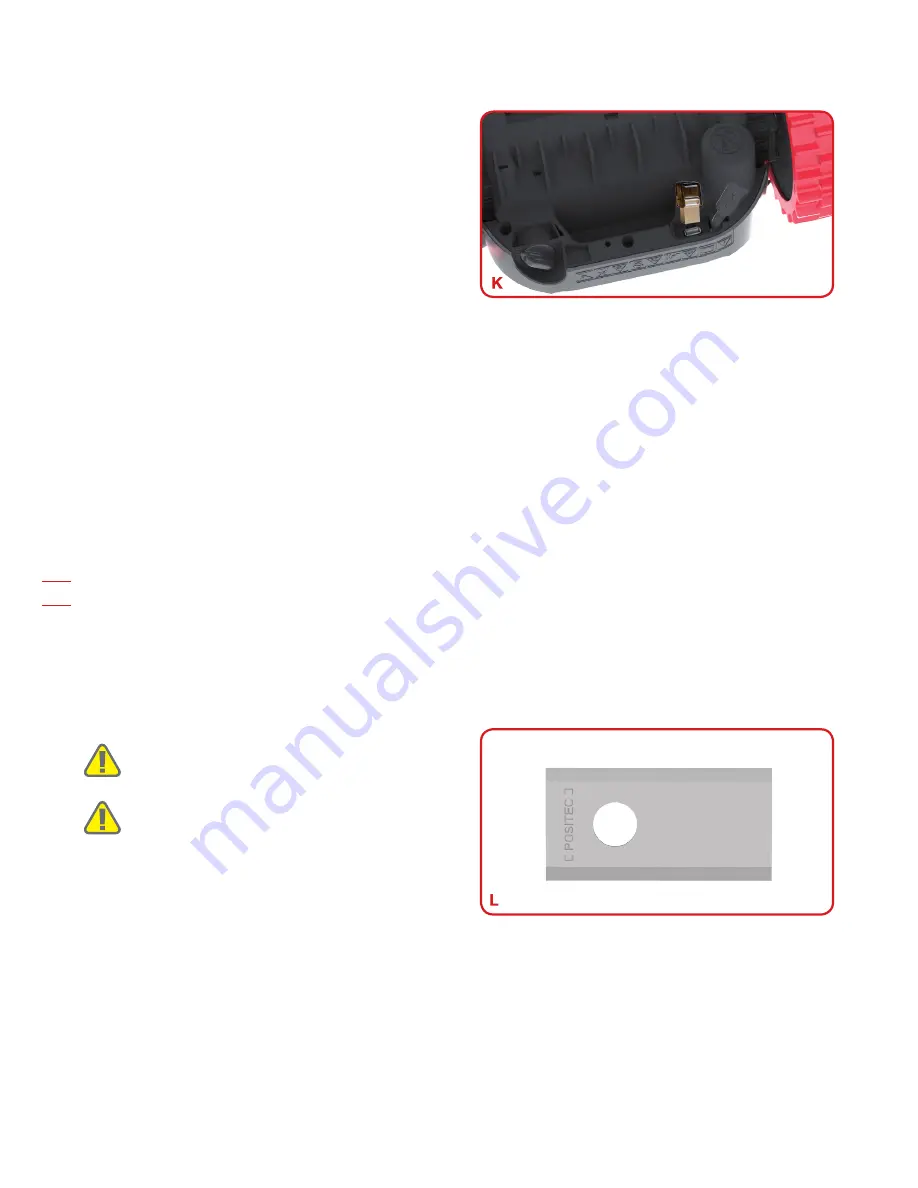
5)  Insert the USB drive (flash drive) in the port. (See Fig. K)
6)  Place MissionNANO™ on the ground again.
7)  Turn the main switch to the “I” position to turn on 

MissionNANO™.

8)  The battery indication light will start to pulse. When 

the error indication light flashes blue, the file has been 
copied.

9)  Without lifting MissionNANO™, remove the USB drive 

(flash drive).

10)The update will begin automatically and may take 

several minutes. The final alert sequence will include a 
beep, and both the battery indication light and error indication light will flash. When the error indication light 
turns off and only the green battery indication light remains lit, the update is complete.


NOTE:

 If MissionNANO™ is not inside the boundary wire, the error indication light will flash RED after the 

update. Please refer to the manual for more information. 

(11)Be sure to tightly and completely close the rubber protective USB port cover.

Method 2:

 Update via your smartphone.

If your MissionNANO™ is connected to your smartphone via the MissionNANO™ App, you can check the 
software version. The App will also notify you when new software version is available. 
The manual included with your MissionNANO™ is based on the default software at the time of production. 
Some new features/functions in the new version may not exist in the manual. If you found some settings not in 
the manual, please visit www.kress-robotik.com to download the latest manual.
 

9. Maintenance

Your MissionNANO™ works hard and needs to be cleaned and checked from time to time. Some parts will 
require replacement as they become worn. Never use your MissionNANO™ with defective main switch.
Switch off the machine before carrying out any service or maintenance. 
Here's how to take care of your MissionNANO™.

9.1 Keep it Sharp

WARNING:


Before cleaning, adjusting, or 

replacing the blades, turn your MissionNANO™ 

OFF and put on protective gloves.

WARNING: When fitting new blades, make sure 

you replace ALL the blades. Always use new 

screws when fitting blades. This is important to 

ensure blade retention and balance the blade turning 

disc. Failure to use new screws could cause serious 

injury. 

MissionNANO™ does not cut grass like other mowers. 
Its cutting blades are razor sharp on 2 edges and rotate in both directions for maximum cutting capacity (See 
Fig. L). Each blade of your MissionNANO™ has 2 cutting edges. The blade turning disc will make forward 
and reverse rotation at random to use both cutting edges and minimize the frequency of replacing the blades. 
Each cutting blade will last up to 2 months when it is programmed to mow everyday. Always check to see if 
the blades are chipped or damaged and replace them if they are. When the cutting blades are dull and worn 
out, they should be replaced with the spare blades provided with your MissionNANO™. Spare blades are also 
available at your nearest Kress retailer.
  

A. Replace the Blades

After some time, usually every season, your MissionNANO™’s Blades will need to be replaced. When 

1

2

Содержание Mission NANO

Страница 1: ...Owner s Manual KR100 ...

Страница 2: ...boundary wire D Starting and stopping while mowing 5 3 Cut to Edge 5 4 Working Time 5 5 How efficiently will my MissionNANOTM mow the grass 6 App 7 Boundary wire basics 7 1 Pegging the Boundary Wire 7 2 Burying the Boundary Wire 7 3 Joining the Boundary Wire 8 Software update 9 Maintenance 9 1 Keep it Sharp A Replace the Blades 9 2 Keep it Clean A Cleaning the Body B Cleaning the Underside C Clean...

Страница 3: ...ut the guard in place Operation 1 General a Never operate the appliance with defective guards or without safety devices for example deflectors in place b Do not put hands or feet near or under rotating parts Keep clear of the discharge opening at all times c Never pick up or carry an appliance while the motor is running d Remove the disabling device from the appliance Before clearing a blockage Be...

Страница 4: ...circuit a battery pack Do not store battery packs haphazardly in a box or drawer where they may short circuit each other or be short circuited by conductive materials When battery pack is not in use keep it away from other metal objects like paper clips coins keys nails screws or other small metal objects that can make a connection from one terminal to another Shorting the battery terminals togeth...

Страница 5: ...the disabling device before working on or lifting the machine WARNING Do not ride on the machine Class III appliance Waste electrical products must not be disposed of with household waste Please recycle where facilities exist Check with your local authorities or retailer for recycling advice Do not dispose of batteries Return exhausted batteries to your local collection or recycling point Do not b...

Страница 6: ...6 EN 2 Component list 10 26cm inch 10 2 4 0 0 10 26cm inch 10 2 4 0 0 2 4 3 1 5 6 8 13 15 18 21 22 17 19 7 16 14 9 10 11 12 20 ...

Страница 7: ... of machinery representative of Robotic Lawnmower Rated voltage 20V Max No load speed 2800 min Cutting area 600m2 Cutting diameter 18cm Cutting height 30 60mm Cutting height positions 4 Battery type Lithium ion Battery model KA0101 Charging time approx 2hrs Charger model KA0200 KA0201 Charger rating Input 100 240V 50 60Hz 38W Output 20V 1 5A Machinery weight 8 8kg Protection degree III App Y Frequ...

Страница 8: ...urs to a minimum For their personal protection and protection of people working nearby an appropriate hearing protection shall be worn Accessories Screw 9 Charging base 1 Charging base fixing nails 8 Boundary wire 150m Wire pegs 210 Hex key 1 Boundary wire distance gauge 2 Blade 9 Battery pack KA0101 1 Charger KA0200 KA0201 1 Connector 2 We recommend that you purchase genuine accessories listed in...

Страница 9: ...tion light will stay red If the battery is too low it will not stay red but shut down to prevent battery damage please refer to Battery Life for emergency charge 3 Press then press to start mowing 4 Press then to make MissionNANOTM go to the charging base MissionNANOTM will work continuously until reaching low battery power level and then it will return to the charging base Once charging is comple...

Страница 10: ... unattractive mowing paths See Fig A 5 1 How does my MissionNANOTM know what to mow Congratulations on your new purchase of the MissionNANOTM and welcome to the care free life of automatic mowing In the following we would like to help you better understand how your MissionNANOTM thinks 5 Understanding Your MissionNANOTM A ...

Страница 11: ...error indication light will flash blue four times per cycle When the rain sensors dry MissionNANO will begin the delay time countdown or return to mowing depending on the saved settings If you want to exit from the rain delay dry the sensor area and perform a power cycle by operating the main switch After the power cycle has been performed you can see that the blue LED is not flashing and so you c...

Страница 12: ...y working schedule includes 4 hours of working time mowing and charging included and 20 hours on standby on the charging base See chart below The working schedule can be changed using the mobile app To download the app please refer to section APP The working schedule can be re set by removing and re installing the battery Please refer to Replacing the Battery Working Day 1 Day 2 Day 3 4h 20h 4h 20...

Страница 13: ...areas of different sizes although this depends on various factors such as Species of grass in your lawn and its growth rate Sharpness of the cutting blades Humidity Surrounding temperature Amount of obstacles in your Lawn Unlike most other mowers MissionNANO uses a side charging system which is able to cut the much surrounding grass as possible The holes on the bottom of the charging base allow th...

Страница 14: ...When MissionNANO is located in an area with low or no Wi Fi signal instructions sent from the mobile App may not be executed immediately MissionNANO will receive instructions when it returns to an area with good Wi Fi signal 3 For strong Wi Fi signal to ensure stable connection it is recommended to install Wi Fi extenders to cover areas with weak or no Wi Fi signal 7 Boundary Wire Basics 7 1 Peggi...

Страница 15: ...h wire ends in any two of the three holes of the connector Insert the wires fully until both wire ends are visible on the other side of the connector See Fig J1 Press the connector together by using a pair of pliers See Fig J2 J3 WARNING It is not recommended to simply splice the boundary wire with insulating tape or use a screw terminal block for connection A broken circuit may occur after a peri...

Страница 16: ... If you found some settings not in the manual please visit www kress robotik com to download the latest manual 9 Maintenance Your MissionNANO works hard and needs to be cleaned and checked from time to time Some parts will require replacement as they become worn Never use your MissionNANO with defective main switch Switch off the machine before carrying out any service or maintenance Here s how to...

Страница 17: ...NANO is an electric machine you will need to take care when cleaning DO NOT use a hose high pressure washers or otherwise pour running water on your MissionNANO It is best to use a spray bottle filled with water When cleaning the machine body use a soft brush or clean cloth and avoid using solvents or polishes See Fig N Lastly remove all build up of grass clippings and debris B Cleaning the Unders...

Страница 18: ... longer and healthier if it is allowed to hibernate So even though it is tough we recommend storing your MissionNANO in your shed or garage during the winter Before you prepare your MissionNANO for winter hibernation we recommend you Thoroughly clean your MissionNANO Fully charge the battery Turn the power off To maximize the battery life fully charge the battery before storage during winter WARNI...

Страница 19: ...tighten the screws 10 Function Messages The battery indication light on the interface of MissionNANOTM indicates the following status Battery indication light Status Green light on Sufficient power for mowing Red light on Low power need to recharge Green light flashing Auto charging Red light flashing Battery too hot Wait until the battery cools down Error indication light Status Blue light flashi...

Страница 20: ...cted to the clamps on the Charging Base If the problem persists check that the boundary wire hasn t been cut Blue light on Wheel motor blocked 1 Turn MissionNANO off take MissionNANO to an area free of obstacles 2 Turn MissionNANO on Wait until the battery indication light stays green If MissionNANO has low battery capacity the battery indication light will stay red Press 3 If the error message is...

Страница 21: ...ly to the charging base turn power on by turning the main switch to I on press then the charge process will start If MissionNANO runs abnormally once in a while please try to restart it If the problem is not resolved try to removing and reinstalling the battery If the problem is still not resolved please contact a Kress service agent for help Do not wash the machine with a high pressure washer Thi...

Страница 22: ... up of grass in the blade disc or motor frame box Make sure the blade disc rotates easily If need be you may take off the blade disc and remove the debris Your MissionNANOTM is inside its territory and the boundary wire is connected The error indication light flashes red The boundary wire ends are clamped incorrectly Reverse the boundary wire ends The charging time is far more than 2h Poor connect...

Страница 23: ...losely Ensure your MissionNANOTM boundary wire has at least 1m of space between the neighboring boundary wire The boundary wire has been installed with tight corners Check the boundary wire to ensure the corners are smooth In wet conditions the boundary wire electric signal may leak were wire has been joined or repaired Check boundary wire joints Insulate to provide a fully waterproof connection T...

Страница 24: ... 14 EC amended by 2005 88 EC Conformity Assessment Procedure as per Annex V Measured Sound Power Level 67 6 dB A Declared Guaranteed Sound Power Level 68 dB A Standards conform to EN 60335 1 2012 A11 2014 EN 50636 2 107 2015 EN 60335 2 29 2004 A2 2010 EN 62233 2008 EN ISO 3744 2005 EN 55014 1 2006 A1 2009 A2 2011 EN 61000 3 2 2014 EN 61000 3 3 2013 EN 55014 2 2015 EN 61558 1 2005 A1 2009 EN 61558 ...

Страница 25: ......

Страница 26: ...www kress robotik com ...

Отзывы: