background image

Getting Started

16

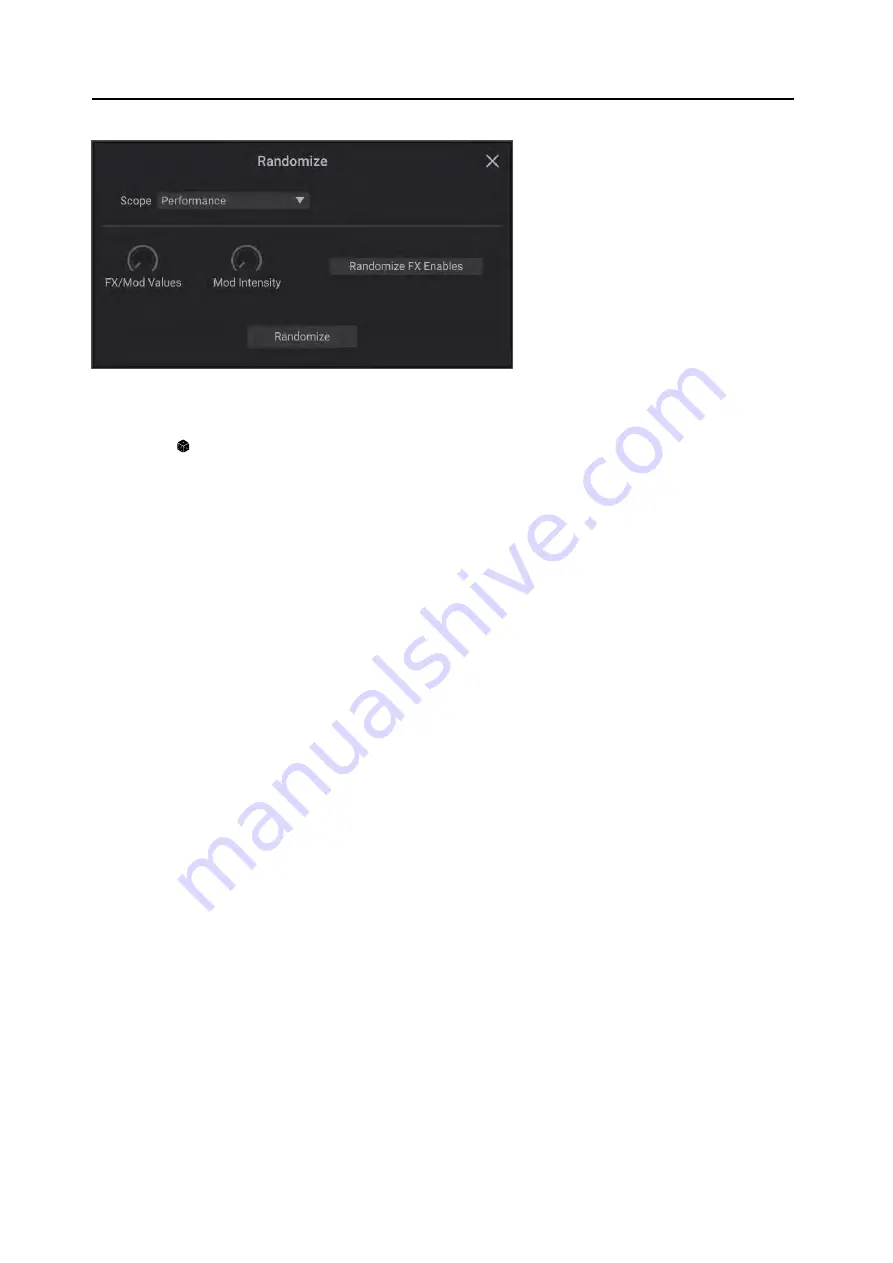
Randomize

Randomize uses a combination of preset selection and select value randomization, rather than direct randomization of 

all parameters.
To use Randomize:
1.  Press the   (Randomize) button at the top right of the window.
The Randomize dialog will appear. 
2.  Set the Scope as desired.
Scope
 controls the parts of the sound that will be randomized. It’s set to 

Performance

 by default, but can be set to 

Program Select, Layer, Wave Sequence Select, Arpeggiator, Filter, and so on.
Depending on the Scope, additional settings may appear:
Fx/Mod Knob Values randomizes the Mod Knobs (Program and/or Performance, according to Scope) and Effects 

Edit 1/2/3 by the specified percentage. 
Modulation Intensities randomizes the standard LFO and Envelope intensities for Filter, Amp, Pitch, and Pan.
Randomize Fx Enables controls the On/Off settings for the Effects (with probability weighted towards On).
Speed randomizes Wave Sequence Speed.
3.  Press the Randomize button to randomize the selected Scope.

Содержание wavestate native

Страница 1: ...wavestate native WAVE SEQUENCING SYNTHESIZER E2 ...

Страница 2: ...tion 15 Copy Paste 15 Randomize 16 Overview page 17 Synthesis page 19 Filter 20 Pitch 23 Amp 25 Wave Sequencing 2 0 27 Overview 27 Wave Sequence Page 28 Wave Sequence 29 Standard Lane Controls 30 Step Probability 31 Master Lane 31 Timing 32 Sample 34 Pitch 36 Shape 37 Gate 38 Step Seq 38 Wave Sequence Steps contextual menu 39 Setup page 41 Program Setup 42 Voice Allocation 42 Layer Setup 44 Arpegg...

Страница 3: ...igger 58 LFOs 59 Filter Amp Pitch Pan LFO 59 KeyTrack 62 Filter KeyTrack 62 Amp KeyTrack 63 Modulation Processors 65 Overview 65 Gate 65 Offset 66 Quantize 67 Scale 68 Curve 68 Smooth 70 Sum 70 Effects page 72 Overview 72 Mini Editors 73 Pre FX 73 Mod FX 74 Delay 75 Reverb EQ page 76 Master Reverb 76 Master EQ 76 Librarian page 77 Librarian contextual menu 78 Import and export 79 Set Lists 81 Set ...

Страница 4: ...ps or noise 85 Sound is delayed 85 Can t control the software synthesizer from a MIDI device connected to the computer 85 Specifications 86 Operating requirements 86 Support and service 87 Before you contact us 87 Information to provide when contacting us 87 ...

Страница 5: ...odulation routing includes a primary modulation source an intensity and a secondary modulation source the three are multiplied together to create the modulation amount A single destination such as Filter Cutoff can have up to 31 incoming modulation routings Mod Knobs put macro transformations under your fingertips making it easy to explore the sonic worlds inside each Performance Tweaking an exist...

Страница 6: ...Filters Key Vel Zones Vector Env parameters Vector Env Performance Scales Tempo Step Seq Key Track Key Track ADSR 2x Mod Processors Pitch Portamento Slope Mod Knobs Performance Mod Knobs User Interface Elements Knobs and sliders To edit knob values drag vertically or use the mouse wheel or drag on the trackpad To edit slider values drag in the direction of the slider Most sliders also support the ...

Страница 7: ...rmance Select 2 Main Editing Area 7 Main Menu 8 Perf Hold 9 Mod Inspector 3 Edit Librarian select 4 Randomize 5 Sync Tempo 6 Volume 10 Mod Knobs 11 Page Tabs 12 Layer Select 13 Mod Sources The Overview Synthesis Wave Seq Setup and Effects pages all follow this basic layout and the other pages under Edit also include most of these elements 1 Performance Select The Performance with its four Layers i...

Страница 8: ...und For details see Randomize on page 16 5 Sync Tempo When Sync To Host is On all tempo related parameters will synchronize to the tempo from the DAW When it is Off they will use the tempo saved in the Performance When running as a stand alone application this changes to the Clock parameter which lets you choose the MIDI clock source Internal External or Auto Tempo 40 300 This is the stored tempo ...

Страница 9: ...enu 100 100 0 0 100 Unipolar Bipolar 11 PageTabs These select the page shown in the Main Editing Area 12 Layer Select For the Synthesis Wave Sequence Setup and Effects tabs these select which of the Layers is shown in the Main Editing Area You can also select Programs for the Layers adjust the Layer volumes and turn them on and off Volume Inf 84 9 6 0dB This controls the volume of the Layer Note t...

Страница 10: ...elect sounds from the filtered list 2 Data List This shows the list of selectable sound data Performances in the example above as filtered by the Search Category and Collection settings in the Filters Panel Click on an item in the list to select it for auditioning or use the keyboard up down arrows to browse through items one by one Double click or press OK to select and close the browser 3 Metada...

Страница 11: ...ese data types into a Performance a new copy of the data is created in the Performance Any edits affect only the local copy inside the Performance and not the original data This lets you edit freely without worrying about affecting other sounds To save 1 Press the Save icon or right click control click macOS on the name and select the Save or Save As New com mand in the contextual menu To overwrit...

Страница 12: ...to the state prior to the previous operation This applies to any edits made in the Editor windows for instance editing synthesis parameters Wave Sequences or effects creating modulation routings and so on In the Librarian it applies to edits of metadata such as names and categories Set List edits creation of new Set Lists object duplication and deletion and data Import The system supports multiple...

Страница 13: ...AW session and applies to all open instances of wavestate native even if the instances are in different hosts You can have many different User Sample Banks stored on your computer but only one can be used at a time User Sample Banks are created by the separate Sample Builder application which is available as a free download from www korg com For more information please see the documentation includ...

Страница 14: ...nds respond to variations in pressure applied to the keyboard while playing a note aftertouch Choose the curve that is most appropriate for your controller playing strength and style Aftertouchcurve 1 0 127 3 4 5 7 2 6 8 Random MAX MIDI Aftertouch Aftertouch effect 1 Heavy 2 These are for heavy playing most of the variation occurs with stronger pressure 3 Normal This is the default 4 5 Light These...

Страница 15: ...s over a range of 50 cents A cent is 1 100 of a semitone At the default of 0 A4 440 Hz The value shown for A4 s frequency assumes that the scale is set to Equal Temperament If a different scale is selected the actual frequency of A4 may be different Global MIDI Channel 1 16 This is the basic MIDI channel for wavestate native It applies to MIDI received by any Layer with Use Global MIDI Channel ena...

Страница 16: ...Layer C Mod Knobs 1 8 102 109 Layer D Mod Knobs 1 8 110 117 Defaults Pressing the Defaults button resets the CC assignments to the defaults as shown above Copy and Paste These buttons let you copy and paste the CC assignments between plug in instances ...

Страница 17: ...nnel Sources Only appears the parameter cannot be modulated from per voice sources such as LFOs envelopes the Step Seq Lane and Key Track The Vector Env can be used since there is a separate Performance level version of this envelope In this case choose a different modulation source 3 In the Mod Inspector set the Intensity as desired The maximum Intensity is typically the full range of the paramet...

Страница 18: ...ontrol click macOS on the desired Mod Knob A contextual menu will appear 3 Select MIDI Learn from the contextual menu 4 On the MIDI controller move a knob wheel slider etc to generate a CC The CC will be assigned to control the Mod Knob when you send the CC from a MIDI controller the knob will move in response You can confirm this assignment or edit it manually in the CC Assign section of the cont...

Страница 19: ...Steps For example you can copy from one LFO to another in the same Program or copy the Filter or Arpeggiator settings from one Layer to another Using Copy Paste To use copy and paste with anything other than Wave Sequence Steps 1 Right click or control click on MacOS on the title of the section that you d like to copy such as Filter LFO Arpeggiator or Mod Processor 2 A contextual menu will appear ...

Страница 20: ...lt but can be set to Program Select Layer Wave Sequence Select Arpeggiator Filter and so on Depending on the Scope additional settings may appear Fx Mod Knob Values randomizes the Mod Knobs Program and or Performance according to Scope and Effects Edit 1 2 3 by the specified percentage Modulation Intensities randomizes the standard LFO and Envelope intensities for Filter Amp Pitch and Pan Randomiz...

Страница 21: ... and arrows to step through Wave Sequences one by one or click on the name to bring up a browser window Right click control click macOS on the name to bring up a contextual menu for saving and renaming 3 Master Lane Progress Bar When enabled the Master Lane restarts all of the other Lanes after either a specified number of beats or elapsed time see Master Lane on page 31 This progress bar shows it...

Страница 22: ...ach Lane of each Wave Sequence may be on different steps and may also have different Start End Loop Start Loop End settings Single Multisample display When the Wave Sequence page Mode parameter is set to Single Multisample the Multisample and its related parameters are shown instead of the Wave Sequence Overview 8 Program parameters This section offers immediate access to the most commonly used Pr...

Страница 23: ...urrent Filter Type Cutoff and Resonance settings 3 Portamento This controls the type and amount of Portamento For more information see Portamento on page 24 4 Mod Inspector This shows the modulation routings for the selected parameter You can add or delete routings from the list adjust modulation intensity and change the selected Mod Sources including adding a second Mod Source for routings create...

Страница 24: ...ers these create a sharper roll off beyond the cutoff frequency with more delicate resonance Many classic analog synths used this general type of filter Multi Filter This is a complex filter which is capable of all of the 2 pole filter types and many more besides See Multi Filter on page 22 MS 20 LP and HP These 12dB octave self resonating filters lovingly recreate the distinctive timbral signatur...

Страница 25: ...esonant settings or Multi Filter Resonance Bass controls the character of the filter resonance at low cutoff frequencies Its effect is most noticeable with high Resonance settings Tight produces a more restrained resonance similar to a classic American wood paneled monophonic synthesizer Full produces a wide boomy resonance reminiscent of a famous five voice American synthesizer 4 Pole LP HP BP BR...

Страница 26: ...et combinations or create your own complex filter modes using the Manual controls This is capable of some cool sounds in and of itself but things really get interesting when you modulate Crossfade see below Crossfade 0 100 This is available only when Type is Multi Filter Crossfade morphs between the Mode 1 and Mode 2 settings 0 is all Mode 1 100 is all Mode 2 and 1 99 are intermediate values betwe...

Страница 27: ... and the overall Keyboard Track shape With positive values the effect will be in the direction specified by keyboard tracking if the Slope goes up the Cutoff will increase With negative values the effect will be in the opposite direction if the Slope goes up the Cutoff will decrease To create one octave per octave key tracking useful when creating pitch through filter resonance 1 Set the Key Track...

Страница 28: ...On Portamento lets the pitch glide smoothly between notes instead of changing abruptly On Turns on Portamento so that pitch glides smoothly between notes Off Turns off Portamento This is the default Fingered Off On Fingered applies only when Portamento is On On Playing legato will turn on Portamento and playing detached will turn it off again Off Legato detached playing will not affect Portamento ...

Страница 29: ...iplicative Modulation values are offset by 1 0 so that a value of 0 has no effect The maximum modulation value for example moving the Mod Wheel all the way up doubles the volume level if the Intensity is 100 or brings the level to silence if the Intensity is 100 Tip To start with a low level or silence and then use modulation to raise the level to maximum use the Filter Output Level instead Level ...

Страница 30: ...Synthesis page 26 Random Pan Off On Off The normal pan controls above apply On Each voice will be randomly panned across the stereo field All other pan controls are disabled ...

Страница 31: ...ach time the sequence moves forward values from the individual Lanes are combined to create the output The result can be either ever changing rhythmic patterns or smooth organic crossfading timbres Individual modulatable Step Probabilities provide additional variation WaveSequencing2 0 Master Shape Gate Step Seq 2 Piano 1 Pluck 3 Gtr 4 Flute 6 Voice 5 Bell 2 1 16 1 1 8 3 1 16 4 1 4 2 G 1 C 3 C Tim...

Страница 32: ...owser window Right click control click macOS on the name to bring up a contextual menu for saving and renaming 4 Lanes This is the main editing area for Wave Sequences Select Lanes or Steps here to show their details in the Wave Sequence Inspector Editing Start End and Loop steps The triangles above the Steps show the Loop Start green and Loop End red The triangles below the Steps show the Start g...

Страница 33: ...teps will play in a different order every time the loop repeats For details see Random Order on page 31 Wave Sequence Mode This lets you choose whether the Program will play a Wave Sequence or a single Multisample WaveSequence SingleMultisample Wave Sequence The Program will use a Wave Sequence Single Multisample The Program will use a Multisample instead of a Wave Sequence All of the Lane control...

Страница 34: ...fsets These skip part of the beginning of the samples either to make them more gentle for percussive sounds or to make them start more quickly for sounds with slow attacks The number of available offsets will vary depending on the specific Multisample If no alternate start points are available this will show n a Channel Stereo Left Right n a This applies to stereo Multisamples only for mono Multis...

Страница 35: ...p Probability Each individual Step has a Probability setting from 0 to 100 This controls how likely the Step is to play As with most Step parameters Probability can be modulated for instance moving a Mod Knob might make some Steps more likely to occur and other steps less likely to occur If a step has less than 100 Probability and loses the roll of the dice as it were it is skipped See note about ...

Страница 36: ... continually from 0 01 1 100 of the original speed to 100 00 100 times the original speed Try modulating this from the 8 Speed Mod Knob or from an envelope When TEMPO is On you can select tempo locked ratios from 1 4 to 4x of the original Speed Xfade Time Tempo Off This determines how all of the Step Xfade parameters will work Time Crossfades times are set in seconds Tempo Crossfades times are set...

Страница 37: ...th of the step in seconds If Tempo is On you can set the basic length of the step as a rhythmic value relative to the system tempo The values range from a 32nd note to a double breve four whole notes including dotted notes and triplets This length is then modified by x Multiply Base Note by below x Multiply Base Note by 1 32 This appears only if Tempo is On It multiplies the length of the Duration...

Страница 38: ...move more rapidly as it approaches the end of the crossfade Linear the step will fade out steadily over the duration of the crossfade Exp the step will fade out quickly at first and then move more slowly as it nears the end of the crossfade Sample This Lane sets the sample played by each Step Sample Lane Preset Start End Loop Start Loop End Repeats See Standard Lane Controls on page 30 Pitch Lane ...

Страница 39: ...ckly for sounds with slow attacks The number of available offsets will vary depending on the specific Multisample If no alternate start points are available this will show n a Probability See Step Probability on page 31 Fixed Pitch Original Off On On PitchLane By default most Multisamples change in pitch as you play up and down the keyboard A few however use Fixed Pitch so that they make the same ...

Страница 40: ... On ScaleType Major Minor HrmnicMaj HrmnicMin MelodicMin Dorian Phrygian Lydian Mixolydian Locrian Penta Maj PentaMin Diminished HalfDim Augmented WholeTone Tritone Blues BebopDom Flamenco Romani Hungarian Persian Harmonics Acoustic Enigmatic This selects the scale to which the generated notes will be confined It only applies if Fit To Scale is On Notes generated by Pitch Lane if Scale Key C Scale...

Страница 41: ...e duration of the step It can affect volume when Shape Controls Volume is On and or the Pitch or Step Sequencer Lanes when the respective Lane s Use Shape is On Shape Lane Preset Start End Loop Start Loop End Repeats See Standard Lane Controls on page 30 Shape ControlsVolume Off On Off Shape does not affect the Wave Sequence volume On Shape directly controls the Wave Sequence volume Shape Lane Ste...

Страница 42: ...l sound as a percentage of the Timing Lane Step Duration Probability 0 100 See Step Probability on page 31 Step Seq This Lane generates a modulation source to control other synthesis parameters just like envelopes LFOs etc Important Wave Sequences run independently per voice This means that the Step Seq Lane can only modulate per voice parameters such as settings in the Amp Pitch Filter Envelopes ...

Страница 43: ...d Step s If the Lane doesn t already contain enough steps to complete the paste operation more will be added to the end up to the maximum of 64 If you have cut or copied multiple Steps and then select a range of Steps as the Paste destination the following will happen If a single Step is selected the Steps will be pasted starting at that step and then replace as many steps as necessary following t...

Страница 44: ...to play normally If you select other Steps in the current Lane solo will follow the selected Step To exit Step Solo mode click on the yellow STEP SOLO text at the top of the window Alternatively you can bring up the contextual menu and un select Solo Step Only one Lane at a time can be in Step Solo mode If you enter Step Solo mode for a second Lane the first Lane s Step Solo mode is turned off aut...

Страница 45: ...offsets between Layers without making the Program play out of tune if it s saved and selected elsewhere 3 MIDI This section controls MIDI behavior including MIDI Channel and controller reception 4 Layer Level Inf 84 9 6 0dB This controls the volume of the Layer Note that this is saved in the Performance but not with the Program so it s a good choice when balancing levels between Layers 5 Voice All...

Страница 46: ...ssing down on the sustain pedal Notes continue to play as if you were holding down the key even after you lift your fingers from the keyboard If the sound is a looped Wave Sequence or a looped single sample it will play continuously until you select a different sound Off Notes will play normally This is the default setting On The sound will hold indefinitely Important This older Program level Hold...

Страница 47: ...te is released On The first note in a legato phrase will sound normally subsequent notes in the phrase will sound smoother for instance envelopes will continue instead of restarting Off Legato playing will produce the same sound as detached playing Priority Low High Last Priority is available when Voice Assign Mode is set to Mono This determines what happens when more than one note is being held d...

Страница 48: ...eater Layer Setup Pitch Octave 3 3 This transposes the Layer by 3 octaves up or down Tune 100 100cents This lets you detune the Layer by up to 100 cents 1 100 of a semitone up or down MIDI Use Global MIDI Channel Off On On This is the default The Layer will receive on the Global Channel Off The Layer will receive on the channel specified below MIDI Channel 1 16 This is shown only if Use Global MID...

Страница 49: ...rn Pattern Up Down Alt1 Alt2 Random This controls the note pattern of the Arpeggiator Most should be self explanatory Alt1 and Alt2 each go up and then down the difference between them is that Alt2 plays the top most and bottom most notes twice Up Down Alt1 Alt2 Random Octaves 1 4 This controls the range of the arpeggiated notes Sort Off On Off The Arpeggiator Patterns will be based on the order i...

Страница 50: ...ion above 100 The second rhythmic division will be pushed to the third triplet for a full swing feel 100 The second rhythmic division will be pulled to the second triplet for a reverse swing feel Trigger Latch Off On Off The Arpeggiator will only play as long as notes are being held on the keyboard or via the damper pedal On The Arpeggiator will continue to play after notes are released Sync Notes...

Страница 51: ...e Velocity Zones HighVel A D LowVel A D 1 127 These set the highest and lowest velocities on which the Layer will sound High Fade A D 0 126 0 The High Vel acts as a hard split with full volume on one side and silence on the other 1 126 This lets you create a velocity crossfade As velocity approaches the High Vel the volume fades out gradually High Fade sets the velocity range over which the fade o...

Страница 52: ...hite keys The black keys will play the equal tempered pitches Pure Major Pure Minor These are Just Intonations optimized for major and minor keys respectively Unlike the other scales they maintain the A4 tuning e g A 440 Hz as set by the Master Tune parameter see Master Tune on page 11 Because of this the root note of the selected Key may shift from its equal tempered pitch Slendro This Indonesian...

Страница 53: ...r Column 2 filters by either destination category such as Synth or Effects or source category such as Controllers or Generators Column 3 filters more specifically such as by specific synth section such as the Filter or a specific controller such as the Mod Wheel 2 Mod List This shows all of the modulation routings which match the criteria set in the Show in Mod List section You can change mod sour...

Страница 54: ...urces are shown here including the Vector Envelope and Joystick Pitch and Mod Wheels Velocity and Aftertouch LFOs Envelopes Key Tracking Mod Processors and the Step Sequencer Lane Graphics show the mod source outputs making it easy to figure out what s creating a specific modulation effect ...

Страница 55: ...ects and the differences between higher velocities will be more pronounced ReleaseVelocity This is the note off velocity representing how quickly the note is released from the keyboard Gate and Gate Damper Gate is triggered by a new note after all notes have been released such as at the beginning of a phrase Gate Damper is similar except that it is triggered by a new note on after all notes and th...

Страница 56: ...ope trigger source use Step Pulse instead Step Pulse This generates a brief trigger pulse at the start of each Wave Sequence Step Tempo This lets you use the system tempo as a modulation source 120 is the center for a value of 0 60BPM is 100 and 240BPM is 100 the value continues to increase up to 300BPM Note that this is different from tempo synchronization for that purpose use the dedicated Tempo...

Страница 57: ...s MIDI CCs 1 to 119 can all be used as modulation sources Some also have preset assignments to specific functions as detailed below MIDI CC Fixed assignment 7 Volume Overall volume 11 Expression Overall volume 16 Vector Joystick X position 17 Vector JoystickY position 64 Damper Damper sustain pedal 66 Sostenuto Sostenuto holds only notes sounding when the pedal is first pressed 67 Soft Reduces vel...

Страница 58: ...trol the Vector manually you can use the on screen Vector Joystick or CC 16 X axis and CC 17 Y axis If you re using a controller with a physical Vector Joystick the range will generally be constrained as shown in the graphics below VectorPointandXandYaxisvalues 127 127 127 127 0 B D C A 0 Vector Joystick Range Vector Point Y value 50 Y Axis X value 90 X Axis In addition to moving the point directl...

Страница 59: ...h point which also translate into the Vector Env modulation outputs You can edit these by hand if desired or simply use the graphic editor Unlike volumes modulation outputs are not clipped to the diamond shape Positions times and Time Scale are modulatable from channel sources such as the Mod Wheel MIDI CCs and Performance Mod Knobs as well as by velocity and note number but not from per voice sou...

Страница 60: ...se point 1 126 The Vector Envelope will loop the specified number of times hold at point 3 until the note is released and then proceed to the Release point Inf The Vector Envelope loops as long as the note is held and then moves to the Release point when the note is released VectorVolume Each point of the Vector Envelope has X and Y positions from which the A B C and D percentages are derived This...

Страница 61: ... straight lines In actuality they are more likely to be made out of curves In other words each segment s level will change quickly at first and then slow down as it approaches the next point This tends to sound better than straight linear segments Classic analog synth envelopes made these curved shapes naturally The wavestate native goes a step further than vintage synths however and lets you cont...

Страница 62: ...e Threshold the envelope resets When the threshold is negative the envelope resets when passing through the threshold moving downwards In other words if the value has been above the Threshold and then changes so that it is equal to or below the Threshold the envelope resets Note modulation sources may not always reliably reach the extreme values of 100 or 100 This can happen due to smoothing or wi...

Страница 63: ...e self explanatory but a few will benefit from more details GTR Guitar is intended for guitar vibrato It is positive only so that when used for pitch it only bends upwards RND 1 Random 1 generates traditional sample and hold waveforms random level changes with steady timing RND 2 Random 2 randomizes both levels and timing RND 3 Random 3 generates a pulse wave with random timing RND 4 6 are smoothe...

Страница 64: ...elow 0 again Offset is shown as a dotted line in the LFO graphic and can be edited by dragging the line up and down Offset affects the signal after the Shape function as shown below LFOSignalFlow Offset Curve Waveform Curve 100 100 Curve adds curvature to the basic waveform As you can see in the graphic below this can make the waveforms either more rounded or more extreme It can also be useful to ...

Страница 65: ...tarts from the phase determined by the first note in the phrase so that the LFOs for all notes being held are synchronized together Fade applies only to the first note in the phrase Note Even if Sync Notes is On each note s LFO speed may still be different if modulated by note number velocity key scaling or other note specific modulation sources ...

Страница 66: ...stay the same between the Low Key and the Mid Key You can think of the resulting shape as being like two folding doors attached to a hinge in the center At the Mid Key the main hinge the keyboard tracking has no effect The two folding doors swing out from this center point to create changes in the higher and lower ranges of the keyboard Slope Positive slope values mean that the keyboard tracking o...

Страница 67: ...normal key track use negative values 1 00 is the default Mid Key C 1 G9 This sets the center of the keyboard tracking the main hinge When this key is played the Key Track output is 0 The Mid Key can t be set below the Low Key or above the High Key Mid High Slope Inf 12 00 12 00 Inf This sets the slope between the Mid and High keys For normal key track use positive values 1 00 is the default High K...

Страница 68: ...s that unlike Filter Key Track Amp Key Track s negative Slopes are steeper than positive Slopes KeyTrack amount Slope Change in level 100 Inf Silent in one half step 12 00 Silent in five semitones 5 00 Silent in one octave 1 00 Silent in five octaves 00 no change 1 00 2x in five octaves 5 00 2x in one octave 12 00 2x in five semitones Inf 2x in one half step ...

Страница 69: ... the threshold For instance you can use Gate to Apply pitch bend or other effects to some notes but not to others using Control at Note On Only Apply modulation only after the source reaches a certain threshold for instance use Velocity to modulate an LFO s frequency but only once Velocity is greater than 90 Use a controller to switch between two different LFOs or any two modulation sources Contro...

Страница 70: ...verts the phase Offset 200 200 This controls how the Input is shifted up or down 200 shifts an input of 100 all the way to 100 Converting from bipolar to unipolar You can use Offset to convert a bipolar modulation source both negative and positive such as an LFO to a unipolar signal positive only To do so 1 Select the LFO as the source 2 Set the Input Amount to 50 This cuts the overall level of th...

Страница 71: ...Pitch Bend You can use Quantize to create quantized pitch bend for fret dragging effects brass rips and more 1 Open the Synthesis tab 2 Click and hold on Mod Processor 1 in the Mod Source footer and drag it to the Tune knob This creates a modulation routing from Mod Processor 1 to Tune 3 In the Mod Panel on the right of the window set the Intensity to any exact half step value 5 00 7 00 etc 4 Clic...

Страница 72: ...ut is an LFO and the Scale Source is an Envelope positive settings mean that the Envelope will increase the amount the of LFO Curve Curve can create custom controller curves such as exponential joystick logarithmic velocity and so on It can also alter the shape of programmable modulation sources such as Envelopes and LFOs Note Curve primarily affects modulation signals which already have some amou...

Страница 73: ...and deemphasizes the center Negative emphasizes center value range around 0 Asymmetric Unipolar Positive emphasizes extreme upper range with offset Negative emphasizes extreme lower range with offset Bipolar Positive emphasizes upper value range Negative emphasizes lower value range Bipolar and Unipolar modulation sources To understand Curve it helps to understand the difference between bipolar an...

Страница 74: ...Mod Processor Attack 0 000 10 000sec This controls how long it takes the smoother to reach a new higher value Higher settings mean longer times Decay 0 000 10 000sec This controls how long it takes the smoother to reach a new lower value Higher settings mean longer times Sum Output MainInput Sum Source MainInputAmount Sum Source Amount Sum adds two modulation sources together This is useful if you...

Страница 75: ...Modulation Processors 71 Input LFO Sum Source Env Output ...

Страница 76: ...ffect you can select a Type aka algorithm and a Preset within that Type For full lists of Effect Types see Pre FX on page 73 Mod FX on page 74 Delay on page 75 and Master Reverb on page 76 Types ending in all such as Delay All Chorus All etc let you select Presets from all related Types 3 Effect Preset These are the presets available for the selected Type 4 Effect On Off Click on the power button ...

Страница 77: ... the effect Use this to alter the response of effects such as the Waveshaper or to compensate for gain increases in effects such as the Talking Modulator Volume Inf 84 9 12 0dB This controls the post Drive output of the Guitar Amp Use it to compensate for level changes caused by Drive Output Level Inf 84 9 0 0dB This controls the output volume from the effect Use it to compensate for level changes...

Страница 78: ...orus This effect models the scanning chorus and vibrato circuitry of a vintage organ EP Chorus This is inspired by a rare chorus built into a famous modified tine piano Harmonic Chorus This stereo effect applies chorus only to higher frequencies particularly useful for bass sounds Some presets use feedback to turn the chorus into a flanger Modern Chorus This stereo effect adds thickness and warmth...

Страница 79: ...y VOX wah pedals the V847 and the V848 Clyde McCoy model Delay L C R Delay This mono in stereo out multitap delay has three taps panned to the left right and center respectively Multiband Mod Delay This monster effect divides the input signal into four frequency bands with a modulatable delay for each band It can produce everything from complex frequency specific delays to thick choruses Reverse D...

Страница 80: ...l ambiences gated reverbs and reverse effects Overb The Overb features a high quality diffusion based reverb core including randomization for richer and smoother reverb timbres Master EQ Performances include a dedicated parametric EQ after the Master Reverb EQ On Off enables and disables the EQ Use Trim to compensate for EQ boosts The L Low and H High bands can be set to Peak Shelf or Cut Low cut ...

Страница 81: ...n the wavestate native This menu chooses which type s of data are shown in the list All Data shows all types of data at once 3 Data List This shows lists of all the data in the wavestate native database as filtered by the Search Data Type Category and Collection settings in the Filters Panel Selection Click on an item in the list to select it for metadata editing or export Double clicking on Perfo...

Страница 82: ...nel can be resized by dragging its left edge 8 Search Type into this field to filter the list by searching for text in any of the metadata fields Click on the X to clear the field 9 Categories Categories let you filter by the type of sound such as basses leads bells etc Each sound can be assigned to two Categories and each data type Performances Programs etc has its own list of Categories Click on...

Страница 83: ...o confirm the import including information about which files have been added Data conflicts If some of the imported data appears to be different or updated versions of the internal data a dialog will appear with the text A different or changed item already exists in the database for item name The dialog offers several options Cancel the item will not be imported Overwrite the item will be imported...

Страница 84: ...ingle bundle file without saving the write protected factory sounds 1 In the menu select the Export Bundle of All User Sounds command 2 Navigate to the location to save the bundle and enter a name for the file 3 Press Save to save the bundle file This exports a bundle of all non write protected data for backing up or transferring all of your custom sounds at once Importing and exporting Set Lists ...

Страница 85: ... in the title bar SetListwindow Slots selected for cut copy paste are outlined in blue Active shows Set List selected in Settings The name of the Set List is shown both in the window s title bar and in an editable field at the top of the window Selected Slots are shown with a blue outline You can select multiple non continuous Slots by holding down the command key on MacOS or the Ctrl key in Windo...

Страница 86: ... right click or control click on MacOS or drag and drop You can open multiple Set List windows at once If one of the windows shows the active Set List the note Active appears after its name in the title bar Using commands in the contextual menu To re arrange Slots using the contextual menu 1 Select the Slots that you d like to copy cut or delete You can select two or more non continuous Slots usin...

Страница 87: ...be filled by the Init Performance Copy This copies the selected Set List Slot s and places their data on the clipboard for use in Paste or Insert Before Paste This replaces the selected Set List Slot and potentially subsequent Slots with the data on the clipboard If multiple Slots are selected only the lowest numbered selection affects the Paste operation other selections are ignored Important if ...

Страница 88: ...Set Lists 84 Make Active When an active Set List window is open this selects the current Set List Slot When an inactive Set List window is open this selects the Performance assigned to the Set List Slot ...

Страница 89: ...he following If other applications are running close them Reduce the maximum polyphony of the synthesizer you re using In the Audio MIDI Settings window increase the audio buffer size Note that this will also increase the latency the delay before you hear sound Sound is delayed Latency is determined by the number of samples x the number of buffers If you are using a plug in host adjust the buffer ...

Страница 90: ...irements MacOS OS macOS 10 13 High Sierra or later Latest updates CPU Apple M1 or better or Intel Core i5 or better Core i7 or better recommended Memory 8 GB RAM or more 16 GB RAM or more recommended Storage 8 GB or more free space SSD recommended Internet connection Plug in AU VST3 AAX 64 bit only Windows OS Windows 10 or later 64 bit Latest updates 32 bit operating systems are not supported CPU ...

Страница 91: ...r sounds Information to provide when contacting us In order for us to help you we ll need the following information Your name The name and version of the product you can find the version using the About command in the three dot menu Your computer hardware and operating system name and version Your question provide as much detail as possible Apple Mac and the Mac logo are trademarks of Apple Inc re...

Отзывы: