


MUL
TI
1.1
2.2
2.3
3.1
3.2
3.3
3.4
4.1
4.2
4.3
4.4
5.1
6.1
7.1
7.2
7.3
63
• Inputting a tie
If you press the [F5] (“Tie”) key without pressing the key-
board, the previously-input note will be tied, and length-
ened by the amount specified in
4
.
If you press the [F5] (“Tie”) key while holding down a
note, the note you are playing will be tied, and length-
ened by the amount specified in
4
.
You can even input notes as shown in the following dia-
gram.
• Deleting a note or rest
To delete a note or rest, press the [F6] (“Back”) key. The
location will move backward by the amount specified in
4
, and the data in that interval will be deleted.
• Auditioning the next note before input
If you wish to verify the note you intend to enter next,
press the [F7] (“Pause”) key. In this condition, playing a
key will produce sound, but a note will not be recorded.
Press the [F7] (“Pause”) key once again to defeat pause
and resume input.
8
When you reach the end of the pattern you will return to
the beginning. Recording will continue, allowing you to
add more data.
9
When you are finished with step recording, press the [F8]
(“Done”) key. If you press the [COMPARE] key, you will
return to the condition of before you began step record-
ing.
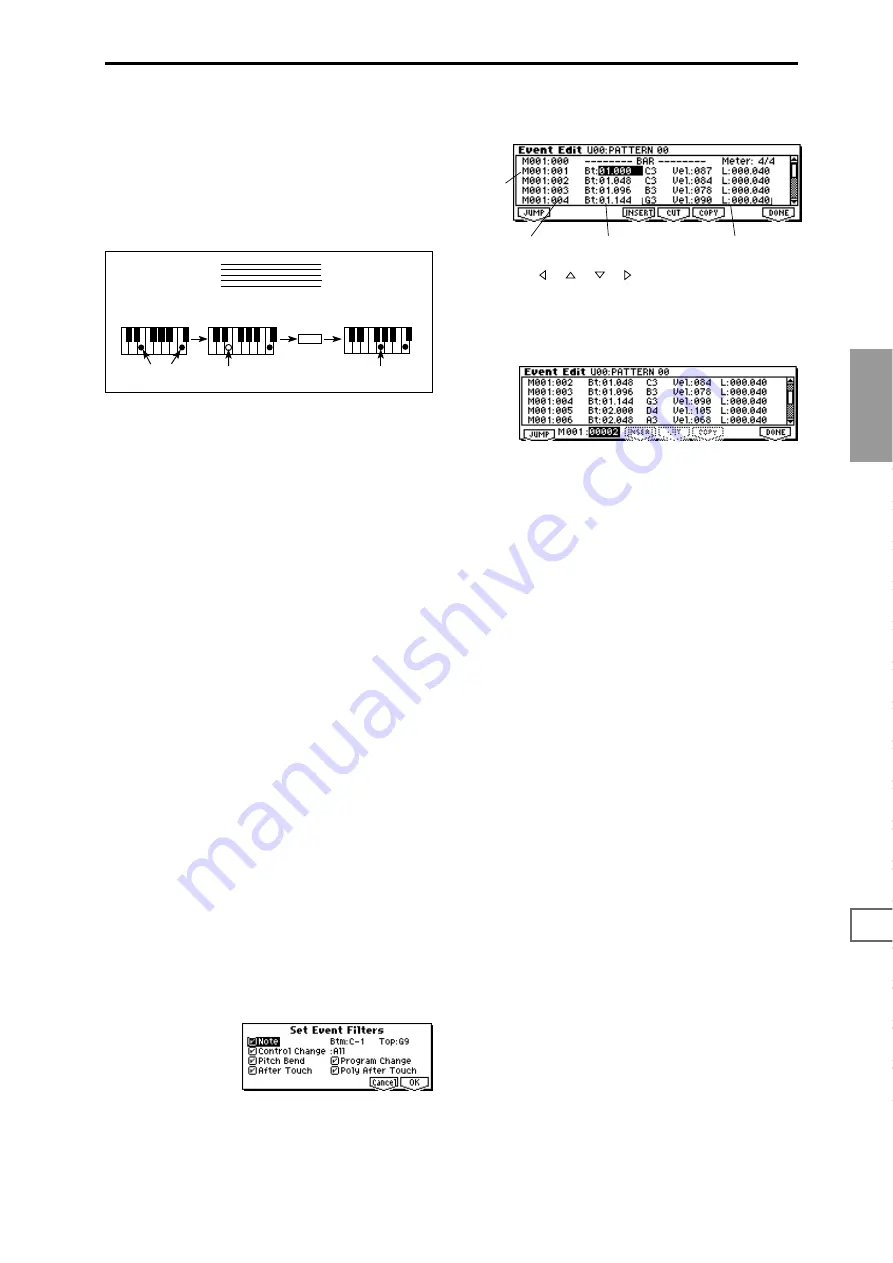
Event Edit
Here you can edit individual events of music data that were
input.
1
Use “Pattern Bank” and “Pattern Select” to specify the
pattern that you wish to edit.
2
Select the “Event Edit,” and access the Set Event Filters
dialog box.
The Set Event Filters dialog box displays an event editing
screen, and allows you to select the type of events (musi-
cal data) to be edited. Check the events that you wish to
view.
For “Note,” you can set “Bottom” and “Top” to specify
the range of notes that will be edited. You can also input
these values by holding down the [ENTER] key and
playing a note on a connected MIDI instrument. Nor-
mally you will set this to C–1 and G9.
“Control Change” specifies the control change numbers
that will be edited. Normally you will set this to ALL.
You can also check various other events (“Pitch Bend,”
“Program Change,” “After Touch,” and “Poly After
Touch”).
3
Press the [F8] (“OK”) key to open the Event Edit dialog
box.
4
Use the [ ], [
], [
], [ ] keys to select the event that
you wish to edit.
You can also press the [F1] (“JUMP”) key and use “M
(Measure)” and “Index” so that the events of the measure
being edited and the index number within that measure
are displayed at the beginning of the dialog box.
5
Select the event that you wish to edit, and use the
[VALUE] dial etc. to modify its value(s).
• By modifying the value of the “Bt” (Beat. Tick) location
within the measure, you can move the event within the
measure.
• You can edit each event by modifying its data value(s).
When you select a note event, it will sound.
6
You can press the buttons located at the bottom of the
dialog box to edit events as follows.
• Inserting an event
Select the location “Bt” at which you wish to insert an
event, and press the [F4] (“INSERT”) key to insert an
event.
• Deleting an event
Select the event that you wish to delete, and press the
[F5] (“CUT”) key to delete the event.
• Moving an event
You can use the [F5] (“CUT”) key and [F4] (“INSERT”)
key to move an event (by “cut and paste”).
Use the [F5] (“CUT”) key to delete the event that you
wish to move, then use the [F4] (“INSERT”) key to insert
it at the desired location.
You can also move an event by modifying its “Bt” value.
• Copying an event
Select the event that you wish to copy, and press the [F6]
(“Copy”) key. Then select the copy destination and press
the [F4] (“INSERT”) key to insert the event at that loca-
tion.
7
The end of the pattern is indicated as End of Pattern.
When you are finished event editing, press the [F8]
(“DONE”) key. If you press the [COMPARE] key, you
will return to the state before you began event editing.
Step Time =
Step Time =
Step Time =
Tie
On
Press E and C
ON
Press G
Off
Release E (continue holding C)
Event data
Measure
Index no.
Location within the
measure (beat, clock)


