background image

41

Quick Star

t

Power on/off

Demo song

Playing 

programs

Playing 

combinations

Using 

controllers

Arpeggiator

RPPR

Program 

editing

Combination 

editing

Sampling

Song

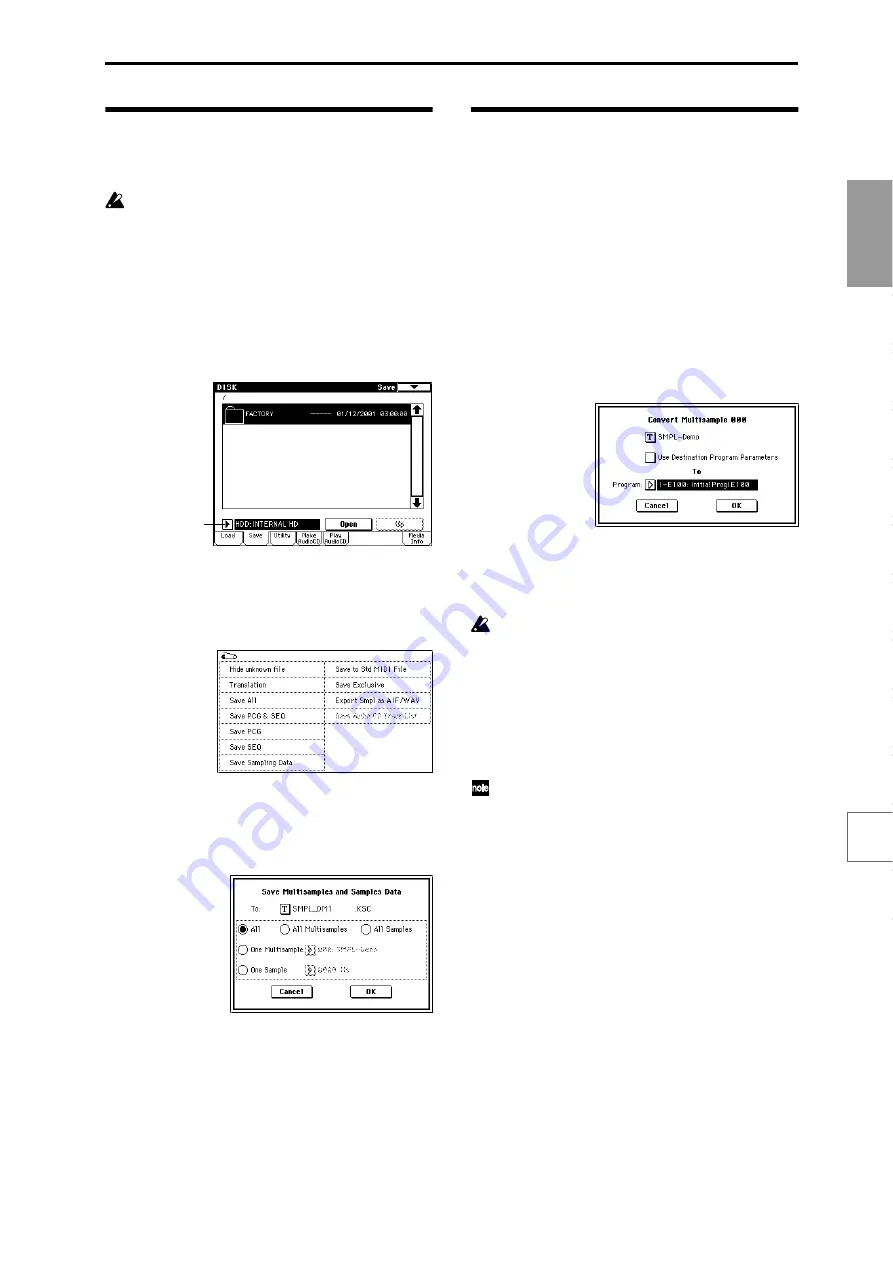
Saving sample data

Here’s how to save a sample or multisample that you cre-
ated.

All samples and multisamples in the TRITON STU-
DIO will be lost when the power is turned off.

Sample data can be saved on a floppy disk, the internal 
hard drive, the CDRW-1 option, or external SCSI storage 
media (hard disk, MO, Zip, Jaz, ORB, CD-R/RW, etc.).

1

Insert the media and/or make the appropriate set-
tings for the connected external SCSI device so that it 
is ready to save data.

2

Press the [DISK] key to select Disk mode.

3

Press the Save tab.

4

If you want to save to a different device, use the drive 
select setting to select the device on which you want 
to save the data.

5

Press the page menu button to access the page menu, 
and press “Save Sampling Data.”

6

When the dialog box appears, press the text edit but-
ton to access the text dialog box, assign a filename of 
SMPL_DM1, and press the OK button.

7

Make sure that the All radio button is selected, and 
press the OK button to save the data.

When saving is completed, a file with an extension of 
.KSC together with the .KMP and .KSF files (in folders) 
will be saved. For details on each file, refer to PG p.162 
“About Korg format PCM data files.”

Converting a multisample into a 
program

A multisample you create can be converted into a pro-
gram. If a sample or multisample is converted into a pro-
gram, it can be played in Program mode or used in 
Combination mode and Sequencer mode.

1

Press the [SAMPLING] key to enter Sampling mode.

2

Create a multisample. 

Refer to “Sampling a vocal from a mic, and playing it 
as a “one-shot” sample” (

p.37).

3

Press the [EXIT] key to select the P0: Recording page.

4

Press the page menu button to access the page menu, 
and press “Convert MS To Program.”

The following dialog box will appear.

5

In the To “Program:” field, select the program into 
which the data will be converted.

We recommend that you select one of the initialized 
programs in bank I–E.

When you execute the Convert operation, the pro-
gram in the conversion destination location will be 
overwritten and replaced by the converted program.

6

Set the “Use Destination Program Parameters” set-
ting.

For this example, leave this unchecked. If you execute 
the conversion with this unchecked, the program will 
be created using the sound that you heard in Sam-
pling mode.

If you want to use the program parameters of a pre-
loaded program (INT-A000–INT-D127), copy that 
program to bank INT-E before you perform this oper-
ation. Use the To “Program:” field to select that pro-
gram, and check “Use Destination Program 
Parameters

” before you perform the conversion.

However if you want to convert a stereo multisam-
ple with “Use Destination Program Parameters” 
checked

, you must change the “Oscillator Mode” 

(

PG p.7) to Double for the conversion destination 

program (To “Program”) before executing the conver-
sion.

7

As necessary, press the text edit button to access the 
text dialog box and assign a program name.

8

Press the OK button. A dialog box will ask you for 
conformation. Press the OK button once again, and 
the conversion will begin.

9

Listen to the converted program.

Switch to Program mode, select the program (INT-E100 
in the above example), and play the keyboard to hear 
the sound.

Drive select

Содержание sampler

Страница 1: ...1 E...

Страница 2: ...intended to alert the user to the presence of uninsulated dangerous voltage within the product s enclosure that may be of sufficient magnitude to constitute a risk of electric shock to persons The exc...

Страница 3: ...so any SCSI devices that are connected This device begins to access the hard drive immedi ately after the power is turned on Never turn off the power while the hard drive is being accessed Doing so ca...

Страница 4: ...lists the multisamples and drumsamples that are built into the TRITON STUDIO and the factory preset combinations programs drum kits and user arpeggio patterns Refer to these lists when you wish to kn...

Страница 5: ...cting a program 22 Selecting and playing a combination 24 Selecting a combination 24 Using controllers to modify the sound 25 Joystick 25 Ribbon controller 25 SW1 SW2 25 REALTIME CONTROLS 1 2 3 4 26 V...

Страница 6: ...80 The structure of Sequencer mode 81 Songs 81 Patterns 81 Cue List 81 Preparations for recording 82 Recording methods 83 Realtime recording on a track 83 Step recording 86 Event Edit and Create Contr...

Страница 7: ...Dual arpeggiator editing 137 Synchronizing the arpeggiator 138 Synchronization between arpeggiators A and B 138 Synchronization between the arpeggiators and sequencer in Sequencer or Song Play mode 1...

Страница 8: ...viii...

Страница 9: ...n stereo out two master effects mono in stereo out and a three band master EQ stereo in stereo out can all be used simultaneously You can select and edit any of 102 types of effect algorithms The effe...

Страница 10: ...using the Fixed Note Mode that is ideal for drums bass phrases or guitar and keyboard backing riffs The arpeggiator is also effective for use with subtly moving pads synth sounds or sound effects In C...

Страница 11: ...headphone jack 5 REALTIME CONTROLS Use the REALTIME CONTROLS key to select A or B mode for the realtime controllers and use knobs 1 4 to control the tone effects and MIDI control changes etc in realt...

Страница 12: ...nel LCD screen By touching on objects that are shown in the LCD screen you can select pages tabs and parameters and set values p 8 10 EXIT key When a dialog box is open this key will cancel the set ti...

Страница 13: ...urrent tempo GATE knob This adjusts the gate time note duration of the arpeggi ated notes At the center position 12 o clock the gate time will be the same as the Gate parameter of the arpeggiator Rota...

Страница 14: ...ch oscillator drum timbre track or insert effect can be freely routed to any output p 139 MAIN L MONO R These are unbalanced phone jacks These are the main audio output jacks By setting Bus Select to...

Страница 15: ...onal Korg EXP 2 or XVP 10 expression pedal can be connected here p 11 Its function can be assigned in Global mode allowing you to use the pedal to control the volume etc p 124 10 Contrast adjustment k...

Страница 16: ...close the popup menu If the popup menu is unlocked Pin it will close if you touch a location outside the popup menu Popup menu Pin This switches the popup menu display between locked and unlocked Whe...

Страница 17: ...mands are executed the previously locked page menu will be unlocked automatically and the page menu will be closed Text edit button When you press this button a text edit dialog box will appear Here y...

Страница 18: ...MIC GAIN MIC5 BAL OR UNBAL LINE IN 5 LOW CUT 75Hz 18dB OCT TRIM 10dB 40dB 10 60 U 10dBV MIC GAIN MIC6 BAL OR UNBAL LINE IN 6 LOW CUT 75Hz 18dB OCT TRIM 10dB 40dB 10 60 U 10dBV MIC GAIN 60 U 15 U 15 AU...

Страница 19: ...nections Digital audio output The same audio signal present at the TRITON STUDIO s AUDIO OUTPUT MAIN L MONO and R jacks can be output in digital format to a DAT MD or digital multi track recorder that...

Страница 20: ...ations Connecting MIDI deveices computers Connections to a computer Your performance on the TRITON STUDIO as well as controller and sequencer data can be sent to a computer connected via MIDI interfac...

Страница 21: ...u can choose combinations from rewritable banks INT A INT E and EXB A EXB G which contain a total of 1 536 combinations Sample or resample For example you can sample an external audio source while lis...

Страница 22: ...y specified order Sampling mode Sample external audio sources i e record samples Insert effects can be applied to the external input sound while you sample Edit the waveform data you sampled or wavefo...

Страница 23: ...y 30 voices can be used However if OSC1 is sounded by one tone generator and OSC2 is sounded by the other tone generator e g OSC1 ROM OSC2 Piano a maximum of 60 voices can be used If OSC1 and OSC2 use...

Страница 24: ...to the selected page and it will appear in the display As an example here press P1 Edit Basic As a reminder the page that was selected before you pressed the MENU key will have its top right corner be...

Страница 25: ...n Combination mode to select the combination bank In combination Sequencer and Song Play modes these keys are used to select the bank of the program used by each timbre track COMPARE key Use this key...

Страница 26: ...the keyboard to input the setting Hold down the ENTER key and play the note that you wish to enter as a value The note number or velocity value will be input When the Global P5 Drum Kit page is displa...

Страница 27: ...obal Setting Drum Kits or Arpeggio Patterns Loading Program Combination Global Setting Drum Kit or Arpeggio Patterns data in Disk mode Receiving a MIDI data dump for Program Combination Global Setting...

Страница 28: ...ck the data that you want to load along with the song In this case make the settings shown below Check Load PRELOAD PCG too If this is checked the PCG file will be loaded along with the SNG file when...

Страница 29: ...stop playback press the SEQUENCER START STOP key once again If the last step is End playback will stop automatically when it reaches that point If the last step is Continue to Step01 playback will re...

Страница 30: ...screen will indicate Bank INT B INT A INT D With the factory settings these banks contain a wide variety of preloaded programs that use the internal PCM ROM multisamples effects and arpeggio pat terns...

Страница 31: ...will appear In the graphic bank G is selected The center area shows the programs contained in that bank The Variation button will be displayed only when bank G is selected Each time you press this but...

Страница 32: ...o load combina tions that use programs of the EXB MOSS option or to store combinations that you created EXB A EXB G With the factory settings these banks do not contain combinations These banks can be...

Страница 33: ...on the following page You can use the ribbon controller as a source for alter nate modulation or effect dynamic modulation to control program parameters or effect parameters SW1 SW2 You can use these...

Страница 34: ...sound you modified by the two controllers will be maintained In many programs and combinations the SW2 key is assigned to control the Lock function for the joy stick Y direction and the ribbon contro...

Страница 35: ...or song In Sampling mode and Song Play mode the B mode func tions are set for the entire mode p 145 Viewing the parameters that are assigned to SW1 SW2 keys and the REALTIME CONTROLS B mode In Program...

Страница 36: ...ned function can be switched on off using the foot switch The function of the foot switch is assigned in Global P2 Controller Foot SW Assign p 125 Assignable Foot Pedal An optional expression pedal su...

Страница 37: ...p 134 Using the arpeggiator in Program mode 1 Press the PROG key to enter Program mode and select a program Selecting and playing a program p 22 As you select various programs you will notice that th...

Страница 38: ...e factory settings U000 I A B U199 I A B U312 User U506 User contain a wide vari ety of preloaded user arpeggio patterns For the arpeggio pattern names VNL Choose Pat Pattern Select and use the VALUE...

Страница 39: ...ng and playing a combination p 24 As you select various combinations you will notice that the ARPEGGIATOR ON OFF key LED will light for some combinations Linking the arpeggiator to program combination...

Страница 40: ...Top Key and Bottom Key are set so that arpeggiator A will operate only for keys B3 and lower and that the B Top Key and Bottom Key are set so that arpeggiator B will operate only for keys C4 and high...

Страница 41: ...ing a demonstration song in Sequencer mode p 21 4 Make sure that the RPPR check box is checked Checked The specified RPPR set in Sequencer P6 Pat tern RPPR RPPR Setup will function Unchecked RPPR wil...

Страница 42: ...ms program this perfor mance editor will have no effect Amp Level Indicates the amp level This will adjust the volume of the entire program Attack Time Indicates the attack time of the filter EG and a...

Страница 43: ...2 These two programs are layered to create a frequently heard type of electric piano sound A timbre consists a of program together with multi ple parameters that control that program A combina tion c...

Страница 44: ...ereo position 7 Press the Mixer tab 8 Press Pan for timbre 2 it will be highlighted and use the VALUE controllers to edit the setting With a setting of C064 the sound will be located in the center A s...

Страница 45: ...jack located on the rear panel Set the AUDIO INPUT MIC LINE switch to the MIC position and set the LEVEL knob to the center 2 Press the SAMPLING key to enter Sampling mode 3 Press the Input Setup tab...

Страница 46: ...ecording page 2 Set Save to to RAM The sample you record will be written into sample memory RAM For details on the DISK setting refer to p 105 3 Set Sampling Mode to L Mono With this setting the inter...

Страница 47: ...ecord additional samples Example Easy To Sample With TRITON STUDIO 6 Play consecutive notes on the keyboard Play a chromatic scale upward starting at the C2 key The samples you recorded will be played...

Страница 48: ...that order Press the Shift button once again to switch to lower case letters and press e m and o in that order Press the OK button to close the text dialog box If you do not need to make any correctio...

Страница 49: ...1 Press the SAMPLING key to enter Sampling mode 2 Create a multisample Refer to Sampling a vocal from a mic and playing it as a one shot sample p 37 3 Press the EXIT key to select the P0 Recording pa...

Страница 50: ...we will sample one measure of a 140 BPM drum phrase in a 4 4 time signature In this example we will use a CD player For details on how you can digitally sample or rip from the CDRW 1 option or from a...

Страница 51: ...this setting you can press the SAMPLING REC key to enter record ready mode and then press the SAMPLING START STOP key to start recording 4 Settings for the sample that will be recorded REC Sample Setu...

Страница 52: ...Start and Start to the same value If desired you can make a dotted vertical line appear in the sample waveform display to indicate the BPM If you use this function with waveforms that have a specific...

Страница 53: ...e P0 Play Sampling page make the following settings for Sampling Setup Source BUS L R This lets you sample the sound of the L R channel i e the sound that is output from the headphones and the AUDIO O...

Страница 54: ...itar connected to the AUDIO INPUT jack can be played along to a drum pattern played by the TRITON STUDIO and how both can be sampled together Sampling can be performed in a similar way in Com bination...

Страница 55: ...instruments is not to your lik ing use the LEVEL knob or the performance editor Amp Level to adjust the balance 3 When you have finished making adjustments press the SAMPLING REC key Press the ARPEGG...

Страница 56: ...INPUT 1 and 2 jacks while you listen to the sound of the TRITON STUDIO arpeggiator etc Input Analog Input1 BUS Select 1 2 Pan L000 Input2 BUS Select 1 2 Pan R127 Source BUS Indiv 1 2 Recording Level 0...

Страница 57: ...olume and effect settings suitable for various styles of music By loading a template into a song you can begin recording immediately without having to make the same frequently used settings each time...

Страница 58: ...Intro you can begin the loop after adding an introduction PG p 55 Track Play Loop will continue repeating for the num ber of measures specified by Length If you want to limit the number of repetitions...

Страница 59: ...our performance in measures 5 8 was the best take you can use the Track Play Loop function to repeatedly play back just this portion In the P0 Play REC PlayLoop T01 08 page check Track Play Loop for t...

Страница 60: ...of the note that is selected at the left Note Duration indicates the length that the note itself will sound Smaller values will produce a staccato note and larger values will produce a legato note Fo...

Страница 61: ...ESONANCE HPF real time controllers or the joystick Y axis to record their movements When you are finished performing press the SEQUENCER START STOP key If you make a mistake or want to re record press...

Страница 62: ...power is turned off 1 Perform steps 1 4 of Saving sample data p 41 2 Press the page menu button to access the page menu and press Save SEQ The Save Songs and Cue Lists Data dialog box will appear 3 W...

Страница 63: ...ples from the RAM bank are used in the Multisample or Drum Kit of a program you should be aware that these multisamples or sam ples cannot be written into memory This means that if you turn the power...

Страница 64: ...rogram or combination Before you write data into memory you must turn off the memory protect setting in Global mode Memory protect A combination does not contain the actual program data for each timbr...

Страница 65: ...data or load data from floppy disk hard disk or other external media use the following pro cedure to turn the memory protect off uncheck the appro priate check box You must also turn memory protect of...

Страница 66: ...er arpeggio pattern the Global mode memory protect setting must be turned off Memory protect The user arpeggio pattern parameter settings Tempo Pattern Octave Resolution Sort Latch Key Sync and Keyboa...

Страница 67: ...rage device hard disk removable disk etc Other types of data can also be saved on storage media Even if you later modify this data you will always be able to reload the original settings It is a good...

Страница 68: ...R RW disc into the drive For details on handling CD R RW discs please be sure to read Cautions when handling CD R RW discs If you will be using the disc to save data it must be for matted PG p 170 29...

Страница 69: ...asked whether you want to overwrite If you wish to overwrite press the OK but ton If you wish to save without overwriting press the Cancel button re do the operation from step 6 and rename the data i...

Страница 70: ...e protect tab so that the hole is uncovered This will prohibit writing to the disk and will prevent the data from being destroyed acci dentally Inserting a floppy disk With the label of the floppy dis...

Страница 71: ...described below Here we will explain how to load the PRELOAD PCG file from the included floppy disk A PCG file contains programs combinations drum kits user arpeggio patterns and global settings When...

Страница 72: ...r remove the media while data is being loaded Loading individual banks from a PCG file In the dialog box for step 6 of Loading data Restoring the factory settings it is also possible to set PCG Con te...

Страница 73: ...f the included floppy disk The TRITON STUDIO comes with one floppy disk TNSFD 00P The disk contains the following data TNSFD 00P PRELOAD PCG already loaded when the TRITON STU DIO is shipped Programs...

Страница 74: ...ve PCG to save the current data before you per form the procedure described here EXB MOSS If you want to load the floppy disk included with the EXB MOSS into the TRITON STUDIO load program bank I F an...

Страница 75: ...ure of a program Basic program editing You can edit the preloaded programs banks INT A INT D that the TRITON STUDIO is shipped with or you can start with an initialized program banks INT E EXB A EXB G...

Страница 76: ...t is recalled when the COM PARE key LED is dark Oscillator settings P1 Edit Basic Basic settings for the oscillator are made in the P1 Edit Basic page The TRITON STUDIO provides two oscilla tors and f...

Страница 77: ...r example if you set Velocity M Sample SW Lo Hi to 100 playing the keyboard softly will sound the Low multisample and playing strongly will sound the High multisample 3 Adjust the Lvl Level for High a...

Страница 78: ...ill occur when MIDI control change CC 16 messages are received or when the ribbon controller of a TRITON STUDIO or other MIDI connected instrument is moved to left or right With a setting of 12 the pi...

Страница 79: ...remolo or auto pan cyclical change in volume Filter settings P3 Edit Filter The filter allows you to diminish or emphasize specified frequency areas of the multisample selected for the oscil lator The...

Страница 80: ...These three settings will determine the depth of the tonal change produced by the filter EG Filter A B Modulation Set this when you wish to produce tonal change by using controllers etc to vary the cu...

Страница 81: ...l drum sounds will sound at the same location Preload and GM drum kits are set to stereo settings Normally you will leave this checked Amp Mod page Keyboard Track This lets you vary the volume relativ...

Страница 82: ...make settings for them The master EQ is also set here p 141 More about Alternate Modulation Alternate Modulation is a type of modulation that can be used to control various aspects of the sound AMS Al...

Страница 83: ...ttings being edited In the following pages we will explain how to edit some of the major parameters and explain their functions For a more detailed explanation of the parameters refer to PG p 33 and f...

Страница 84: ...or each one These settings can also be made in the Program Select and Mixer pages of P0 Play Edit Program Mixer page Category Program Select Bank Program Assigns a program to each timbre When the Bank...

Страница 85: ...y the relationship between arpeggiator assignments Status and MIDI Channel Bank Select when status EX2 This setting is valid when Status is set to EX2 It speci fies the Bank Select message that will b...

Страница 86: ...DI Filter 1 Enable Damper parameter Timbre 1 Enable Damper unchecked Timbre 2 Enable Damper checked Layer split and velocity switch settings Controller settings P4 Edit Zone Ctrl Key Zone page Key zon...

Страница 87: ...own above 1 In the P0 Play Program Select page or the P1 Edit Program Mixer Prog page use the Program Select area to select the program that will be used for each timbre 1 and 2 Select a brass program...

Страница 88: ...song or can be played by the RPPR function Various methods of recording are supported including realtime recording in which your performance on the keyboard and controllers including MIDI control even...

Страница 89: ...ns Patterns suitable for drum tracks are preset in internal memory and can be selected for any song User patterns Each song can have up to 100 patterns When using a pattern in a different song use the...

Страница 90: ...The MIDI channel of the external tone generator must be set to match the MIDI Channel of TRITON STUDIO tracks that are set to EXT EX2 or BTH If Status is set to BTH both the external tone genera tor...

Страница 91: ...u can record on the TRITON STUDIO Recording a track There are two ways to record to a track realtime record ing and step recording You can choose from six types of realtime recording In addition you c...

Страница 92: ...g Mode to Manual Punch In 3 In Location specify a location several measures earlier than the point at which you wish to begin recording 4 Press the SEQUENCER START STOP key Playback will begin 5 At th...

Страница 93: ...he SEQUENCER START STOP key Playback will end and you will return to the recording start location that you specified in step 4 If Loop All Tracks is selected normal playback will be looped as well Mul...

Страница 94: ...recording to create a pat tern User patterns can be accessed by the RPPR function in the same way as preset patterns and can be copied to or placed in a song Playback data from a track can also be cop...

Страница 95: ...e the RPPR function to play the pattern However the following control data will be automatically reset to the follow ing values when the song or RPPR function finishes playing the pattern or when play...

Страница 96: ...the copy source If you select All all song settings and playback data will be copied from that song If you select Without Track Pattern Events set tings other than Play Loop and RPPR will be copied F...

Страница 97: ...sure song Then mute all tracks other than tracks 1 3 When you play back you will hear only the drums bass and elec tric piano 6 As described in steps 1 4 set song S002 CHORUS to 008 8 measures making...

Страница 98: ...o so in an efficient way You can also use this as a jukebox function that will play back completed songs in the order you specify Each unit in a cue list is called a step and each step con tains a son...

Страница 99: ...tarted or when switching from song to song Although it will not be possible to change effect types within the cue list you can use dynamic modulation or MIDI control changes such as Effect Control to...

Страница 100: ...d This section explains how to assign a pattern to RPPR and how to play and record Playing with the RPPR Realtime Pattern Play Recording function p 33 Creating RPPR data 1 Create a new song p 88 2 Spe...

Страница 101: ...hese keys to control pattern playback and use keys C3 and above to play solos in realtime It is a good idea to keep the assigned keys together in this way RPPR playback Let s use the RPPR you created...

Страница 102: ...ing will start in synchronization with the measures of the sequencer 2 We will use the arpeggiator to play the bass pattern Follow these settings Set Track Select to Track02 Bass Select the Sequencer...

Страница 103: ...nation Here s how you can copy the sounds of a combination to multiple tracks and record your performance Make sure that the global MIDI channel Global P1 MIDI MIDI Channel is set to 01 1 Create a ne...

Страница 104: ...the same MIDI channel as the track being played by the arpeggiator the data played by the arpeggiator will be combined with the per formance data that was played manually and all of this data will be...

Страница 105: ...ly for this instrument However it is partially compatible with the TRITON TRITONpro TRITONproX TRITON Rack Multi PG p 279 It cannot be loaded into other instru ments Since the performance will be fait...

Страница 106: ...oard and controllers will sound and control TRITON STUDIO s own tone generator When Status is set to EXT EX2 or BTH operating TRI TON STUDIO s keyboard and controllers will sound and control the exter...

Страница 107: ...ffect can be specified as a BPM value which is highly effective when sampling phrase loops etc In Sampling mode only the insert effects can be used In Program Combination and Sequencer modes the maste...

Страница 108: ...truments such drums Stereo samples are supported The Crossfade Loop function is an important looping tool that helps smooth out irregularities in long loops which contain complex material By executing...

Страница 109: ...a multisample you can record separate samples for each pitch range and assign these samples to their respec tive pitch ranges to avoid any unnatural sounds during playback All of the instrumental sou...

Страница 110: ...output jack of your DAT etc to the rear panel S P DIF IN jack PG p 138 Input from the mLAN connector if the EXB mLAN option is installed Connect the IEEE 1394 connector FireWire style of your mLAN de...

Страница 111: ...to L R or IFX please be aware that the volume level of the AUDIO OUT L MONO and R jacks and the head phones may rise excessively 2 Setting the recording level Recording Level dB 1 Produce sound at th...

Страница 112: ...ill specify the location into which the data will be sampled select mono or stereo sampling and specify the sampling time REC Sample Setup settings are made in Sampling mode and Sampling Setup setting...

Страница 113: ...ording level and Auto 12 dB On When you resample the playback of a song or your key board performance using a program combination or sample or if you mix your performance with an external audio source...

Страница 114: ...ss the Create button will be created according to the P0 Recording Pregerence page Create Zone Preference settings These settings can also be made in P3 Multisample Preference page Create Zone Prefere...

Страница 115: ...rding Recording page Auto 12 dB On Off checked P0 Recording Preference page 3 In the P0 Recording Input Setup page set Resam ple to Auto Use Key to specify the sample that will be resam pled Set this...

Страница 116: ...the Volume 5 Press the SEQUENCER START STOP key to play back the audio CD track 6 During playback press the ENTER key at the points where you want ripping to begin and end This will set Range Start an...

Страница 117: ...4 Use Drive drive select to select the drive that con tains the audio CD and use Track to select the track that you want to read Raise the Volume Some SCSI connected CD ROM or CD R RW drives cannot be...

Страница 118: ...the same way In the exam ple shown below Start is set immediately before the first waveform LoopS Loop Start is set immedi ately before the second waveform and End is set as desired By using the ZOOM...

Страница 119: ...d Index the sample will be played back according to its loop settings The procedure for using the ZOOM and Use Zero check boxes is the same as for P2 Loop Edit 4 From the list of page menu select the...

Страница 120: ...rum kit A sample you created in Sampling mode can be used as one of the instruments in a drum kit In the Global P5 Drum Kit Sample Setup page and Low Sample page set Drumsample Bank to RAM and use Dru...

Страница 121: ...u want to edit This portion of the waveform display will be highlighted Then you can make adjustments by adjusting Start or End and by using Divide to separate or Link to combine PG p 110 6 Press the...

Страница 122: ...tween samples may become obtrusive if you play back at a slower tempo or noise may occur between samples if you play back at a faster tempo To avoid such problems you can set Stretch New BPM or Ratio...

Страница 123: ...put of the mixer 1 In Sequencer mode select the song to which you want to add the guitar sound You can either create a song or use Disk mode to load a previously created song 2 Connect your guitar to...

Страница 124: ...t and the Open and Up buttons to select the directory in which the WAVE file will be saved If you want to create a new directory access the Disk mode Utility page and execute the page menu com mand Cr...

Страница 125: ...ettings Effects settings Other functions 7 When the song finishes playing back press the SAM PLING START STOP key to stop sampling Use the page menu command Select Directory to verify that the WAVE fi...

Страница 126: ...ile press the Insert button You can continue adding files until you press the Exit button The files will be added to the track list in the order in which you selected them If you want to add all the W...

Страница 127: ...sible to add more tracks If you only want to execute finalization execute Finalize Audio CD 5 When you are ready to write to the CD R RW media or to execute a writing test press the OK button To cance...

Страница 128: ...sound an exter nal tone generator When the Status of a track is set to INT the data played back by that track and the data produced by operating the keyboard or controllers of the TRITON STUDIO will p...

Страница 129: ...between levels and find the desired SMF When the SMF file make sure that the extension is SMF appears in the LCD screen press the EXIT key and move to P0 Prog Mix File Select will show the SMF filenam...

Страница 130: ...n the Jukebox list To delete a file from the Jukebox list press the Delete button 7 Press the EXIT key to display P0 Prog Mix 8 Press the SEQUENCER START STOP key The files will playback in the order...

Страница 131: ...ting a specific part and playing that part your self 1 Playback the SMF data identify the track whose part you wish to play and stop playback p 121 2 In P0 Prog Mix select the Prog 1 8 tab or Prog 9 1...

Страница 132: ...sic tab 4 To adjust the tuning select Master Tune to adjust the transposition select Key Transpose 5 Use the VALUE controllers to adjust the setting You can use numeric keys 0 9 to enter a value and p...

Страница 133: ...dvance the cue list step PG p 251 This setting is made in Global P2 Controller Foot Switch Assign You can specify the function that will be performed by an assignable pedal the optional XVP 10 or EXP...

Страница 134: ...m bre in a combination or for each track of a song These settings are made by the Scale Use Prog s Scale parameters in the following pages Here we will show how to make settings in Sequencer mode 1 Pr...

Страница 135: ...h and level etc The TRITON STUDIO has 144 drum kit memory areas When shipped from the factory some of the 000 I A B 015 A B and 128 User 143 User areas contain pre loaded drum kits suitable for variou...

Страница 136: ...or cymbal sounds If you uncheck the Assign check box so that the drum sample at the right will be played at a pitch one semitone lower access the Program P2 Edit Pitch OSC1 Pitch Mod page and set Pitc...

Страница 137: ...ck sounds to IFX2 and the remaining sounds to L R You can also specify 1 2 3 4 1 2 or 3 4 so that spe cific drum samples will be sent to the AUDIO OUTPUT INDIVIDUAL 1 4 jacks The settings you make her...

Страница 138: ...play will indicate EXT This setting lets you synchronize the tempo with an external MIDI device In this case it will not be possible to change the tempo on the TRITON STU DIO 3 In Pattern select the a...

Страница 139: ...r hand off the key board If this is unchecked the arpeggio will stop play ing when you take your hand off the keyboard Key Sync If this is checked the arpeggio pattern will start from the beginning wh...

Страница 140: ...s that you will be using set Status to INT and set MIDI Channel to Gch or to the global MIDI channel set in Global P1 MIDI MIDI Chan nel For this example set timbres 1 4 to a Status of INT and timbres...

Страница 141: ...he timbre s that are set to Gch or to the global MIDI channel in this case 01 Since the MIDI Channel of T7 is set to 02 it will not sound T8 is set to Gch but since Status is Off it will not sound Any...

Страница 142: ...4 Arpeggiator Select will automatically be set to A when you move here from Program mode 5 In Pattern select the arpeggio pattern that you wish to edit For this example select an empty user arpeggio p...

Страница 143: ...ts the pitch of the arpeggio note in semitones up or down You can input the same tone for each step and change the Pitch Offset value for each to create a melody using a single tone Melody pattern Gat...

Страница 144: ...simulate the timing nuances of a strummed guitar chord select Flam In Program mode select an acoustic guitar program and choose the user arpeg gio pattern that you created here In the Arpeg Setup pag...

Страница 145: ...using the ARPEG GIATOR GATE and VELOCITY knobs to the cen ter position 12 o clock Dual arpeggiator editing Here we will use a combination as an example in our explanation The same procedure applies wh...

Страница 146: ...urrently running arpeggiator set Sync to SEQ Sequencer P6 Pattern RPPR RPPR Setup page The pattern playback will synchronize to the Tempo timing of the arpeggiator When a song is being played or recor...

Страница 147: ...nput Setup These settings are valid only for Sampling mode You can also sample while applying an insert effect to the samples assigned to a multisample The external input from the AUDIO INPUT 1 2 S P...

Страница 148: ...t the effect type for each insert effect When you press the popup button all effects will be displayed organized into six categories Use the pages located at the left to select a category and select a...

Страница 149: ...he master EQ PG p 239 Effect settings in Combination Song and Song Play modes In Combination Sequencer and Song Play modes you can specify the routing of each timbre track to the insert effects and ma...

Страница 150: ...xternal audio input and set the Sampling P0 Recording Input Setup page BUS IFX Indiv Select parame ter to specify the bus i e the insert effect to which the signal will be sent p 39 The Input settings...

Страница 151: ...fects to external input signals from the AUDIO IN 1 2 S P DIF IN and mLAN inputs oscillation may be heard depending on the type of effect and the parameter settings of the effect If this occurs adjust...

Страница 152: ...et Feedback Src to SW 1 CC 80 7 Set Amt to 30 When you move the joystick away from yourself and press the SW1 key the feedback level will increase and the delay sound will continue for a longer time T...

Страница 153: ...urned off you must save them p 56 However the settings of Sampling mode cannot be saved Setting the B mode functions of REALTIME CONTROLS 1 4 You can specify the B mode functions of REALTIME CONTROLS...

Страница 154: ...ISK key to enter Disk mode 2 Press the Utility tab 3 Select the page menu command Set Date Time The following dialog box will appear 4 Use the VALUE controllers to set Year Month Day Hour Minute and S...

Страница 155: ...Basic Setup execute the Touch Panel Calibration page menu command to adjust the sensitivity of the touch panel PG p 137 If it is not possible to select this command from the page menu enter Global mod...

Страница 156: ...py disk CD R RW external SCSI media sample memory or internal memory Digital audio input is sometimes not heard for two or three seconds When you change the sampling frequency in S P DIF Sample Rate e...

Страница 157: ...by the program Playback does not start when you press the SEQUENCER START STOP key in Sequencer mode Is the MIDI Clock Global P1 MIDI set to Internal PG p 143 Can t record in Sequencer mode Is the Me...

Страница 158: ...d the playback of a song or your playback performance using a program combina tion or sample or combined your performance with an external audio source and sampled the result did you set Recording Lev...

Страница 159: ...y disk covered so that it is in the write permit position Correctly insert a 3 5 inch 2HD or 2DD floppy disk with its write protect hole covered into the disk drive and perform the save or load operat...

Страница 160: ...ot recognized by the TRITON TRITON pro TRITON proX TRITON Rack These models do not support UDF version 1 5 and therefore will not recognize such a disc In the case of a CD R it may be possible to make...

Страница 161: ...s or master effects Effect dynamic modulation function Combinations Programs 1 536 user memory combinations 512 presets 1 536 user memory programs 128 more when EXB MOSS is installed 512 presets 256 9...

Страница 162: ...ce 600 S P DIF Connector optical Format 24 bit S P DIF IEC60958 EIAJ CP 1201 Sample rate 48 kHz 96 kHz selectable Control inputs DAMPER half damper supported ASSIGNABLE SWITCH PEDAL Internal hard driv...

Страница 163: ...am Change After Touch Control Change Exclusive is Enable respectively 1 When Global mode P1 MIDI Clock is Internal transmitted but not received The opposite for External MIDI or mLAN 2 LSB MSB 02 00 A...

Страница 164: ...rent page 8 Cutoff frequency 26 71 D DAMPER 7 11 28 78 Damper Pedal 28 Data dump 55 62 Delete Specific data 85 87 Demo song 20 Dialog 9 DIGITAL OUT 7 11 Disk 14 16 60 64 102 118 Dmod 144 Drum Kit 58 6...

Страница 165: ...utton 9 Page menu command 9 Pan AUDIO INPUT 143 Combination 36 76 Program 71 73 74 140 Sampling 37 Sequencer 82 Parameter 17 Pattern Arpeggio pattern 30 32 Pattern Sequencer 81 83 86 90 92 112 PCG 21...

Страница 166: ...nature 80 82 86 TNSFD 00P 65 Toggle button 9 Tone 26 27 68 71 124 User arpeggio pattern 135 Tone Generator 15 Tone Arpeggiator 135 TouchView 2 Track 83 Musical data 81 113 Setup parameters 81 Track ed...

Страница 167: ...used If you have purchased this product via the internet through mail order and or via a telephone sale you must verify that this product is intended to be used in the country in which you reside WAR...

Отзывы: