


Sequencer mode
280
8. When you are finished with step recording, press the
Done button.
If you press the COMPARE switch, you will return to the
condition of before you began step recording.
Event Edit
Here you can edit individual events of MIDI data that were
input.
1. Use Track Select to select the track that you wish to edit,
and use From Measure (Seq 6–1c) field to specify the
measure at which you wish to begin editing.
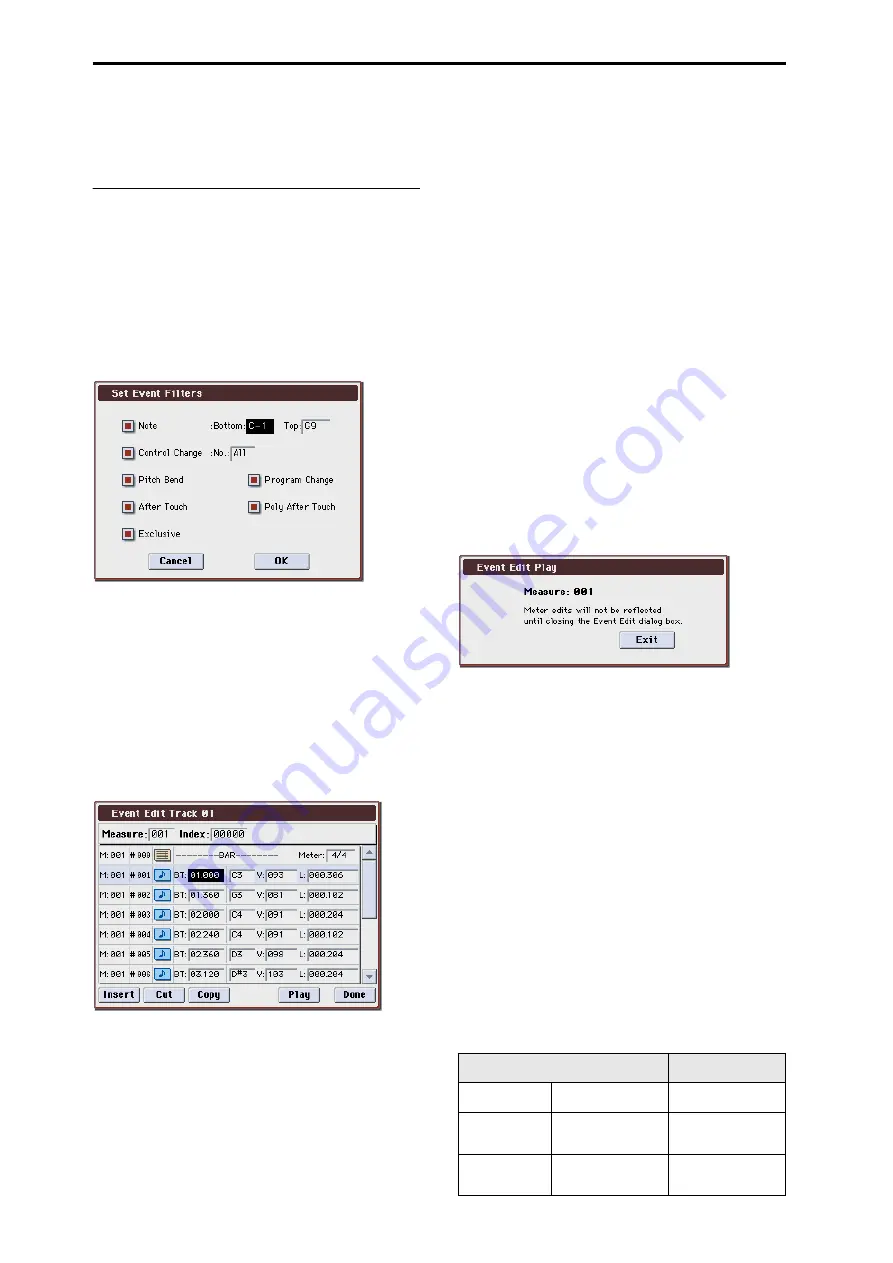
If you selected Track 01–16 in Event Edit, selecting this
command will open the Set Event Filters dialog box.
If you selected Master Track in Track Select, this dialog box
will not appear.
In the Set Event Filters dialog box you can select the types
of events (musical data) that will appear and can be edited
in the event edit window.
For Note you can set Bottom and Top to specify the range of
notes available for editing. Normally you will leave these set
at C–1 and G9.
Control Change
lets you specify the control change number.
Normally you will leave this set at All.
You can also check various other events (Pitch Bend,
Program Change
, After Touch, Poly After Touch, and
Exclusive
).
2. Press the OK button to open the Event Edit dialog box.
3. In the upper part of the dialog box, Measure and Index
show the measure that you are editing and the events of
the index numbers within the measure.
You can touch the scroll bar located at the right to move to
the event that you wish to edit.
4. Select the event that you wish to edit, and use the
VALUE controller etc. to modify its value(s).
• By modifying the value of the Beat Tick location within
the measure, you can move the event within the
measure.
• You can edit each event by modifying its data value(s).
When you select a note event, it will sound.
5. You can press the buttons located at the bottom of the
dialog box to edit events as follows.
• Inserting an event
Select the location Beat Tick at which you wish to insert an
event, and press the Insert button to insert an event.
• Deleting an event
Select the event that you wish to delete, and press the Cut
button
to delete the event.
• Moving an event
You can use the Cut button and Insert button to move an
event (by “cut and paste”).
Use the Cut button to delete the event that you wish to
move, then use the Insert button to insert it at the desired
location.
You can also move an event by modifying its Beat Tick
value.
• Copying an event
Select the event that you wish to copy, and press the Copy
button
. Then select the copy destination and press the Insert
button
to insert the event at that location.
• Playing back an event
When you press the Play button, a dialog box will open and
the song will begin playing. Use this to audition the edits
you’ve made in Event Edit.
• Playback will begin from the measure specified by
Measure
.
• Playback will occur according to the settings of the song.
(The song will play back in the same way as in the P01–
1: Play/REC page, etc.)
If you want to play back only the track you’re editing,
exit “Event Edit” and solo the desired track.
Alternatively, mute the other tracks.
Note: If the menu command Panel–SW Solo Mode On is
checked, switches 1–8 will control solo on/off if you’ve
selected Control Assign MIXER T1–8 or T9–16, even while
using Event Edit Play.
• If you’ve edited the Meter, the change will not be
reflected in the playback until you exit Event Edit.
• When you press the Exit button, playback will stop and
you will return to the Event Edit dialog box.
6. When you are finished event editing, press the Done
button. If you press the COMPARE switch you will
return the data to the condition in which it was before
you began event editing.
The following table shows the types of musical data that can
be edited by Event Edit and the range of their values.
BAR (displayed only)
(Measure line)
Meter: 1/4...16/16 *
1
(Time signature)
C–1...G9 *
2
(Note data)
V: 1...127 *
2
(Velocity)
L: 000.000...15984.000
(Length: beats, clocks)
PAFT
(Polyphonic after
touch)
C–1...G9
(Note number)
0...127
(Value)
CTRL
(Control change)
C: 0...119
(Control change
number)
0...127
(Value)
Содержание M3
Страница 1: ...4 E ...
Страница 306: ...Sequencer mode 296 ...
Страница 364: ...Sampling mode 354 ...
Страница 430: ...Media mode 420 ...
Страница 534: ...Effect Guide 524 ...
Страница 646: ...Appendices 636 ...


