PagePro 1250W Setup Guide
English (1/2)
Before setting up the printer, see the safety informa-
tion in the
User’s Guide
, included in PDF format on the
Utilities and Documentation
CD-ROM.
1
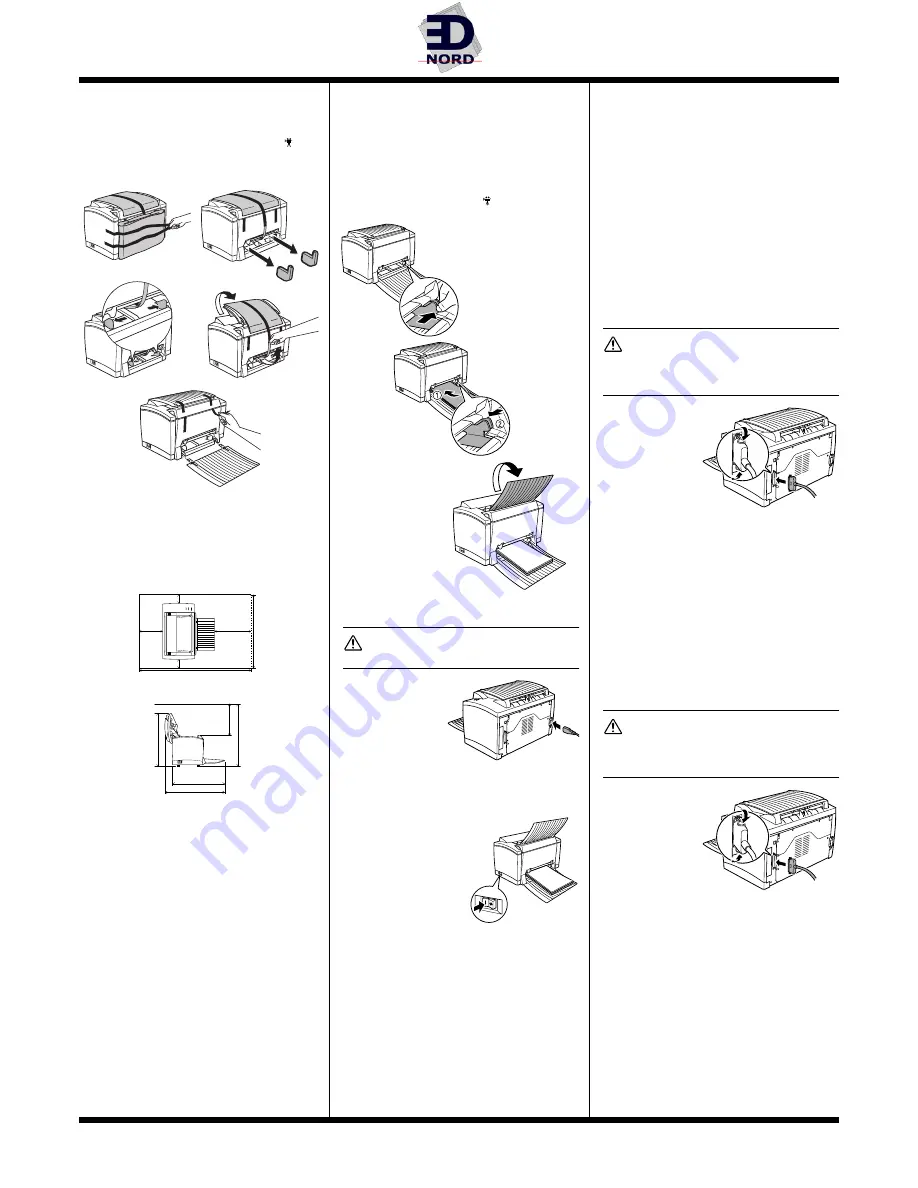
Remove the Packing Materials
Keep all of the packing materials in case you ever
need to move the printer.
2
Choose a Location
■
Space Requirements
Provide enough space around the printer to ensure
easy printer operation, paper and toner replacement,
and maintenance.
■
Precautions
Set up the printer in a place that is
•
dry and free from dust
•
on a stable surface
•
well ventilated
•
near an easily accessible power socket
•
away from objects which might obstruct the
printer’s ventilation grille
•
away from highly flammable items (such as cur-
tains)
•
away from splashing liquids
•
away from organic gases (such as ammonia)
•
away from direct sunlight
•
away from severe temperature fluctuations
•
away from exhaust-air from heating, ventilation,
and air-conditioning systems
3.9 in. (100 mm)
3.9 in. (100 mm)
5.9 in.
(150 mm)
23.
2
in
.
(5
89
m
m
)
35.1 in. (891 mm)
11.8 in.
(300 mm)
18.7 in. (475 mm)
16.1 in. (410 mm)
21.7 in.
(550 mm)
15.6 in.
(395 mm)
11.2 in.
(285 mm)
3
Install Optional Accessories
If you purchased a lower feeder unit and/or face-up
output tray, install them now. Instructions are included
in the
User’s Guide
(in PDF format on the
Utilities and
Documentation
CD-ROM).
4
Set up the Printer
■
Load Paper into Tray 1
■
Connect the Power Cord
CAUTION
Use only the power cord supplied with the printer.
1
Make sure that the
printer’s power
switch is in the “O”
(OFF) position.
2
Plug one end of the
power cord that
comes with the
printer into the power cord socket on the back of
the printer. Plug the other end into a power outlet.
■
Turn on the Printer
Set the power switch to
the “I” (ON) position. The
printer is ready to use in
approximately 20
seconds. The green
“Ready” indicator should
be on (but not blinking)
and the orange “Error”
indicator off.
5
Connect the Printer to a PC
■
Minimum System Requirements
•
IBM-compatible PC with a Pentium/Celeron series,
AMD K6/Athron/Duron family or compatible 200
MHz processor (300 MHz recommended)
•
Windows XP/Me/2000/98/95/NT 4.0
•
16 MB RAM (Windows 98/95/NT 4.0), 32 MB RAM
(Windows Me), 64 MB RAM (Windows 2000), or
128 MB RAM (Windows XP)
•
36 MB free hard disk space (20 MB for printer
driver and status display, 16 MB for image
processing)
•
IEEE 1284 Type B parallel port or USB Revision
1.1 port
•
CD-ROM drive
■
Parallel Interface (Windows XP/2000/Me/
98/95/NT 4.0)
CAUTION
Using the wrong type of cable can damage the
socket on the printer. Use only an IEEE 1284 type B
shielded interface cable.
1
Turn off both the
printer and the
PC.
2
Connect one end
of the interface
cable to the paral-
lel port of the PC.
3
Connect the other
end of the inter-
face cable to the parallel interface connector on
the back of the printer. Secure the cable using the
two clips.
4
Turn on the printer and then, when it’s ready, turn
on the PC.
5
If you’re using Windows XP/Me/2000/98, plug-and-
play printer driver installation should start
automatically. Follow the instructions on the
screen.
If you’re using Windows 95/NT 4.0, or if plug-and-
play doesn’t start automatically, use the instruc-
tions in Section 6, “Install the Printer Driver,” to
install the printer driver manually.
■
USB Interface (Windows XP/2000/Me/98)
CAUTION
Using the wrong type of cable can damage the
socket on the printer. Use only a USB Revision 1.1
compliant cable.
1
Turn off both the
PC and the
printer.
2
Turn on the PC.
3
Turn on the
printer.
4
When Windows
and the printer are
both ready, connect one end of the interface cable
to the PC’s USB port.
5
Connect the other end of the interface cable to the
USB interface connector on the back of the printer.
6
Plug-and-play printer driver installation should
start automatically. Follow the instructions on the
screen.
If plug-and-play doesn’t start automatically, use
the instructions in Section 6, “Install the Printer
Driver,” to install the printer driver manually.
EDNord - Istedgade 37A - 9000 Aalborg - telefon 96333500


