background image

71

Installing the Softwar

e and T

ransferring Images to a PC

7

Using Macintosh

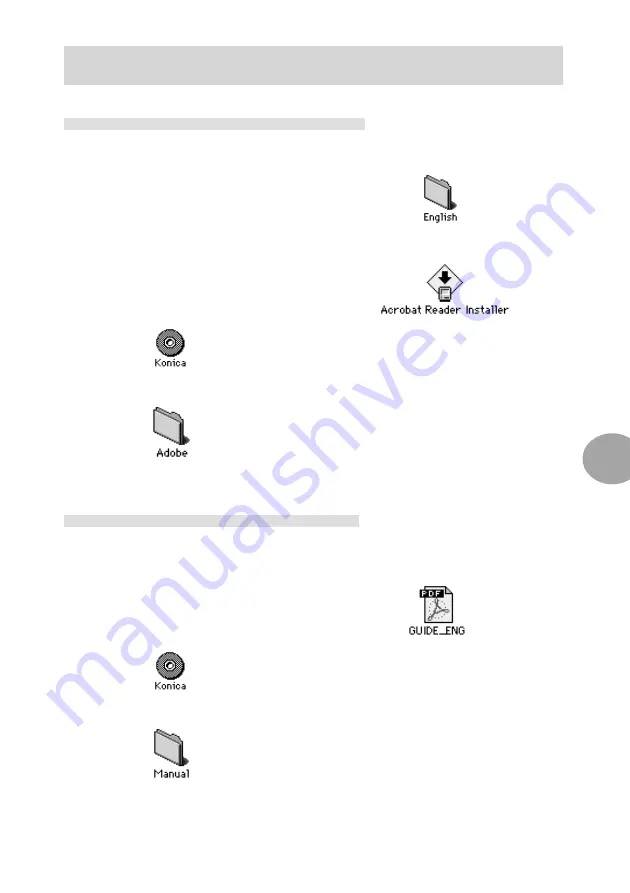
Installing the Adobe Acrobat Reader

Installing the KD-200Z User’s Guide

*

Be sure to install.

q

 Set the included CD-ROM in the CD-ROM

drive.

w

 Double click the “Konica” icon.

e

 Double click the “Manual” folder.

r

 Copy “GUIDE_ENG” to a location of your

choice.

t

 Double click the copied “GUIDE_ENG” to

display the “KD-200Z User’s Guide”.

*

Be sure to install. And it is not necessary

to install the Adobe Acrobat Reader for

MacOSX users.

q

Turn on the power of your PC.

w

Set the included CD-ROM in the CD-ROM

drive.

e

Double click the “Konica” icon.

r

Double click the “Adobe” icon.

t

Double click the “English” icon.

y

Double click the “Acrobat Reader Installer”

icon.

u

Follow the instructions shown on the

screen.

Содержание Konica Digital Revio KD-200Z

Страница 1: ...age of this product please read this User s Manual and the warranty card carefully and keep them in a safe place for future reference Before accepting the warranty card please make sure that the date...

Страница 2: ...restriction concerning radio wave interference This equipment is a class B information technology device based on the standards of VCCI Voluntary Control Council for Interference Use of this device ne...

Страница 3: ...Selecting the Recording Mode 29 Auto Mode 30 Red eye Reduction Mode 30 Forced Flash Mode 30 Night View Portrait Mode 31 Flash Off Mode 31 Long Distance Mode 31 Macro Recording Mode 32 Self timer Mode...

Страница 4: ...54 Displaying the file number 56 Adjusting the Screen Contrast 56 Selecting the Image to Print DPOF 57 Chapter 6 Advanced Operations SET UP Using the SET UP Menu 62 Customizing the Camera 63 Chapter...

Страница 5: ...gree of danger or damage that may occur if the displayed content is not followed or the product is misused Warning This symbol indicates that misuse may result in serious injury and even death Caution...

Страница 6: ...n consult the dealer from whom you bought the product Do not allow the camera to get wet Fire electrical shock and or malfunction of the unit may occur if internal parts are exposed to water or other...

Страница 7: ...e strap may wrap around the neck causing strangulation or accessories such as batteries SD Memory Card etc may be swallowed Unstable surfaces such as on an unstable table or an angled surface Camera d...

Страница 8: ...acts with a dry cloth before use When cleaning or carrying out non photographic operations on the cam era disconnect the AC adapter for safety Remove the batteries when the camera will not be used for...

Страница 9: ...About the SD Memory Card Multi Media Card As well as the SD Memory Card included with this camera Multi Media Cards may also be used Caution SD Memory Cards and Multi Media Cards are manufactured usi...

Страница 10: ...card check and deletion may take some time Always back up important data When using SD Memory Cards Multi Media Cards on a PC do not change the attributes read only etc of the files image data on the...

Страница 11: ...t supplied Rechargeable AA nickel hydrogen battery 2 units optional AA alkaline battery 2 units optional Notes Do not mix AA lithium batteries and manganese batteries Use the pre scribed battery When...

Страница 12: ...oftware Windows 98 98SE QuickTime Windows Adobe Acrobat Reader Windows Macintosh KD 200Z User s Guide Windows Macintosh Optional accessories AC adapter model DR AC2 Soft case model DR CC1 Chapter 1 Pr...

Страница 13: ...le Flash sensor Viewfinder window Lens Flash Self timer LED Shutter button LCD monitor Status LCD Viewfinder LEDs Viewfinder eyepiece Battery card cover MENU button DISPLAY button PICTURE button MODE...

Страница 14: ...can be changed Note For details on default settings see Default settings are of page 45 The camera mode and picture quality mode can also be selected see page 15 5 way button Used for zoom operation a...

Страница 15: ...ecording w Battery level indicator When using batteries the battery level is indicated using 3 levels full half full empty e Picture quality mode The picture quality of image data can be selected from...

Страница 16: ...the battery com partment Caution Inserting batteries with the polarity incorrect cause battery fluid leakage and heating resulting in personal injury de facement and or damage to the camera Dont rech...

Страница 17: ...Repeated focus operations by pressing the shutter button halfway Repeated zoom operations Extensive use of the LCD monitor in the Playback mode Communication with a PC Warning When you continue using...

Страница 18: ...battery card cover w Face the label of the SD Memory Card Multi Media Card toward the front of the camera and securely insert into the camera with the mark on the label facing up until a click is hear...

Страница 19: ...e care so that it is not accidentally banged When installing the strap there is a possibility that the camera could be dropped and dam aged Place the camera on a stable surface before installing the s...

Страница 20: ...eck to make sure that new batteries fully charged battery or AC adapter have been installed connected w Set the main switch to The LCD monitor will turn on and the Lan guage Setting screen will appear...

Страница 21: ...ing screens to correct previously set items 0 Press the SET button The Confirmation screen for the date setting will appear 1 Press the SET button again The set values will be stored and the LCD monit...

Страница 22: ...ct is near record with the LCD monitor set to ON since the viewfinder and the recording range will vary For macro recording see page 32 Definitions of viewfinder LED display statuses on the right of t...

Страница 23: ...e lens is being held Err may appear in the status LCD If this occurs turn the main switch to OFF and turn it back to e Press the PICTURE button to set the picture quality of the image data to record D...

Страница 24: ...heard The operation of writing the recorded image to the SD Memory Card Multi Media Card will start and at the same time the card access LED on the side of the camera will light or ange When the card...

Страница 25: ...ock In this case the focus cannot be re locked w While continuing to hold the shutter button down lightly halfway re position the sub ject for the desired composition and gently press the shutter butt...

Страница 26: ...displayed on the status LCD See page 22 1 Always format the SD Memory Card Multi Media Card using the camera For details on formatting see page 63 2 The time of release lock varies depending on the t...

Страница 27: ...3 seconds To save press the SET button To delete use the button to select NO and then press the SET button If there is no key operation within the 3 sec onds the image is automatically saved and the L...

Страница 28: ...es About 400KB FINE About 26 images About 250KB ECONOMY About 60 images About 100KB Note When using an SD Memory Card Picture quality modes and number of recorded pixels Picture quality mode Number of...

Страница 29: ...Self timer night view portrait Self timer flash off Self timer long distance Self timer macro recording Note When pressing the button with holding the MODE button down the MODE changes in reverse orde...

Страница 30: ...the flash is being charged the viewfinder LED will light in red While the LED is on flash recording cannot be made When continuously using the flash for recording check to make sure that the LED on th...

Страница 31: ...Mode Used when recording in a place where flash photography is prohibited or when utilizing the night view or indoor lighting for recording The flash will always be off during recording Under low ligh...

Страница 32: ...n the image becoming blurred When using macro recording the use of a tripod is recommended Caution For macro recording the recording range and the field of view within the viewfinder will differ Use t...

Страница 33: ...age recording is completed when the buzzer sound is heard Note Focus adjustment in the macro recording mode may take longer than usual Focus adjustment may be difficult for the following A location wh...

Страница 34: ...MODE button and select Note The self timer can be used with and modes r Look through the viewfinder to adjust the im age composition and press the W and T buttons to set the subject size t Lightly pre...

Страница 35: ...menu mode Screen Contrast will be selected e Press the button to enter the Screen Contrast menu and use the and buttons to adjust the brightness Note The screen will become darker with the button and...

Страница 36: ...ngs q Set the main switch on the top of the cam era to The lens will extend If the main switch is set to with the lens is being held Err may appear in the status LCD If this occurs turn the main switc...

Страница 37: ...repeat steps e and r t Press the SET button to exit the M REC menu mode Through image will be displayed on the LCD monitor y Record using the set conditions See Re cording page 23 Note The menu setti...

Страница 38: ...me And the resolution will be displayed in the upper left of the screen and the recording time will be displayed in the upper right of the screen r Record the movie The movie will be recorded while th...

Страница 39: ...d press the button again A blue frame will appear on the LCD monitor and the magnification ratio will be displayed on the top right Use the LCD monitor as the viewfinder for recording Note Pressing th...

Страница 40: ...ompensation Note Pressing the button will darken the image and the button will lighten the image e Press the SET button to exit the M REC menu mode Note The result after setting the camera exposure ma...

Страница 41: ...he setting changes as shown below every time the button is pressed Auto default setting Daylight Incandescent lighting Strobe lighting Fluorescent lighting e Press the SET button to exit the M REC men...

Страница 42: ...ds but by turning on Slow shutter mode the range can be extended to between 1 2000 and 2 seconds q Enter the M REC menu mode and press the button to select Slow Shutter w Press the button and select O...

Страница 43: ...ding location q Enter the M REC menu mode and press the button to select Screen Contrast w Press the button to enter the Screen Contrast menu and press the but ton to adjust the brightness e Press the...

Страница 44: ...lack White w Press the button and select On e Press the SET button to exit the M REC menu mode Through image on the LCD monitor will be displayed in black and white Note When Black White is selected t...

Страница 45: ...ES e When the SET button is pressed all settings will return to the default settings and the M REC menu mode will end Default settings are Movie mode Off Digital Zoom Off Camera Exposure 0 White Balan...

Страница 46: ...he main switch on the top of the cam era to The latest image recorded will be displayed Notes Movies will be displayed inside a yellow frame When there is no image data the message No picture in camer...

Страница 47: ...d image is displayed Superfine Fine Economy Movie Protected mark displayed only for protected images 1 The maximum number of frames this camera can play back is 999 If there are more than 999 images o...

Страница 48: ...o play back Note Movies are displayed in a yellow frame Movies may take some time to display w Press the SET button The playback of the movie will start Note All information displays will be cleared a...

Страница 49: ...ed q Set the main switch on the top of the cam era to The last image recorded will be displayed Note Movie images will be displayed inside a yellow frame w Press the MENU button and enter the PLAY men...

Страница 50: ...ress the button to select This Note If NO is selected and the SET button is pressed the camera will return to the normal playback screen r Press the SET button The displayed image will be erased and t...

Страница 51: ...he SET button After Erasing ALL Pictures is displayed all images are erased and No Picture in Cam era is displayed Note If there are one or more protected images the last frame is displayed Erasure ti...

Страница 52: ...pear at one time Note The image displayed at the time of entering the menu is displayed inside a red frame within the index screen The select frame is displayed with a red frame Movie images are displ...

Страница 53: ...he SET button Slideshow will start with the first frame and each frame will be displayed in order at an interval of 3 seconds r During playback Press the SET button to stop playback The image displaye...

Страница 54: ...en will appear YES is selected Note In the protect confirmation screen the frame number of the screen is displayed on the lower right If NO is selected using the button and the SET but ton is pressed...

Страница 55: ...e Press the button The protect confirmation screen will appear YES will be selected r Press the button to select NO t Press the SET button The protect setting will be removed from the image and the pr...

Страница 56: ...n or MENU button the file no will be cleared from the image Adjusting the Screen Contrast The screen contrast can be adjusted according to the brightness of the playback location q Enter the PLAY menu...

Страница 57: ...Format When printing images using the DPOF function on your own printer first check with the printer manufacturer to make sure that your printer is DPOF compatible Note Image can be printed from the...

Страница 58: ...ted Note The range that can be specified for Quantity is 1 99 for each image file If there are more than 100 images on the card the mes sage You may select up to 100 pictures will appear and the camer...

Страница 59: ...ll be displayed in a list e After checking the contents using the button press the button and select Select r Press the SET button The camera will return to the DPOF menu t Press the SET button to exi...

Страница 60: ...age re moved will be displayed Note If NO is selected and the SET button is pressed the deletion will be canceled and the camera will return to the list display t Press the button to select OK and pre...

Страница 61: ...the button to select Clear ALL and press the SET button The camera will return to the DPOF menu e Press the SET button to exit the PLAY menu mode PLAY DPOF List 1 2 100 0023 File number Quantity 100 0...

Страница 62: ...ressed Format Self Timer Auto Shut Off Number Reset Beep Quick Review Date Time Language e Press the button to select the menu content Note To make a series of settings repeat steps w and e r Set the...

Страница 63: ...g to 3 seconds q Enter the SET UP menu mode and press the button to select Self Timer 10 sec is selected w Press the button to select 3 sec The setting will take effect at the time the menu selection...

Страница 64: ...ted w Press the button to select On The setting will take effect at the time the menu selection is made e Move to the next menu or set the main switch to a mode other than to exit the SET UP menu mode...

Страница 65: ...w Press the button to select Off The setting will take effect at the time the menu selection is made e Move to the next menu or set the main switch to a mode other than to exit the SET UP menu mode S...

Страница 66: ...guage w Press the button to enter the Language menu e Press the button to select the de sired language and press the SET button The language confirmation screen will appear r Press the button to selec...

Страница 67: ...ay 32 000 colors or more resolution of 640 480 pixels or higher Others CD ROM drive USB port standard equipped 2 Macintosh OS Mac OS 9 0 9 1 X Version 10 0 1 or later CPU PowerPC Memory 16MB or more o...

Страница 68: ...icon on the desktop w The KD 200Z User s Guide will be displayed Be sure to install QuickTime Adobe Acrobat Reader and KD 200Z User s Guide y Software checked in t will be installed in order Follow t...

Страница 69: ...Click Search for the best driver for your device Recommended and then click Next y Click Specify a location and input D To USB connector for PC Installing the USB device driver Note Here the CD ROM dr...

Страница 70: ...are using y Double click the DCIM folder u Double click 100konic to display the icon of the image file Note The first 3 digits of 100konic vary depending on the existing directory of the card i Doubl...

Страница 71: ...r Copy GUIDE_ENG to a location of your choice t Double click the copied GUIDE_ENG to display the KD 200Z User s Guide Be sure to install And it is not necessary to install the Adobe Acrobat Reader for...

Страница 72: ...mera will not only play back on the camera but may cause the camera to malfunction when inserted Do not change the file name of image data saved on an SD Memory Card Multi Media Card using a PC or sav...

Страница 73: ...era do not use solvents such as benzene or paint thinner Before cleaning remove the batteries from the camera or disconnect the power plug of the AC adapter from the wall outlet The exterior casing su...

Страница 74: ...and foreign objects away from the terminal section About image data Use a PC to delete images and files recorded with other models The recorded data may be lost when you or a third part misuses the SD...

Страница 75: ...amera is being used at low temperature 77 New nickel hydrogen battery is being used 11 Main switch is not set to or 23 36 Recordable SD Memory Card Multi Media Card is 63 not inserted SD Memory Card i...

Страница 76: ...For inquiries concerning repair handling and care contact the dealer from whom you pur chased the camera Symptom Check page Cannot play back Battery dies after very little playback Correct date is not...

Страница 77: ...low temperature polysilicon TFT color LCD monitor Playback Single frame close up playback 2 movie playback index playback slideshow Deletion Single frame all frames format LED display Self timer LED v...

Страница 78: ...you purchased the camera Outside the warranty period Repairable products can be repaired for a charge upon request However the minimum holding period of performance parts for repairing digital still...

Страница 79: ...mful interference to radio or television reception which can be determined by turning the equipment off and on the user is encouraged to try to correct the interference by one or more of the following...

Страница 80: ...80...

Отзывы: