background image

Cleaning the Printer

174

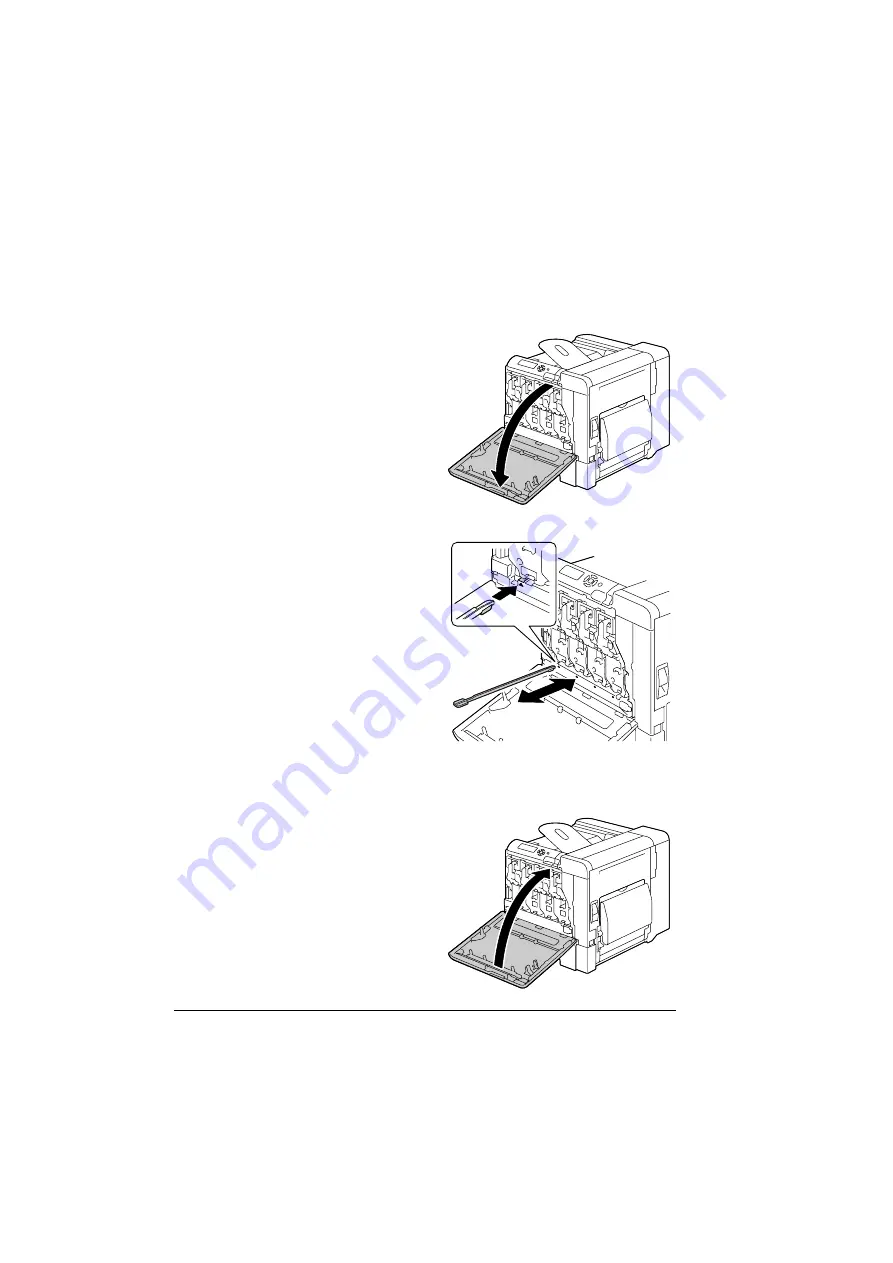
Cleaning the Laser Lens

This printer is constructed with four laser lenses. Clean all lenses as 
described below. The laser lens cleaning tool should be attached to the inside 
of the front cover.

1

Open the printer’s front cover 
and remove the cleaning tool 
from the machine’s front cover.

2

Insert the laser lens cleaning 
tool into the laser lens cleaning 
opening, pull it out, and then 
repeat this back and forth move-
ment 2 or 3 times.

3

Clean between each of the laser 
lenses in the same way.

"

The laser lens cleaning tool 
is included with the printer.
Safely store the laser lens 
cleaning tool so that it will not 
be lost.

4

Return the laser lens cleaning tool to its holder on the inside of the front 
cover.

5

Close the front cover.

Содержание BIZHUB C30P

Страница 1: ...bizhub C30P User s Guide A011 9566 00A ...

Страница 2: ...LTA BUSINESS TECHNOLOGIES INC Notice KONICA MINOLTA BUSINESS TECHNOLOGIES INC reserves the right to make changes to this guide and to the equipment described herein without notice Considerable effort has been made to ensure that this guide is free of inaccuracies and omissions However KONICA MINOLTA BUSINESS TECHNOLOGIES INC makes no warranty of any kind including but not limited to any implied wa...

Страница 3: ...nder this Agreement to an assignee of all of Licensee s right and interest to such Software and Documentation Assignee provided you transfer to Assignee all copies of such Software and Documentation Assignee agrees to be bound by all of the terms and conditions of this Agreement 5 You agree not to modify adapt or translate the Software and Documentation 6 You agree that you will not attempt to alt...

Страница 4: ... the Software is allowed including without limitation distribution of the Software when incorpo rated into or bundled with any application software All individual profiles must be refer enced by their ICC Profile description string You may not modify the Software Adobe is under no obligation to provide any support under this Agreement including upgrades or future versions of the Software or other ...

Страница 5: ...D EXCLUSIONS APPLY TO THE EXTENT PERMITTED BY APPLICABLE LAW IN YOUR JURISDICTION ADOBE S AGGREGATE LIABILITY AND THAT OF ITS SUPPLIERS UNDER OR IN CONNECTION WITH THIS AGREEMENT SHALL BE LIMITED TO THE AMOUNT PAID FOR THE SOFT WARE Nothing contained in this Agreement limits Adobe s liability to you in the event of death or personal injury resulting from Adobe s negligence or for the tort of decei...

Страница 6: ...prior agree ment oral or written between Adobe and you with respect to the licensing to you of the Software No variation of the terms of this Agreement will be enforceable against Adobe unless Adobe gives its express consent in writing signed by an authorized signatory of Adobe ICC Profile for TOYO INK Standard Color on Coated paper TOYO Offset Coated 2 1 This ICC Profile TOYO Offset Coated 2 1 ch...

Страница 7: ...tes only This symbol means Do not dispose of this product together with your household waste Please contact the Local Authority for appropriate dis posal instructions In the case of a new device being purchased the used one can also be given to our dealer for appropriate disposal Recycling of this product will help to conserve natural resources and prevent potential negative consequences for the e...

Страница 8: ......

Страница 9: ...ICC Profile for TOYO INK Standard Color on Coated paper TOYO Offset Coated 2 1 6 For EU member states only 7 1 Introduction 1 Getting Acquainted with Your Printer 2 Space Requirements 2 Printer Parts 4 Front View 4 Rear View 5 Front View with Options 5 2 About the Software 7 Printer Driver CD ROM 8 PostScript Drivers 8 ...

Страница 10: ...ons 17 OK 17 Cancel 17 Apply 17 Help 17 Easy Set 17 Paper View 18 Printer View 18 Watermark View 18 Quality View 18 Default 18 Advanced Tab PostScript Printer Driver Only 18 Basic Tab 19 Layout Tab 19 Cover Page Tab 20 Overlay Tab 20 Watermark Tab 20 Quality Tab 21 Version Tab 21 Limitations on printer driver functions installed with Point and Print 21 3 Using the Status Monitor Windows Only 23 Wo...

Страница 11: ...FAULT MENU 75 MAINTENANCE MENU 86 SERVICE MENU 92 5 Camera Direct 93 Camera Direct 94 Printing Directly from a Digital Camera 94 6 Memory Direct 95 Memory Direct 96 Printing From a Connected USB Memory Device 96 7 Using Media 97 Media Specifications 98 Media Types 99 Plain Paper Recycled Paper 99 Thick Stock 101 Envelopes 101 Labels 102 Letterhead 103 Postcards 104 Transparencies 105 Glossy Media ...

Страница 12: ...Waste Toner Bottle 145 Replacing the Transfer Roller 148 Replacing the Transfer Roller 148 Replacing the Ozone Filter 151 Replacing the Transfer Belt Unit 152 Replacing the Backup Battery 158 Replacing the Staple 161 9 Maintaining the Printer 165 Maintaining the Printer 166 Cleaning the Printer 168 Exterior 168 Media Rollers 169 Cleaning the Media Feed Rollers Manual Feed Tray 169 Cleaning the Med...

Страница 13: ...ervice Messages 214 Standard Status Messages 214 Error Messages Warning 215 Error Messages Operator Call 219 Service Messages 224 11 Installing Accessories 225 Introduction 226 Antistatic Protection 226 Dual In Line Memory Module DIMM 227 Installing a DIMM 227 Hard Disk Kit 230 Installing the Hard Disk drive 230 CompactFlash 233 Installing the CompactFlash card 233 Duplex Option 236 Installing the...

Страница 14: ...Contents vi ...

Страница 15: ...Introduction ...

Страница 16: ...maintenance adhere to the recommended space requirements detailed below Front View with Options Front View 704 mm 27 7 100 mm 3 9 100 mm 3 9 420 mm 16 5 284 mm 11 2 100 mm 3 9 462 mm 18 2 420 mm 16 5 1175 mm 46 3 480 mm 18 9 420 mm 16 5 100 mm 3 9 294 mm 11 6 420 mm 16 5 110 mm 4 3 110 mm 4 3 934 mm 36 8 100 mm 3 9 100 mm 3 9 60 mm 2 4 475 mm 18 7 ...

Страница 17: ...Getting Acquainted with Your Printer 3 The options appear shaded in the above illustrations Side View with Options 846 mm 33 3 100 mm 3 9 526 mm 20 7 ...

Страница 18: ...e take some time to become familiar with them Front View 1 Control panel 2 Output tray 3 Fuser unit 4 Right side cover 5 Tray 1 Manual feed tray 6 Transfer roller 7 Transfer belt unit 8 Tray 2 9 Print unit 10 Grip 11 Laser lens cleaning tool 12 Front cover 13 Waste toner bottle 14 Toner cartridge 1 14 13 2 3 4 5 6 12 11 10 9 8 7 Y Y P U S H 14 13 6 7 9 11 ...

Страница 19: ...ct Print Port 2 Power switch 3 Ozone filter 4 Power connection 5 Parallel port 6 10Base T 100Base TX 1000Base T Ethernet Interface port 7 USB port 8 Ventilation grilles Front View with Options 1 Duplex option 2 Lower feeder units Tray 3 and Tray 4 3 Staple Finisher 1 2 3 4 5 6 7 8 3 1 2 ...

Страница 20: ......

Страница 21: ...About the Software ...

Страница 22: ...s Operating System Use Benefit Windows XP Server 2003 2000 These drivers give you access to all of the printer features including finish ing and advanced layout See also Displaying Printer Driver Settings for Windows on page 16 Windows XP for 64bit Windows Server 2003 for 64bit Operating System Use Benefit Windows XP Server 2003 2000 These drivers give you access to all of the printer features inc...

Страница 23: ...t ing system For details of the Macintosh and Linux printer drivers refer to the bizhub C30P Reference Guide on the Utilities and Documentation CD ROM Linux Utility Use Benefit Download Manager Windows XP Server 2003 2000 NT 4 0 Macintosh OS 10 2 x or later This utility which can be used only if the optional hard disk drive is installed enables fonts and overlay data to be downloaded to the printe...

Страница 24: ... the bizhub C30P Reference Guide on the Utilities and Documentation CD ROM PageScope Network Setup Using the TCP IP and IPX protocols basic network printer settings can be specified For details refer to the PageScope Network Setup User Manual on the Utilities and Documentation CD ROM PageScope Plug and Print This utility automatically detects a new printer connected to the network and creates a pr...

Страница 25: ...Scope Direct Print This application provides functions for sending PDF and TIFF files directly to a printer to be printed For details refer to the PageScope Direct Print Users Guide on the Utili ties and Documentation CD ROM Utility Use Benefit ...

Страница 26: ... NT 4 0 Service Pack 6 Mac OS 9 9 1 or later Mac OS X 10 2 or later Classic mode Mac OS X 10 2 or later We recommend installing the newest patch Mac OS X Server 10 2 or later Red Hat Linux 9 0 SuSE Linux 8 2 Free hard disk space Approximately 20 MB of free hard disk space for printer driver and Status Monitor Approximately 128 MB of free hard disk space for image processing RAM 128 MB or more CD R...

Страница 27: ...30P PCL6 or KONICA MINOLTA bizhub C30P PS printer icon and choose Properties PostScript printer driver for Windows NT 4 0 is not supported 2 If you have installed options proceed with the next step Otherwise skip to step 9 3 Select the Configure tab 4 Check that the installed options are correctly listed If not proceed with the next step Otherwise continue with step 8 5 Click the Refresh to automa...

Страница 28: ...bizhub C30P PCL6 printer icon in the Printers directory and then click Document Defaults Skip to step 10 8 Select the General tab 9 Click Printing Preferences Printing Preference dialog box appears 10 Select the default settings for your printer such as the default media for mat you use on the appropriate tabs 11 Click Apply 12 Click OK to exit from the Print preference dialog box 13 Click OK to e...

Страница 29: ...ows XP Server 2003 From the Start menu choose All programs KONICA MINOLTA bizhub C30P and then Uninstall Printer Driver Windows 2000 NT4 0 From the Start menu choose Programs KONICA MINOLTA bizhub C30P and then Uninstall Printer Driver 3 When the Uninstall dialog box appears select the name of the driver to be deleted and then click the Uninstall button 4 Click Uninstall 5 Click OK and restart you...

Страница 30: ...or KONICA MINOLTA bizhub C30P PS printer icon and choose Printing Prefer ences Windows 2000 NT 4 0 1 From the Start menu point to Settings and then click Printers to display the Printers directory 2 Display the printer driver settings Windows 2000 Right click the KONICA MINOLTA bizhub C30P PCL6 or KONICA MINOLTA bizhub C30P PS printer icon and choose Printer Properties Windows NT 4 0 Right click t...

Страница 31: ...r Help Click to view the help Easy Set This allows the current settings to be saved To save the current settings specify the desired settings and then click Save Specify the settings described below and the click OK Name Type in the name of the settings to be saved Comment Add a simple comment to the settings to be saved Sharing Specify whether or not the settings to be saved can be used by other ...

Страница 32: ...ew of the watermark This button appears only when the Watermark tab is selected Quality View Click this button to display a sample of the settings selected in the Quality tab This button appears only when the Quality tab is selected Default Click this button to reset the settings to their defaults This button does not appear on the Advanced and Version tabs Advanced Tab PostScript Printer Driver O...

Страница 33: ...ail addresses and passwords Specify user authentication and account track settings Print on the back side of paper that has already been printed on Use paper that has been printed on with bizhub C30P In addition the page printed with this setting is not guaranteed Do not use the following types of paper Paper that has been printed on with an inkjet printer Paper that has been printed on with a mon...

Страница 34: ...p or Booklet in the printer driver the overlay form cannot be adjusted to match the specified settings The Overlay Tab allows you to Select the form to use Add or delete overlay files Launch Download Manager to download a form PostScript printer driver only Download Manager Application should be installed earlier Create a form PCL printer driver only Specify that the document and form are printed ...

Страница 35: ...ntrast PCL printer driver only Specify the image compression method PCL printer driver only Version Tab The Version Tab allows you to view information about the printer driver Limitations on printer driver functions installed with Point and Print If Point and Print is performed with the following server and client combina tions there are limitations on some printer driver functions Server and clie...

Страница 36: ...Using the Postscript and PCL Printer Driver 22 ...

Страница 37: ...Using the Status Monitor Windows Only ...

Страница 38: ...ble click the Status Monitor icon displayed in the taskbar Windows 2000 NT 4 0 From the Start menu choose Programs KON ICA MINOLTA and then Status Monitor Double click the Status Monitor icon displayed in the taskbar Using the Status Monitor Status Tab Select Printer Selects the printer whose status is displayed In addition the messages that appear in the message window of the selected printer are...

Страница 39: ...led information Recognizing Status Monitor Alerts When the Status Monitor detects a printing problem the icon on the Windows task bar changes from green normal to yellow warning magenta or red error depending on the severity of the printer problem Recovering from a Status Monitor Alert When the Status Monitor notifies you of a printing problem double click its icon on the Windows task bar to open ...

Страница 40: ......

Страница 41: ...Printer Control Panel and Configuration Menu ...

Страница 42: ...printer including any condition that needs your attention Control Panel Indicators and Keys No Indicator Off On 1 The printer is not ready to accept data The printer is ready to accept data Flashes while data is being received or while printing 2 No problem The printer requires operator attention usually accompanied by a status message in the message window YMCK MENU 4 1 5 6 3 8 2 7 MESSAGE WINDOW...

Страница 43: ...ucture Applies the selected setting appears in the message window 5 Moves the cursor up Returns to the status screen from the help screen Within a menu choice that is changeable char acter by character scrolls upward through the available characters appears in the message window 6 Moves the cursor to the right Displays the next help screen appears in the message window 7 Moves the cursor down Disp...

Страница 44: ...NICA MINOLTA Digital Camera Direct Print Port with a USB cable the sym bol appears on the right side of the message window When a USB memory device is plugged into the KONICA MINOLTA Digital Camera Direct Print Port the symbol ap pears on the right side of the message window While a print job is being received the symbol appears on the right side of the message window While a camera direct or mem ...

Страница 45: ...creens The help screens appear when the key is pressed after an error occured such as a media misfeed so that the error can be corrected 3 Key information is displayed 4 The approximate amount of toner remaining is displayed No Details ...

Страница 46: ...optional hard disk drive is installed This menu item appears when INTERFACE MENU MEMORY DIRECT is set to ENABLE and the optional hard disk drive or a Com pactFlash card is installed This menu item appears when INTERFACE MENU CAMERA DIRECT is set to ENABLE PRINT MENU PAPER MENU CAMERA DIRECT INTERFACE MENU SYS DEFAULT MENU PROOF PRINT MENU MEMORY DIRECT READY QUALITY MENU MAINTENANCE MENU SERVICE M...

Страница 47: ...IRECT and CAMERA DIRECT do not appear if public user access has not been permitted through authentication settings For details on the authentication settings refer to the bizhub C30P Reference Guide on the Utilities and Documentation CD ROM ...

Страница 48: ...tion on the Basic tab of the printer driver can be printed or deleted All factory default values are shown in bold Printing Deleting a Stored Job 1 Follow the procedure described below to select a job Press Key Until Display Reads PROOF PRINT MENU User name If no print jobs have been stored on the hard disk NO STORED JOB appears PROOF PRINT MENU User name Job name Job name COPIES 1 Job name YES NO...

Страница 49: ...Select YES or NO 6 Press the Menu Select key If YES was selected the print job is deleted If NO was selected the PRINT DELETE selection screen appears again Press until the desired user name appears Desired user name Job name Press until the desired job name appears Desired job name PRINT DELETE If the selected print job was set as a secured job from the printer driver a screen for entering the pa...

Страница 50: ...er 1 Press the and keys to increase or decrease the first digit of the password 2 Press the key to move the cursor to the next digit 3 Press the and keys to increase or decrease the second digit of the password 4 Continue these steps until all four digits of the password are specified 5 Press the Menu Select key The PRINT DELETE selection screen appears If an incorrect password is entered INVALID ...

Страница 51: ...y default values are shown in bold CONFIGURA TION PG Settings PRINT CANCEL Prints the configuration page STATISTICS PAGE Settings PRINT CANCEL Prints the statistics page such as the number of pages printed FONT LIST POST SCRIPT Settings PRINT CANCEL Prints the PostScript font list PCL Settings PRINT CANCEL Prints the PCL font list POSTSCRIPT PCL MENU MAP DIRECTORY LIST CONFIGURATION PG FONT LIST S...

Страница 52: ...Configuration Menu Overview 38 MENU MAP Settings PRINT CANCEL Prints the menu map DIRECTORY LIST Settings PRINT CANCEL Prints the directory list of the hard disk ...

Страница 53: ...PAPER TYPE DEFAULT TRAY TRAY 1 PAPER SIZE CUSTOM SIZE TRAY 2 PAPER TYPE FINISHING PAPER SIZE TRAY 3 TRAY 4 PAPER SOURCE COLLATE DUPLEX COPIES PAPER TYPE PAPER SIZE PAPER TYPE PAPER SIZE PAPER MENU TRAY CHAINING TRAY MAPPING LOGICAL TRAY 0 TRAY MAPPING MODE LOGICAL TRAY 9 IMAGE ROTATION JOB SEPARATION ...

Страница 54: ...ower feeder units are installed This menu item appears only if the optional duplex unit Duplex Option is installed This menu item appears only if the optional hard disk drive or a CompactFlash card of 1 GB or more is installed This menu item appears only if the optional staple finisher is installed This menu item appears only if the optional staple finisher is not installed ...

Страница 55: ...ts are installed TRAY 1 PAPER SIZE Settings ANY LETTER LEGAL EXECUTIVE A4 A5 A6 B5 JIS B6 JIS GOVT LETTER STATEMENT FOLIO SP FOLIO UK QUARTO FOOLSCAP GOVT LEGAL 16K PHOTO 10 15 KAI 16 KAI 32 ENV C5 ENV C6 ENV DL ENV MONARCH ENV CHOU 3 ENV CHOU 4 B5 ISO ENV 10 ENV YOU 4 JPOST JPOST D CUSTOM Select the setting for the size of paper loaded into Tray 1 Depending on the setting selected for SYS DEFAULT...

Страница 56: ...and inches with the SYS DEFAULT MENU PAPER UNIT OF MEASURE setting Setting range for WIDTH For MILLIMETERS 92 to 216 mm default 210 mm For INCHES 3 63 to 8 50 inches default 8 26 inches Setting range for LENGTH For MILLIMETERS 148 to 356 mm default 297 mm For INCHES 5 83 to 14 00 inches default 11 69 inches This menu item appears only if PAPER SIZE is set to CUSTOM ...

Страница 57: ...loaded into Tray 2 TRAY 3 TRAY 4 PAPER SIZE The size of paper loaded in Tray 3 and Tray 4 is indicated This menu item only shows the current setting This setting cannot be changed PAPER TYPE Settings ANY PLAIN PAPER RECYCLED Select the setting for the type of paper loaded into Tray 3 Tray 4 TRAY CHAINING Settings ON OFF If ON is selected and the specified Lower Feeder Unit runs out of paper during...

Страница 58: ... installed DUPLEX Settings OFF LONG EDGE SHORT EDGE If LONG EDGE is selected the pages will be printed on both sides of the paper for long edge binding If SHORT EDGE is selected the pages will be printed on both sides of the paper for short edge binding The setting specified in the printer driver will override this menu setting COPIES Settings 1 9999 Specify the number of copies to be printed The ...

Страница 59: ...ray The setting specified in the printer driver will override this menu setting JOB SEPA RATION Settings ON OFF The paper is fed to the main output tray with each print job slightly shifted If FINISHING is set to SUB TRAY the print jobs are fed out stacked on top of each other without begin shifted If FINISHING is set to STAPLING the print jobs are stapled before being fed out IMAGE ROTA TION Sett...

Страница 60: ...uality can be specified TEXT PRINTING COLOR MODE BRIGHTNESS HALFTONE QUALITY MENU IMAGE PRINTING GRAPHICS PRINTING IMAGE PRINTING PCL SETTING CONTRAST TEXT PRINTING EDGE ENHANCEMENT IMAGE PRINTING GRAPHICS PRINTING EDGE STRENGTH ECONOMY PRINT GLOSSY MODE RGB SOURCE RGB INTENT RGB GRAY ...

Страница 61: ...TENT RGB GRAY PS SETTING IMAGE PRINTING RGB SOURCE RGB INTENT RGB GRAY DESTINATION PROF GRAPHICS PRINTING RGB SOURCE RGB INTENT RGB GRAY TEXT PRINTING RGB SOURCE RGB INTENT RGB GRAY DESTINATION PROF GRAPHICS PRINTING RGB SOURCE RGB INTENT RGB GRAY DESTINATION PROF ...

Страница 62: ...5 The brightness of the printed image can be adjusted HALFTONE IMAGE PRINTING Settings LINE ART DETAIL SMOOTH Select how halftones in images are reproduced If LINE ART is selected halftones are reproduced with high precision If DETAIL is selected halftones are reproduced with detail If SMOOTH is selected halftones are reproduced with smoothness SIMULATION PROF SIMULATION INTENT CMYK GRAY SIMULATIO...

Страница 63: ...PRINTING Settings LINE ART DETAIL SMOOTH Select how halftones in graphics are reproduced If LINE ART is selected halftones are reproduced with high precision If DETAIL is selected halftones are reproduced with detail If SMOOTH is selected halftones are reproduced with smoothness EDGE ENHANCE MENT IMAGE PRINTING Settings ON OFF Select whether image edges are emphasized If ON is selected the edges a...

Страница 64: ...OFF is selected the edges are not emphasized If ECONOMY PRINT is set to ON the edges cannot be emphasized EDGE STRENGTH Settings OFF LOW MIDDLE HIGH Select the desired amount that edges are emphasized If OFF is selected the edges are not emphasized If LOW is selected the edges are slightly emphasized If MIDDLE is selected the edges are emphasized by an average amount If HIGH is selected the edges ...

Страница 65: ...ed when printing even if ON was selected for this menu item If ON is selected the edges are not emphasized even if IMAGE PRINTING and GRAPHICS PRINTING of the EDGE ENHANCEMENT menu item are set to ON GLOSSY MODE Settings ON OFF Select whether to relax the limitations on the amount of toner used in order to widen the color reproduction range and produce glossy prints If ON is selected glossy prints...

Страница 66: ...RGB image data If DEVICE COLOR is selected no color space is specified If RGB source profiles are downloaded with the Download Manager they are available from the list of settings RGB INTENT Settings VIVID PHOTOGRAPHIC Specify the characteristic applied when converting RGB image data to CMYK data If VIVID is selected a vivid output is produced If PHOTOGRAPHIC is selected a brighter output is produ...

Страница 67: ...e CMYK colors If BLACK AND GRAY is selected black and gray are reproduced using black only If BLACK ONLY is selected black is reproduced using only black TEXT PRINTING RGB SOURCE Settings DEVICE COLOR sRGB Specify the color space for RGB text data If DEVICE COLOR is selected no color space is specified If RGB source profiles are downloaded with the Download Manager they are available from the list...

Страница 68: ...black and grays are reproduced in RGB text data If COMPOSITE BLACK is selected black is reproduced using the CMYK colors If BLACK AND GRAY is selected black and gray are reproduced using black only If BLACK ONLY is selected black is reproduced using only black GRAPHICS PRINTING RGB SOURCE Settings DEVICE COLOR sRGB Specify the color space for RGB GRAPHICS data If DEVICE COLOR is selected no color ...

Страница 69: ...ced If PHOTOGRAPHIC is selected a brighter output is produced RGB GRAY Settings COMPOSITE BLACK BLACK AND GRAY BLACK ONLY Specify how black and grays are reproduced in RGB GRAPHICS data If COMPOSITE BLACK is selected black is reproduced using the CMYK colors If BLACK AND GRAY is selected black and gray are reproduced using black only If BLACK ONLY is selected black is reproduced using only black ...

Страница 70: ...th the Download Manager they are available from the list of settings RGB INTENT Settings VIVID PHOTOGRAPHIC RELATIVE COLOR ABSOLUTE COLOR Specify the characteristic applied when converting RGB image data to CMYK data If VIVID is selected a vivid output is produced If PHOTOGRAPHIC is selected a brighter output is produced If RELATIVE COLOR is selected relative color is applied to the RGB source pro...

Страница 71: ...lack and gray are reproduced using black only If BLACK ONLY is selected black is reproduced using only black DESTI NATION PROF Settings AUTO Specify the destination profile If AUTO is selected a destination profile that the printer automatically adapts is selected based on a combination of the specified color matching halftones and other profiles If destination profiles are downloaded with the Dow...

Страница 72: ... Download Manager they are available from the list of settings RGB INTENT Settings VIVID PHOTOGRAPHIC RELATIVE COLOR ABSOLUTE COLOR Specify the characteristic applied when converting RGB text data to CMYK data If VIVID is selected a vivid output is produced If PHOTOGRAPHIC is selected a brighter output is produced If RELATIVE COLOR is selected relative color is applied to the RGB source profile If...

Страница 73: ...ack and gray are reproduced using black only If BLACK ONLY is selected black is reproduced using only black DESTI NATION PROF Settings AUTO Specify the destination profile If AUTO is selected a destination profile that the printer automatically adapts is selected based on a combination of the specified color matching halftones and other profiles If destination profiles are downloaded with the Down...

Страница 74: ...he Download Manager they are available from the list of settings RGB INTENT Settings VIVID PHOTOGRAPHIC RELATIVE COLOR ABSOLUTE COLOR Specify the characteristic applied when converting RGB image data to CMYK data If VIVID is selected a vivid output is produced If PHOTOGRAPHIC is selected a brighter output is produced If RELATIVE COLOR is selected relative color is applied to the RGB source profile...

Страница 75: ...lack and gray are reproduced using black only If BLACK ONLY is selected black is reproduced using only black DESTI NATION PROF Settings AUTO Specify the destination profile If AUTO is selected a destination profile that the printer automatically adapts is selected based on a combination of the specified color matching halftones and other profiles If destination profiles are downloaded with the Dow...

Страница 76: ...pecified If simulation profiles are downloaded with the Download Manager they are available from the list of settings SIMU LATION INTENT Settings RELATIVE COLOR ABSOLUTE COLOR Specify the characteristic of the simulation profile If RELATIVE COLOR is selected relative color is applied to the simulation profile If ABSOLUTE COLOR is selected absolute color is applied to the simulation profile ...

Страница 77: ...CK AND GRAY is selected black and gray are reproduced using black only If BLACK ONLY is selected black is reproduced using only black CALIBRA TION TONE CALIBRATION Settings ON OFF If ON is selected image adjustments are applied If OFF is selected image adjustments are not applied AIDC PROCESS Settings EXECUTE CANCEL If EXECUTE is selected image adjustments are performed immediately If CANCEL is se...

Страница 78: ...tings 3 2 1 0 1 2 3 The density of the shadow color in images can be adjusted COLOR SEPARA TION Settings ON OFF If ON is selected color separation are performed The contents of a color page is separated into the color pages for yellow magenta cyan and black and each is printed with black gradations as individual pages The printing order is yellow magenta cyan then black If OFF is selected color se...

Страница 79: ... memu settings for memory direct function can be specified For details on memory direct refer to Memory Direct on page 96 This menu item appears when a USB memory device is plugged into the KONICA MINOLTA Digital Camera Direct Print Port All factory default values are shown in bold LIST OF FILES Select the file that you wish to output and then press the Menu Select key If the file to be printed is...

Страница 80: ...FAULT MENU PAPER UNIT OF MEASURE PHOTO 10 15 may change to PHOTO 4 6 This menu item does not appear if the selected file is a PDF file DUPLEX OFF Settings LONG EDGE SHORT EDGE OFF Select whether to perform duplex printing If LONG EDGE is selected the page will be printed on both sides of the paper for long edge binding If SHORT EDGE is selected the page will be printed on both sides of the paper f...

Страница 81: ...MAIN TRAY OFFSET STAPLING Select the output tray and finishing settings When SUB TRAY is selected the paper is fed to the sub output tray When MAIN TRAY is selected the paper is fed to the main output tray When OFFSET is selected the paper is fed to the main output tray with each copy slightly shifted When STAPLING is selected each copy is stapled and fed to the main output tray This menu item app...

Страница 82: ...entica tion settings refer to the bizhub C30P Reference Guide on the Utilities and Documentation CD ROM With this menu settings for camera direct function can be specified These settings are overridden by any settings configured within the digital camera For details on camera direct refer to Camera Direct on page 94 ECONOMY PRINT GLOSSY MODE RGB SOURCE BRIGHTNESS CONTRAST RGB INTENT PAPER SOURCE L...

Страница 83: ... area that is not printed in If STANDARD is selected the standard media margin size is specified If MINIMUM is selected the media margins are reduced IMAGE QUAL ITY BRIGHT NESS Settings 15 10 5 0 5 10 15 The brightness of the printed image can be adjusted CONTRAST Settings 15 10 5 0 5 10 15 The contrast of the image can be adjusted ECONOMY PRINT Settings ON OFF Select whether to print graphics wit...

Страница 84: ... the color space for RGB image data If DEVICE COLOR is selected no color space is specified RGB INTENT Settings VIVID PHOTOGRAPHIC Specify the characteristic applied when converting RGB image data to CMYK data If VIVID is selected a vivid output is produced If PHOTOGRAPHIC is selected a brighter output is produced RGB GRAY Settings COMPOSITE BLACK BLACK AND GRAY BLACK ONLY Specify how black and gr...

Страница 85: ... LINE ART DETAIL SMOOTH Select how halftones are reproduced If LINE ART is selected halftones are reproduced with high precision If DETAIL is selected halftones are reproduced with detail If SMOOTH is selected halftones are reproduced with smoothness ...

Страница 86: ...fter changing settings in the ETHERNET menu This menu item appears only if the optional hard disk drive or a CompactFlash card is installed SUBNET MASK DEFAULT GATEWAY DHCP BOOTP ENABLE ENABLE TCP IP ENABLE IP ADDRESS NETWARE APPLETALK SPEED DUPLEX JOB TIMEOUT ETHERNET INTERFACE MENU MEMORY DIRECT TELNET CAMERA DIRECT ...

Страница 87: ...ork Use the and keys to specify the value If the IP address is manually specified DHCP BOOTP is automatically set to OFF SUBNET MASK Setting 255 255 000 000 Specify the subnet mask for the network Use the and keys to specify the value DEFAULT GATEWAY Setting 000 000 000 000 Specify the IP address of the router if one is on the network Use the and keys to specify the value DHCP BOOTP Settings ON OF...

Страница 88: ...pleTalk is disabled SPEED DUPLEX Settings AUTO 10BASE FULL 10BASE HALF 100BASE FULL 100BASE HALF 1000BASE FULL Specify the transmission speed for the network and the transmission method for bi directional transmission MEMORY DIRECT Settings ENABLE DISABLE Select whether to enable or disable memory direct printing If ENABLE is selected memory direct printing is enabled If DISABLE is selected memory...

Страница 89: ...w and the time until the machine enters Energy Saver mode LANGUAGE EMULATION DEF EMULATION POSTSCRIPT WAIT TIMEOUT PS ERROR PAGE PS PROTOCOL PCL CR LF MAPPING LINES PER PAGE FONT SOURCE FONT NUMBER PITCH SIZE POINT SIZE SYMBOL SET PAPER DEFAULT PAPER UNIT OF MEASURE SYS DEFAULT MENU PAPER SIZE CUSTOM SIZE PAPER TYPE GRAYSCALE PAGE DO STARTUP PAGE STARTUP OPTIONS AUTO CONTINUE ...

Страница 90: ...RITY CHANGE PASSWORD LOCK PANEL CLOCK DATE xx xx xx TIME HDD FORMAT USER AREA ONLY ALL RESTORE DEFAULTS RESTORE NETWORK RESTORE PRINTER RESTORE ALL ENERGY SAVER TIME MENU TIMEOUT ENERGY SAVER TIME ZONE HOLD JOB TIMEOUT CARD FOR MAT USER AREA ONLY ALL ...

Страница 91: ...his menu item appears when you select except OFF from the ENERGY SAVER menu This menu item appears only if an optional CompactFlash card is installed These menu items appear only if corresponding optional lower feeder unit is installed ENABLE WARNING PAPER EMPTY TRAY1 TRAY2 TRAY3 TRAY4 TONER LOW I UNIT LOW ...

Страница 92: ...ttings AUTO POSTSCRIPT PCL Specify the printer emulation language If AUTO is selected the printer automatically selects the printer emulation language from the data stream POST SCRIPT WAIT TIME OUT Settings 0 300 Specify the time until an error is determined to be a PostScript error If 0 is selected no timeout is performed PS ERROR PAGE Settings ON OFF Select whether or not an error page is printe...

Страница 93: ...Specify the default font in the PCL language The font numbers that appear correspond to the PCL font list For details on printing the font list refer to PRINT MENU on page 37 PITCH SIZE POINT SIZE Settings 0 44 10 00 99 99 4 00 12 00 999 75 Specify the font size in the PCL language If the selected FONT NUMBER is for a bitmap font PITCH SIZE appears If the selected FONT NUMBER is for an outline fon...

Страница 94: ...ENT FOLIO SP FOLIO UK QUARTO FOOLSCAP GOVT LEGAL 16K PHOTO 10 15 KAI 16 KAI 32 ENV C5 ENV C6 ENV DL ENV MONARCH ENV CHOU 3 ENV CHOU 4 B5 ISO ENV 10 ENV YOU 4 JPOST JPOST D CUSTOM Select the size of media that is normally used Depending on the setting selected for SYS DEFAULT MENU PAPER UNIT OF MEASURE PHOTO 10 15 may change to PHOTO 4 6 ...

Страница 95: ...ed between millimeters and inches with the SYS DEFAULT MENU PAPER UNIT OF MEASURE setting Setting range for WIDTH For MILLIMETERS 92 to 216 mm default 210 mm For INCHES 3 63 to 8 50 inches default 8 26 inches Setting range for LENGTH For MILLIMETERS 148 to 356 mm default 297 mm For INCHES 5 83 to 14 00 inches default 11 69 inches ...

Страница 96: ...LE PRINT is selected black and white printing is automatically performed depending on each page If COLOR PRINT is selected color printing is performed even for a black and white page STARTUP OPTIONS DO START UP PAGE Settings ON OFF Select whether or not a startup page is printed when the printer is turned on AUTO CON TINUE Settings ON OFF Select whether or not printing continues if the size or typ...

Страница 97: ...will not enter Energy Saver mode ENERGY SAVER TIME Settings 5 minutes 15 minutes 30 minutes 1 hour 3 hours Specify the length of time until the machine enters Energy Saver mode This menu item appears only when ENERGY SAVER is set to ON MENU TIME OUT Settings OFF 1 minute 2 minutes Specify the length of time until the status screen is displayed when no operation is performed while a menu or help sc...

Страница 98: ...o lock the control panel be sure to specify a password other than 0000 CLOCK DATE xx xx xx Specify the date for the printer s internal clock TIME Specify the time for the printer s internal clock TIME ZONE Settings 12 00 00 00 13 00 Specify the time zone HDD FORMAT USER AREA ONLY Initialize the user area of the hard disk When this menu item is selected the printer is automatically restarted ALL In...

Страница 99: ...TY TRAY1 Settings ON OFF Select whether or not a warning appears when Tray 1 runs out of media TRAY2 Settings ON OFF Select whether or not a warning appears when Tray 2 runs out of media TRAY3 Settings ON OFF Select whether or not a warning appears when Tray 3 runs out of media TRAY4 Settings ON OFF Select whether or not a warning appears when Tray 4 runs out of media TONER LOW Settings ON OFF Whe...

Страница 100: ...GNMENT TOP ADJUSTMENT PLAIN PAPER THICK TRANSFER POWER SIMPLEX PASS MAINTENANCE MENU PRINT MENU EVENT LOG HALFTONE 64 CYAN MAGENTA YELLOW BLACK 64 CYAN MAGENTA YELLOW BLACK 128 CYAN MAGENTA YELLOW BLACK 256 HALFTONE 128 HALFTONE 256 GRADATION ENVELOPE TRANSPARENCY LEFT ADJUSTMENT LEFT ADJ TRAY 1 4 LEFT ADJ DUPLEX LEFT ADJ TRAY 1 4 PLAIN PAPER TRANSPARENCY THICK 2 POSTCARD THICK 1 ...

Страница 101: ... THICK CYAN MAGENTA DUPLEX PASS YELLOW BLACK PLAIN PAPER THICK 1 POSTCARD THICK 2 IMG ADJ BLACK LABEL GLOSSY 1 GLOSSY 2 MANUAL DUPLEX PLAIN PAPER LABEL GLOSSY 2 GLOSSY 1 ENVELOPE SUPPLIES REPLACE TRANS BELT TRANS ROLLER FUSER UNIT ENVELOPE ...

Страница 102: ...128 gradations HALF TONE 256 CYAN MAGENTA YELLOW BLACK 256 Settings PRINT CANCEL Print cyan magenta yellow black half tones at 256 gradations GRADA TION Settings PRINT CANCEL Prints the gradation ALIGN MENT TOP ADJUST MENT PLAIN PAPER Settings 15 15 When printing on plain paper specify the size of the top margin THICK Settings 15 15 When printing on thick paper specify the size of the top margin E...

Страница 103: ...Settings 15 15 When duplex printing on media in Tray 1 specify the size of the left margin LEFT ADJ TRAY2 Settings 15 15 When duplex printing on media in Tray 2 specify the size of the left margin LEFT ADJ TRAY3 Settings 15 15 When duplex printing on media in Tray 3 specify the size of the left margin LEFT ADJ TRAY4 Settings 15 15 When duplex printing on media in Tray 4 specify the size of the lef...

Страница 104: ...ELO PE Settings 8 7 When printing on envelope using simplex pass correct the secondary image transfer current LABEL Settings 8 7 When printing on LABEL using simplex pass correct the sec ondary image transfer current GLOSSY 1 Settings 8 7 When printing on GLOSSY 1 using simplex pass correct the secondary image transfer current GLOSSY 2 Settings 8 7 When printing on GLOSSY 2 using simplex pass corr...

Страница 105: ...ng manual duplex pass correct the secondary image transfer current POST CARD Settings 8 7 When printing on POST CARD using manual duplex pass correct the secondary image transfer current ENVE LOPE Settings 8 7 When printing on ENVELOPE using manual duplex pass correct the secondary image transfer current LABEL Settings 8 7 When printing on LABEL using manual duplex pass correct the secondary image...

Страница 106: ...GENTA Settings 5 0 5 When printing on thick paper adjust the magenta in the image YELLOW Settings 5 0 5 When printing on thick paper adjust the yellow in the image BLACK Settings 5 0 5 When printing on thick paper adjust the black in the image IMG ADJ BLACK Settings 2 0 2 When printing in grayscale adjust the black in the image SUP PLIES RE PLACE TRANS BELT Settings YES NO Reset the service life c...

Страница 107: ...Camera Direct ...

Страница 108: ...t Paper Margin and Image Quality The Media Type setting that is used is the default printer setting that is selected The Media Type setting cannot be selected from the digital cam era If these settings can be specified from the digital camera they do not need to be specified from the control panel These settings are overridden by settings configured within the digital camera For details on control...

Страница 109: ...Memory Direct ...

Страница 110: ... corner of the mes sage window and the Memory Direct menu appears 2 Select LIST OF FILES and then press the Menu Select key When all files PDF JPEG and TIFF are displayed select Type OF FILES and then press the Menu Select key 3 From the file list select the file that you wish to print and then press the Menu Select key If the file to be printed is in a folder select the folder and then press the ...

Страница 111: ...Using Media ...

Страница 112: ...6 0 100 0 x 150 0 1 No 16 K 7 7 x 10 6 195 0 x 270 0 1 Yes Kai 16 7 3 x 10 2 185 0 x 260 0 1 Yes Kai 32 5 1 x 7 3 130 0 x 185 0 1 No Japanese Postcard 3 9 x 5 8 100 0 x 148 0 1 No Japanese Postcard D 5 8 x 7 9 148 0 x 200 0 1 No B5 ISO 6 9 x 9 8 176 0 x 250 0 1 No Envelope Com10 4 126 x 9 5 104 8 x 241 3 1 No Envelope DL 4 3 x 8 7 110 0 x 220 0 1 No Envelope C5 6 4 x 9 0 162 0 x 229 0 1 No Envelop...

Страница 113: ...such as standard or recycled office paper Note Do not use the media types listed below These could cause poor print quality media misfeeds or damage to the printer DO NOT use media that is Coated with a processed surface such as carbon paper and colored paper that has been treated Capacity Tray 1 Manual Feed Tray Up to 100 sheets depending on the paper weight Tray 2 3 4 Up to 500 sheets depending ...

Страница 114: ... Paper that has been printed on with any other printer or fax machine Dusty Wet or damp Keep media between 35 and 85 relative humidity Toner does not adhere well to moist or wet paper Layered Adhesive Folded creased curled embossed warped or wrinkled Perforated three hole punched or torn Too slick too coarse or too textured Different in texture roughness on the front and back Too thin or too thick...

Страница 115: ...of three layers of paper the front back and flap Anything printed in these lay ered regions may be lost or faded Capacity Tray 1 Manual Feed Tray Up to 20 thick stock sheets depending on their thickness Tray 2 3 4 Not supported Orientation Face down Driver Media Type Thick 1 91 150 g m2 Thick 2 151 210 g m2 Weight 91 210 g m 25 55 9 lb bond Duplexing Not supported Glossy Mode ON OFF Supported Glos...

Страница 116: ...eet of labels consists of a face sheet the printing surface adhesive and a carrier sheet The face sheet must follow the plain paper specification The face sheet surface must cover the entire carrier sheet and no adhe sive should come through on the surface You can print continuously with label sheets However this could affect the media feed depending on the media quality and printing environment I...

Страница 117: ...f and media misfeeds to occur Are precut or perforated Letterhead Try printing your data on a sheet of plain paper first to check placement Driver Media Type Label Weight 60 163 g m 16 43 lb bond Duplexing Not supported Glossy Mode ON OFF Supported Glossy mode is Disabled at Grayscale Color Mode or Duplex Print Capacity Tray 1 Manual Feed Tray Up to 20 sheets depending on their size and thickness ...

Страница 118: ... warped area before putting it in Tray 1 Weight 60 90 g m 16 24 lb Duplexing See page 98 for supported sizes Glossy Mode ON OFF Supported Glossy mode is Disabled at Grayscale Color Mode or Duplex Print Capacity Tray 1 Manual Feed Tray Up to 20 postcards depending on their thickness Tray 2 3 4 Not supported Orientation Face down Driver Media Type Postcard Weight 60 163 g m 16 90 lb bond Duplexing N...

Страница 119: ...ending on the media quality static buildup and printing envi ronment Try printing your data on a sheet of plain paper first to check placement If you have problems feeding 20 sheets try loading only 1 10 sheets at a time Loading a large number of transparencies at one time may cause static buildup thus causing feeding problems Always first test a small quantity of a particular type of transparency...

Страница 120: ...ia in Tray 1 as this will cause printer misfeed ing Capacity Tray 1 Manual Feed Tray Up to 20 glossy media sheets depending on their thickness Tray 2 3 4 Not supported Orientation Face down Driver Media Type Glossy 1 Glossy 2 Weight Glossy 1 100 150 g m Glossy 2 128 210 g m Duplexing Not supported Glossy Mode ON OFF Supported Glossy mode is Disabled at Grayscale Color Mode or Duplex Print ...

Страница 121: ...rinting on Banner Paper the bottom margin is 10 mm 0 393 Banner Paper Weight 127 160g m2 Width 216mm Length 357 1200mm Imageable Area Envelopes Envelopes have a nonguaranteed imageable area that varies with envelope type The envelope print orienta tion is deter mined by your appli cation Page Margins Margins are set through your application Some applications allow you to set custom page sizes and ...

Страница 122: ...t is not intended to print exclusively on a single media type except plain paper Continuous printing on media other than plain paper such as envelopes labels thick stock or transparencies may adversely affect print quality or reduce engine life When refilling media first remove any media remaining in the tray Stack it with the new media even the edges then reload it Tray 1 Manual Feed Tray For det...

Страница 123: ...09 2 Slide the media guides to pro vide more space between them 3 Press down on the center of the paper lifting plate until the left and right locking tabs white lock into place 4 Load the paper face down in the tray ...

Страница 124: ...figuration menu and then select the setting for the size and type of paper that are loaded See also PAPER MENU on page 39 When printing from Tray 1 with the corresponding Paper Source set ting in the printer driver Tray1 Manual Feed it is not necessary to change the configuration menu setting Other Media When loading media other than plain paper set the media mode Envelope Label Thick 1 Thick 2 Gl...

Страница 125: ...Loading Media 111 Loading Envelopes 1 Pull the lever and then open the right side cover Before opening the right side cover fold up Tray 1 2 Open the door at the side of the right side cover ...

Страница 126: ...Loading Media 112 3 Turn the two dials on the fuser unit to the setting for envelopes 4 Close the door at the side of the right side cover Plain paper Envelope ...

Страница 127: ...Loading Media 113 5 Close the right side cover 6 Open Tray 1 7 Slide the media guides to pro vide more space between them ...

Страница 128: ...Before loading enve lopes press them down to make sure that all air is removed and make sure that the folds of the flaps are firmly pressed other wise the envelopes may become wrinkled or a media misfeed may occur Up to 10 envelopes can be loaded into the tray at one time For envelopes with the flap along the long edge load the envelopes with the flap toward the right of Tray 1 ...

Страница 129: ...RAY 1 PAPER SIZE and PAPER TYPE in the configuration menu and then select the setting for the size and type of paper that are loaded See also PAPER MENU on page 39 When printing from Tray 1 with the corresponding Paper Source set ting in the printer driver Tray1 Manual Feed it is not necessary to change the configuration menu setting Loading Label Sheets Postcards Thick Stock Glossy Media and Tran...

Страница 130: ...to pro vide more space between them 3 Press down on the center of the paper lifting plate until the left and right locking tabs white lock into place 4 Load the media face down in the tray Up to 20 sheets can be loaded into the tray at one time ...

Страница 131: ...IZE and PAPER TYPE in the configuration menu and then select the setting for the size and type of paper that are loaded See also PAPER MENU on page 39 When printing from Tray 1 with the corresponding Paper Source set ting in the printer driver Tray1 Manual Feed it is not necessary to change the configuration menu setting ...

Страница 132: ...mm long can be loaded into the bypass tray and printed one at a time 1 Open Tray 1 2 Slide the media guides to pro vide more space between them 3 Press down on the center of the paper lifting plate until the left and right locking tabs white lock into place ...

Страница 133: ...h as possible into the feed slot One sheet of banner paper can be loaded into the tray at one time In order to avoid toner smudges do not load curled paper 5 Slide the media guides against the edges of the banner paper 6 Raise the bypass tray and secure the banner paper Return the bypass tray to its original position ...

Страница 134: ...t and right media guides When printing multiple copies on banner paper repeat the procedure starting from step 2 8 Select Tray 1 Manual Feed from the Paper Source list and specify a cus tom size in the Original Size list of the printer driver and then print ...

Страница 135: ...Loading Media 121 Tray 2 Loading Plain Paper 1 Pull out Tray 2 2 Press down the media pressure plate to lock it into place ...

Страница 136: ...00 sheets 80 g m2 22 lb of plain paper can be loaded into the tray at one time 4 Close Tray 2 5 Select PAPER MENU PAPER SOURCE TRAY 2 PAPER SIZE and PAPER TYPE in the configuration menu and then select the setting for the size and type of paper that are loaded See also PAPER MENU on page 39 ...

Страница 137: ...edia 123 Tray 3 4 Optional Lower Feeder Units Loading Plain Paper 1 Pull out Tray 3 Tray 4 2 Press down the media pressure plate to lock it into place 3 Slide the media guides to pro vide more space between them ...

Страница 138: ...ia 124 4 Load the paper face up in the tray Do not load above the mark Up to 500 sheets 80 g m2 22 lb of plain paper can be loaded into the tray at one time 5 Slide the media guides against the edges of the paper ...

Страница 139: ...dia 125 6 Close Tray 3 Tray 4 7 Select PAPER MENU PAPER SOURCE TRAY 3 or TRAY 4 PAPER TYPE in the configuration menu and then select the setting for the type of paper that is loaded See also PAPER MENU on page 39 ...

Страница 140: ...o matically with the duplex option installed and selected Note Only plain paper 60 90 g m2 16 24 lb bond can be autoduplexed See Media Specifications on page 98 Duplexing envelopes labels postcards thick stock glossy media or transparencies is not supported How do I autoduplex You should verify that the duplex option is physically installed on the printer to successfully duplex Double Sided the jo...

Страница 141: ...ted Output Tray All printed media is output to the face down output tray on top of the printer This tray has a capacity of approximately 250 sheets A4 Letter of 80 g m2 22 lb paper If the media is stacked too high in the output tray your printer may experience media misfeeds excessive media curl or static buildup Remove transparencies as soon as possible from the output tray to avoid static buildu...

Страница 142: ... staple printing Paper is fed to the main output tray with job separation offset and sta ple printing Job Separation Printing When paper is fed to the main output tray the pages are fed out shifted as shown below When paper is fed to the sub output tray the pages are fed out stacked on top of each other without begin shifted If staple printing is selected the pages are stapled together before bein...

Страница 143: ...stapled when they contain 2 to 30 pages 3 to 60 pages when double sided If staple printing is selected when COLLATE is set to ON the pages are stapled before being fed out If staple printing is selected when COLLATE is set to OFF the pages are not stapled before being fed out except when only one copy is being printed When copies are stapled they are not fed out shifted as with offset printing or ...

Страница 144: ...may dry up too much and cause misfeeding If media has been removed from its wrapper place it in its original pack aging and store in a cool dark place on a level surface Avoid moisture excessive humidity direct sunlight excessive heat above 35 C 95 F and dust Avoid leaning media against other objects or placing it in an upright posi tion Before using stored media do a trial print to check print qu...

Страница 145: ...Replacing Consumables ...

Страница 146: ...r printer uses four toner cartridges black yellow magenta and cyan Handle the toner cartridges carefully to avoid spilling toner inside the printer or on yourself Install only new toner cartridges in your printer If a used toner car tridge is installed the indicator message will not clear and the supplies status in the Status Monitor will not be updated The toner is nontoxic If you get toner on yo...

Страница 147: ...over your printer For optimum print quality and performance use only the corre sponded TYPE genuine KONICA MINOLTA toner cartridges Keep toner cartridges In their packaging until you re ready to install them In a cool dry location away from sunlight due to heat The maximum storage temperature is 35 C 95 F and the maximum storage humidity is 85 noncondensing If the toner cartridge is moved from a c...

Страница 148: ...ring handling and storage Do not hold stand or store cartridges on their ends or turn them upside down the toner inside the cartridges may become caked or unequally distributed Away from salty air and corrosive gases such as aerosols Y ...

Страница 149: ... ENABLE WARNING is set to ON the message TONER LOW X where X represents the color of the toner appears when toner cartridge becomes empty Follow the steps below to replace the toner cartridge If TONER LOW on the SYS DEFAULT MENU ENABLE WARNING is set to OFF you are advised to replace the indicated toner cartridge when the message TONER EMPTY X appear 1 Open the printer s front cover 2 Pull the fro...

Страница 150: ...replaced and then pull out the cartridge Note Dispose of the used toner cartridge according to your local regulations Do not burn the toner cartridge For details refer to About Toner Cartridges on page 132 5 Check the color of the new toner cartridge to be installed 6 Remove the toner cartridge from the bag Y Y Y ...

Страница 151: ...ute the toner 8 Make sure that the toner car tridge is the same color as the printer compartment and then insert the toner cartridge into the printer 9 Make sure that the toner car tridge is securely installed and then peel off the protective film Y 3 Y Y Y Y ...

Страница 152: ...ont lever to its origi nal position 11 Pull the lever to the left to lock it in place The front lever should be securely returned to its original position other wise the front cover of the printer cannot be closed 12 Close the front cover Y Y ...

Страница 153: ...not touch the OPC drum surface This could lower image quality If I UNIT LOW on the SYS DEFAULT MENU ENABLE WARNING is set to ON the message I UNIT LOW X where X represents the color of the toner appears when a print unit becomes empty Follow the steps below to replace the print unit You are advised to replace the indicated print unit when the message I UNIT LIFE X appears 1 Check the message windo...

Страница 154: ...Replacing Consumables 140 2 Open the printer s front cover 3 Pull the front lever to the right 4 Lower the lever to release the lock K K ...

Страница 155: ... way out of the printer Note Dispose of the used print unit according to your local regulations Do not burn the print unit 6 Check the color of the new print unit to be installed In order to prevent toner from spilling leave the print unit in the bag until step 5 is being performed 7 Remove the print unit from the bag K PUSH ...

Страница 156: ...illustration Do not grab the bottom of the bag otherwise the print unit may be dam aged resulting in decreased print quality 9 Remove all packing tape from the print unit 10 Remove the protective cover from the print unit The protec tive cover slides after having turned Y PU SH Y PUSH K P U S H K P U S H ...

Страница 157: ...he printer compartment and then install the print unit in the printer 12 Raise the front lever to its origi nal position 13 Pull the lever to the left to lock it in place The front lever should be securely returned to its original position other wise the front cover of the printer cannot be closed K K ...

Страница 158: ...Replacing Consumables 144 14 Close the front cover ...

Страница 159: ...ll the message WASTE TONER FULL REPLACE BOTTLE appears in the message window The printer stops and will not start again until the waste toner bottle is replaced 1 Open the printer s front cover 2 Turn the dial on the waste toner bottle counterclockwise until it is in the unlock position Lock Unlock ...

Страница 160: ... if the lock is closed when the waste toner bottle is removed 5 Remove the new waste toner bottle from its packaging Insert the used waste toner bottle into the plastic bag included in the box and then box it up Note Dispose of the used waste toner bottle according to your local regulations Do not burn the waste toner bottle Before installing the waste toner bottle be sure that the dial on the was...

Страница 161: ...Replacing Consumables 147 6 Slide the waste toner bottle all the way into the printer 7 Turn the dial clockwise until the waste toner bottle is in the locked position Lock Unlock ...

Страница 162: ...he message TRANS ROLLER END OF LIFE appears Printing can continue even after this message appears however since the print quality is reduced the transfer roller should be replaced immediately When replacing the transfer roller also replace the ozone filter A new ozone filter is included with the new transfer roller Replacing the Transfer Roller 1 Pull the lever and then open the right side cover B...

Страница 163: ...the levers to the inside move the roller presser toward you 3 While continuing to press the levers remove the transfer roller 4 Prepare a new transfer roller 5 While pressing the levers insert the shaft of the transfer roller into the bearings ...

Страница 164: ...50 6 Move the levers away from you until it snaps into place 7 Close the right side cover 8 Reset the counter in the MAINTENANCE MENU SUPPLIES REPLACE TRANS ROLLER menu 9 Replace the ozone filter using the following procedure ...

Страница 165: ...Replacing Consumables 151 Replacing the Ozone Filter 1 Remove the ozone filter from the printer 2 Slide the new ozone filter into the printer until it snaps into place ...

Страница 166: ...e appears however since the print quality is reduced the trans fer belt unit should be replaced immediately 1 Open the printer s front cover 2 Remove the print unit and waste toner bottle For details on removing the print unit or waste toner bottle refer to Replacing a Print Unit on page 139 or Replac ing the Waste Toner Bot tle on page 145 Cover the removed print unit to protect it from direct su...

Страница 167: ...153 3 Using a coin remove the four screws on the left side Be careful not to lose the screws 4 Remove the left side cover 5 Pull the lever and then open the right side cover Before opening the right side cover fold up Tray 1 ...

Страница 168: ...curing the transfer belt unit 7 On the left side pull to the right the blue shutter lever for the transfer belt unit Do not remove the blue lever 8 From the side where the left side cover was removed hold the arm and then carefully pull out the transfer belt unit ...

Страница 169: ... from the transfer belt unit 10 Remove the protective cover from the transfer belt unit 11 Prepare a new transfer belt unit Be careful not to touch the surface of the belt Do not remove the blue lever 12 Insert the new transfer belt unit along the rails ...

Страница 170: ... the left side pull to the left the blue shutter lever for the transfer belt unit 14 From the right side cover side tighten the screws to secure the transfer belt unit and then close the right side cover 15 Close the right side cover ...

Страница 171: ...ver 17 Tighten the four screws on the left side 18 Install the print unit and waste toner bottle For details on installing the print unit or waste toner bottle refer to Replacing a Print Unit on page 139 or Replac ing the Waste Toner Bot tle on page 145 ...

Страница 172: ...annot be retained Follow the procedure described below to replace the backup battery Note It s very important to protect the printer controller board and any associated circuit boards from electrostatic damage Before performing this procedure review the antistatic caution on page 226 In addition always handle circuit boards by the edges only 1 Turn off the printer and discon nect the power cord an...

Страница 173: ... a screwdriver remove the screw Then slide the rear cover to the right and remove it 3 Using a screwdriver loosen the seven screws Do not remove them from the printer 4 Slide the panel slightly to the right and lift it off the printer ...

Страница 174: ...tery 6 Insert a new backup battery When inserting the new backup battery be sure that the side faces toward the left 7 Reinstall the panel and tighten the seven screws 8 Attach the rear cover 9 Reconnect all interface cables 10 Reconnect the power cord and turn on the printer ...

Страница 175: ...U CLOCK menu to set the date and use TIME on the SYS DEFAULT MENU CLOCK menu to set the time Replacing the Staple When there are no more staples the message STAPLER EMPTY appears Replace the staple cartridge 1 Open the stapler cover 2 Pull out the stapling unit ...

Страница 176: ...Replacing Consumables 162 3 Pull out the stapler 4 Remove the empty cartridge and then insert the new one ...

Страница 177: ...Replacing Consumables 163 5 Install the stapler 6 Install the stapling unit 7 Close the stapler cover ...

Страница 178: ......

Страница 179: ...Maintaining the Printer ...

Страница 180: ...ser unit is hot When the right side cover is opened the fuser unit temperature drops gradually one hour wait time Be careful when cleaning the inside of the printer or removing media mis feeds as the fuser unit and other internal parts may be very hot Do not place anything on top of the printer Use a soft cloth to clean the printer Never spray cleaning solutions directly on the printer s surface t...

Страница 181: ...ality to deteriorate Keep media in the output tray at a minimum level If the media is stocked too high your printer may experience media misfeeds and excessive media curl Make sure two people are avail able to lift the printer when mov ing it Keep the printer level to avoid toner spillage When lifting the printer fold up Tray 1 and then lift the printer as shown in the illustration at the right Ev...

Страница 182: ...your eyes wash it out immediately with cool water and consult a doctor Make sure any parts removed during cleaning are replaced before you plug in the printer Cleaning the Printer CAUTION Be sure to turn off the printer and unplug the power cord before cleaning Exterior YMCK MENU Control Panel Ventilation Grill Printer Exterior ...

Страница 183: ... paper dust and other debris on the media rollers can cause media feeding problems Cleaning the Media Feed Rollers Manual Feed Tray 1 Open Tray 1 2 Press down on the center of the paper lifting plate until the left and right locking tabs white lock into place ...

Страница 184: ...Cleaning the Printer 170 3 Clean the media feed rollers by wiping them with a soft dry cloth 4 Close the tray ...

Страница 185: ...Cleaning the Printer 171 Cleaning the Media Feed Rollers Tray 2 3 4 1 Pull out the tray 2 Clean the media feed rollers by wiping them with a soft dry cloth 3 Close the tray ...

Страница 186: ...Cleaning the Printer 172 Cleaning the Duplex Option Feed Rollers 1 Open the duplex cover 2 Clean the feed rollers by wiping them with a soft dry cloth 3 Close the duplex cover ...

Страница 187: ...Rollers for Tray 3 and 4 1 Open the right side cover of Tray 3 Tray 4 Before opening the right side cover of Tray 3 Tray 4 fold up Tray 1 2 Clean the media transfer rollers by wiping them with a soft dry cloth 3 Close the right side cover of Tray 3 Tray 4 ...

Страница 188: ...tool from the machine s front cover 2 Insert the laser lens cleaning tool into the laser lens cleaning opening pull it out and then repeat this back and forth move ment 2 or 3 times 3 Clean between each of the laser lenses in the same way The laser lens cleaning tool is included with the printer Safely store the laser lens cleaning tool so that it will not be lost 4 Return the laser lens cleaning ...

Страница 189: ...10 Troubleshooting ...

Страница 190: ...Page 176 Preventing media misfeeds Page 177 Understanding the media path Page 178 Clearing media misfeeds Page 179 Solving problems with media misfeeds Page 199 Solving other problems Page 202 Solving problems with printing quality Page 208 Status error and service messages Page 214 Press Key once Until Display Reads READY PRINT MENU If the hard disk drive is installed the PROOF PRINT MENU appears...

Страница 191: ...ality media mis feeds and printer damage You load the media printing side up in the tray many manufacturers place an arrow on the end of the wrapper to indicate the printing side Avoid Media that is folded wrinkled or excessively curled Double feeding remove the media and fan the sheets they may be sticking together Fanning transparencies since this causes static Loading more than one type size we...

Страница 192: ...you locate media misfeeds 1 Toner cartridge 9 Laser 2 Relay unit 10 Print unit 3 Fuser unit 11 Transfer belt unit 4 Duplex option 12 Main output tray 5 Tray 1 Manual feed tray 13 Sub output tray 6 Tray 4 optional 14 Staple Finisher optional 7 Tray 3 optional 15 Staple 8 Tray 2 3 2 1 15 14 13 12 11 10 9 5 4 8 7 6 ...

Страница 193: ...oving the misfed media Make sure not to spill any toner inside the printer CAUTION Unfused toner can dirty your hands clothes or anything else it gets on If you accidentally get toner on your clothes lightly dust them off as best as you can If some toner remains on your clothes use cool not hot water to rinse the toner off If toner gets on your skin wash it off with cool water and a mild soap CAUT...

Страница 194: ...isfeed Message Page Reference PAPER JAM TRAY 2 Page 181 PAPER JAM TRAY 3 Page 185 PAPER JAM TRAY 4 Page 185 PAPER JAM DUPLEX 1 Page 187 PAPER JAM DUPLEX 2 Page 187 PAPER JAM FUSER EXIT Page 188 PAPER JAM TRAY 1 Page 191 PAPER JAM SECOND TRANS Page 191 PAPER JAM VERTICAL TRANS Page 185 Page 191 PAPER JAM UPPER TRANS Page 193 PAPER JAM FINISHER Page 194 PAPER JAM SUB EXIT Page 195 PAPER JAM MAIN EXI...

Страница 195: ...learing Media Misfeeds 181 Clearing a Media Misfeed in Tray 2 1 Pull the lever and then open the right side cover Before opening the right side cover fold up Tray 1 2 Carefully pull out the misfed media ...

Страница 196: ... and dials may result in burns If you get burned immediately cool the skin under cold water and then seek professional medical attention Note Decreased print quality may result if the surface of the image transfer belt or the transfer roller is touched Be careful not to touch the surface of the image transfer belt or transfer roller ...

Страница 197: ...Clearing Media Misfeeds 183 3 Close the right side cover 4 Pull out Tray 2 and then remove all media from the tray 5 Fan the media you removed and then align it well ...

Страница 198: ...Clearing Media Misfeeds 184 6 Load the media face up in Tray 2 Make sure that the media is flat Do not load paper above the mark 7 Close Tray 2 ...

Страница 199: ...earing a Media Misfeed in Tray 3 4 1 Open the right side cover of Tray 3 Tray 4 Before opening the right side cover of Tray 3 Tray 4 fold up Tray 1 2 Carefully pull out the misfed media 3 Close the right side cover of Tray 3 Tray 4 ...

Страница 200: ...emove all paper from the tray 5 Fan the paper you removed and then align it well 6 Load the paper face up in Tray 3 Tray 4 Make sure that the paper is flat Do not load paper above the mark Slide the media guides against the edges of the paper 7 Close Tray 3 Tray 4 ...

Страница 201: ...Clearing Media Misfeeds 187 Clearing a Media Misfeed from the Duplex Option 1 Open the duplex cover 2 Carefully pull out the misfed media 3 Close the duplex cover ...

Страница 202: ...edia Misfeed from the Fuser Unit 1 Pull the lever and then open the right side cover Before opening the right side cover fold up Tray 1 2 Push up the levers of the fuser unit cover and then open the cover 3 Carefully pull out the misfed media ...

Страница 203: ... and dials may result in burns If you get burned immediately cool the skin under cold water and then seek professional medical attention Note Decreased print quality may result if the surface of the image transfer belt or the transfer roller is touched Be careful not to touch the surface of the image transfer belt or transfer roller ...

Страница 204: ...Clearing Media Misfeeds 190 4 Push down the levers 5 Close the right side cover ...

Страница 205: ...eds 191 Clearing a Media Misfeed from Tray 1 Manual Feed Tray and Transfer Roller 1 Pull the lever and then open the right side cover Before opening the right side cover fold up Tray 1 2 Carefully pull out the misfed media ...

Страница 206: ... and dials may result in burns If you get burned immediately cool the skin under cold water and then seek professional medical attention Note Decreased print quality may result if the surface of the image transfer belt or the transfer roller is touched Be careful not to touch the surface of the image transfer belt or transfer roller ...

Страница 207: ...Clearing Media Misfeeds 193 3 Close the right side cover Relay Unit 1 Open the upper cover 2 Carefully pull out the misfed media ...

Страница 208: ...le Finisher Case 1 If the media misfeed occurred between the relay unit and the top of the staple finisher follow the procedure described below to remove the misfed media 1 Open the finisher cover 2 Carefully pull out the misfed media ...

Страница 209: ...a Misfeeds 195 Staple Finisher Case 2 If the media can be seen from the sub output tray follow the procedure described below to remove the misfed media 1 Open the finisher cover 2 Carefully pull out the misfed media ...

Страница 210: ...e staple finisher fol low the procedure described below to remove the misfed media 1 Open the finisher cover 2 Clockwise turn the knob on the inside until the media is fed into the main output tray 3 When the media is fed into the main output tray lift up the sub output tray and then slowly pull out the media ...

Страница 211: ...Media Misfeeds 197 Clearing Jammed Staples If the staples are jammed follow the procedure described below to remove the jammed staples 1 Open the stapler cover 2 Pull out the stapling unit 3 Pull out the stapler ...

Страница 212: ...sfeeds 198 4 Push up the guide for the staple cartridge and then remove any jammed staples 5 Return the guide to its original position and then install the sta pler 6 Install the stapling unit 7 Close the stapler cover ...

Страница 213: ...ge stays on Right side cover needs to be opened and closed again to reset the printer Open and close the right side cover of the printer again Some media remains misfed in the printer Recheck the media path and make sure that you have removed all of the misfed media Duplex option mis feeds Unsupported media wrong size thick ness type etc is being used Use KONICA MINOLTA approved media See Media Sp...

Страница 214: ...media smooth it out and reload it If it still misfeeds do not use that media The media is moist from humidity Remove the moist media and replace it with new dry media Custom sized media envelopes labels postcards thick stock glossy or transparencies are loaded in Tray 2 3 or 4 Special media must be loaded in Tray 1 only The recommended transparency or label sheet is facing the wrong way in Tray 1 ...

Страница 215: ... load them in the tray one sheet at a time Do not fan transparencies before load ing them Unsupported media wrong size thick ness type etc is being used Use KONICA MINOLTA approved media See Media Specifications on page 98 The media roller is dirty Clean the media supply roller For more details refer to Media Roll ers on page 169 Symptom Cause Solution ...

Страница 216: ...h a voltage or fre quency that does not match the printer specifications Use a power source with the specifica tions listed in appendix A Technical Specifications Data was sent to the printer but it doesn t print An error message is displayed in the mes sage window Handle according to the message dis played A job may be can celled if user authen tication or account track settings are specified Cli...

Страница 217: ...idge Printer only supports a PictBridge compliant digital camera Set the digital camera transfer mode to PictBridge CAMERA DIRECT for the printer is set to DISABLE Change the setting for INTERFACE MENU CAMERA DIRECT to ENABLE A public user is not specified for user authentication Contact the printer administrator Printing from a USB mem ory device is not possible The file format file extension is ...

Страница 218: ...e job is very com plex Wait No action needed The printer memory is insufficient Add more memory A toner cartridge for a different region or an unapproved genuine toner cartridge is installed INCOR RECT TONER X is displayed in the mes sage window Install a correct KONICA MINOLTA toner cartridge approved for your spe cific printer Blank pages come out during print ing One or more of the toner cartri...

Страница 219: ...ys are loaded with media in place and secure A document is printed with an overlay file which has been cre ated by a non bizhub C30P driver Print the overlay file using a bizhub C30P driver Printer resets or turns off fre quently The power cord is not correctly plugged into the outlet Turn off the printer confirm that the power cord is correctly plugged into the outlet and then turn on the printer...

Страница 220: ...river Layout Double Sided choose Dou ble Sided For N up on duplexed pages choose Collate only in the Windows driver s Paper Tab Do not set collation in the application With N up on multiple cop ies the out put is incorrect Both the driver and the application have been set for collation For N up on multiple copies choose Collate only in the Windows driver s Paper Tab Do not set collation in the app...

Страница 221: ...essary contact Technical Support with the error information Unsupported media wrong size thick ness type etc is being used Use KONICA MINOLTA approved media See Media Specifications on page 98 The date and time is not correctly maintained on the printer The backup battery has reached the end of its service life Replace the backup battery For details see Replacing the Backup Bat tery on page 158 Th...

Страница 222: ...h new dry media The media set in the printer driver mis matches the media loaded in the printer Load the correct media in the printer The power source does not match the printer specifications Use a power source with the proper specifications Several sheets are being fed at the same time Remove the media from the tray and check it for static electricity Fan plain paper or other media but not trans...

Страница 223: ...ge If one is damaged replace it The media type is set incorrectly When printing envelopes labels post cards thick stock glossy or transpar encies specify the appropriate media type in the printer driver Image is too dark One or more of the print units may be defective Remove the print units and check them for damage If one is damaged replace it Image is blurred background is lightly stained there ...

Страница 224: ...n page 98 One or more of the print units may be defective Remove the print units and check it for damage If it is damaged replace it There is insufficient fusing or the image comes off when rubbed The media is moist from humidity Remove the moist media and replace it with new dry media Unsupported media wrong size thick ness type etc is being used Use KONICA MINOLTA approved media See Media Specif...

Страница 225: ...ler If you think the transfer roller should be replaced contact Technical Support with the error information The media path is dirty with toner Print several blank sheets and the excess toner should disappear One or more of the print units may be defective Remove the print units and check it for damage If it is damaged replace it Abnormal areas white black or color appear in a regular pattern The ...

Страница 226: ...m for damage If one is damaged replace it Colors look drastically wrong One or more of the print units may be defective Remove the print units and verify that the toner is distributed evenly on each cartridge roller and reinstall the print units One or more of the toner cartridges may be low or empty Check the control panel for an TONER LOW X or TONER EMPTY X mes sage If necessary replace the spec...

Страница 227: ... the above have been per formed contact Technical Support with the error information The color has a poor reproduction or has poor color density One or more of the print units may be defective Remove the print units and check them for damage If one is damaged replace it Symptom Cause Solution ...

Страница 228: ...hanges your printer automatically pauses to do an Auto Image Density Control AIDC cycle This process is pro vided to make reliable printer operation with opti mum output quality possible No action needed CANCELLING JOB The job is being cancelled COPYING The printer is printing with the collating function ENERGY SAVER The printer is in Energy Saver mode to reduce power consumption during periods of...

Страница 229: ...disk drive could not be used Replace the hard disk drive with one compatible with this machine or select HDD FORMAT from SYS DEFAULT MENU and format the hard disk INCORRECT MEMORY CARD Since the CompactFlash was formatted with a different machine the CompactFlash could not be used Replace the CompactFlash with one compatible with this machine or select CARD FORMAT from SYS DEFAULT MENU and format ...

Страница 230: ... not be used Use CompactFlash compatible with this printer PAPER EMPTY TRAY X Tray X Tray 1 2 3 or 4 is empty Appears when SYS DEFAULT MENU ENABLE WARN ING PAPER EMPTY TRAY X is set to ON Load media into the specified tray Tray X Tray 2 3 or 4 is not correctly installed Appears when SYS DEFAULT MENU ENABLE WARN ING PAPER EMPTY TRAY X is set to ON Correctly install the specified tray I UNIT END X T...

Страница 231: ...of staples Otherwise the staples are almost empty Replace the staple cartridge TONER EMPTY X The X toner cartridge is empty Replace the toner car tridge Printing does not stop immediately when this message appears Therefore if printing is continued the Operator Call message TONER EMPTY appears and then printing stops Refer to page 222 TONER LOW X The X toner cartridge is low and should be replaced...

Страница 232: ...roller and reset the counter in the MAINTE NANCE MENU SUP PLIES REPLACE TRANS ROLLER menu UNABLE TO COLLATE JOB The hard disk is full Print jobs over 10 000 pages cannot be col lated Print one copy of the file at a time UNABLE TO STAPLE JOB A job set for stapling contains pages that exceed the number of pages that can be stapled Reduce the printed pages to the number that can be stapled Refer to p...

Страница 233: ... X Tray 3 or 4 is open Close the right side cover of the tray COVER OPEN UPPER COVER The upper cover is open Close the upper cover FUSER MISSING CHECK UNIT The fuser unit is not installed Contact Technical Sup port with the error infor mation HOLD JOB ERROR UNABLE TO STORE JOB The specified print job saved on the hard disk is sent while the hard disk is not installed Print jobs can be saved only i...

Страница 234: ...inted for example by decreasing the resolution and then try printing again If that doesn t solve the problem install an optional memory mod ule OUTPUT FULL REMOVE PAPER YYYY The output tray is full of media Remove all media from the output tray PAPER EMPTY SIZE MEDIA The specified tray is empty Appears when PAPER MENU PAPER SOURCE TRAY CHAINING ON is set Load the correct media into the specified t...

Страница 235: ... Media has misfed in the feed section of the main output tray PAPER JAM SECOND TRANS Media has misfed in the transfer roller area This type of misfeed means that the media did not make it to the media exit area PAPER JAM STAPLER Media has misfed in the stapler PAPER JAM SUB EXIT Media has misfed in the feed section of the sub output tray PAPER JAM TRAY1 Media has misfed in Tray 1 PAPER JAM TRAYX M...

Страница 236: ...e toner car tridge TONER MISSING CHECK X The X toner cartridge is not installed or an unapproved toner cartridge is installed Install a correct KONICA MINOLTA toner car tridge TRAY X EMPTY SIZE MEDIA The X Tray 1 2 3 or 4 was specified with the printer driver for printing but Tray X is empty This message appears when the PAPER MENU PAPER SOURCE TRAY CHAINING menu is set to OFF Load the correct med...

Страница 237: ...is different from the type of media loaded Load the correct media type into the specified tray WASTE TONER FULL REPLACE BOTTLE The waste toner bottle is full Install a new waste toner bottle CONFIGURATION ERR The printer configura tion was changed when the printer power was on Reboot the printer INCORRECT TONER X The X toner cartridge is an unapproved type Install a KONICAMI NOLTA toner cartridge ...

Страница 238: ...ain If the problem persists contact your local vendor or authorized service provider This service message means do this SERVICE CALL XXXX Error An error has been detected with the item indicated XXXX in the service message Information about errors appears at the bottom of the message window Reboot the printer This often clears the service message and printer operation can resume If the problem per...

Страница 239: ...11 Installing Accessories ...

Страница 240: ...er option kit attach one end of it to your wrist and the other end to the bare metal chassis on the back of your printer Never attach the wrist strap to any piece of equipment with an electrical current present Plastic rubber wood painted metal surfaces and telephones are not acceptable grounding points If you don t have an antistatic wrist strap discharge your body s static electric charge by tou...

Страница 241: ...ne of the slots By using both slots the memory can be expanded to a maximum of 1024 MB 512 MB 512 MB Installing a DIMM Note It s very important to protect the printer controller board and any associated circuit boards from electrostatic damage Before performing this procedure review the antistatic caution on page 226 In addition always handle circuit boards by the edges only 1 Turn off the printer...

Страница 242: ... new DIMM straight into the DIMM connector until the latches snap into the locked position Observe the keyed side of the DIMM to align it with the connec tor If you cannot snap the DIMM into place do not force it Repo sition it making sure that the DIMM is seated completely in the connector 6 Reinstall the panel and tighten the seven screws 7 Attach the rear cover 8 Reconnect all interface cables ...

Страница 243: ...ord and turn on the printer 10 Declare the additional Printer Memory in the Windows printer driver Properties Configure tab 11 Print a configuration page PRINT MENU CONFIGURATION PG and verify that the total amount of the RAM installed in your printer is listed ...

Страница 244: ...protect the printer controller board and any associated circuit boards from electrostatic damage Before performing this procedure review the antistatic caution on page 226 In addition always handle circuit boards by the edges only 1 Turn off the printer and discon nect the power cord and inter face cables 2 Using a screwdriver remove the screw Then slide the rear cover to the right and remove it ...

Страница 245: ...g a screwdriver loosen the seven screws Do not remove them from the printer 4 Slide the panel slightly to the right and lift it off the printer 5 Plug the cable on the hard disk drive into the connector on the controller board ...

Страница 246: ...n in the illustra tion at the right to mount the hard disk drive onto the control ler board 7 Reinstall the panel and tighten the seven screws 8 Attach the rear cover 9 Reconnect all interface cables 10 Reconnect the power cord and turn on the printer 11 Declare the Hard Disk in the Windows printer driver Properties Configure tab ...

Страница 247: ...installed Installing the CompactFlash card Note If the installed CompactFlash card was used with a device other than this printer such as a computer or digital camera the card is automatically formatted and all of its data is deleted Note It is very important to protect the printer controller board and any associated circuit boards from electrostatic damage Before performing this procedure review ...

Страница 248: ...crewdriver remove the screw Then slide the rear cover to the right and remove it 3 Using a screwdriver loosen the seven screws Do not remove them from the printer 4 Slide the panel slightly to the right and lift it off the printer ...

Страница 249: ...of the slot circled in the illustration slightly pops out Before removing the CompactFlash card press in this button 6 Reinstall the panel and tighten the seven screws 7 Attach the rear cover 8 Reconnect all interface cables 9 Reconnect the power cord and turn on the printer 10 Declare the Memory card in the Windows printer driver Properties Con figure tab ...

Страница 250: ... Duplex Double Sided printing can be performed automatically with the duplex option and enough memory installed See Duplexing on page 126 Installing the Duplex Option 1 Turn off the printer 2 Remove the cover on the right side cover ...

Страница 251: ...ight side cover 4 Prepare the duplex option Before installing the duplex option open the duplex cover and then check that the knob is positioned as shown in the illustration Then close the duplex cover 5 Attach the duplex option as shown in the illustration ...

Страница 252: ...cover and then turn both knobs counterclock wise until they are horizontal to secure the duplex option to the right side cover 7 Then close the duplex cover 8 Declare the Duplex Unit in the Windows printer driver Properties Config ure tab ...

Страница 253: ...eeder units Trays 3 and 4 Each lower feeder unit increases your printer s media feed capacity by 500 sheets Kit Contents Lower feeder unit with a tray 500 sheet capacity Four metal brackets Two front brackets Two rear brackets Four securing screws Transport guide used only for Tray 3 ...

Страница 254: ...rder to prevent accidental spills 1 Turn off the printer and discon nect the power cord and inter face cables 2 Prepare the lower feeder unit Be sure to place the lower feeder unit on a level surface 3 Open the right side cover of the lower feeder unit The right side cover of the lower feeder must be opened before the feeder can be installed onto the printer ...

Страница 255: ...e bottom of the printer If two lower feeder units are to be installed stack the two lower feeder units and secure them together before installing them to the printer WARNING This printer weighs approximately 44 kg 97 0 lb when it is fully loaded with consumables The printer must be lifted by two people 5 Using a screwdriver install the two securing brackets at the rear of the printer 44 kg 97 lbs ...

Страница 256: ...out the trays 7 Install the two securing brackets at the front of the printer 8 Close the trays 9 Attach the transport guide to the right door of Tray 3 It is not necessary to attach the transport guide to the right door of Tray 4 ...

Страница 257: ...Lower Feeder Unit 243 10 Close the right side cover of the lower feeder unit 11 Declare Paper Source Unit 3 4 in the Windows printer driver Properties Configure tab ...

Страница 258: ...paration offset and staple printing can be performed Accessories 1 6 2 5 4 3 7 1 3 4 5 2 6 7 1 Staple Finisher 2 Relay Unit 3 Main output tray 4 Sub output tray 5 Hooks For securing the relay unit 6 Hooks For installing the staple finisher 7 Mounting clips for the main output tray ...

Страница 259: ...nisher 245 Unpacking and installing the Staple Finisher 1 Open the box for the optional finisher 2 Unpack the relay unit and then open the relay unit cover 3 Remove all packing tape 4 Close the relay unit cover ...

Страница 260: ... unit Since the gears 1 are exposed be careful not to grab them or hit them Since the performance of the transport roller and springs 2 may be greatly reduced if they are firmly grabbed treat them with special care 6 Turn off the machine and discon nect the power cord and inter face cables 2 1 ...

Страница 261: ... from the machine While lightly bending the output tray as much as possible remove the out put tray 8 Remove the inside cover three locations at the top of the machine 9 Use a coin to remove the front cover two locations at the top of the machine ...

Страница 262: ...Staple Finisher 248 10 Install the relay unit on the machine 11 Open the relay unit cover ...

Страница 263: ...aple Finisher 249 12 With your fingers press the left and right pins Make sure that the pins are pushed in 13 Secure the relay unit on the machine with the two mounting hooks 14 Lock the relay unit lever ...

Страница 264: ...he box 17 Remove the main output tray and the sub output tray and then unpack them 18 Hold the left and right sides of the staple finisher and lift it out of the box When grabbing the staple finisher be sure to grab the areas indicated in the illustration 19 Remove the sheet from the sta ple finisher ...

Страница 265: ...pe and packing materials from the con nectors and the outside of the staple finisher 21 Open the stapler cover and then remove the tape securing the staple cartridge 22 Use a coin to remove the cover two locations on the left side of the machine ...

Страница 266: ... staple finisher to the left side of the machine 24 Align the side of the relay unit with that of the staple finisher and then hook them onto the fin isher to install them When grabbing the staple finisher be sure to grab the areas indicated in the illustration ...

Страница 267: ...Staple Finisher 253 25 Remove the two mounting clips from the main output tray 26 Insert the main output tray 27 Secure the main output tray with the mounting clips ...

Страница 268: ...all the sub output tray 29 Insert the connector on the fin isher into the connector on the machine 30 Reconnect the power cord and turn on the machine 31 Declare the staple finisher in the printer driver Properties Config ure tab ...

Страница 269: ...Appendix ...

Страница 270: ...B EN 61000 3 2 EN 61000 3 3 Type Desktop Tandem Full Color A4 laser beam printer Print system Electro photographic Printing System 4colors toner bottle print unit of supply type Exposure system 4 laser diode and 1 polygon mirror Developing system Mono component SMT Resolution 600 dpi 600 dpi 4 bits First print Simplex Monochrome Full color 14 seconds for A4 Letter plain paper Duplex Double Sided M...

Страница 271: ... length 148 to 1200 mm 5 8 to 47 2 Tray 2 A4 Letter Trays 3 and 4 Optional B5 JIS Legal Paper Media Plain paper 60 to 90 g m2 16 to 24 lb bond Recycled 60 to 90 g m2 16 to 24 lb bond Transparencies Envelopes Letterhead Label Thick 1 91 to 150 g m2 Thick 2 151 to 210 g m2 Postcard Glossy 1 Glossy 2 Input capacity Tray 1 Manual feed tray Plain Recycled paper 100 sheets Envelope 10 envelopes Label Po...

Страница 272: ... Time to return to READY from the ENERGY SAVER mode Acoustic Noise Printing 56 dB or less Standby 39 dB or less External dimensions Height 420 mm 16 5 Width 526 mm 20 7 Depth 420 mm 16 5 Weight Printer approximately 33 4 kg 73 6 lb Not including consumables approximately 44 kg 97 0 lb Packaged condition including consumables Toner cartridge Standard in box cartridge 1 65 kg 3 64 lb Y M C 1 68 kg 3...

Страница 273: ...ife Expectancy Toner cartridge Standard in box Cartridge Printed within a constant environment 12 000 pages or more Continuous Printed outside of a constant environment 9 600 pages or more Continuous Replacement Cartridge High Capacity Printed within a constant environment 12 000 pages or more Continuous Printed outside of a constant environment 9 600 pages or more Continuous Print unit 30 000 pag...

Страница 274: ...chine meets the ENERGY STAR Guidelines for energy efficiency What is an ENERGY STAR product An ENERGY STAR product has a special feature that allows it to automati cally switch to a low power mode after a period of inactivity An ENERGY STAR product uses energy more efficiently saves you money on utility bills and helps protect the environment ...

Страница 275: ...94 CompactFlash 233 Configuration menu 32 Consumables Backup battery 158 Ozone filter 151 Print unit 139 Staple 161 Toner cartridge 132 Transfer belt unit 152 Transfer roller 148 Waste toner bottle 145 Control panel 28 D Dual in line memory module 227 Duplexing 126 Duplex option 236 E Electrostatic discharge 226 Envelopes 101 Error messages 215 F Finishing 128 Staple Finisher 244 ...

Страница 276: ...s 102 Letterhead 103 Plain paper 99 Postcards 104 Thick stock 101 Transparencies 105 Memory Direct 96 Message window 30 Messages 214 Misfeed problems 199 Clearing 179 Media path 178 Preventing 177 O Output tray 127 P Plain paper 99 Postcards 104 Preventing media misfeeds 177 Print quality 208 Printer Parts 4 Printer driver Postscript PCL 17 Advanced tab 18 Basic tab 19 Cover page tab 20 Displaying...

Отзывы: