background image

 Recorder Implementation Guide


 5 


1.3.


Connecting cables 

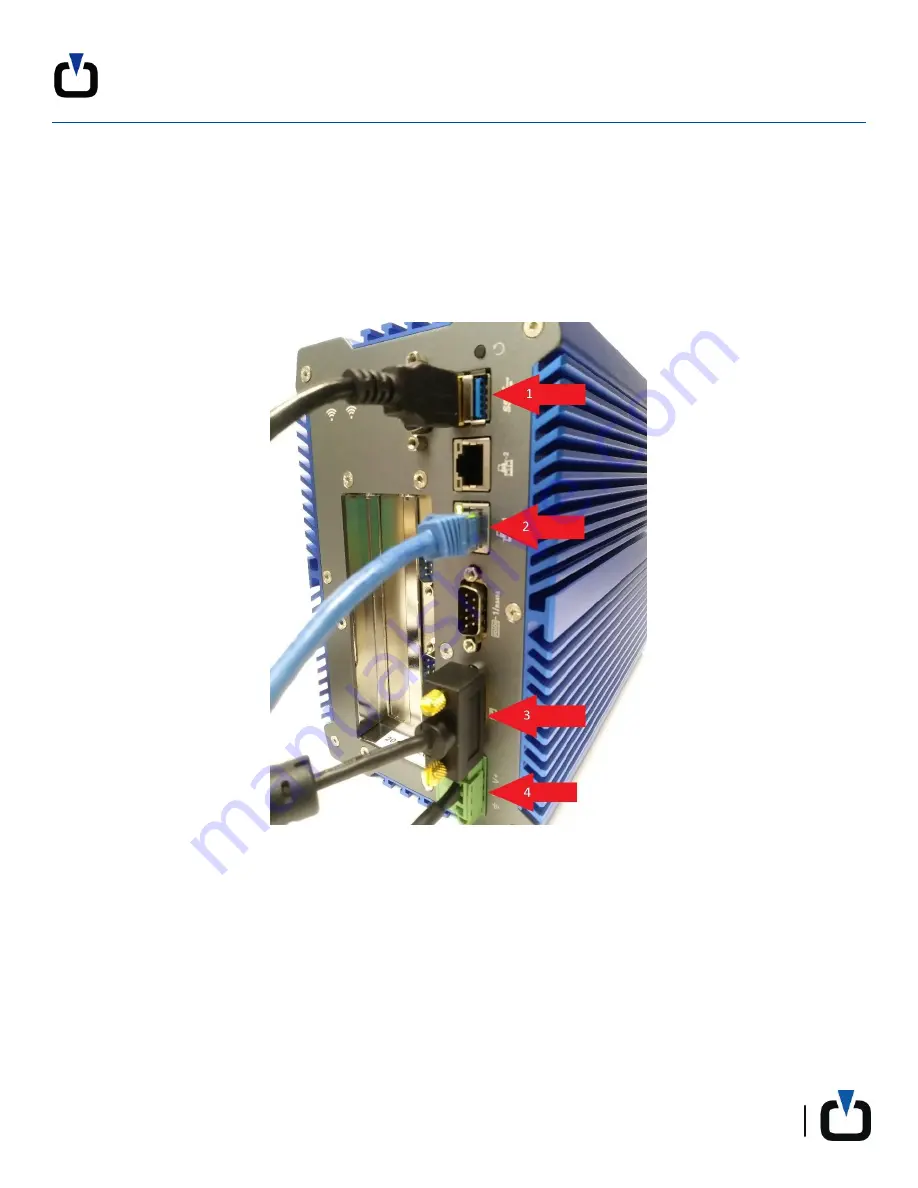
Firstly, connect the power cord to the recorder (4) and turn recorder on using the rocker switch located in front. 

Connect a keyboard and/or a mouse. (1) 

Connect the network cable. (2) 

Connect a monitor. (3) 


Содержание NP8-G2

Страница 1: ...Recorder Implementation Guide NP8 G2 ...

Страница 2: ...tation Guide 2 Table of Contents 1 INTRODUCTION 3 1 1 Front panel 3 1 2 Back Panel 4 1 3 Connecting cables 5 1 4 Connecting the Input Cable 6 1 5 Accessing Windows 7 2 OPTION TOUCHSCREEN 8 APPENDIX A 9 Specifications 9 ...

Страница 3: ...n Guide 3 1 Introduction The NP8 G2 is a small recorder that can be set up on a desk or wall mounted It is the perfect solution for small call centers 1 1 Front panel 1 Microphone 2 Headset 3 USB 3 0 4 USB 2 0 5 Power On Off ...

Страница 4: ...t one end It is used to attach the audio input module 2 USB input Used to connect keyboard mouse or touchscreen 3 The NP8 is equipped with 2 Network connections One is designated for a LAN connection the other in case a telephone recording or radio VoIP connection is required 4 VGA input to connect a monitor 5 Power supply input ...

Страница 5: ... Guide 5 1 3 Connecting cables Firstly connect the power cord to the recorder 4 and turn recorder on using the rocker switch located in front Connect a keyboard and or a mouse 1 Connect the network cable 2 Connect a monitor 3 ...

Страница 6: ...e input cable is a 25 pair cable with a male Amphenol connector at one end It is used to attach the audio input module at the back of the server chassis The other end of the cable is then connected to customer audio sources via a number of telecom bridging standards ...

Страница 7: ...Recorder Implementation Guide 7 1 5 Accessing Windows Here are the login and password needed when first accessing the system Login user Password Komu9988 ...

Страница 8: ...creen The NP8 can be purchased with a 10 inches LCD touchscreen 1 Power supply cable 2 VGA input that is connecting to the NP8 3 Sound input that is connecting to the NP8 front panel 4 USB cable that is connecting to the NO8 Used for the touchscreen ...

Страница 9: ...I EFI BIOS Display Chip Integrated Intel HD Graphics 620 Display Port 1 VGA Front I O 2 USB3 0 2 USB2 0 2 Indicator Led 1 Power Switch Rear I O 2 USB3 0 2 Intel 1000M Lan 1 VGA 1 3pins phoenix power connector 1 RST LAN 2 Intel i211 AT 10 100 1000M Lan Storage Onboard 1 2 5 SATA 1 MSATA Power Supply DC 9 36V Work Temp 10o C 50o C Work Humidity 0 95 Non condensing Dimension 215 185 115 mm Weight 3 6...

Отзывы: