Koldfront WTC12001W Скачать руководство пользователя страница 1


V2.3-07132018 


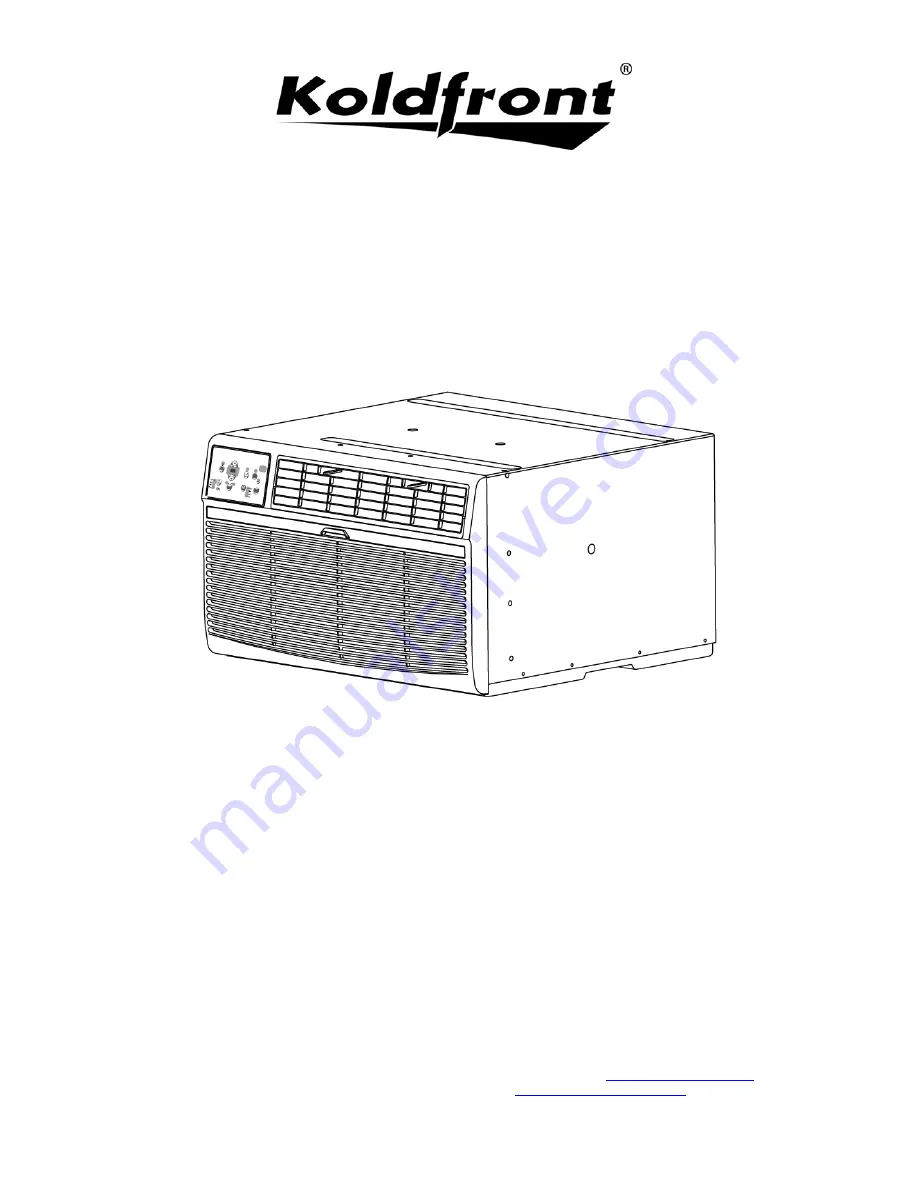
Through The Wall Air Conditioner

With Supplemental Heater


For more information on other great EdgeStar products on the web, go to 

http://www.edgestar.com


To use the EdgeStar self-diagnostic tool, go to 

https://support.edgestar.com


Owner’s Manual 

WTC8001W / WTC12001W 

Содержание WTC12001W

Страница 1: ...Conditioner With Supplemental Heater For more information on other great EdgeStar products on the web go to http www edgestar com To use the EdgeStar self diagnostic tool go to https support edgestar com Owner s Manual WTC8001W WTC12001W ...

Страница 2: ...e the outlet with another appliance Do not use this unit with an extension cord and or adapter plug Do not use this unit near flammable gases combustibles or in close proximity to heating appliances During operation do not remove any part of the outside casing General Safety Do not let people or pets sit or set an object directly in front of air flow If a strange sound smell or smoke comes from th...

Страница 3: ...plug does not trip and you are able to turn on the unit please contact EdgeStar support DO NOT USE YOUR AIR CONDITIONER IF THE TEST FAILS 3 Press the RESET button to start using your air conditioner Note Electrical products should not be disposed of with household waste Please contact your local recycling center for more information on how to recycle electronic waste Notes Always make sure the Res...

Страница 4: ...Completing Installation 11 Alternate and Supplemental Installation Instructions 12 Install Rear Louver Panel Grille Directly on Back of Air Conditioner 12 Non Koldfront Wall Sleeve Types 12 CONTROL PANEL OPERATIONS 13 To Turn the Unit on 13 To Change the Temperature 13 To Adjust Fan Speeds 13 To Select Operating Mode 14 To Operate in Auto Mode 14 To Operate in Fan Only 14 To Operate in Dry Mode 14...

Страница 5: ...on the back of your unit and are needed to obtain warranty service You may also want to staple your receipt to this manual as it is the proof of your purchase and is also needed for service under your warranty Model Number Serial Number Date of Purchase For a more efficient experience please do the following before contacting customer service If you received a damaged product immediately contact t...

Страница 6: ...3 Parts Identification Air Conditioner Unit Wall Sleeve purchased or provided separately ...

Страница 7: ...ntended to be used in conjunction with a Koldfront branded Wall Sleeve Part Name Size Qty Included Horizontal Insulation Seals 1 x 3 8 x 25 1 Vertical Insulation Seals 1 x 3 8 x 14 2 Horizontal Insulation Seals 1 x 3 4 x 14 2 Foam Support Blocks 1 x 1 1 2 x 14 2 Tapered Support Blocks 1 x 1 x 17 tapered to 2 Main Insulating Seal stuffer seal 1 x 1 1 2 x 84 1 Trim Frame sides 2 Trim Frame top botto...

Страница 8: ...f you are installing your new Koldfront air conditioner into an existing wall sleeve please check to confirm that the wall sleeve is in sound structural condition and that is sized appropriately to accommodate your Koldfront air conditioner For reference your new Koldfront Air Conditioner is 24 1 4 x 20 3 8 x 14 1 2 Note When choosing your window make sure power supply cord is within 4 feet of a g...

Страница 9: ... Ensure that the wall sleeve is properly fastened to the wall a minimum of 4 from any heating source and that high grade sealant caulking has been used to prevent air and water infiltration 2 Place the Rear Louver Panel Grille included with your new air conditioner towards the rear of the sleeve 3 Mark the mounting hole positions 4 Drill through the sleeves flanges with a 1 8 drill bit 5 Attach th...

Страница 10: ...alignment of the louvered fins Also please note that when aligned as instructed above the holes in the louver panel grille will properly line up to the holes in the Koldfront wall sleeve If you are unable to secure the Rear Panel Louver Grille to the wall sleeve it may be attached directly to the rear of the air conditioning unit Please see the Alternate and Supplemental Installation Instructions ...

Страница 11: ...ves positioning seals and foam support blocks inside of the wall sleeve enclosure in order to enable a proper fit for the air conditioning unit Important The below instructions are to be used in conjunction with the Koldfront Wall Sleeve model WTCSLV Instructions for other compatible wall sleeves can be found in the Alternate and Supplemental Installation Instructions section on page 11 ...

Страница 12: ...to drill a hole for the grounding screw The hole needs to be approximately 1 from the bottom and 3 from the front edge of the wall sleeve on the left side 3 Attach one end of ground wire using 1 one Toothed Washer and 1 one Grounding Screw Note This step may require the use of a drill with a 1 8 drill bit If your wall sleeve has been previously installed there may be no requirement to drill a new ...

Страница 13: ...tioner cabinet using the screw you just removed along with a Toothed Washer 3 Gently slide the air conditioner cabinet into the Wall Sleeve With the cabinet screw hole still exposed attach the ground wire to the cabinet using the cabinet screw making sure that the Toothed Grounding Screw Washer is pressed against the cabinet 4 Slide air conditioner completely to the rear of the wall sleeve unit en...

Страница 14: ...h the installation kit This is the longest seal and measures 1 X 11 2 X 84 Using a putty knife or flathead screwdriver insert the seal into the gap between the air conditioner cabinet and the Wall Sleeve frame Trim seal as needed 2 Locate the 4 four trim kit components that were packaged with your installation kit Snap the pieces together as shown in the image below 3 Pull the power cord through t...

Страница 15: ... from unit 3 Align the top of the Grille with the top of the air conditioner unit Holes should be pre drilled but if required carefully pre drill 4 four 1 8 holes through the Grille and into the side flange of the air conditioner cabinet frame approximately 1 2 from the top and bottom 4 Attach Grille to unit with 4 four self tapping screws 5 Install unit into sleeve Non Koldfront Wall Sleeve Types...

Страница 16: ...e is seen on the digital display This temperature will be automatically maintained anywhere between 62 F 17 C and 86 F 30 C To Adjust Fan Speeds To select the speed of the fan press Fan Speed which cycles through four steps Auto Low Medium or High Each time the button is pressed the fan speed mode is shifted On Off Energy Saver Timer Mode Check Filter Fan Speed Sleep Temp Timer Up Temp Timer Down ...

Страница 17: ...nt You can choose any speed you prefer During this function the display will show the actual room temperature as in the cooling mode In Fan Only mode the temperature is not adjusted To Operate in Dry Mode In this mode the air conditioner will operate as a dehumidifier Because the conditioned space is closed or sealed some degree of cooling will continue to occur Note Heat function is intended to p...

Страница 18: ...en the unit is on or off press the Timer button and the Timer On indicator light illuminates It indicates that the Auto Start Stop program is initiated To switch to off press the Timer button again and the Timer Off indicator light illuminates It indicates that the Auto Stop program is initiated Press or hold the Up or Down button to change the Auto Time by hour increments up to 10 hours or 1 hour...

Страница 19: ... Left and Right throughout the room as needed To adjust the air directional louvers side to side use the center handles as you move side to side To pivot the louvers press with your fingers until the desired airflow direction is obtained Additional Tips The Cool mode has an automatic 3 minute timed delay start if the unit is turned off and on quickly This prevents overheating of the compressor and...

Страница 20: ...securely stop using the product remove the batteries and keep away from children If a new or used lithium button coin cell battery is swallowed or enters the body it can cause severe internal burns and can lead to death in as little as 2 hours If you think batteries might have been swallowed or placed inside any part of the body seek immediate medical attention The cells should always be disposed ...

Страница 21: ...Rules Operation subject to the following two conditions 1 This device may cause harmful interference to other devices and 2 This device must accept any interference received including interference that may cause undesired operation This device has been tested and found to comply with the limits for a Class B digital device pursuant to part 15 of the FCC Rules These limits are designed to provide r...

Страница 22: ...ash the filter using liquid dishwashing detergent and warm water Rinse the filter thoroughly 4 Gently shake excess water from the filter 5 Be sure the filter is thoroughly dry before replacing it 6 You may also gently clean the filter with a vacuum 7 Re insert the Air Filter Cabinet Cleaning Be sure to unplug the air conditioner to prevent shock or fire hazard The cabinet and front may be dusted w...

Страница 23: ...ioner Do not cover the air outlet exhaust while in use Use the timer to operate the unit before it is needed For example set the timer to turn on the unit in cooling mode for 3 or more hours to cool the room before you arrive You may want to operate the unit all day if you live in a warmer climate Minimize the heat sources direct sunlight computers servers people etc in the room Close all windows ...

Страница 24: ...l located behind the air filter Straighten the tube away from the coil The compressor shut off by changing modes Wait approximately 3 minutes and listen for the compressor to restart when it is set in the COOL mode The air conditioner is cooling but the room is too warm Ice is forming on the cooling coil behind the decorative front The outdoor temperature is below 18 C 64 F To defrost the coil set...

Страница 25: ...o a higher setting to bring air past the cooling coils more frequently Some air movement sound is normal If the unit is too loud set it to a slower FAN setting There is window vibration due to poor installation Refer to the installation instructions or check with the installer There is water dripping INSIDE when the unit is cooling The unit was improperly installed Tilt the air conditioner slightl...

Страница 26: ...oling 8 000 12 000 11 700 BTU s heating 4 200 10 600 8 600 Current cooling 7 8A 5 5A 5 9A Current heating 12 0A 15 0A 13 5A Color White White Coolant R410A 14 81 oz R410A 21 87 oz Timer 24 Hour 24 Hour Dimensions W x D x H 24 1 4 x 20 3 8 x 14 1 2 24 1 4 x 20 3 8 x 14 1 2 Net Weight 66 6 lbs 78 3 lbs WTC8001W WTC12001W ...

Страница 27: ...ion or commercial use Labor service transportation and shipping charges for the removal and replacement of defective parts beyond the initial 24 month period Products that have been modified to perform outside of specifications without the prior written permission of EdgeStar Products lost in shipment or theft Products sold AS IS or from an unauthorized reseller Products with serial numbers that h...

Отзывы: