background image

Before You Begin (cont.)

Connect to a cold water supply with a pressure of 20-80 psi
(139-551 kPa).

Connect only to cold water supply line carrying water of drinking
quality.

Unplug the seat and drain the seat if the functions of the seat will
not be operated for an extended period of time.

All information in these instructions is based on the latest product
information available at the time of publication. Kohler Co.
reserves the right to make changes at any time without notice.

Kohler Co.

5

1093479-2-A

Содержание K-4744

Страница 1: ...and Care Guide Bidet Seat M product numbers are for Mexico i e K 12345M Los números de productos seguidos de M corresponden a México e j K 12345M Français page Français 1 Español pagina Español 1 K 4744 1093479 2 A ...

Страница 2: ...ny room where this product is installed Adjust the temperature of the toilet seat for the elderly those who are incapacitated or persons with sensitive skin Use this appliance only for its intended purpose as described in the manual Do not use attachments not recommended by Kohler Co Never operate this appliance if it has a damaged cord or plug if it is not working properly if it has been dropped ...

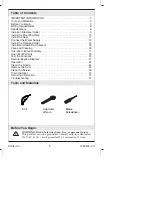
Страница 3: ...eaning 16 One Year Limited Warranty 17 One Year Warranty 18 Test the Functions 20 Remote Keypad Diagram 21 Operation 22 Clean the Nozzle 24 Remove the Seat 25 Clean the Screen 26 Drain the Seat 27 Servicing Information 27 Troubleshooting 27 Tools and Materials Before You Begin WARNING Risk of electric shock fire or personal injury This product must be grounded Connect only to a dedicated 120 VAC 6...

Страница 4: ...to high humidity levels IMPORTANT Risk of product or property damage Pushing or pulling on the water connection may cause water leakage IMPORTANT Risk of product damage Do not apply excessive force to the spray wands Product may break IMPORTANT Risk of product damage In areas where water may freeze in the pipes make arrangements to keep the pipes warm Any water remaining in the seat may freeze dur...

Страница 5: ...of drinking quality Unplug the seat and drain the seat if the functions of the seat will not be operated for an extended period of time All information in these instructions is based on the latest product information available at the time of publication Kohler Co reserves the right to make changes at any time without notice Kohler Co 5 1093479 2 A ...

Страница 6: ... NOT ground the unit If there is any doubt whether the cover screw is grounded have it checked by a qualified electrician or service professional A temporary connection with a two prong adaptor may be made where local codes permit provided that the adaptor is grounded Specifications Water supply pressure 20 psi 139 kPa 80 psi 551 kPa Maximum electrical rating 120 VAC 60 Hz 1260 W Power cord length...

Страница 7: ... Heater rating 50 watts Temperature adjustments Off 95 F 35 C 99 5 F 37 5 C 104 F 40 C Safety adjustments Thermal fuse heating element thermal cut out Warm air blower Fan air flow 7 8 cu ft min 22 cu m min Heater rating 250 Watts Temperature adjustment Off 100 F 37 7 C 122 F 50 C 140 F 60 C Safety devices Thermal fuse heating element thermal cut out Deodorize Deodorization type Oxygen deodorizer c...

Страница 8: ...Specifications cont Other Power switch On Off Energy save On Off Safety User sensor Touch type switch hidden in seat Night lighted bowl 2 blue LED s Auto On Off 1093479 2 A 8 Kohler Co ...

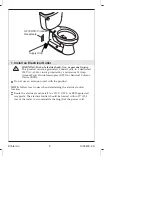
Страница 9: ...errupter GFCI or Residual Current Device RCD Do not use an extension cord with the product NOTE Follow local codes when determining the electrical outlet location Route the electrical and install to a 120 V GFCI or RCD protected receptacle The electrical outlet should be located within 12 30 5 cm of the toilet to accommodate the length of the power cord Supply Stop GFCI RCD Protected Receptacle Ko...

Страница 10: ...aded Inserts Insert a bolt through the mounting plate and position the washers so they rest in the grooves of the mounting plates Loosely thread the bolts into the inserts Do not overtighten For All Other Installations Insert a bolt through the mounting plate and the toilet mounting holes Position the washers so they rest in the grooves of the mounting plate Thread a nut onto each of the bolts Han...

Страница 11: ...he opening in the tank through the tank and out the opening in the back of the tank Slide the seat onto the mounting plate until you feel it snap into place NOTE The mounting plate may need to be adjusted to properly align the seat To adjust the seat position remove the seat by pressing in the release button and sliding the seat forward Reposition the mounting plate as needed Reinstall the seat Re...

Страница 12: ...Install the Seat cont Once the seat is positioned as desired remove the seat and securely tighten down the mounting plate Reinstall the seat 1093479 2 A 12 Kohler Co ...

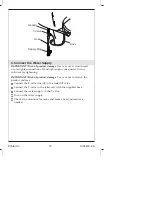
Страница 13: ...ORTANT Risk of product damage Use care not to scratch the product surfaces Connect the T valve directly to the toilet fill valve Connect the T valve to the toilet seat with the supplied hose Connect the water supply to the T valve Turn on the water supply Check all connections for leaks and make any adjustments as needed Hose Supply Stop T Valve Gasket Hose Kohler Co 13 1093479 2 A ...

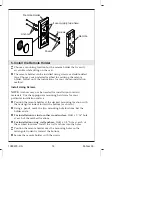
Страница 14: ...ngular indent toward the bottom as shown Using a pencil mark the two mounting hole locations Set the holder aside For installation to stud or other wood surface Drill a 1 16 hole at each of the marked locations For installation using wall anchors Drill a 1 4 hole at each of the marked locations Install the wall anchors into the holes Position the remote holder over the mounting holes so the rectan...

Страница 15: ... one side of each of the tape squares Install a tape square in each of the rectangular areas located on the back of the remote holder NOTE Before mounting the remote holder verify the rectangular indent is toward the bottom Remove the paper from the tape squares Press the remote holder into place Position the remote into the holder with the user preset icons facing up Kohler Co 15 1093479 2 A ...

Страница 16: ...the right side of the seat approximately 1 3 from the front of the seat as illustrated Proceed to the Remote KeypadDiagram and Operation section to test the various seat functions Care and Cleaning For best results keep the following in mind when caring for your KOHLER product IMPORTANT Do not immerse product in water Use a soft dampened sponge or cloth Never use an abrasive material such as a bru...

Страница 17: ... Co is not responsible for removal or installation costs Use of in tank toilet cleaners will void the warranty To obtain warranty service contact Kohler Co either through your Dealer Plumbing Contractor Home Center or E tailer or by writing Kohler Co Attn Customer Service Department 444 Highland Drive Kohler WI 53044 USA or by calling 1 800 4 KOHLER from within the USA 1 800 964 5590 from within C...

Страница 18: ...ave the invoice or receipt as additional protection as it may substitute the warranty in the case that there is a discrepancy in the validity of the warranty EXCEPTIONS AND RESTRICTIONS The Warranty will not be valid in the following cases 1 When the product is not operated in accordance with the instructions concerning use and operation set forth in the owner s manual or installation instructions...

Страница 19: ...One Year Warranty cont AV CARLOS PACHECO NO 7200 CHIHUAHUA CHIH MEXICO C P 31060 TEL 52 14 29 11 11 Kohler Co 19 1093479 2 A ...

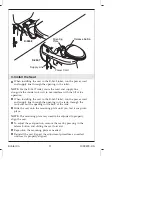
Страница 20: ...upant To activate the seat controls for testing purposes when facing the toilet place your hand or a damp wash cloth on the right side of the seat approximately 1 3 from the front of the seat as illustrated Proceed to the Remote KeypadDiagram and Operation section to test the various seat functions Supply Stop GFCI RCD Protected Receptacle 1093479 2 A 20 Kohler Co ...

Страница 21: ... AT E S T O P N O Z Z L E B A C K WA R D N O Z Z L E F O R WA R D D E O D O R I Z E R H 2 O T E M P S E AT T E M P A I R T E M P A I R S P E E D P O W E R L I G H T E N E R G Y S AV E A B C E H K M D F O P Q G C G D J I L N F R O N T T O P Remote Panel Kohler Co 21 1093479 2 A ...

Страница 22: ...e flow level low medium and high E Oscillate Press the icon to begin the wand moving forward and backward Press the icon a second time to stop the nozzle movement F Pulsate Press the icon to begin alternating the flow Press the icon a second time to stop the pulsating flow and return the flow rate to the previously selected flow G Stop Press this icon to stop the Front wash Rear wash or Air Speed ...

Страница 23: ...e heated seat temperature will switch to off Once the seat is activated the power indicator LED light will change to green the temperature changes to the previous user setting and the timer restarts the energy save mode P Power Pressing this icon turns the seat controls on or off Q Light This icon turns the LED night light feature on or off The lights are sensor activated and the room must be suff...

Страница 24: ...d Raise the cover and seat Press the FRONT icon on the panel to extend that spray wand forward for cleaning Clean the spray wand with a soft bristled brush Press the FRONT icon on the panel again to retract the spray wand Repeat above steps for the REAR spray wand Wand in extended position 1093479 2 A 24 Kohler Co ...

Страница 25: ...e NOTE The seat will contain water until drained Refer to the Drain the Seat section Unplug the seat from the electrical outlet Disconnect the water supply hose from the T valve Push in the release button Slide the seat forward to disengage the seat from the mounting plate Release Button Mounting Plate Kohler Co 25 1093479 2 A ...

Страница 26: ... screen from the seat inlet Clean the screen with a soft bristled brush Reinstall the screen Reinstall the seat IMPORTANT Risk of product damage Use care not to crossthread the connection Reconnect the water supply hose to the seat Turn on the water supply Check all connections for leaks and make any adjustments as needed Screen Long nosed Pliers 1093479 2 A 26 Kohler Co ...

Страница 27: ... drained from the seat Servicing Information For service and installation issues and concerns call 1 800 4 KOHLER Troubleshooting This troubleshooting guide is for general aid only A Kohler Authorized Service Representative or qualified electrician should correct any electrical problems For warranty service contact your dealer or wholesale distributor General Functions Symptoms Probable Causes Rec...

Страница 28: ...em D None of the above actions correct the symptom D Contact a Kohler Service Representative 3 Seat is loose A Screws and nuts are loose A Tighten the screws and nuts according to the installation guide 4 Water does not spray out of spray wands or nozzles A Seat does not detect user A Sit on the seat B Water supply stop closed B Open the water supply stop C Water supply screen plugged C Clean the ...

Страница 29: ...he seat sensor is not detecting the user B See activating the seat information in the Operation section 4 Dripping sounds are heard before and after using the cleansing functions A The unit is running through the pre or post use cleansing cycle A No action needed Deodorizer Function Symptoms Probable Causes Recommended Action 1 The Deodorizer feature doesn t work A Deodorizer is off A Press the De...

Страница 30: ...tion 1 Wash Deodorizer or Air functions operate when you press the icon while seat is not occupied A The seat sensor is covered by an object or the seat is wet A Remove any water or object from the seat sensor area 2 Even though the seat is occupied the spray function does not work A The seat sensor may not be able to detect you depending on the way you are sitting A Change the way you sit Remote ...

Страница 31: ...and clean the seat reception window E The seat sensor is not detecting the user E See activating the seat information in the Operation section 2 The remote control lights flicker A The batteries are getting old A Replace the batteries Other Symptoms Probable Causes Recommended Action 1 The seat moves both up and down and right and left A The bolts for the mounting plate that secure the main unit a...

Страница 32: ...est nécessaire lorsque cet appareil est utilisé près de jeunes de personnes âgées ou d invalides Les enfants ne devraient pas être autorisés à utiliser ou toucher cet appareil Ne pas laisser les enfants sans surveillance dans une pièce où ce produit est installé Ajuster la température du siège du W C pour les personnes âgées les personnes handicapées ou celles à peau sensible Utiliser cet appareil...

Страница 33: ...amais faire tomber ou insérer d objets quelconques dans les ouvertures ou le tuyau Ne pas utiliser à l extérieur ou en présence d aérosols ou endroits où de l oxygène est administré Toujours suivre les instructions de mise à la terre de ce manuel avant de brancher l unité Kohler Co Français 2 1093479 2 A ...

Страница 34: ...ntie limitée d un an 17 Tester les fonctions 19 Diagramme télécommande clavier 20 Opération 21 Nettoyer la buse 23 Retirer le siège 24 Nettoyer la grille 25 Purger le siège 26 Information d entretien 26 Dépannage 26 Outils et matériels Avant de commencer AVERTISSEMENT Risque de choc électrique d incendie de blessures Ce produit doit être mis à la terre Connecter uniquement à un circuit dédié de 12...

Страница 35: ...r une ventilation adéquate lors de la prise de bain afin d éviter un endommagement des composants électroniques à cause de niveaux d humidité élevés IMPORTANT Risque d endommagement du produit Pousser ou tirer sur la connexion d eau pourrait causer une fuite d eau IMPORTANT Risque d endommagement du produit Ne pas appliquer de force excessive aux rallonges du vaporisateur Le produit peut casser IM...

Страница 36: ...oide avec une pression de 20 80 psi 139 551 kPa Connecter uniquement la ligne d alimentation d eau froide de qualité potable Débrancher le siège et purger le siège si les fonctions de celui ci n opèrent pas pour de longues périodes Toutes les informations contenues dans ces instructions sont basées sur les données les plus récentes relatives au produit au moment de la publication Kohler Co se rése...

Страница 37: ...ette unité Si il y a quelque doute que ce soit quant à l isolation de cette vis la faire vérifier par un électricien qualifié ou un service professionnel Une connexion temporaire avec un adaptateur à deux broches peut être créé là où les codes locaux le permettent ceci tant que l adaptateur soit mis à la terre Spécifications Pression d alimentation d eau 20 psi 139 kPa 80 psi 551 kPa Calibrage éle...

Страница 38: ...lacement du vaporisateur 5 positions Température d eau de nettoyage Arrêt 95 F 35 C 99 5 F 37 5 C 104 F 40 C Nettoyage oscillation Marche arrêt Nettoyage pulsation Marche arrêt Dispositifs de sécurité Chauffe eau en ligne prévention de surchauffe Coupe thermique de sortie d eau fusible thermique de logement coupe thermique de l élément chauffant capteur de débit d eau Prévention anti retour de flu...

Страница 39: ...ent de chauffage Désodorise Type de désodorisation Filtre catalytique désodorisant d oxygène Débit d air du ventilateur 7 8 pieds cubes min 0 22 mètres cubes min Fermeture du couvercle Fermeture lente Fermeture du siège Fermeture lente Sanitaire Auto nettoyage de buse Cycle de rinçage automatique avant et après chaque utilisation Corps à libération rapide Levier activé par bouton pression Matériau...

Страница 40: ... de courant résiduel RCD Ne pas utiliser de rallonge avec ce produit REMARQUE Suivre les codes locaux lors de la détermination de l emplacement de la prise électrique Acheminer le service électrique et installer à un réceptacle protégé par un GFCI 120 V ou un boîtier protégé par un RCD La prise électrique devrait être localisée dans les 12 30 5 cm du W C pour accommoder la longueur du cordon d ali...

Страница 41: ...ulon dans la plaque de montage et positionner les rondelles de manière à ce qu elles reposent dans les rainures des plaques de montage Visser légèrement les boulons dans les insertions Ne pas trop serrer Pour toutes les autres installations Insérer un boulon dans la plaque de montage et les orifices de fixation du W C Positionner les rondelles de manière à ce qu elles reposent dans les rainures de...

Страница 42: ... ligne d alimentation dans l ouverture du réservoir à travers le réservoir et de sortie de l ouverture de l arrière du réservoir Glisser le siège dans la plaque de montage jusqu à ce qu elle s enclenche en place REMARQUE La plaque de montage devra peut être être ajustée pour s aligner correctement avec le siège Pour ajuster la position du siège retirer celui ci en pressant sur le bouton de relâche...

Страница 43: ...Répéter la procédure d installation selon le besoin jusqu à ce que le siège soit correctement aligné Une fois le siège positionné selon le désir le retirer et bien serrer la plaque de montage Ré installer le siège Kohler Co Français 12 1093479 2 A ...

Страница 44: ...gement du produit Faire attention de ne pas rayer les surfaces du produit Connecter la valve en T directement à la valve de remplissage du W C Connecter la valve en T du siège du W C avec le tuyau fourni Connecter l alimentation d eau à la valve en T Ouvrir l alimentation d eau Vérifier s il y a des fuites dans les connexions et faire tous les réglages au besoin Tuyau Arrêt d alimentation Valve en...

Страница 45: ...ec le renfoncement vers le bas tel qu indiqué Marquer au crayon l emplacement des deux orifices de fixation Mettre le support de côté Pour une installation à un montant ou autre surface en bois Percer un orifice de 1 16 à chacun des emplacements marqués Pour une installation utilisant des ancrages muraux Percer un orifice de 1 4 à chacun des emplacements marqués Insérer les dispositifs d ancrage d...

Страница 46: ...le papier d un côté de chaque carré du ruban Installer le carré de ruban dans chacun des emplacements rectangulaires localisés à l arrière du support de télécommande REMARQUE Avant de monter le support de télécommande vérifier que le renfoncement rectangulaire soit orienté vers le bas Retirer le papier des carrés de ruban Presser le support de télécommande en place Positonner la télécommande dans ...

Страница 47: ...ce au W C placer la main ou un chiffon humide sur le côté droit du siège à approximativement 1 3 de l avant de ce dernier tel qu illustré Procéder à la section Diagramme de télécommande clavier et Opération pour tester les diverses fonctions du siège Entretien et nettoyage Pour de meilleurs résultats prendre ce qui suit en considération lors de l entretien de votre produit KOHLER IMPORTANT Ne pas ...

Страница 48: ... la date de l installation Kohler Co jugera à sa discrétion de la réparation du remplacement ou du réglage approprié et ceci après toute inspection faite par Kohler Co de tous défauts dûs à une utilisation normale et ceci pendant un 1 an à partir de la date d installation Kohler Co n est pas responsable des coûts de démontage ou d installation L utilisation de nettoyants à l intérieur du réservoir...

Страница 49: ...à un accident ainsi ces limitations ou exclusions pourraient ne pas s appliquer dans votre cas Cette garantie vous donne des droits légaux spécifiques Vous pouvez également avoir d autres droits qui varient d un état province à l autre Ceci constitue la garantie écrite exclusive de Kohler Co Kohler Co Français 18 1093479 2 A ...

Страница 50: ...es contrôles du siège pour effectuer des tests en faisant face au W C placer la main ou un chiffon humide sur le côté droit du siège à approximativement 1 3 de l avant de ce dernier tel qu illustré Procéder à la section Diagramme de télécommande clavier et Opération pour tester les diverses fonctions du siège Arrêt d alimentation Receptacle protégé GFCI RCD 1093479 2 A Français 19 Kohler Co ...

Страница 51: ...S T O P N O Z Z L E B A C K WA R D N O Z Z L E F O R WA R D D E O D O R I Z E R H 2 O T E M P S E AT T E M P A I R T E M P A I R S P E E D P O W E R L I G H T E N E R G Y S AV E A B C E H K M D F O P Q G C G D J I L N AVA N T D E S S U S Télécommande Panneau Kohler Co Français 20 1093479 2 A ...

Страница 52: ...débit bas médium et haut D Arrière Presser l icône pour activer la fonction de lavage Arrière et changer le niveau de débit bas médium et haut E Oscillation Presser l icône pour commencer à déplacer la tige rallonge vers l avant et l arrière Presser l icône une seconde fois pour stopper le mouvement de la buse F Pulsation Presser l icône pour commencer à alterner le débit Presser l icône une secon...

Страница 53: ... température du siège chauffé change au réglage le plus bas Après 48 heures d inactivité la température du siège chauffé passera à l arrêt Une fois le siège activé la LED indicatrice de courant passera au vert la température passera au réglage de l utilisateur initial et la minuterie redémarrera le mode de conservation d énergie P Alimentation En pressant sur cette icône les contrôles du siège ser...

Страница 54: ...cône AVANT du panneau pour étendre ce vaporisateur vers l avant pour le nettoyage Nettoyer la rallonge du vaporisateur avec une brosse de soie douce Presser sur l icône AVANT du panneau à nouveau pour rétracter la rallonge du vaporisateur Répéter les étapes ci dessus pour la rallonge du vaporisateur ARRIÈRE Tige rallonge en position étendue 1093479 2 A Français 23 Kohler Co ...

Страница 55: ...ndra de l eau jusqu à être purgé Se référer à la section Purger le siège Débrancher le siège de la prise électrique Déconnecter le tuyau d alimentation d eau de la valve en T Presser le bouton de déclenchement Glisser le siège vers l avant pour le désengager de la plaque de montage Bouton de relâche Plaque de fixation Kohler Co Français 24 1093479 2 A ...

Страница 56: ... grille avec une brosse en soie douce Ré installer la grille Ré installer le siège IMPORTANT Risque d endommagement du produit Utiliser des précautions afin de ne pas fausser la connexion Reconnecter le tuyau d alimentation d eau du siège Ouvrir l alimentation d eau Vérifier s il y a des fuites dans les connexions et faire tous les réglages au besoin Grille Pinces à bec long 1093479 2 A Français 2...

Страница 57: ...ntation d eau Presser le bouton du drain jusqu à ce que l eau soit purgée du siège Information d entretien Pour des problèmes ou questions concernant le dépannage et l installation composer le 1 800 4 KOHLER Dépannage Ce guide de dépannage est seulement destiné à une aide générale Seul un agent agréé de Kohler ou un électricien qualifié devrait corriger tous les problèmes électriques Pour une répa...

Страница 58: ...ation B Le disjoncteur différentiel GFCI peut être déclenché B Réinitialiser le GFCI et localiser le problème C Le disjoncteur a été déclenché C Réinitialiser le disjoncteur et localiser le problème D Aucune des actions ci dessus n ont remédié au problème D Contacter un technicien représentant de Kohler 3 Le siège est desserré A Les vis et écrous sont desserrés A Serrer les vis et les écrous selon...

Страница 59: ...3 L eau s arrête de s écouler de la tige rallonge du vaporisateur avant de finir le nettoyage A Deux minutes après avoir pressé une des icônes du vaporisateur le lavage s arrête automatiquement A Presser à nouveau l icône Avant ou Arrière B Le capteur du siège ne détecte pas l utilisateur B Voir l information d activation du siège dans la section Opération 4 Des sons de goutte sont entendus avant ...

Страница 60: ... Dix minutes après avoir pressé sur l icône Vitesse d air le souffleur s arrête automatiquement A Presser à nouveau sur le bouton Vitesse d air Abattant à fermeture lente Symptômes Causes probables Action recommandée 1 La vitesse de fermeture du siège et de l abattant varie en été et en hiver A A cause des changements de température ambiantes A Aucune Capteur du siège Symptômes Causes probables Ac...

Страница 61: ...ption du siège est sont couverte s C Retirer l objet couvrant la les fenêtre s de réception du siège D La fenêtre de réception du siège est couverte de poussière ou d eau D Retirer la poussière ou l eau et nettoyer la fenêtre de réception du siège E Le capteur du siège ne détecte pas l utilisateur E Voir l information d activation du siège dans la section Opération 2 Les lumières de la télécommand...

Страница 62: ...ños pequeños ancianos o inválidos No se debe permitir que los niños utilicen ni toquen este aparato No deje a los niños sin supervisión en ningún cuarto donde este producto esté instalado Ajuste la temperatura del asiento del inodoro para los ancianos los incapacitados o personas con piel sensible Use este aparato únicamente para el fin con el que se ha fabricado tal como se explica en el manual N...

Страница 63: ... ninguna de las aberturas o manguera No utilice en exteriores ni en lugares en los que se rocíe aerosoles o se administre oxígeno Siempre siga las instrucciones de conexión a tierra indicadas en este manual antes de enchufar la unidad Kohler Co Español 2 1093479 2 A ...

Страница 64: ...ada de un año 17 Garantía de un año 18 Pruebe las funciones 20 Diagrama del control remoto teclado 21 Funcionamiento 22 Limpie la boquilla 24 Desmonte el asiento 25 Limpie la rejilla 26 Drene el asiento 27 Información de servicio 27 Procedimiento para resolver problemas 27 Herramientas y materiales Antes de comenzar ADVERTENCIA Riesgo de descarga eléctrica incendio o lesiones personales Este produ...

Страница 65: ...es eléctricos por altos niveles de humedad IMPORTANTE Riesgo de daños al producto o a la propiedad Jalar o empujar la conexión de agua puede causar fugas de agua IMPORTANTE Riesgo de daños al producto No aplique fuerza excesiva a las varillas rociadoras El producto se puede romper IMPORTANTE Riesgo de daños al producto En áreas donde el agua pueda congelarse en las tuberías provea lo necesario par...

Страница 66: ... una línea de agua fría de calidad para beber Si las funciones del asiento no se utilizarán por un periodo prolongado de tiempo desenchufe el asiento y el drene el asiento Toda la información contenida en estas instrucciones está basada en la información más reciente disponible al momento de su publicación Kohler Co se reserva el derecho de realizar cambios en cualquier momento sin previo aviso 10...

Страница 67: ...i el tornillo de la tapa está conectado a tierra solicite la verificación por un electricista calificado o profesional de servicio Donde los códigos locales lo permitan puede realizar una conexión provisional con un adaptador de dos clavijas siempre y cuando el adaptador esté conectado a tierra Especificaciones Presión del suministro de agua 20 psi 139 kPa 80 psi 551 kPa Capacidad eléctrica máxima...

Страница 68: ...jo de agua Prevención de contracorriente Válvula rompevacío Comfort Asiento con calefacción Capacidad del calentador 50 watts Ajustes de temperatura Apagado 95 F 35 C 99 5 F 37 5 C 104 F 40 C Ajustes de seguridad Fusible térmico corte térmico del elemento calefactor Soplador de aire templado Flujo de aire del ventilador 7 8 pies cúbicos min 0 22 metros cúbicos min Capacidad del calentador 250 Watt...

Страница 69: ...lanca activada por botón Material antimicrobiano Asiento y piezas de la boquilla Otro Interruptor de encendido apagado Encendido Apagado Ahorro de energía Encendido Apagado Seguridad sensor de usuario Sensible al tacto interruptor oculto en el asiento Taza con iluminación nocturna 2 diodos LED azules Encendido apagado automático Kohler Co Español 8 1093479 2 A ...

Страница 70: ...nimo o un dispositivo de corriente residual RCD No utilice un cable de extensión con este producto NOTA Cumpla con los códigos locales para determinar la ubicación de la caja eléctrica Instale los cables eléctricos e instale un tomacorriente de 120 V protegido por un GFCI o RCD Debido a la longitud del cable eléctrico la caja eléctrica debe ubicarse a menos de 12 30 5 cm del inodoro Llave de paso ...

Страница 71: ... perno en la placa de montaje y coloque las arandelas de manera que descansen en las ranuras de las placas de montaje Atornille sin apretar los pernos en los insertos No apriete demasiado Para todas las demás instalaciones Inserte un perno a través de la placa de montaje y los orificios de fijación del inodoro Coloque las arandelas de manera que descansen en las ranuras de la placa de montaje Enro...

Страница 72: ...línea de suministro a través de la abertura del tanque a través del tanque y sáquelo por la abertura de la parte posterior del tanque Deslice el asiento en la placa de montaje hasta que se sienta que encaja en su lugar NOTA La placa de montaje puede requerir ajuste para alinear correctamente el asiento Para ajustar la posición del asiento quite el asiento presionando el botón de desenganche y desl...

Страница 73: ...procedimiento de ajuste según sea necesario hasta que el asiento esté correctamente alineado Una vez que el asiento esté en la posición deseada quite el asiento y apriete con seguridad la placa de montaje Vuelva a instalar el asiento Kohler Co Español 12 1093479 2 A ...

Страница 74: ...cuidado de no rayar la superficie del producto Conecte la válvula en T directamente a la válvula de llenado del inodoro Conecte la válvula en T al asiento del inodoro con la manguera provista Conecte el suministro de agua a la válvula en T Abra el suministro de agua Revise todas las conexiones para asegurarse que no haya fugas y ajuste según sea necesario Manguera Llave de paso Válvula en T Empaqu...

Страница 75: ...ajo como se muestra Marque con un lápiz el lugar de los dos orificios de fijación Coloque el portacontrol remoto a un lado Para la instalación a un poste u otra superficie de madera Taladre un orificio de 1 16 en cada lugar marcado Para la instalación utilizando anclajes de pared Taladre un orificio de 1 4 en cada lugar marcado Instale los anclajes de pared en los orificios Coloque el portacontrol...

Страница 76: ...ada cuadro de cinta adhesiva Instale un cuadro de cinta adhesiva en cada área rectangular de la parte posterior del portacontrol remoto NOTA Antes de instalar el portacontrol remoto verifique que la depresión rectangular esté hacia abajo Retire el papel de los cuadros de cinta adhesiva Presione el portacontrol remoto en su lugar Coloque el control remoto en el portacontrol remoto con los iconos de...

Страница 77: ...prueba estando de frente hacia el inodoro coloque su mano o una toallita húmeda en el lado derecho del asiento aproximadamente 1 3 del frente del asiento como se ilustra Proceda a la sección Diagrama del control remoto y teclado y Funcionamiento para probar las diferentes funciones del asiento Cuidado y limpieza Para obtener los mejores resultados tenga presente lo siguiente al limpiar su producto...

Страница 78: ...Kohler Co a su criterio reparará reemplazará o realizará los ajustes pertinentes en los casos en que la inspección realizada por Kohler Co determine que dichos defectos ocurrieron durante el uso normal en el transcurso de un 1 año a partir de la fecha de la instalación Kohler Co no se hace responsable de los gastos de desinstalación o instalación El uso de limpiadores de inodoro que se colocan den...

Страница 79: ...ner el servicio de garantía favor de presentar la factura de compra y la garantía correspondiente 3 Kohler Co a través de sus distribuidores autorizados se compromete a reparar el producto defectuoso o a reemplazarlo por uno nuevo o equivalente en caso de que el producto esté descontinuado cuando no sea posible la reparación sin ningún cargo al consumidor 4 El tiempo de reparación no excederá de s...

Страница 80: ...es naturales tales como incendios o casos de fuerza mayor incluyendo inundaciones terremotos tormentas eléctricas etc Para obtener una lista de distribuidores cerca de usted y así hacer valer sus derechos bajo esta garantía llame al 001 877 680 1310 KOHLER CO KOHLER WI 53044 U S A IMPORTADOR INTERNACIONAL DE CERÁMICA S A B DE C V AV CARLOS PACHECO NO 7200 CHIHUAHUA CHIH MÉXICO C P 31060 TEL 52 14 ...

Страница 81: ...el asiento para fines de prueba estando de frente hacia el inodoro coloque su mano o una toallita húmeda en el lado derecho del asiento aproximadamente 1 3 del frente del asiento como se ilustra Proceda a la sección Diagrama del control remoto y teclado y Funcionamiento para probar las diferentes funciones del asiento Llave de paso Tomacorriente protegido por un interruptor GFCI RCD Kohler Co Espa...

Страница 82: ... P N O Z Z L E B A C K WA R D N O Z Z L E F O R WA R D D E O D O R I Z E R H 2 O T E M P S E AT T E M P A I R T E M P A I R S P E E D P O W E R L I G H T E N E R G Y S AV E A B C E H K M D F O P Q G C G D J I L N F R E N T E PA R T E S U P E R I O R Control remoto Panel 1093479 2 A Español 21 Kohler Co ...

Страница 83: ...o del Frente y cambiar el nivel de flujo bajo medio y alto D Trasero Presione el icono para activar la función de lavado del Trasero y cambiar el nivel de flujo bajo medio y alto E Oscilar Presione el icono para comenzar el movimiento de la varilla hacia delante y hacia atrás Presione el icono una segunda vez para detener el movimiento de la boquilla F Pulsar Presione el icono para comenzar a alte...

Страница 84: ...el asiento con calefacción cambia al valor más bajo Después de 48 horas de inactividad la temperatura del asiento con calefacción se apagará Una vez que el asiento se activa el diodo LED indicador de encendido cambiará a verde la temperatura cambia al valor seleccionado por el usuario anterior y el temporizador se restablece en el modo de ahorro de energía P Encendido apagado Presionar este icono ...

Страница 85: ...one el icono FRENTE en el panel para extender esa varilla rociadora hacia el frente para limpiarla Limpie la varilla rociadora con un cepillo de cerdas suaves Vuelva a presionar el icono FRENTE en el panel para retraer la varilla rociadora Repita los pasos anteriores para la varilla rociadora del TRASERO Varilla en la posición extendida Kohler Co Español 24 1093479 2 A ...

Страница 86: ...NOTA El asiento contendrá agua hasta que se drene Consulte la sección Drene el asiento Desenchufe el asiento de la caja eléctrica De la válvula en T desconecte la manguera de suministro de agua Oprima el botón de desenganche Deslice el asiento hacia delante para desenganchar el asiento de la placa de montaje Botón de desenganche Placa de montaje 1093479 2 A Español 25 Kohler Co ...

Страница 87: ...impie la rejilla con un cepillo de cerdas suaves Vuelva a instalar la rejilla Vuelva a instalar el asiento IMPORTANTE Riesgo de daños al producto Tenga cuidado de no dañar las roscas de la conexión Vuelva a conectar la manguera de suministro de agua al asiento Abra el suministro de agua Revise todas las conexiones para asegurarse que no haya fugas y ajuste según sea necesario Rejilla Pinzas de pun...

Страница 88: ...prima el botón de desagüe hasta que toda el agua se haya drenado del asiento Información de servicio Para preguntas de servicio e instalación llame al 1 800 4 KOHLER Procedimiento para resolver problemas Esta guía para resolver problemas está diseñada únicamente como ayuda general Un representante de servicio autorizado de Kohler o un electricista calificado debe resolver todos los problemas eléct...

Страница 89: ...r de circuito con pérdida a tierra GFCI puede haberse disparado B Restablezca el GFCI y determine el problema C El interruptor de circuito se ha disparado C Restablezca el interruptor de circuito y determine el problema D Ninguna de las acciones anteriores corrigen el síntoma D Consulte a un representante de servicio de Kohler 3 El asiento está flojo A Los tornillos y tuercas están flojos A Apriet...

Страница 90: ...ión Limpie la rejilla 3 El agua deja de fluir de la varilla rociadora antes de yo termine de limpiarme A Dos minutos después de presionar uno de los iconos de rociado el lavado se detiene automáticamente A Presione otra vez el icono Trasero o Frente B El sensor del asiento no detecta al usuario B Consulte la información sobre la activación del asiento en la sección Funcionamiento 4 Se escuchan got...

Страница 91: ...nte el uso A Diez minutos después de presionar el icono Velocidad del aire el soplador se detiene automáticamente A Oprima el botón Velocidad del aire otra vez Tapa de cierre lento Síntomas Causas probables Acción recomendada 1 La velocidad de cierre del asiento y la tapa varía en el verano y el invierno A Debido a los cambios en la temperatura ambiental A Ninguno Sensor del asiento Síntomas Causa...

Страница 92: ... recepción del asiento están cubiertas C Retire el objeto que cubre la ventana o ventanas de recepción del asiento D La ventana de recepción del asiento está cubierta de polvo o agua D Retire el polvo o el agua y limpie la ventana de recepción del asiento E El sensor del asiento no detecta al usuario E Consulte la información sobre la activación del asiento en la sección Funcionamiento 2 Las luces...

Страница 93: ...1093479 2 A ...

Страница 94: ...1093479 2 A ...

Страница 95: ...1093479 2 A ...

Страница 96: ...USA 1 800 4 KOHLER Canada 1 800 964 5590 México 001 877 680 1310 kohler com 2008 Kohler Co 1093479 2 A ...

Отзывы: