background image

A

A1

B

C

C1

D

F

G

H

J

N

I

x3

E

L

M

K

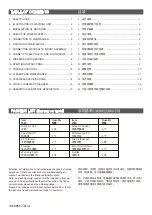
Parts List

/零件清单

A.   Stopper /

盖子

A1. Removable Spash Guard /

防溅罩子

B.   Sink Flange /

不锈钢法兰

C*. Rubber Washer /

法兰橡胶平垫

C1. Fiber Gasket /

纤维垫圈

D.   Backup Flange /

支撑环

E.   Screws (x3)  /

螺丝

F.   Mounting Ring /

装配环

G.   Snap Ring /

卡箍

H.   Cushion Mount /

橡胶件

I.    Lower Mounting Ring  /

连接环

J.   Disposal /

处理器

K.   Drain Elbow /

弯管

L.   Rubber Gasket /

弯管橡胶件

M.   Screws /

法兰固定片螺钉

N.   Powercord  /

电源线

1460955-T01-A

-3-

3. INSTALLATION OF MOUNTING

3. 

组件的安装

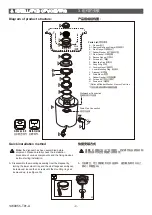
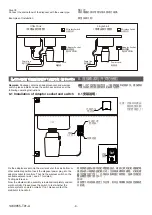
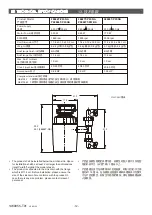
Diagram of product structure:

产品组成结构图:

快捷安装方式

注意:

处理器已在出厂前组装好,因此请您在安装前仔细

观察各部件及固定装置的安装程序。

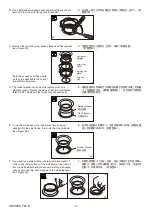
A.  

拧松螺丝,用工具顺时针松开连接环,直到装配环可以向上

移动(参看图

3A

)。

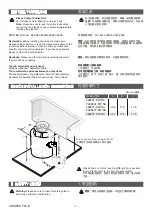
Quick installation method

Note:

 the disposal has been assembled before 

shipment. Please carefully check the installation 

procedure of various components and the fixing devices 

before starting installation.

A.  Disassemble the mounting assembly from the disposal by 

turning the lower mount ring and the sink flange assembly can 

be removed. loosen the 3 screws until the mounting ring can 

be moved up  (see Figure 3A).

*(Optional)Rubber Washer, Neoroc,Cast Iron

*可选石槽/铸铁槽专用橡胶垫圈

Drain Pipe Connection

排污口连接

Dishwasher Connection

洗碗机排水口连接

Sink

水槽

Above sink Below sink

在水槽上方操作 在厨下操作

上方

下方

3A

下方

Содержание K-28886T-PW-NA

Страница 1: ...lp reduce greenhouse gas emissions at capable wastewater treatment stations food waste can be converted to biosolids and used as fertilizer The gracious living kitchen lifestyle by Kohler is a clean convenient and environmentally responsible method of ridding your kitchen food wastes At the touch of switch food waste is dealt with hygienically and instantly rather that leaving it in a bin to encou...

Страница 2: ...ANCE 13 TECHNICAL SPECIFICATIONS 14 CIRCUIT SCHEMATIC DIAGRAM 15 HAZARDOUS SUBSTANCE DESCRIPTION 1 安全指南 2 处理器的图示说明 3 组件的安装 4 检查电源 5 洗碗机的连接 6 排水弯管的固定 7 处理器和组件的连接 8 连接电源与开关的使用 9 无线开关的配对 10 操作说明 11 故障检修 12 清理和维护 13 技术参数 14 电路原理图 15 产品中有害物质含量的说明 1 2 3 6 6 7 7 8 9 9 10 11 12 13 13 1 2 3 6 6 7 7 8 9 9 10 11 12 13 13 Attention all information instruction was checked by trained personnel If there are misp...

Страница 3: ...l and adhere to the recommendations therein in order to avoid any malfunction possibly occurring during operation If you have any queries please contact the local distributor Reminder Please read the instructions carefully and retain them for use as necessary Tools materials you will need Slotted screwdriver Adjustable Pliers Tools materials and accessories you may need Phillips screwdriver Tape M...

Страница 4: ...g Please unplug the electrical plug or shut off the power switch of the disposal when preparing to clean up or take an object from the disposal Please use a long handled wooden spoon or wooden stick to clear a blocked disposal or use the long handle at the cap bottom to clear it Please use a long handled clamp or pliers to remove objects from the disposal In order to reduce damage caused by any sp...

Страница 5: ...式 注意 处理器已在出厂前组装好 因此请您在安装前仔细 观察各部件及固定装置的安装程序 A 拧松螺丝 用工具顺时针松开连接环 直到装配环可以向上 移动 参看图3A Quick installation method Note the disposal has been assembled before shipment Please carefully check the installation procedure of various components and the fixing devices before starting installation A Disassemble the mounting assembly from the disposal by turning the lower mount ring and the sink flange assembly ...

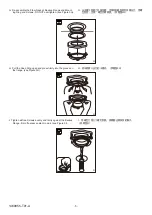
Страница 6: ...embly sequence D The rubber washer can be used to replace putty on a stainless steel or Newroc as well as Cast iron sink please refer to SPP However other sinks may still need putty E If no putty will be used the rubber washer can be put directly onto the sink flange Insert into the sink plughole see Figure 3E F If you will use a putty sealing apply a complete round of putty on the lower surface o...

Страница 7: ...assemble the Fiber Gasket Backup Flange and Mount ing Ring and Screws DO NOT overtighten see Figure 3G H Pull the Snap Ring open and press firmly into the groove on the flange see Figure 3H I Tighten all tree Screws evenly and firmly against the Backup Flange trim off excess sealant in sink see Figure 3I 3G 3H 3I 下方 下方 下方 ...

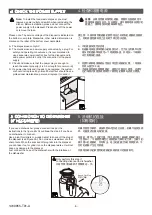
Страница 8: ... by himself herself but should have a professional maintenance personnel replace it or send it 1460955 T01 A 6 5 CONNECTION TO DISHWASHER IF NECESSARY 5 洗碗机的连接 如需要时 如果您使用洗碗机 请按照图5A指示进行连接 如果不连接洗碗 机 则直接进行第6步的安装 连接时 请用一个钝的工具 钳子或木棍 敲掉处理器的塞子 见图5A 不要使用螺丝刀或其他较为锋利的工具 当敲下的 塞子落入处理器时 您可取出 或当处理器工作时将其搅碎 不 会对处理器产生任何损害 只需将洗碗机的软管同处理器的洗碗机接口相连接即可 If you use a dishwasher please connect it as per the instructions in ...

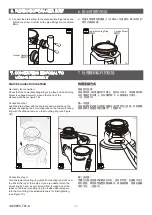
Страница 9: ...wer mounting ring with the slide up ramps on the mounting ring see Figure 7B Connection step II Turn the lower mounting ring until all 3 mounting tabs lock over the ribs at the top of the ramps If you are unable to turn the omunt ring by hand insert a screw driver through one of the tubes on the lower mounting ring to provide extra leerage to turn the mount ring Use adjustable pliers for final rig...

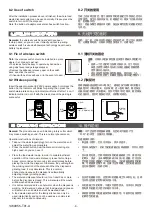
Страница 10: ...nstalled completely and can work normally Please press the switch to test whether the whole system can work normally If not please contact the distributor to handle it 8 CONNECT TO ELECTRICITY AND USE OF SWITCH 8 连接电源与开关的使用 说明 本产品控制部分包含一个转换插座和无线开关 请按照以 下操作说明进行插座和开关的安装与使用 8 1 安装说明 Remarks Package contains an adaptor socket and wireless switch please install and use the switch assembly as per the fo...

Страница 11: ... family kitchen can only be used intermittently and can not be used as a commercial disposer to be used continuously 9 WIRELESS SWITCH PAIRING 9 无线开关的配对 说明 出厂时 无线开关和插座已经对码完成 用户可以直接使 用 无需重新对码 无线开关是自发电设计 无需电池 9 1 无线开关的固定 9 2 开关配对 将转换器插座连接到220V电源上 通电后按下按键3秒 如图I 插座指示灯闪烁 如图II 松开按键 进入配对模式 随后按压 无线开关的翘板1次 如图III 指示灯常亮1秒后熄灭 随后再按 动无线开关 指示灯随按动亮灭 说明配对成功 注意 无线开关的安装位置应该是不易被水淋到的地 方 选择一个合适的地方安装无线开关 这个地方应 该是当使用水槽水龙...

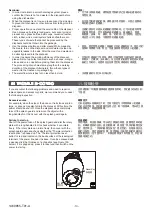
Страница 12: ...may lengthen the working duration of the disposal Alternately throw these types of waste into the trashcan or garbage bag The water flow rate is best at no less than 4L min 11 TROUBLE SHOOTING 11 故障检修 当您遇到如下问题需要修理或更换零配件时 我们建议您进行如 下检查 噪音过大 比如处理骨头或果核过大时 也有可能会勺子等物体掉入处理器 此时应关闭电源 待处理器完全停止后 取下防溅罩 用长柄工具 将物体取出 再盖回防溅罩 无法启动 关闭电源 取出防溅罩 用长柄工具拨动转盘 查看是否转动自 如 如果转盘转动自如 盖回防溅罩 再检查 热保护器复位按 钮 是否弹出 热保护器复位按钮 是红色的 在电源线引...

Страница 13: ...险闸门 电源断合器等 如果电源线的连线和电器 部分都完好 有可能是处理器内部的问题 需要与分销商联系修理 或更换 转盘不能自如转动 请检查处理器的叶轮与粉碎腔内是否有异物存在 用长柄工具拨 动转盘取出异物 见下图10B 如果没有异物 就可能是机器 内部的问题 渗漏 如果机器发生渗漏 有可能是下列原因导致 水槽法兰安装不合适 垫圈 腻子及是否拧紧 支撑环安装不合适 弹性垫圈失效 如果机器从排水弯管处渗漏 那可能是此处的螺丝未拧紧 12 CLEANUP AND MAINTENANCE 12 清理和维护 处理器电机已有终身润滑剂 请勿另行添加润滑剂 机器自身也 可自行清洗 处理器都配有可拆卸的防溅罩 其清洗及更换十分容易 您只须 从水槽上方将其取出即可 清洗后再放回原处 防溅罩在长期使用中容易损件 如需更换请与销售代理商联系 用户在使用过程中 如有发现在转盘上有黑色胶状物时 请不要担 心 那是余...

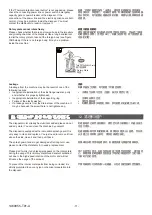
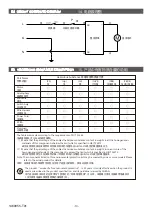
Страница 14: ... cm 5 4 kg 净 6 0 kg 毛 BA光面 11 4 cm 1 3 cm 40 50 外牙 0 9 HP 28888T PW NA 220 V 50 Hz 770 W 2000 rpm 17 4 x 31 3 x 34 1 cm 5 7 kg 净 6 3 kg 毛 BA光面 11 4 cm 1 3 cm 40 50 外牙 1 05 HP 产品应安装在橱柜的水槽下面 安装空间至少要大于所选型 号的外形尺寸 长 宽 高 3 厘米以上 产品是通过法兰与水槽排水口处相连接 标配法兰的尺寸规 格为Ø11 4 厘米 在安装前应检查并确保水槽排水口位置尺 寸与产品相符合 如发生不相符的情况 请与销售或是安装 人员联系 The product shall be installed below the kitchen sink Space for installation shall be at ...

Страница 15: ...of the subject hazardous substance content in weight in one or more of the homogeneous materials of this component is exceed the limit which is specified in GB T 26572 表示该有害物质至少在该部件的某一均质材料中的含量超出GB T26572规定的限量要求 Note The components listed on this environmental protection list may be covered by one or more models Please refer to the actual product for details 说明 环保清单中的零部件可能包含不同产品型号的部件 具体以实物为准 The pr...

Страница 16: ...1460955 T01 LKK3153 www kohler com cn Manufactured by Kohler Co ...

Отзывы: