background image

TT-1601 5/16

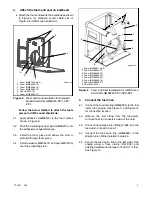
3

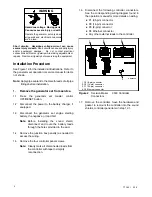
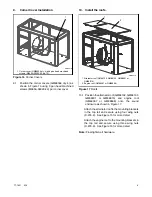
1.8 Position the generator set onto the sound shield

base (GM86014 or GM86015) and secure the set

with 4 bolts (X-6238-3 or X-6238-11) and 4 washers

(X-25-37). See Figure 3.

For UMS Kit GM88267-KP1/-KP2/-KP3 only:

Install two base plates (GM88919 or GM88920)

onto sound shield base (GM86014 or GM86015).

1

GM86014-B

Top View of Base

1. Engine end

2. Mounting hole locations

2

Figure 3

Sound Shield Base Mounting Position

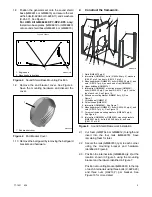
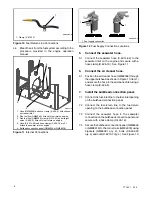
1.9 Remove the end bracket cover. See Figure 4.

Save the mounting hardware and discard the

cover.

GM79560-

1. End bracket cover

1

Figure 4

End Bracket Cover

1.10 Remove the belt guard by removing the belt guard

brackets and hardware.

2.

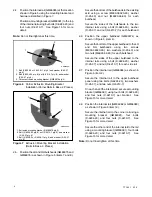
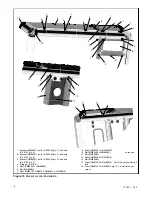
Construct the framework.

4

2

1

GM86016-

1. Rails (GM86079 qty. 4)

2. Internal rail (GM86084), bolts (X-6224-20 qty. 2), washers

(X-25-37 qty. 2), and nuts (X-6210-7 qty. 2)

3. Mounting bracket (GM86091), bolts (X-6224-20 qty. 4), and

nuts (X-6210-7 qty. 4) on each end of rail (GM86084)

4. Upper bulkhead (GM86074)

5. Internal rail (GM86085), mounting bracket (GM86091),

bolts (X-6224-20 qty. 3), and nuts (X-6210-7 qty. 3) on the

top of each rail. See Figure 15.

6. Extrusion mounting bracket (GM85876 qty. 3). See

Figure 7.

7. LH bulkhead (GM86076)

8. RH bulkhead (GM86075)

9. Internal rail (GM86085). See Figure 7.

10. Mounting bracket (GM86091), bolts (X-6224-20 qty. 4), and

nuts (X-6210-7 qty. 4). See Figure 15.

11. Corner extrusion mounting brackets (GM85875 qty. 4).

See Figure 6.

12. Internal rail (GM86082 or GM86083), mounting brackets

(GM86091 qty. 2), bolts (X-6224-20 qty. 8), and nuts

(X-6210-7 qty. 8)

3

5

1

6

7

8

6

9

10

11

12

3

Figure 5

Sound Shield Framework Installation

2.1 Cut foam (GM87549 or GM88912) to length and

insert into the four rails (GM86079). Save

remaining foam for later.

2.2 Secure the rails (GM86079 qty. 4) to each corner

using the mounting bracket and hardware

identified in Figure 6.

2.3 Position the internal rails (GM86085 qty. 2) at the

location shown in Figure 5 using the mounting

bracket and hardware identified in Figure 7.

Position a mounting bracket (GM86091) to the top

of each internal rail using three bolts (X-6224-20)

and three nuts (X-6210-7) per bracket. See

Figure 15 for more detail.

Содержание 40EFOZDJ

Страница 1: ...injury or death Before working on the generator set or equipment connected to the set disable the generator set as follows 1 Move the generator set master switch to the OFF position 2 Disconnect the power to the battery charger 3 Remove the battery cables negative lead first Reconnect the negative lead last when reconnecting the battery Follow these precautions to prevent starting of the generator...

Страница 2: ...o the battery charger if equipped 1 3 Disconnect the generator set engine starting battery the negative lead first Note Before installing the sound shield disconnect and route the battery leads through the holes provided in the skid 1 4 Remove the junction box panel s as needed to access the wiring 1 5 Remove the four controller panel screws Note Clearly mark all disconnected leads from the contro...

Страница 3: ...ernal rail GM86085 mounting bracket GM86091 bolts X 6224 20 qty 3 and nuts X 6210 7 qty 3 on the top of each rail See Figure 15 6 Extrusion mounting bracket GM85876 qty 3 See Figure 7 7 LH bulkhead GM86076 8 RH bulkhead GM86075 9 Internal rail GM86085 See Figure 7 10 Mounting bracket GM86091 bolts X 6224 20 qty 4 and nuts X 6210 7 qty 4 See Figure 15 11 Corner extrusion mounting brackets GM85875 q...

Страница 4: ... each bulkhead Secure the sides of the bulkheads to the two internal rails using a bolt X 6224 20 washer X 25 37 and nut X 6210 7 for each bulkhead 2 6 Position the upper bulkhead GM86074 as shown in Figure 5 item 4 Secure the bottom of the upper bulkhead to the LH and RH bulkheads using two screws M933 06020 60 two washers X 25 40 and two nuts M6923 06 80 for each bulkhead Secure the sides of the...

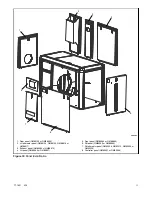
Страница 5: ...ece 3 4 Install a washer GM96474 and cap GM55130 over the protruding stud GM88267 C 1 Foam GM88911 qty 2 2 Foam GM88906 17 3 Foam GM88906 22 4 Foam GM88906 19 5 Foam GM88906 20 6 Foam GM88906 18 7 Foam GM88906 21 8 Seal X 6422 12 1 2 3 4 5 6 7 8 Figure 9 Foam and Seal Installation for UMS Sound Shield Kits GM88267 KP1 KP2 KP3 4 Connect the fuel lines 4 1 Connect the fuel inlet line GM86395 to the ...

Страница 6: ...onnect the seawater hose 5 1 Connect the seawater hose X 6014 66 to the seawater inlet on the engine and secure with a hose clamp X 426 19 See Figure 11 6 Connect the air cleaner hose 6 1 Position the air cleaner hose GM92558 through the upper bulkhead as shown in Figure 11 item 1 and secure the hose to the air cleaner inlet using a hose clamp X 426 5 7 Install the bulkhead connection panel 7 1 Co...

Страница 7: ...9 or GM88912 to length and insert into the rails GM86078 qty 2 and GM86080 or GM86081 qty 2 See Figure 15 8 2 Position the rails GM86078 qty 2 and GM86080 or GM86081 qty 2 as shown in Figure 14 8 3 Attach the brackets GM86091 qty 5 to the service side rail GM86080 or GM86081 using the hardware specified at the locations shown in Figure 15 8 4 Attach the brackets GM86091 qty 4 using the hardware sp...

Страница 8: ... 5 Roof GM86097 or GM88898 6 Rail GM86084 7 Roof GM86102 GM86103 GM88901 or GM88915 8 Panel GM93007 or GM93008 9 Rail GM86082 or GM86083 10 Rail GM86085 11 Panel GM86096 or GM88913 12 Rail GM86084 13 Foam GM87549 or GM88912 Cut to fit and insert into all rails 14 Foam GM87547 or GM88910 qty 12 Install three per corner 1 1 1 1 1 1 1 1 1 2 2 2 2 3 3 2 4 4 4 4 4 4 4 4 5 7 4 8 9 10 10 11 12 13 14 4 4 ...

Страница 9: ...6102 GM86103 GM88901 or GM88915 2 Engine roof GM86097 or GM88898 1 2 Figure 17 Roofs 10 1 Position the alternator roof GM86102 GM86103 GM88901 or GM88915 and engine roof GM86097 or GM88898 onto the sound enclosure as shown in Figure 17 Attach the alternator roof to the mounting brackets in the top rail and secure using four wing nuts X 276 9 See Figure 15 for more detail Attach the engine roof to ...

Страница 10: ... with the holes in the base and install the front panel GM86094 or GM88896 on the engine end of the unit See Figure 18 item 5 11 6 Align the pins with the holes in the base and install the RH panel GM86093 or GM88895 to the service side engine end of the unit See Figure 18 item 6 11 7 Align the pins with the holes in the base and install the RH alternator panel GM93009 GM93010 GM93024 or GM93025 t...

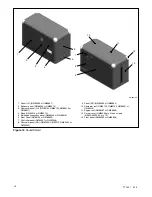
Страница 11: ...105 GM88916 or GM88917 3 Exhaust panel GM86096 or GM88913 4 LH panel GM86095 or GM88897 5 Front panel GM86094 or GM88896 6 RH panel GM86093 or GM88895 7 RH alternator panel GM93009 GM93010 GM93024 or GM93025 8 Controller panel GM93007 or GM93008 1 2 3 4 5 6 7 8 Figure 18 Panel Identification ...

Страница 12: ...8918 6 Rear Panel GM86106 or GM88902 7 Controller panel GM93007 or GM93008 8 Alternator panel RH GM93009 GM93010 GM93024 or GM93025 9 Panel RH GM86093 or GM88895 10 Alternator roof GM86102 GM86103 GM88901 or GM88915 11 Engine roof GM86097 or GM88898 12 Corner cover GM86036 qty 4 and screws M965A 06020 20 qty 12 13 Front panel GM86094 or GM88896 GM86016C 1 2 3 4 5 6 7 8 9 10 11 12 13 Figure 19 Soun...

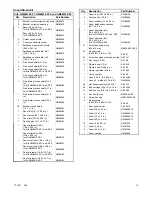
Страница 13: ...P4 GM93010 1 Panel controller 16 6 x 10 6 in for Kits GM86016 KP1 and KP3 GM93007 Panel controller 18 9 x 10 6 in for Kit GM86016 KP4 GM93008 1 Roof alternator 16 6 x 23 7 in for Kits GM86016 KP1 and KP3 GM86102 Roof alternator 18 9 x 23 7 in for Kit GM86016 KP4 GM86103 Qty Description Part Number 1 Panel rear 23 7 x 29 9 in GM86106 2 Fuel line flex 70 in GM86395 1 Panel exhaust 11 4 x 33 in GM860...

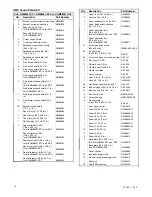
Страница 14: ... Roof alternator 16 6 x 23 7 in for Kits GM88267 KP1 and KP3 GM88901 Roof alternator 18 9 x 23 7 in for Kit GM88267 KP2 GM88915 Qty Description Part Number 1 Panel rear 23 7 x 29 9 in GM88902 2 Fuel line flex 70 in GM86395 1 Panel exhaust 11 4 x 35 9 in GM88913 1 Panel bulkhead connection 23 7 x 5 9 in GM88918 1 Panel alternator LH 16 6 x 35 9 in for Kits GM88267 KP1 and KP3 GM88916 Panel alternat...

Страница 15: ...TT 1601 5 16 15 Notes ...

Страница 16: ...ystems Asia Pacific Headquarters 7 Jurong Pier Road Singapore 619159 Phone 65 6264 6422 Fax 65 6264 6455 Availability is subject to change without notice Kohler Co reserves the right to change the design or specifications without notice and without any obligation or liability whatsoever Contact your local Kohlerr generator set distributor for availability 2013 and 2016 by Kohler Co All rights rese...

Отзывы: