background image

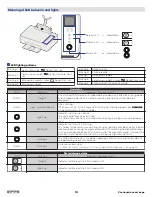
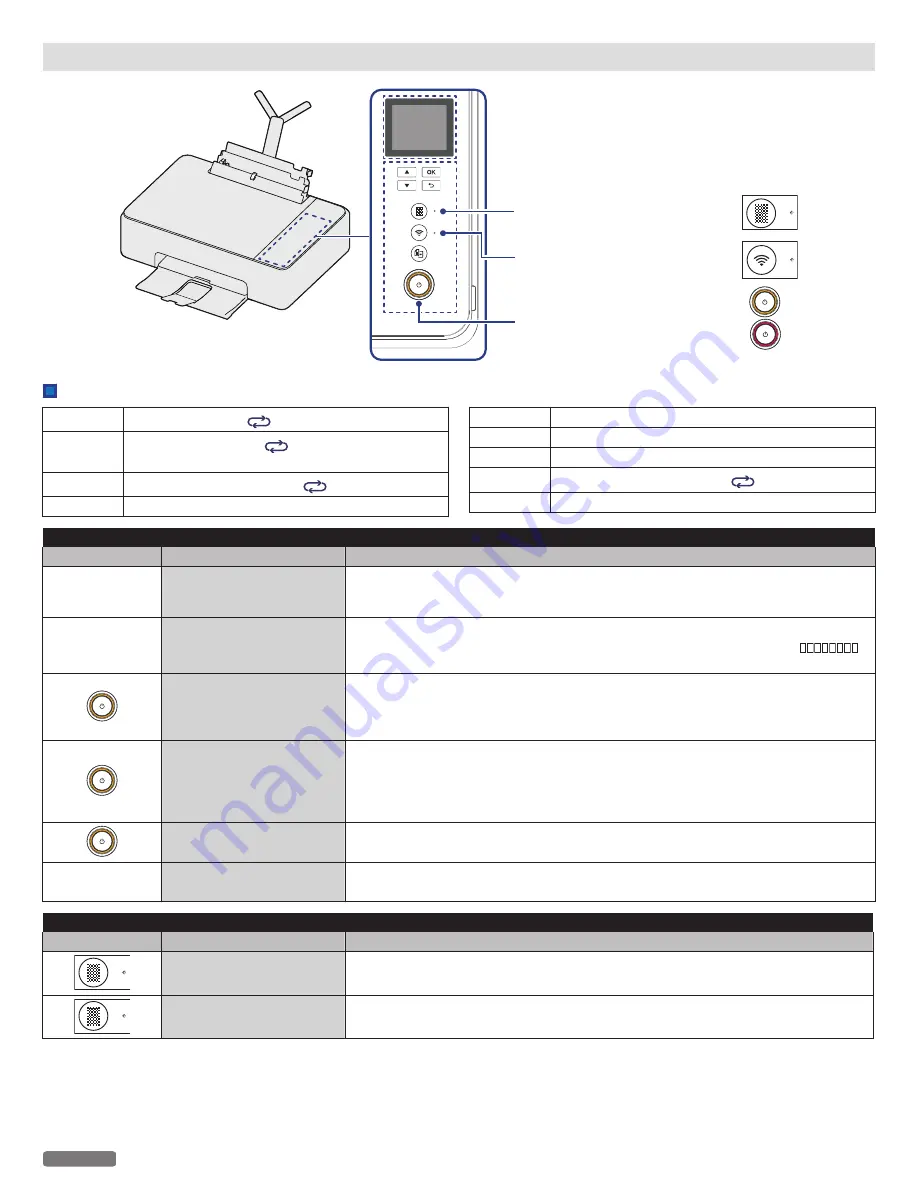
Meaning of LED behavior and lights

Material LED

Wireless LED

Power LED

—  indicated by

—  indicated by

—  indicated by

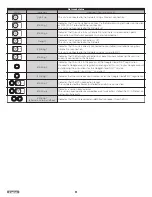
LED lighting patterns

Blinking 1

Lights up for 1 sec. 

 No light for 1 sec.

Blinking 2

Lights up very rapidly 

 No light for more than 1

sec.

Blinking 3

Blinking very rapidly 2 times 

 No light for 1 sec.

Blinking 4

Blinking very slowly

Blinking 5

Blinking slowly

Blinking 6

Blinking rapidly

Blinking 7

Blinking very rapidly

Blinking 8

Blinking very rapidly 4 times 

 No light for 2 sec.

Blinking 9

Blinking slowly (in Power-On mode)

Unit status

LED(s)

Behavior

Meaning / Possible cause(s)

All LEDs

No light

Unit is turned Off (Standby) or in Sleep mode, a mode which is effective in saving power.

Even in Sleep mode, the unit is able to receive a print job from USB / Network

equipment.

All LEDs

Lights up and Blinking 9

Unit is Starting.
When you turn On, KODAK Logo with “Starting Up” and the progress bar (

)

will be displayed on the Menu display.

Lights up

Indicates that the unit is Ready.

The unit is able to receive a print job.

This Yellow LED behavior is also used when copying, scanning or cancelling copy or

scan.

Blinking 5

Indicates that the unit is Running.

This Yellow LED behavior is used when printing, cancelling a print job and after the print

jobs are received, running the alignment process (While running the alignment process,

any new print job received will start printing after the alignment process is done. (The

print job is not effected while the unit is scanning the alignment pattern.)).

Blinking 1

This Yellow LED behavior is used when updating Software, restoring factory default

and performing weekly maintenance.

All LEDs

Blinking 1

System error occurred.

» Refer to “Status messages, LCD messages and LED behaviors” on page 75.

Material mode status

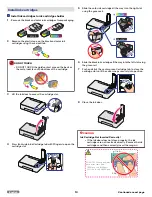
LED(s)

Behavior

Meaning / Possible cause(s)

No light

Indicates that Material Craft Print mode is OFF.

Lights up

Indicates that Material Craft Print mode is ON.

10

English

Continued on next page.

Содержание VERITE CRAFT 6

Страница 1: ...ing your KODAK VERITÉ Wireless Art Craft Printer more enjoyable If you have read your instructions and still need assistance you may access our online help at www kodakverite com support or call 1 844 995 6325 1 844 99KODAK Details explanations and expressions displayed on your tablet smartphone PC display may differ from those shown in this Extended User Guide The displayed items and specificatio...

Страница 2: ...m onto the Rear tray 32 Using Menu display 33 Manual Craft Print 33 Print settings 34 Confirming Printing Preferences for Windows 34 Confirming Print Settings for Mac 37 Making Copies 39 Copy by using the Menu display 39 Copy Setting 40 Check ink levels 43 Copy in Copy application by Windows 43 Scanner 46 Scan in Scanning application by Windows 46 Scan in Mac 47 Settings 49 Maintenance 49 Paper Se...

Страница 3: ...71 Setup troubleshooting 71 Status messages LCD messages and LED behaviors 75 Improving the print quality 83 Appendix 84 Specifications 84 Note about recycling 85 Safety Data Sheet SDS 85 Limited Warranty 86 3 English ...

Страница 4: ... you can copy both sides of a small document e g business card onto one page Refer to ID Card Copy on page 45 Web interface The web interface is available to you on all operating systems YoucanaccessthewebinterfacewithanInternetbrowseronyour PC and conduct many different settings to your device Refer to Web interface on page 62 Status Messenger for Windows only The Status Messenger is available on...

Страница 5: ...oths or carpets and do not cover the ventilation slits Otherwise the device could overheat or degrade The area in which you operate the device must be adequately ventilated especially if the device is used frequently Set up your device in such a way that the Heat or A C vent s air flow must be directed away from the work station Never use a gas duster on this device This gas trapped inside of this...

Страница 6: ... RSS standard s Operation is subject to the following two conditions 1 This device may not cause interference and 2 this device must accept any interference including interference that may cause undesired operation of the device CAN ICES 3 B NMB 3 B PC connection Use only a custom high speed certified USB cable to connect the device to your PC The recommendable cable length is no longer than 5 fee...

Страница 7: ... copyrighted work is prohibited except for personal domestic use or use in a limited extent based on that purpose Reproducing a photographic portrait may also be subject to punishment Currency securities etc Forging any of the following to use as genuine articles or producing misleading articles is subject to punishment by law Banknotes paper currency coins including foreign currency Government bo...

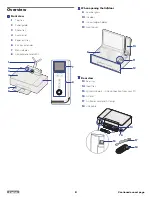
Страница 8: ...ntrol panel and LEDs 1 2 4 3 5 6 8 7 When opening the lid door 9 Scanner glass 10 Ink door 11 Ink cartridges holder 12 Front cover 9 11 12 10 Rear view 13 Rear tray 14 Input tray 15 Printer USB port USB connection from your PC 16 AC inlet 17 AC Power cord and AC plug 18 USB cable 15 13 16 14 17 18 8 English Continued on next page ...

Страница 9: ...een cancel a current job delete the letters when inputting change the password cancel a WPS process Material Use to switch material print medium types Every press of the button switches the material type as follows Paper Cardstock Fabric Leather Custom Paper Wireless Use to connect to the Wireless Network Wireless feature On By using Easy Simple Print with the mobile device press it less than 3 se...

Страница 10: ...tarting Up and the progress bar will be displayed on the Menu display Lights up Indicates that the unit is Ready The unit is able to receive a print job This Yellow LED behavior is also used when copying scanning or cancelling copy or scan Blinking 5 Indicates that the unit is Running This Yellow LED behavior is used when printing cancelling a print job and after the print jobsarereceived runningt...

Страница 11: ...g Easy Simple Print Blinking 7 Indicates that the Network connection has become unavailable and the unit is not currently connected to the Network Blinking 5 Indicates that the unit is in the process of the Google Cloud Print registration Proceed to Google account registration and register this unit to your Google account by following the instructions for the Google Cloud Print service Refer to Go...

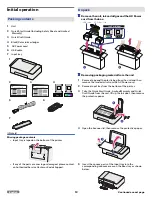
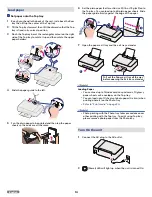
Страница 12: ...Center or Kodak Support Unpack Remove the unit ink cartridges and the AC Power cord from the box Ink Cartridges BLACK COLOR Color Black 1 2 AC Power cord USB cable Removing packaging material from the unit 1 Remove tape and the plastic bag from the unit and then remove the twisted wire from the AC Power cord 2 Remove Input tray from the bottom of the printer 3 Take the Quick Start Guide Limited Wa...

Страница 13: ...lide the color ink cartridge all the way into the right slot using the green rail Slid e Slid e Slid e Slid e Slid e Slid e Color Right Black Left 6 Slidetheblackinkcartridgeallthewayintotheleftslotusing the green rail 7 Push and click the center green Cartridge tab to close the cartridge slot until the cover snaps securely into position Click Click 8 Close the Ink door CAUTION Ink Cartridge Not I...

Страница 14: ...to the Top tray You can load up to 60 plain paper sheets Slide the paper guide firmly against the edge of the paper 1 2 7 Open the paper exit tray and the exit tray extender 1 2 Pull out the Paper exit tray all the way before opening the Exit tray extender Note s Loading Paper You can load up to 15 index cards or postcards 10 glossy paper sheets or 5 envelopes on the Top tray You can load up to 10...

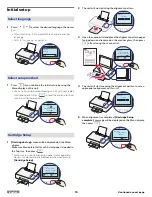
Страница 15: ...lank plain paper sold separately Never use colored or patterned paper when performing Cartridge Setup Step 1 of 5 For best results please proceed with cartridges setup Cartridge Setup OK Next Skip 2 The unit will start printing the alignment pattern Step 2 of 5 Test Print Cartridge Setup 3 Open the scanner lid and place the alignment pattern paper facing down and reversed on the scanner glass then...

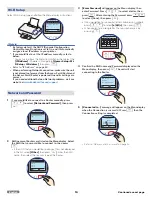
Страница 16: ...play Select the SSID that you would like to connect to then press If the SSID that you would like to connect to is not displayed in the list select Other then press Enter the SSID name then select the security type of the Router Router2 Router3 Router4 Network and Password Back OK Select Router1 3 Enter Password will appear on the Menu display then enter Password Press to select a letter then pres...

Страница 17: ...tup the Wi Fi now you can setup later after the initial setup is completed Refer to Wi Fi Setup on page 53 Usage Tracking 1 Press to see the detailed information about Usage Tracking Privacy Settings Allow printer to periodically send anonymous usage data Usage Tracking OK Accept Se ings 2 Press repeatedly to see the end of the detailed information To improve future versions of Kodak printers allo...

Страница 18: ... extensions the program and file names appear to be different from those described in this User Guide In this Extended User Guide the appearance of the screen images are based on Windows 10 however other operating systems e g Windows 8 etc provide basically the same operations There may be programs and functions named differently CAUTION If there are any programs running close them first The scree...

Страница 19: ... Icon is displayed on the bottom left of the Security Privacy window Click the lock Icon to unlock You may be required to enter the login password to proceed 4 Select Anywhere from options listed For more information visit our FAQ on the website at www kodakverite com support Install the printer driver to your PC There are two ways to connect to the unit Using Wi Fi Recommended When your PC finds ...

Страница 20: ...aper facing down on the scanner glass then click Confirm after closing the scanner lid 9 The unit will start scanning the alignment pattern to set an appropriate alignment on this unit Note s Cartridge Setup screen may not be displayed when you have already performed Cartridge setup Make sure to use only blank plain paper sold separately Never use colored or patterned paper when you set the alignm...

Страница 21: ...e the alignment pattern paper facing down on the scanner glass then click Confirm after closing the scanner lid 7 The unit will start scanning the alignment pattern to set an appropriate alignment on this unit Note s Cartridge Setup screen may not be displayed when you have already performed Cartridge setup Make sure to use only blank plain paper sold separately Never use colored or patterned pape...

Страница 22: ...ill in the blank Network Name SSID Security type Security key then click Next 2 Connect up the Unit to your PC WPS Search 1 Click WPS Search 2 Press and hold the WPS button on your Router for a few seconds 3 Press and hold Wireless until the blinking pattern of Wireless LED changes 4 Click Continue 22 English Continued on next page ...

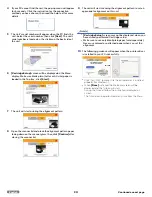
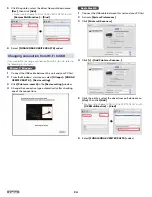
Страница 23: ...ear Select your printer s serial number and click Next Changing connection from USB to Wi Fi USB always has priority If you would like to change connection from USB to Wi Fi refer to the following instructions Microsoft Windows 1 Disconnect the USB cable between this unit and your PC first 2 From the Windows start menu select All apps KODAK VERITE CRAFT 6 Device setting 3 Click Printer re search i...

Страница 24: ...our PC first 2 From the Windows start menu select All apps KODAK VERITE CRAFT 6 Device setting 3 Click Printer re search in the Device setting window 4 Change the connection type automatically after checking one of the connections Apple Mac OS 1 Connect the USB cable between this unit and your PC first 2 Activate System Preferences 3 Click Printers Scanners 4 Click Add Printer or Scanner 5 Click t...

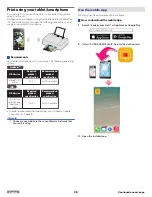
Страница 25: ...ication Android 4 0 3 or later Wi Fi Built in camera iOS OS Version Required product specification Recommended product specification iOS 8 0 or later iPhone iPod touch iPad Wi Fi Built in camera In order to download the mobile App you will need a Google Account or an Apple ID Note s Connect your mobile to the same Wireless Network that your unit is using Use the mobile App Printing using the print...

Страница 26: ...n If the following screen appears the installation and setup are complete 5 For the best results update your printer software firmware to the latest version through the KODAK VERITÉ Printer PC drivers or KODAK VERITÉ Craft App Note s The mobile App s name and screen images display the current version They may be changed due to updates 26 English ...

Страница 27: ...ations Google Cloud Print is compatible with the following operating systems and applications Supported operating systems Chrome OS Android 2 1 or later iOS 3 0 or later Applications that can be used for printing Applications for Chrome OS Google Chrome browser Google Drive for mobile Gmail webmail service for mobile For more information about Google Cloud Print visit website at www kodakverite co...

Страница 28: ...ple devices running the latest version iPhone 3GS or later iPod touch 3rd generation or later iPad all models OS X v10 7 or later macOS v10 12 For more information about AirPrint visit website at www kodakverite com support Information about AirPrint For information about AirPrint visit website at www kodakverite com support The contents of the website are subject to change without notice 1 Click ...

Страница 29: ...ail detailed error information will be displayed Follow the instructions displayed on screen you can fix the problem You can confirm a detailed status about my supplies in Ink Status Menu Settings for pop up message and detailed information display can be configured in Status Messenger Settings For how to configure the settings refer to the following instructions Status Messenger Settings To confi...

Страница 30: ...se the unit unused paper is put back into package please keep it in a flat state And also store it avoiding heat humidity and direct sunlight Supported Material You can set up cardstock fabric faux leather or custom material onto the Rear tray Material support Material Type Cardstock Fabric Leather Custom Size 3 x 5 in 76 x 127 mm to 8 5 x 14 in 216 x 356 mm Thickness Up to 0 05 in 1 2 mm Capacity...

Страница 31: ... Select Note s By selecting other paper Paper Size and Paper Type can be configured separately Refer to Print settings on page 34 9 Open the paper exit tray and exit tray extender 1 2 Pull out the Paper exit tray all the way before opening the Exit tray extender Note s Loading Photo paper Insert the photo paper into the Photo tray You can load up to 10 sheets of photo paper 4 x 6 in Place the phot...

Страница 32: ...ake sure the inserted paper format and paper type matches the printer settings Refer to Print settings on page 34 Set material print medium onto the Rear tray 1 Slide the material guide to the right 2 Place the material onto the Rear tray Slide the material guide firmly against the edge of the material paper 3 Insert the material straight into the printer using 2 flat hands until the medium is aut...

Страница 33: ...e by pressing material button when you print from PC If the Material type is selected to Custom the Unit can print from Craft App only 3 Press to confirm Material Selection screen for the selected material will be displayed e g Fabric 4 Set material after print is started message will be displayed on the Menu display then print from a tablet smartphone or PC 5 Place the material on message will be...

Страница 34: ...t default print setting on the Quick Settings menu You can adjust the default print settings using the Quick settings menu Click on Start Settings Devices Devices and printers Right click on the name of the unit and select Printer properties Click on Preferences in the General tab Note s Devices and printers on Windows OS other than Windows 10 Right click on the Windows start menu click Control Pa...

Страница 35: ...or Color print BlackandWhite Black and white print Paper type Select the desired paper type Ensure that the selected paper size is used Print Quality Select the Quality settings to match the document type to be printed You can select the type of Print Quality Auto Draft Normal Best Auto default Printing with a quality suitable for the paper type that is selected Draft High speed printing but low i...

Страница 36: ...for the page layout e g like 2 pages printed on 1 sheet of paper like a book Poster Prints a document in a larger format The Poster option lets you enlarge a print job to several times the standard size Mirror Prints a horizontally flipped document Note s When Poster is selected Depending on the poster size that you select your documentisdividedintoanequalnumberofsections each of which prints on a...

Страница 37: ...r Setting menu will be displayed 4 If details are not displayed select Show Details on the bottom of the Print Menu You can edit Print Settings when details are displayed Save changes 1 Click on Presets list box and select SaveCurrentSettings as Preset The saved configuration information will be managed by names 2 Input name in Preset Name textbox then select Preset Available For radio button 3 Cl...

Страница 38: ...n t want to scale up select the checkbox Cover Page If necessary you can print the cover page Print Cover Page If you would like to print the cover page select Before document or After document Cover Page Type If you would like to print the Cover Page select the type of Cover Page Quality Media Print Quality Select the Quality settings to match the type of document to be printed You can select the...

Страница 39: ... Copy by using the Menu display Start Color Copy 1 From the Control panel navigate to Home Copy Start Color Copy then press Copy Se ing Start B W Copy Copies 1 ality Text Back Select Start Color Copy PC_ Color Copying Total xxx Pages Copy Cancel Start B W Copy 1 From the Control panel navigate to Home Copy Start B W Copy then press Copy Se ing Start Color Copy Copies 1 ality Text Back Select Start...

Страница 40: ... Text Copy ality Text Photo Photo Dra Cancel Select Text Resize Set the Resize for enlarging or compressing the copy document 1 From the Control panel navigate to Home Copy Resize then press 2 Press to select the Resize setting 100 Default 130 Letter Legal 104 Executive Letter 97 Letter A4 93 A4 Letter 85 Letter Executive Custom Size You can select custom Resize range from 25 to 400 Press toselect...

Страница 41: ...by printing smaller images of each page 1 Lift the scanner lid on the unit 2 Load the original print side down on the scanner glass 3 Close the scanner lid 4 From the Control panel navigate to Home Copy Pages per Side then press 5 Press to select from the following printing option One 2 in 1 Portrait 2 in 1 Landscape 4 in 1 Portrait 4 in 1 Landscape Note s Ifthedocumentforprintingisverticallyorien...

Страница 42: ...ay 2 From the Control panel navigate to Home Copy ID Card Copy then press 3 Press to select the copy Color setting Color Copy B W Copy 4 Lift the scanner lid on the unit 5 Place the front side of the ID card facedown on the scanner glass in the front right placement corner with arrows 6 Close the scanner lid then press 7 Lift the scanner lid on the unit 8 Place the back side of the ID card facedow...

Страница 43: ...nt application From the Windows start menu select All apps KODAK VERITE CRAFT 6 Copying Click Advanced Settings on the top right corner if you want to change detailed settings Copies Set the number of Copies 1 Select the number of copies 1 to 99 Enter the number 1 to 99 directly in the box or click to increase the number of copies or to decrease the number of Copies 2 Click Copy or press Copy 43 E...

Страница 44: ...tter A4 93 A4 Letter 85 Letter Executive Custom You can select custom Resize range from 25 to 400 Enter the number 1 to 99 directly in the box click or to select the Resize value The default value is 100 CAUTION Copy Resize and Pages per side can never be set at the same time If either setting is set another one will be reset to the Copy Resize 100 or Pages per side One Pages per Side You can copy...

Страница 45: ... size paper on the Top tray 3 Lift the scanner lid on the unit 4 Load the front side of the ID card facedown on the scanner glass in the right front placement corner with arrows and then Click Copy or press Copy then Copying process will start 5 Lift the scanner lid on the unit flip ID card over and click Copy the back side or press Copy Note s If you have changed the Paper Settings in the Setup M...

Страница 46: ... 5 in Envelope DL 110 x 220 mm Envelope C5 162 x 229 mm Entire Flatbed 216 x 297 mm Note s A4 JIS B5 A5 A6 Hagaki Envelope DL and Envelope C5 are International Paper Sizes Entire Flatbed 8 5 x 11 7 in 216x297mm is the setting that scans the entire scanner glass Scan Resolution dpi Select the scan Resolution from below 75 dpi 100 dpi 150 dpi 200 dpi 300 dpi 600 dpi 1200 dpi Note s Scanning at 2400 ...

Страница 47: ... an object in Grayscale 256 or Thousands of grays Choose Text to scan text documents Resolution Select the scan Resolution from below 75 dpi 100 dpi 150 dpi 200 dpi 300 dpi 600 dpi 1200 dpi Select the Use Custom Size checkbox to enable the Size fields to specify the width and height you want to scan Select pixels inches or cm centimeters Rotation Angle Set the number of degrees for the clockwise r...

Страница 48: ...Color balance between red and green Temperature to adjust the Color balance of warm and cool Saturation to adjust the vividness of Colors When choosing Black White in Kind Brightness to adjust the balance between light and dark Contrast to adjust the balance of sharpness and softness When choosing Text in Kind Threshold to adjust the transition point between dark and light Note s Those images are ...

Страница 49: ...rom the Control panel navigate to Home Setup Maintenance then press 2 Press to select Cartridge Setup then press Maintenance Clean Printhead Back Select Cartridge Setup 3 Cartridge Setup screen will be displayed on the Menu display Make sure blank plain Letter or A4 size paper is loaded in the Top tray then press Make sure to use only blank plain paper Never use colored or patterned paper when per...

Страница 50: ...up the message Is the following paper loaded will be displayed in the Menu display Press to continue printing if paper is correct No Print Confirm print paper Is the following paper loaded Size 4x6 in Type Glossy Paper Size Set the Paper Size for the document copy 1 From the Control panel navigate to Home Setup Paper Setup Paper Size then press 2 Press to select the Paper Size Letter Legal JIS B5 ...

Страница 51: ...panel navigate to Home Setup Network Status Connection then press 2 The Wireless Connection status is displayed Connected or Disconnected will be shown on the screen Network Status Signal ality Security IP Address Back Select Connection Connection Connected Back Signal Quality You can confirm the current Signal Quality for Wi Fi 1 From the Control panel navigate to Home Setup Network Status Signal...

Страница 52: ...nel navigate to Home Setup Network Status IP Address then press 2 IP Address is displayed on the screen The XXX XXX XXX XXX represents the IP Address of your unit Network Status Connection Signal ality Security Back Select IP Address IP Address XXX XXX XXX XXX Back MAC Address You can confirm the printer s MAC Address 1 From the Control panel navigate to Home Setup Network Status MAC Address then ...

Страница 53: ... and Password Enter Password a b c d e f g h i j k l m n o p q r s t u v w x y z a A 1 Done Network and Password XXXXXXXXXXXXX a b c d e f g h i j k l m n o p q r s t u v w x y z a A 1 Done Network and Password SSID XXXXXXX Password XXXXXXXXXXXXX Back Continue 6 Connected to message will appear on the Menu display when the connection is successful Press then the connection setting is completed Net...

Страница 54: ...Fi Setup IP Address then press 2 Press to select Auto or Manual then press Auto DHCP Dynamic Host Configuration Protocol mode It s easy to Automatically get the IP address of this unit from the Network Manual Static mode Set the Network address manually 3 If you select Manual set the items below IP Address Subnet Mask Gateway DNS Press to select IP Address Subnet Mask Gateway or DNS then press Set...

Страница 55: ...er numbers only When you enter a wrong number then you can erase it by pressing After entering the Proxy Port press to select Done then press Proxy Enter Proxy Port 1 2 3 4 5 6 7 8 9 0 Done Host Name 1 From the Control panel navigate to Home Setup Wi Fi Setup Host Name then press 2 The Host Name is displayed on the screen If you would like to change it press 3 Enter Host Name Press to select lette...

Страница 56: ... 3 Press to confirm If you would like to change the chosen Language press to return to the Device Setup screen Device Setup Sleep 10min Privacy Se ings Paper Warning Back Select Language English Language Select Español Français Cancel Select English Language Select You have chosen English as the language for your printer Cancel Sleep Set time before the printer goes to sleep 1 From the Control pan...

Страница 57: ...gate to Home Setup Device Setup Paper Warning then press 2 Paper Warning has 2 setup items Press to select Paper Detection or PaperSettingMismatch then press Device Setup Language English Sleep 10min Privacy Se ings Back Select Paper Warning Paper Warning Paper Se ing Mismatch Back Select Paper Detection Paper Detection 1 Press to select Yes or No then press Paper Detection Detect paper insertion ...

Страница 58: ...r registration status and unit name will be shown on the Menu display The VeriteC6 XXXX represents the unit name of your unit 3 Press to return to the previous menu Google Cloud Print Register Enable Disable Back Select Status Google Cloud Print Status Not Configured VeriteC6 XXXX Back The following table shows the Google Cloud Print service registration and connection status of this unit Status U...

Страница 59: ... will be unavailable after 15 minutes Google Cloud Print Status Enable Disable Back Select Register GCP Registration Registering printer with Google Cancel Registration URL GCP Registration Registration in progress Waiting for access to URL Cancel GCP Registration Cloud Printer Mail address xxxxxxx x gmail com VeriteC6 XXXX Enable Disable to Google Cloud Print 1 From the Control panel navigate to ...

Страница 60: ...ctory Default All of the unit settings will be reset to the Factory Default 1 From the Control panel navigate to Home Setup Restore Factory Default then press 2 Press 3 Press If you choose Yes all settings will be restored to factory defaults and the unit will restart If you choose No the display will return to Setup screen Setup AirPrint Google Cloud Print Print Reports Back Select Restore Factor...

Страница 61: ...off the printer until update is completed Select So ware Update Are you sure you want to update Yes No Manual Update Manually checks for a newer software version and updates when available 1 From the Control panel navigate to Home Setup SoftwareUpdate then press 2 If the latest Software Version is found on the server the message Do you want to update will be displayed Press 3 Press 4 Select Yes the...

Страница 62: ...Status Installed CartridgeType XXL InkLevel 43 CartridgeStatus Installed CartridgeType XXL InkLevel 75 Language English DefaultPaperSize Letter DefaultPaperType Plain SleepTime out 10min EWSAccessPath http xxx xxx xxx xxx 㸸 㸸 Color Cartridge Black Cartridge Device Information Device Statistics Information Supply Information Device Configuration Network Information EWS Access Path Unit s IP address...

Страница 63: ...e state of the Network If you are not familiar with Network management use the default settings Note s Be careful if you want to assign the IP address manually If the IP address you entered is not correct you will not be able to connect to the unit When you cannot connect to the unit after a configuration change please reset the unit to the factory default Refer to Restore Factory Default on page ...

Страница 64: ...t on page 28 for more information Note s When you select Certificate Installation or Generate Certificate Request you can set the encrypted communication AirPrint Configuration You can turn On Off the AirPrint function If set to On you can print using the AirPrint The printer name Friendly Name and its information are displayed when you are using AirPrint Google Cloud Print You can set the Google ...

Страница 65: ...n ensure plain Letter or A4 size paper is loaded Order Supplies If you would like to purchase consumable material visit the following website at www kodakverite com support Software Update If the Software Update for this unit is available the Update button is displayed Click it and start to update the Software When the Software is the latest version the Update button is not displayed Login Passwor...

Страница 66: ...he unit Observe Packaging Instructions Follow the instructions on the packaging of the consumable materials 1 Open the unit by lifting the Ink door DO NOT Open During a Print Job Never open the Ink door while printing 1 2 2 Press front side blue Cartridge tab with 2 fingers to open the Cartridge slot Press Press 3 Remove the cartridges Slid e Slid e Slid e Slid e Slid e Slid e Color Black 4 Remove...

Страница 67: ...reen Cartridge tab to close the slot until the cover snaps securely into position Click Click 9 Close the Ink door CAUTION Ink Cartridge Not Inserted Correctly If the Ink door does not close properly the Ink cartridges are not inserted correctly Remove the Ink cartridges and then correctly insert them again CLOSE use only GREEN part OPEN use only BLUE part Green Blue DO NOT PUSH the green blue par...

Страница 68: ...rtridges KODAK VERITÉ Ink Cartridges are designed to perform for superior print quality and our inks are formulated to work with the unit and help extend the life of your product We recommend that you use only genuine KODAK VERITÉ Ink Cartridges sold by Funai Corporation Inc Funai s warranty does not cover damage caused by non KODAK VERITÉ Ink or Ink Cartridges Fixing a paper material jam Clearing...

Страница 69: ...some of your Ink from the Cartridges 7 Print the document again to verify that the print quality has improved Cleaning the ink cartridge nozzles and contacts 1 Remove the ink cartridge s 2 Dampen a clean lint free soft cloth with distilled water and then place the cloth on a flat surface 3 Gently dip the nozzles against the cloth and get rid of the debris on the nozzles e g KODAK VERITÉ 5 XL Color...

Страница 70: ...lugged from the AC outlet SHOCK HAZARD To avoid the risk of electric shock disconnect the AC Power cord from the AC outlet and disconnect all cables to the unit before proceeding 2 Remove paper from the Top tray and paper exit tray 3 Dampen a clean lint free soft cloth with water CAUTION Warning Potential Damage DO NOT use household cleaners or detergents as they may damage the finish on the unit ...

Страница 71: ...ling the Software Make sure your operating system is supported The following operating systems are supported Microsoft Windows Windows 10 Windows Server 2012 Windows 8 1 Windows Server 2008 Windows 8 Windows Vista Windows 7 Apple Mac OS Safari Windows Server 2016 OS Version Processor Browser USB port OS Version Processor Browser USB port 32 bit x86 or 64 bit x64 Microsoft Edge Only Windows 10 Inte...

Страница 72: ...uble click the Icon for your unit or right click the Icon for your unit and select see what s printing to open the print queue 3 On the menu make sure there are no check marks next to Pause Printing or Use Printer Offline 4 If you made any changes try to print again If a check mark does not appear next to Set As Default Printer then you must select the unit for each file that you want to print Dis...

Страница 73: ...tions on your PC screen to remove the printer Software 4 Restart the PC before Reinstalling the printer Software 5 Click Cancel on all New Hardware Found screens 6 From your PC go to www kodakverite com support and confirm that the DOWNLOADS is selected 7 Select the model number of your unit from SELECT PRINTER 8 Click PC drivers and software 9 Click OS you use 10 Click download from LAST Refer to...

Страница 74: ... date driver manuals the latest FAQs and troubleshooting tips Visit our website at www kodakverite com support Alignment problems If the following message is displayed on the LCD during alignment make sure whether the alignment pattern is a printing failure or not Cartridge Setup Test scan failed Place test print on lower right corner of scanner and close lid Back Scan If the message is displayed ...

Страница 75: ...llow the procedures by showing the help text on your connected unit If this error occurs occasionally refer to the latest troubleshooting by visiting our website at www kodakverite com support If you cannot solve the problem disconnect the AC plug and contact an Authorized Service Center Load paper Insert Paper Please insert paper into the top tray and press Cancel Start blinks as pattern 1 Insert...

Страница 76: ...ridge can not be detected Cartridge Error Please check ink cartridge lock Press to retry blinks as pattern 1 An ink cartridge is not installed correctly If the protective paper is stuck in the Ink door remove it Reinstall the cartridge then close the Ink door completely Confirm the ink cartridge is correctly installed then press Unpack on page 12 Install ink cartridges on page 13 Changing the ink ...

Страница 77: ...ge 66 Both ink cartridges are not installed correctly Cartridge Error Remove and re insert both black and color ink blinks as pattern 1 Soiled or unsupported ink cartridge s has been inserted Clean the surface of the contacts on the Ink cartridge s with a dry soft cloth Replace the current Ink cartridge s with an authorized Ink cartridge s If this error occurs occasionally try to replace the curre...

Страница 78: ...k cartridges blinks as pattern 1 Ink cartridges error Clean the surface of the contacts on the Ink cartridges with a dry soft cloth Replace the current Ink cartridges with authorized Ink cartridges If this error occurs occasionally try to replace the current Ink cartridges with new Ink cartridges Cleaning the ink cartridge nozzles and contacts on page 69 Changing the ink cartridge on page 66 Ink e...

Страница 79: ...ress If you want to use both Ink cartridges please replace with a new Black Ink cartridge No color ink cartridge detected Color Ink Missing Printing in mono only mode Color ink is not inserted You get good printed results with Mono mode when you make prints in this condition and the warning indication continues until you press If you want to use both Ink cartridges please replace with a new Color ...

Страница 80: ...k is empty in the ink cartridge You get good printed results with Color mode in this condition If you want to use both Ink cartridges please cancel the print job then press and replace with a new Black Ink cartridge Changing the ink cartridge on page 66 Color ink is empty Print Printing Color Ink Empty Cancel Color ink is empty in the ink cartridge You get good printed results with Mono mode in th...

Страница 81: ... 1 Memory is full in the unit You cannot print the multiple copies with this print setting Please change the print setting and try again Resolution Size or Number of copies Confirming Printing Preferences for Windows Page Layouts on page 36 or Confirming Print Settings for Mac Layout on page 38 Confirming Printing Preferences for Windows Print Quality on page 35 or Confirming Print Settings for Ma...

Страница 82: ...tion on the device Wi Fi Module Failure Wi Fi Module Failure Unplug and replug the power cable It may be resolved and blink as pattern 1 Pull out the AC plug Waitatleast30seconds thenreconnecttheAC plug back into the socket If this error occurs occasionally visit our website at www kodakverite com support for the latest troubleshooting If you cannot solve the problem disconnect the AC plug and con...

Страница 83: ... 5 Cleaning the ink cartridge nozzles and contacts Refer to Cleaning the ink cartridge nozzles and contacts on page 69 6 Cleaning the scanner glass Copy function Refer to Cleaning the scanner glass on page 70 7 Cleaning the exterior of the unit Refer to Cleaning the exterior of the unit on page 70 8 Please change to the higher quality mode Faint or White lines Refer to Confirming Printing Preferen...

Страница 84: ...200 x 1200 dpi Up to 19 200 x 19 200 dpi Maximum scan area 8 5 x 11 7 in 216 x 297 mm Supported file types JPEG PDF Paper Input capacity Plain paper 20 lb or 75 g m2 Up to 60 Top tray Photo Paper 4x6 in Up to 10 Photo tray Output capacity Plain paper 20 lb or 75 g m2 Up to 25 Size Letter Legal JIS B5 A4 Executive A5 Statement A6 3x5 in 4x6 in 5x7 in Hagaki 3 5x5 in L 10 Envelope DL Envelope C5 Env...

Страница 85: ...er Currency Bank notes travel checks payment orders Postage stamps tax stamps stamped or unstamped Loan papers certificates of deposit bonds Documents protected by copyright Neither Funai nor its affiliates shall be liable to the purchaser of this product or third parties for damages losses costs or expenses incurred by the purchaser or third parties as a result of accident misuse or abuse of this...

Страница 86: ...ts from accident misuse abuse mishandling misapplication alteration faulty installation improper maintenance commercial use such as hotel rental or office use of this product or damage which results from fire flood lightning or other acts of God THISWARRANTYDOESNOTCOVERPACKINGMATERIALS ANYACCESSORIES ANYCOSMETICPARTS COMPLETEASSEMBLY PARTS DEMO OR FLOOR MODELS FUNAI AND ITS REPRESENTATIVES OR AGEN...

Страница 87: ...The Kodak trademark logo and trade dress are used under license from Kodak www kodakverite com 2017 Funai Electric Co Ltd All rights reserved ...

Отзывы: