background image

10

ASSEMBLY INSTRUCTIONS

d.  Rotate the nozzle until it is aligned with the 

handle and pointing down, ready for use.

e.  Pull the spray wand to be certain it is properly 

secured.

f.   Place the assembled handle with lock-on 

trigger into the handle storage area in the 

carrying handle.

3.  Attaching the Hose
To attach the hose to the tank:

a.  Insert the hose end into the opening on the 

tank (E).

b.  Slide the nut over the opening and hose end. 

Hand tighten. Do not overtighten. 

c.  Make sure the connection is secure.

To attach the hose to the handle:

a.  Insert the hose end into the opening on the 

handle with lock-on trigger (I). 

b.  Slide the nut over the hose and end cap. Hand 

tighten. Do not overtighten.

c.  Make sure the connection is secure.

2b

Cap

3a

Nut

3b

Nut

Содержание 1774924

Страница 1: ...returning to your retailer call our customer service department at 1 888 3KOBALT 1 888 356 2258 8 a m 8 p m EST Monday Sunday ATTACH YOUR RECEIPT HERE Serial Number Purchase Date Español p 15 ITEM 1774924 1930594 CHEMICAL SPRAYER MODEL KSP 1024B 03 ...

Страница 2: ... Preparation 8 Assembly Instructions 9 Operating Instructions 11 Care and Maintenance 13 Troubleshooting 13 Warranty 14 PRODUCT SPECIFICATIONS COMPONENT SPECIFICATION Rated power input 24V d c Tank Capacity 2 gals Recommended tank for this sprayer PART NAME MODEL NUMBER Tank KSPA 124 03 ...

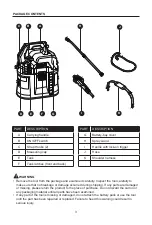
Страница 3: ... and examine it carefully Inspect the tool carefully to make sure that no breakage or damage occurred during shipping If any parts are damaged or missing please return the product to the place of purchase Do not discard the carton or any packaging material until all parts have been examined If any part of the tool is missing or damaged do not attach the battery pack or use the tool until the part ...

Страница 4: ... including lead known to the State of California to cause cancer birth defects or other reproductive harm Wash hands after handling Some spray created from products used with the sprayer contains chemicals known to the State of California to cause cancer birth defect of other reproductive harm Some examples of these chemicals are Compounds in fertilizers Compounds in insecticides herbicides and pe...

Страница 5: ...IS PRODUCT WARNING To reduce risk of fire electric shock or injury Know your chemical sprayer Read the instruction manual carefully Learn the chemical sprayer s applications and limitations as well as the specific potential hazards related to this sprayer Following this rule will reduce the risk of electric shock fire or serious injury Work Area Safety Keep work area clean and well lit Cluttered o...

Страница 6: ...t collection can reduce dust related hazards Do not let familiarity gained from frequent use of tools allow you to become complacent and ignore tool safety principles A careless action can cause severe injury within a faction of a second Use and Care Do not force the power tool Use the correct appliance for your application The correct appliance will do the job better and safer at the rate for whi...

Страница 7: ...e a battery pack or appliance to fire or excessive temperature Exposure to fire or temperature above 130 C may cause explosion Follow all charging instructions and do not charge the battery pack or appliance outside the temperature range specified in the instructions Charging improperly or at temperatures outside the specified range may damage the battery and increase the risk of fire Service Have...

Страница 8: ...hemicals If exposed flush with water immediately For a portable appliance To reduce the risk of electrical shock do not put the appliance in water or other liquid Do not place or store appliance where it can fall or be pulled into a tub or sink Save these instructions Refer to them frequently and use them to instruct others who may use this tool If you loan this tool to someone else also loan thes...

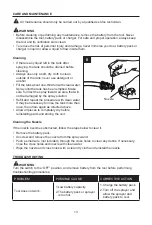
Страница 9: ... Detach Battery Pack a Make sure that the ON OFF switch B is in OFF position b Press the battery release buttons to release the battery pack c Pull backward on the battery pack to remove it from the tool WARNING Battery tools are always in operating condition Therefore the ON OFF switch should always in OFF position when the tool is not in use or when carrying the tool at your side Battery Pack Pr...

Страница 10: ... handle 3 Attaching the Hose To attach the hose to the tank a Insert the hose end into the opening on the tank E b Slide the nut over the opening and hose end Hand tighten Do not overtighten c Make sure the connection is secure To attach the hose to the handle a Insert the hose end into the opening on the handle with lock on trigger I b Slide the nut over the hose and end cap Hand tighten Do not o...

Страница 11: ...l to fill the tank be sure to thoroughly clean and rinse these items after use If premixing the spray solution rinse the container used for mixing NOTICE It is important to thoroughly clean the unit after each use Allowing liquid to remain in an idle tool for an extended period may cause its moving pieces and connectors to seize up 5 To Start Stop the Sprayer a To turn the sprayer ON press the ON ...

Страница 12: ...NOTE Make sure to stand far enough from the object being sprayed to prevent the spray from splashing back onto you e Depress the trigger to start the spray f Release the trigger to stop the spray g Always empty clean and drain the tank after every use as directed in the Maintenance section Operating Tips Never point the spray end of the wand at yourself or others Avoid spraying on windy days Spray...

Страница 13: ... will not be damaged by the spray solution Refill and repeat the procedure with clean water It may be necessary to rinse the tank more than once then drain again as directed above Allow all pieces to completely dry before reinstalling parts and storing the unit Cleaning the Nozzle If the nozzle becomes obstructed follow the steps below to clear it Remove the battery pack Unscrew and remove the noz...

Страница 14: ...dable parts and accessories expected to become unusable after a reasonable period of use This warranty is limited to 90 days for commercial and rental use If you think your product meets the above guarantee criteria please return it to the place of purchase with valid proof of purchase and the defective product will be repaired or replaced at no charge This guarantee gives you specific legal right...

Страница 15: ...enda llame a nuestro Departamento de Servicio al Cliente al 1 888 3KOBALT 1 888 356 2258 de lunes a domingo de 8 a m a 8 p m hora estándar del Este ADJUNTE SU RECIBO AQUÍ Número de serie Fecha de compra ITEM 1774924 1930594 PRODUCTO QUÍMICO ROCIADOR MODELO KSP 1024B 03 ...

Страница 16: ...blaje 23 Instrucciones de funcionamiento 25 Cuidado y mantenimiento 27 Solución de problemas 27 Garantía 28 ESPECIFICACIONES DEL PRODUCTO COMPONENTE ESPECIFICACIONES Entrada de alimentación calificada 24V CC Capacidad del tanque 7 57 litros Tanque recomendado para este rociador NOMBRE DE LA PIEZA NÚMERO DEL MODELO Tanque KSPA 124 03 ...

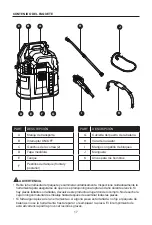
Страница 17: ...l paquete y examínela cuidadosamente Inspeccione cuidadosamente la herramienta para asegurarse de que no se produjo ninguna ruptura o daño durante el envío Si hay piezas faltantes o dañadas devuelva este producto al lugar donde lo compró No deseche la caja ni ningún material de embalaje hasta después de examinar todas las piezas Si falta alguna pieza de la herramienta o si alguna pieza está dañada...

Страница 18: ...idos por el estado de California como causantes de cáncer defectos congénitos u otros daños en el aparato reproductivo Lávese las manos después de manipularlo Cierto material de rociado creado a partir de los productos que se utilizan con el rociador contiene productos químicos reconocidos por el estado de California como causantes de cáncer defectos congénitos u otros daños en el aparato reproduc...

Страница 19: ...dor de productos químicos Lea atentamente el manual de instrucciones Conozca las aplicaciones y las limitaciones del rociador de productos químicos como así también los posibles peligros específicos relacionados con este rociador Al seguir esta norma se disminuirá el riesgo de descargas eléctricas incendios o lesiones graves Seguridad en el área de trabajo Mantenga el área de trabajo limpia y bien...

Страница 20: ...porcionan dispositivos para la conexión de equipos de extracción y recolección de polvo asegúrese de que se conecten y se usen debidamente La recolección de polvo puede disminuir los peligros relacionados con el polvo No permita que la familiaridad obtenida por el uso frecuente de herramientas ocasione el descuido y olvido de los principios de seguridad en el manejo de herramientas Un descuido pue...

Страница 21: ...la batería puede provocar irritación o quemaduras No utilice un paquete de baterías ni el electrodoméstico si están dañados o modificados Las baterías dañadas o modificadas pueden mostrar una conducta impredecible que podría provocar incendios explosiones o riesgo de lesiones No exponga el paquete de baterías ni el electrodoméstico al fuego o a una temperatura excesiva La exposición al fuego o a l...

Страница 22: ... piloto Para reducir el riesgo de lesiones personales graves nunca utilice un producto inalámbrico en la presencia de una llama abierta La explosión de una batería puede lanzar desechos y productos químicos Si se expone enjuague inmediatamente con agua Para un electrodoméstico portátil para reducir el riesgo de descarga eléctrica no sumerja el electrodoméstico en agua o en ningún otro líquido No c...

Страница 23: ...egúrese de que el interruptor ON OFF ENCENDIDO APAGADO B esté en la posición OFF APAGADO b Presione los botones de liberación de la batería para liberar el paquete de baterías c Jale el paquete de baterías hacia atrás para retirarlo de la herramienta ADVERTENCIA Las herramientas con batería siempre están en condiciones de operación Por lo tanto el interruptor ON OFF ENCENDIDO APAGADO debe estar si...

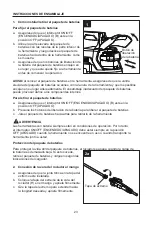
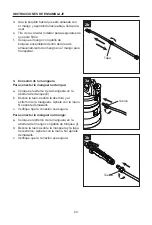
Страница 24: ...guera Para conectar la manguera al tanque a Coloque el extremo de la manguera en la abertura del tanque E b Deslice la tuerca sobre la abertura y el extremo de la manguera Apriete con la mano No apriete demasiado c Verifique que la conexión sea segura Para conectar la manguera al mango a Coloque el extremo de la manguera en la abertura del mango con gatillo de bloqueo I b Deslice la tuerca sobre l...

Страница 25: ...e limpiar y enjuagar completamente estos artículos después de usarlos Si mezcla previamente la solución de rociado enjuague el recipiente que usó para mezclar AVISO es importante limpiar completamente la unidad después de cada uso Dejar que el líquido permanezca en una herramienta que no está en uso durante un periodo prolongado puede causar que las piezas móviles y conectores se dañen 5 Para ence...

Страница 26: ...nte a las plantas u objetos que desea rociar NOTA asegúrese de estar lo suficientemente alejado del objeto que se está rociando para evitar salpicarse e Presione el gatillo para encender el rociador f Suelte el gatillo para detener el rociador g Siempre vacíe limpie y drene el tanque después de cada uso como se indica en la sección de mantenimiento Consejos para la operación Nunca apunte el extrem...

Страница 27: ...edimiento con agua limpia Es posible que necesite enjuagar el tanque más de una vez y luego volver a drenar como se indica anteriormente Deje que todas las piezas se sequen por completo antes de volver a instalarlas y almacenar la unidad Limpieza de la boquilla Si la boquilla se obstruye siga los pasos a continuación para limpiarla Retire el paquete de baterías Desenrosque y retire la boquilla de ...

Страница 28: ...as o accesorios desechables cuya inutilidad es esperable después de un período de uso razonable Esta garantía está limitada a 90 días para uso comercial y de alquiler Si cree que este producto cumple con la garantía mencionada anteriormente devuelva el producto al lugar donde lo compró con un comprobante de compra válido y el producto defectuoso se reparará o reemplazará sin cargo Esta garantía le...

Отзывы: