


Overpressure protection .27
Installation Instructions FK 1100
KNF Flodos 178057_MA_FK1100_EN_00.docx
18
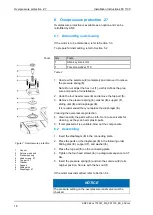
Figure 7: Overpressure protection
6 Overpressure protection .27
Overpressure protection is available as an option and can be
retrofitted by KNF.
6.1 Dismantling and cleaning
If the motor is to be dismantled, refer to Section 5.3.
To prepare for dismantling, refer to Section 5.2.
Qty
Tools
1
Allen key size 4mm
1
Torx screwdriver T10
Table 2
1. Unscrew the setscrew (
2
) completely and remove it to relieve
the pressure spring (
3
).
Note: Do not adjust the hex nut (
1
), as this defines the pres-
sure and position for installation.
2. Undo the four head screws (
4
) and remove the top part (
5
).
3. Remove the pressure spring (
3
), washer (
6
), support (
7
),
sliding disk (
8
), and diaphragm (
9
).
It is recommended that you replace the diaphragm (
9
).
Cleaning the overpressure protection
4. Clean and dry the parts with a cloth. Do not use solvents for
cleaning, as they can harm plastic parts.
5. If compressed air is available, blow out the components.
6.2 Assembling
1. Insert the diaphragm (
9
) in the connecting plate.
2. Place the parts on the diaphragm (
9
) in the following order.
Sliding disk (
8
), support (
7
), and washer (
6
).
3. Place the top part (
5
) on the connecting plate.
4. Tighten the four head screws (
4
) in a diagonal sequence to 0.7
Nm.
5. Insert the pressure spring (
3
) and turn the setscrew (
2
) to its
original position. Secure with the hex nut (
1
).
If the motor was dismantled, refer to Section 5.4.
NOTICE
The pressure setting on the overpressure relief valve must be
checked.
Tools
1
Hex nut
2
Setscrew with bolt
3
Pressure spring
4
Head screws .27
5
Top part .27
6
Washer
7
Support
8
Sliding disk
9
Diaphragm .27
Содержание FK 1100
Страница 2: ......
Страница 22: ...www knf com ...


