background image

three-speaker stereo array. It provides the full range bass
response of the Klipschorn with sensitivity and output
approaching the fully horn-loaded models. Like the Heresy, the
Cornwall is a three-way design utilizing horn-loaded compres-
sion drivers for midrange and treble frequencies and a direct
radiating 15-inch woofer for the low frequencies.

HERESY III

First introduced in 1957, the Heresy started life as a compact
center channel speaker for the Klipschorn in three-speaker
stereo arrays. The Heresy is a compact, three-way design that
uses horn-loaded compression drivers for midrange and treble
reproduction and a direct radiating 12-inch woofer for the low
frequencies.

UNPACKING & ASSEMBLY

Heresy III and Cornwall III

The Heresy III and Cornwall III models are large, heavy speak-
ers. It is recommended that two people unpack and install
these models. Open the top carton flaps, invert the carton and
pull it up and off of the speaker. Remove the internal packing
and save for future use.

Klipschorn and LaScala II

The Klipschorn and La Scala II low and high frequency
cabinets are shipped in two separate cartons. These are large,
heavy speakers. Unpacking and setup will require two people.

The Klipschorn and LaScala II high and low frequency
cabinets are matched by serial number for proper
acoustic performance. Please take care to match upper
and lower cabinet serial numbers when assembling these
loudspeakers.

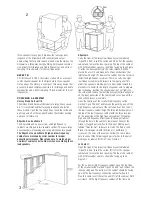
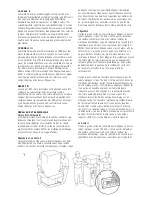
Klipschorn

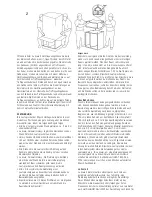
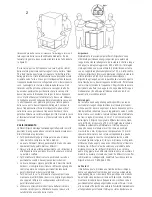
Open the flaps of the larger low frequency carton labeled
“Open This End”, invert the carton and lift it off of the speaker
cabinet and remove the inner packing. The top of the cabinet,
with its three rubber spacers, should be facing up (See Figure
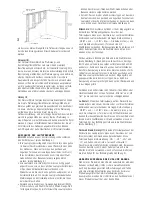
1). Slide the bass cabinet into the corner where it will be
placed for a test fit and make note of any obstructions that
interfere with a tight fit. Remove the cabinet from the corner to
install the high frequency cabinet. Position the speaker near,
but not tight into, the corner and remove the low frequency
grille (two wing nuts) on the input panel side of the cabinet
and set aside until the connection process is complete.

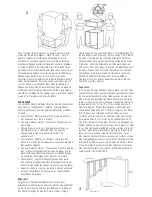
Open the top flaps of the smaller high frequency carton
marked “Open This End” and remove the packing pad. Lift the
high frequency cabinet out of the carton and set it on top of
the low frequency cabinet. Align the three rubber bumpers on
the top of the low frequency cabinet with the three recesses
on the underside of the high frequency cabinet. Thread the
high and mid frequency driver leads in the upper cabinet
through the hole in the cabinet’s lower panel. Connect the
Green (+) tagged pair of wires to the pair of binding posts
labeled “Tweeter Out.” Take care to match the Red (+) and
Black (-) binding posts with the Green (+) and Black (-)
sleeves on the ends of these wires. Follow this same proce-
dure to connect the Yellow tagged pair of wires to the pair of
binding posts labeled “Mid Out.” (See Figure 5.) 

La Scala II

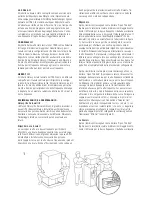
Open the flaps of the larger low frequency carton labeled
“Open This End.” Invert the carton, lift it off of the speaker
cabinet and remove the inner packing. The top of the cabinet,
with its three rubber spacers, should be facing up (See 
Figure 2).

For the La Scala II high frequency cabinet, open the top flaps
of the smaller carton marked “Open This End,” and remove the
inner packing pad. The bottom of the cabinet should be facing
up with the low frequency connection cable attached to it. Free
this cable, invert the carton and lift it off the cabinet. With
assistance, lift the high frequency cabinet off the floor and
place it on top of the low frequency cabinet while placing the
low frequency cable toward the rear and out the gap between
the cabinets. Align the recesses on the bottom surface of the
high frequency cabinet with the rubber bumpers on the top of
the low frequency cabinet. Connect the low frequency cable to
the two screw barrier strip on the rear of the low frequency
cabinet. Be sure to observe proper polarity by connecting the
wire with the Red Indicator to the terminal with the Red mark-
ing and the wire with the Black indicator to the other terminal.

PLACEMENT

Your Klipsch Heritage loudspeakers will perform well in a 
variety of locations but best results will be achieved using the
following general guidelines:
•  All: Place on a common wall 6 to 15 feet apart.
•  La Scala, Cornwall, Heresy: Position them equidistant from 

the wall behind the speakers.

•  Heresy: Equidistant height above the floor with the high 

frequency drivers at seated ear height if wall or cabinet 
mounted.

1

Содержание Klipschorn

Страница 1: ... Owner s Manual ...

Страница 2: ...ing Klipsch and we hope that your speakers bring life to your music and movies for many years PAUL W KLIPSCH The Klipsch Heritage loudspeakers are the direct result of the engineering design genius of Paul W Klipsch The technology incorporated into these loudspeakers is as valid today as it was in 1946 when Paul started Klipsch and Associates with the launch of the Klipschorn The founder of our co...

Страница 3: ...ncy carton marked Open This End and remove the packing pad Lift the high frequency cabinet out of the carton and set it on top of the low frequency cabinet Align the three rubber bumpers on the top of the low frequency cabinet with the three recesses on the underside of the high frequency cabinet Thread the high and mid frequency driver leads in the upper cabinet through the hole in the cabinet s ...

Страница 4: ...of any obstructions that interfere with a tight fit Remove the cabinet from the corner to install the high frequency cabinet There is a left and a right low frequency cabinet with respect to the input panel This allows the speaker s binding posts to be oriented toward the electronics to minimize the length of speaker wire In prepara tion for hookup position the speaker near but not tight into the ...

Страница 5: ...ance between speak ers Another solution to widely spaced Klipschorn loudspeakers in an audio only system is the addition of a center speaker such as the La Scala to create a three speaker stereo array Please contact Klipsch Technical Support at 1 800 554 7724 for connection details La Scala II The La Scala II features a self contained front firing folded bass horn to permit placement out of the co...

Страница 6: ...hor ized dealer from which you purchased this product If your dealer is not equipped to perform the repair of your KLIPSCH product it can be returned freight paid to KLIPSCH for repair Please call KLIPSCH at 1 800 KLIPSCH for instructions You will need to ship this product in either its original packaging or packaging affording an equal degree of protection Proof of purchase in the form of a bill ...

Страница 7: ...oduits Klipsch qui ont suivi Le pavillon permet aux enceintes d offrir une réponse à très haute sensibilité à large plage dynamique à faible distorsion à dispersion contrôlée et à réponse en fréquence uniforme Cela se traduit par une supériorité inégalée du son Klipsch au niveau de la puissance des détails et de la dynamique Afin que nous puissions mieux vous servir n oubliez pas de remplir la fic...

Страница 8: ...deux cartons distincts Ce sont des enceintes volumineuses et lourdes Deux personnes sont requises pour le déballage et l installation Les enceintes basse fréquence et haute fréquence des mod èles Klipschorn et La Scala II sont appairées par numéros de série pour l optimisation des performances acoustiques Lors de l assemblage de ces enceintes veillez à ce que les élé ments supérieur et inférieur a...

Страница 9: ... compenser les caractéristiques acoustiques de la pièce Klipschorn En général le meilleur fonctionnement des enceintes Klipschorn est obtenu lorsqu elles sont placées aux extrémités du mur le plus long d une pièce rectangulaire Si la pièce est très étroite et longue de plus de 5 5 à 6 mètres l image stéréo risque de ne pas être optimale Il est préférable que le rapport longueur sur largeur de la p...

Страница 10: ...e plus grosse section pour les grandes longueurs Les bornes de l enceinte permettent le raccordement de fils nus de cosses à fourche ou de fiches banane Attention Quel que soit le type de raccordement assurez vous de l absence de contact entre les polarités positive et négative au niveau de l enceinte et de l amplifi cateur afin que le matériel ne soit pas endommagé Voir la figure 4 Klipschorn Les...

Страница 11: ...un de ses composants Cette garantie ne couvre pas les dégâts résultant d une utilisa tion d un entretien ou d une installation incorrecte ou d une tentative de réparation par quiconque autre que KLIPSCH ou un détaillant KLIPSCH autorisé par KLIPSCH à effectuer une réparation sous garantie Toute réparation non autorisée annule la présente garantie Cette garantie ne couvre pas les produits vendus EN...

Страница 12: ...olgende Klipsch Produkt Horn Loading ermöglicht es Ihrem Lautsprecher eine hohe Empfindlichkeit einen großen Dynamikbereich eine niedrige Verzerrung einen ebenen Frequenzgang und ein breites Abstrahlverhalten zu bieten Dies führt zu unvergleichlicher Leistung Klangtreue und Dynamik eben den Merkmalen des Klipsch Sound Füllen Sie bitte die Garantiekarte auf der Rückseite dieses Handbuchs aus oder t...

Страница 13: ...derlich Die Tief und Hochfrequenzgehäuse für Klipschorn und La Scala II müssen in der Seriennummer übereinstimmen um eine optimale akustische Leistung sicherzustellen Überprüfen Sie beim Zusammenbau dieser Lautsprecher bitte die Seriennummern des oberen und unteren Gehäuses Klipschorn Öffnen Sie die Laschen des mit Open this End markierten größeren Tieffrequenzkartons drehen Sie den Karton um und ...

Страница 14: ...t Klipschorn Klipschorn Lautsprecher bieten meistens die beste Leistung wenn sie in den Ecken der langen Wand eines rechteckigen Raums platziert werden Wenn der Raum sehr schmal und lang ist und die Ecken mehr als 5 6 m voneinander entfernt sind leidet eventuell das Stereo Klangbild Ein Raum mit einem Längen Breiten Verhältnis von 1 00 zu 0 618 wäre am besten Zudem scheinen Klipschorn Lautsprecher...

Страница 15: ...en positiven und negativen Terminals am Lautsprecher bzw Verstärker vorhanden ist Ansonsten kann es zu Schäden am Gerät kommen Siehe Abbildung 4 Klipschorn Die Anschlüsse befinden sich am Eingangsfeld an der Seite des Tieffrequenzgehäuses Zwei der vier Terminalpaare dienen zum Anschluss der von Ihrem Verstärker kommenden Lautsprecherkabel Sie tragen die Bezeichnung HF IN und LF IN bzw Die beiden r...

Страница 16: ... un alto livel lo di sensitività un ampia gamma dinamica un basso livello di distorsione dispersione ampia e risposta in frequenza piatta generando così la potenza il dettaglio e la dinamica senza precedenti che contraddistinguono il Suono Klipsch Completare la scheda di garanzia sul retro di questo manuale oppure registrare il prodotto su Internet presso il sito www klipsch com per permetterci di...

Страница 17: ...e alte e basse frequenze dei modelli Klipschorn e La Scala II sono affissi numeri di serie corrispon denti per garantire le prestazioni audio corrette Durante l in stallazione dei diffusori verificare che i numeri di serie delle casse superiori e inferiori corrispondano Klipschorn Aprire i lembi contrassegnati con la dicitura Open This End Aprire questo lato della scatola di dimensioni maggiori co...

Страница 18: ...are il suono in base alle caratteristiche acustiche della stanza Klipschorn Normalmente le prestazioni dei diffusori Klipschorn sono ottimizzate posizionandoli negli angoli lungo la parete più lunga di una stanza rettangolare Se la stanza è stretta e lunga con angoli a distanza maggiore di 550 o 600 cm l immagine stereo potrebbe non essere ottimale È preferibile una stanza con un rapporto lunghezz...

Страница 19: ...he non si abbia alcun contatto tra i terminali positivo e negativo del diffusore o dell amplificatore Ciò potrebbe causare danni al dispositivo vedere la figura 4 Klipschorn i connettori sono nel pannello d ingresso sul lato della cassa per le basse frequenze Due delle quattro coppie di perni di collegamento vengono usati per collegare i cavi del diffusore provenienti dall amplificatore Sono contr...

Страница 20: ...olada e resposta de freqüência estável Isto resulta em potência nitidez e dinâmica inigualáveis as características que dis tinguem o Som da Klipsch Não deixe de preencher o cartão de garantia no verso deste manual ou on line no site www klipsch com para que possamos atendê lo melhor Mais uma vez obrigado por escolher a Klipsch Esperamos que as suas caixas acústicas tragam vida às suas músicas e fi...

Страница 21: ...or devem coincidir Klipschorn Abra os painéis da caixa de papelão maior da unidade de baixa freqüência marcados Open This End Abrir esta extremidade vire a caixa de papelão de ponta cabeça lev ante a da caixa acústica e retire o material de embalagem interno A parte superior da caixa com os três espaçadores de borracha deve estar voltada para cima ver a figura 1 Deslize a caixa de graves para o ca...

Страница 22: ...cústicas Klipschorn geralmente têm melhor desem penho quando posicionadas nos cantos de uma parede longa de um ambiente retangular Se o ambiente for muito estreito e longo com cantos a mais de 5 5 m 6 0 m de distância a reprodução estéreo pode não ser otimizada É preferível instalá las em um ambiente com proporção de 1 00 de com primento para 0 618 de largura Além disso as caixas acústi cas Klipsc...

Страница 23: ... conexão ou plugues tipo banana Cuidado Independente do tipo de conexão certifique se de que não haja contato entre os terminais positivo e negativo na caixa acústica e no amplificador pois isso pode causar danos ao equipamento Ver a figura 4 Klipschorn As conexões de entrada encontram se no painel de entrada na lateral da caixa de baixa freqüência Dois dos quatro pares de conectores são utilizado...

Страница 24: ...sello distintivo del Sonido Klipsch Llene la tarjeta de garantía que se encuentra al final de este manual o en línea en www klipsch com para que podamos atenderle mejor Nuevamente le agradecemos que haya escogido a Klipsch y esperamos que estos altavoces le den vida a su música y a sus películas durante muchos años PAUL W KLIPSCH Los altavoces Heritage de Klipsch son el resultado directo de la gen...

Страница 25: ...a hacia arriba para sep ararla de la caja de baja frecuencia y quite el material de empaquetado interno La parte de arriba de la caja con sus tres topes de goma debe estar hacia arriba Vea la Figura 1 Deslice la caja de baja frecuencia hasta la esquina en que la va a poner a fin de probarla y tomar nota de las obstrucciones que puedan interferir con un ajuste apretado Separe la caja de baja frecue...

Страница 26: ...iere colocación en esquina porque las paredes de la sala sirven para completar la trompeta de baja frecuen cia del altavoz Para lograr la extensión total de baja frecuen cia los Klipschorn deben ajustarse apretadamente contra las paredes en la esquina sin la interferencia de un rodapié o una guarnición y las superficies de las paredes deben extenderse por lo menos 25 pulgadas a partir de los lados...

Страница 27: ... que salen del amplificador Dicen Entrada de alta fre cuencia HF IN y y Entrada de baja frecuencia LF IN y Las terminales roja y negra están interconec tadas con puentes de cable Deje estos puentes en posición si va a hacer una conexión convencional de un solo cable y util ice cualquiera de los dos pares de terminales Quite estos puentes para la conexión de cableado doble opcional Vea la Figura 5 ...

Страница 28: ...Chinese ...

Страница 29: ...1 ...

Страница 30: ...2 3 ...

Страница 31: ......

Страница 32: ...Japanese ...

Страница 33: ...1 ...

Страница 34: ...2 3 ...

Страница 35: ......

Страница 36: ...FIGURE 4 ...

Страница 37: ...3502 Woodview Trace Suite 200 Indianapolis Indiana 46268 USA 1 800 KLIPSCH www klipsch com FIGURE 5 ...

Отзывы: