background image


RPTR-OBA/734 


Installation Manual 


REV: B (04/25/2022) 


3


Installation Overview 

3.1


Kit Layout & System Location(s) 

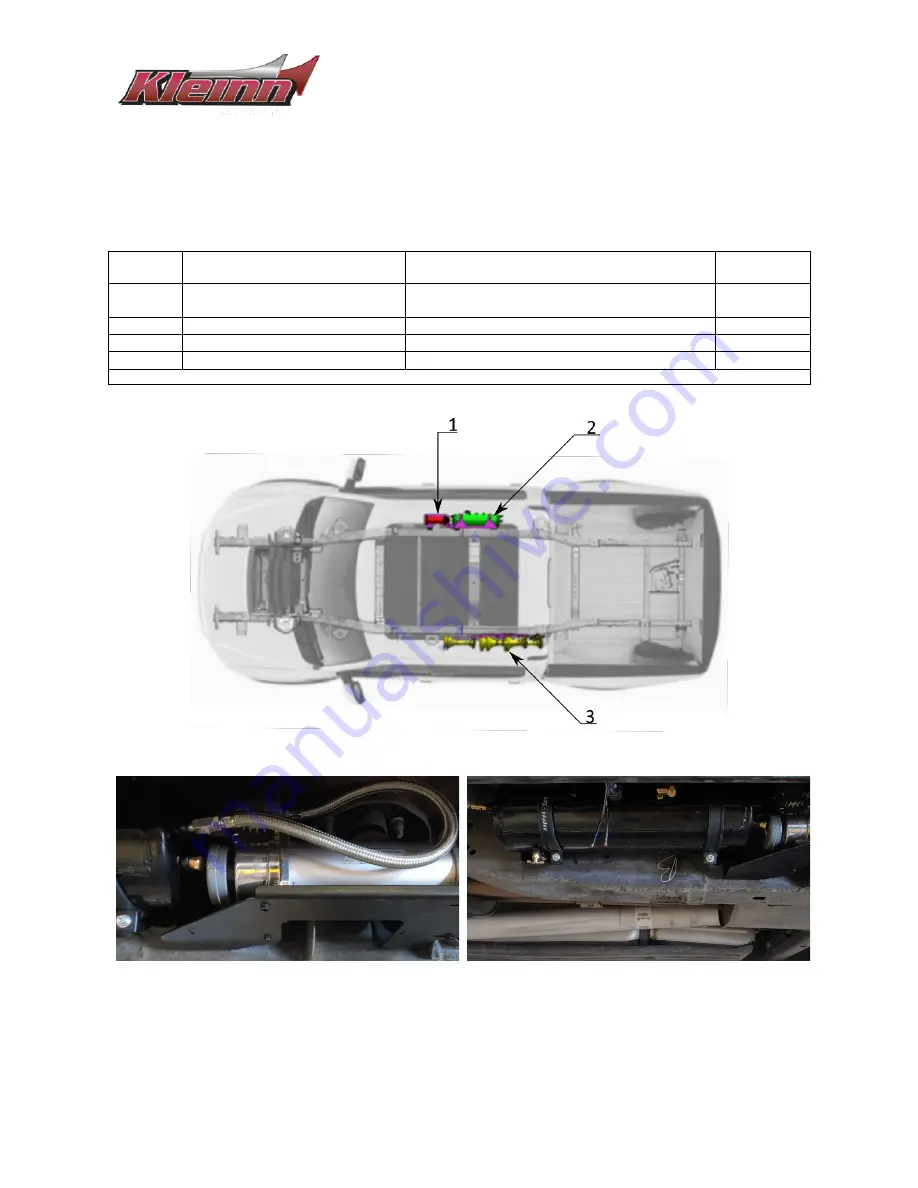
This kit consists of the following components, located on vehicle as follows: 

Item No. 

Component 

Vehicle Location 

Install Time 

(APPROXIMATE)


6450RC 150 PSI Waterproof 

Compressor 

Outer passenger side frame rail, in between 

front/rear door 

2+ Hours 

3 Gallon Air Tank 

Outer passenger side frame rail, under rear door 

2+ Hours 

Model 730 Demon Triple Train Horn 

Outer driver side frame rail, under rear door 

1-2 Hours 

  *4 

Remote Quick-Connect Coupler 

To be determined by installer 

Up to 1 Hour 

*Not Illustrated


Figure 1- Component Location Overhead View 


Figure 2- Compressor Installed 


Figure 3- Tank Installed 

Содержание RPTR-OBA/734

Страница 1: ...RPTR OBA 734 INSTALLATION MANUAL REV B 04 25 2022 Kleinn Air Horns 2021 All Rights Reserved PO Box 91278 Tucson AZ 85752 Phone 520 579 1531 Web https www kleinn com...

Страница 2: ...Standard Tool List Required 8 4 2 Special Tool List Recommended 8 4 3 Shop Consumables List Recommended 8 5 Parts List 9 5 1 Review Parts List 9 5 2 Pre Packaged Electromechanical Kit Items 9 5 3 Pneu...

Страница 3: ...7 5 Front Horn Bracket Installation 27 7 6 Rear Horn Bracket Installation 31 7 7 Air Horn Installation 34 8 Pneumatic Tubing Routing Plumbing 35 9 Electrical Wiring 36 10 Final Steps Testing 38 10 1 R...

Страница 4: ...arp vehicle parts Before starting obtain proper tools required to perform installation correctly adequate lighting eye protection hearing protection for operating train horns and hand protection to gu...

Страница 5: ...oughly review this manual to verify necessary mounting points and overall space exists At the discretion of end user installer included Brackets components may require modifications to attach to vehic...

Страница 6: ...C 150 PSI Waterproof Compressor Outer passenger side frame rail in between front rear door 2 Hours 2 3 Gallon Air Tank Outer passenger side frame rail under rear door 2 Hours 3 Model 730 Demon Triple...

Страница 7: ...ward tank bracket 7 Install the rear tank bracket 8 Install connect the tank compressor 9 Install the horn brackets if applicable 10 Install and plumb the air horns 11 Install and plumb the On board a...

Страница 8: ...ecommended 1 10 100 ft lbs torque wrench 2 20 150 in lbs torque wrench 3 Multi meter or 12V DC test light or equivalent 4 Trim panel tool for removing wiring and body clips when needed 4 3 Shop Consum...

Страница 9: ...Electromechanical Kit Items NOTE Items in this section come in their own packages and may include additional items inside package Item No Qty Part Number Description Picture 1 1 6450RC 150 PSI Air Co...

Страница 10: ...ion 11 1 2151 Pressure Switch NPT 12 10 ft 25014 Black Air Tubing 13 1 JUICE Kleinn Air Horn Juice Thread Sealant 5 4 Electrical Components Item No Qty Part Number Description Picture 14 1 320 Termina...

Страница 11: ...110 Compressor Bracket 19 2 RAPTOR 202 Tank Strap 20 2 RAPTOR 203 Nut Plate 21 1 RAPTOR 210 Rear Tank Bracket 22 1 RAPTOR 211 Front Tank Bracket 23 1 RAPTOR 310 Rear Horn Mount 24 1 RAPTOR 311 Front H...

Страница 12: ...age Bolt square neck 5 16 18 1 25 Long H6 1 Carriage Bolt knurled 5 16 18 1 Long H7 4 Lock Washer H8 15 Lock Washer 5 16 H9 4 Flat Washer 63 OD H10 15 Flat Washer 5 16 69 OD H11 4 Flat Washer 5 16 88...

Страница 13: ...17 Flat Washer M8 16mm OD H18 Compressor Mounting Hardware Assorted Included inside Horn Box Included inside Compressor Box 5 7 Special Parts Item No Qty Description Picture 25 2 Rubber Trim wide C 9...

Страница 14: ...y two drops of Item 13 JUICE to each male pipe thread before installation Hand tighten each fitting then further tighten to turn as necessary to match the fitting orientation shown in the below figure...

Страница 15: ...driver The black housing should be oriented as shown below Figure 7 Horn Solenoid Orientation 3 Install the supplied compression fitting onto the inlet port of the solenoid 6 2 Tank Brackets The foll...

Страница 16: ...04 25 2022 16 Figure 8 Rubber Trim Installation 6 2 2 Tank Strap Installation 1 Take hardware H1 H7 H9 and insert into the hole NOT SLOT of Item 19 tank strap in the stacking order shown below Figure...

Страница 17: ...2 4 Place hardware H1 H7 H9 in the stacking order above onto the slotted hole in the Tank strap form the strap to match the contour of the tank 5 As you form the strap align the fastener to the bottom...

Страница 18: ...dware H5 H8 H10 H13 onto bracket RAPTOR 310 as shown in the below figure Verify hardware stacking and install locations match the figure Figure 11 Rear Bracket Horn Driver Hardware Installation 6 3 2...

Страница 19: ...203 Qty 2 Item 22 RAPTOR 211 Item H2 Qty 2 Item H3 H8 H10 Qty 4 each 1 Thread H2 into RAPTOR 203 approximately halfway REF Below 2 Thread Qty 1 H3 approximately halfway into left or right hole of RAPT...

Страница 20: ...n below Note Ensure RAPTOR 203 holes are parallel to the floor and are not obstructed by the frame Figure 15 RAPTOR 203 Installation 5 Remove the H3 from both RAPTOR 203 s to be reused 6 Take Qty 2 of...

Страница 21: ...re 17 RAPTOR 110 Install 7 On rearmost RAPTOR 203 use the remaining H3 H8 H10 hardware in the same stacking order install RAPTOR 211 in between the frame RAPTOR 110 rear hole as shown below Figure 18...

Страница 22: ...used in this step Item 21 RAPTOR 210 Item H4 H8 H10 H11 H13 Qty 2 each Use the below stacking order for installation of the RAPTOR 210 bracket Figure 19 RAPTOR 210 Hardware Stacking Order 1 Locate th...

Страница 23: ...nce the following figure Figure 21 Example of Hardware Setup 3 Place RAPTOR 210 onto the H4 bolt and install the remaining hardware H10 H8 H13 onto the bolt and loosely fasten to allow the installatio...

Страница 24: ...the air filter media into the air filter housing 2 Install the air filter onto the inlet of the compressor Alternately you may install the air filter remotely using the instructions included in the c...

Страница 25: ...correct guide the air tank into position onto the tank brackets RAPTOR 210 211 beginning from the rear bracket maneuvering it towards the compressor Figure 26 Air Tank Install Orientation 2 Align the...

Страница 26: ...RPTR OBA 734 Installation Manual REV B 04 25 2022 26 Figure 27 Air Tank Installed Figure 28 Compressor Leader Hose Routed to Air Tank 5 Torque tank straps RAPTOR 202 s hardware to 37 in lbs...

Страница 27: ...t Figure 29_RAPTOR 311 Hardware Stacking Order Figure 30 RAPTOR 311 Optional Hardware Stacking Order Some vehicles will be equipped with a parking cable bracket in the install location If so the optio...

Страница 28: ...e noted Alternate additionally use the optional hardware listed at the beginning of this section Vehicles that DO NOT have the parking brake cable assembly skip Steps 2 3 2 Remove the bolt holding the...

Страница 29: ...hole to set it into place along the frame rail The 311 bracket should lie in between the vehicle frame the clip on nut as shown in the below figure a Alternate Slide H14 onto the frame rail lower brac...

Страница 30: ...into the square hole and orient the threads to face outside of the frame rail through the circular hole Reference the following figure Figure 34 RAPTOR 311 Upper Mounting Point Hardware Setup 7 Place...

Страница 31: ...installation of the RAPTOR 310 bracket Figure 36 RAPTOR 310 Hardware Stacking Order Frontmost Hole Left Rearmost Hole Right 1 Locate the RAPTOR 310 mounting holes on the driver side frame rail below...

Страница 32: ...32 3 Place RAPTOR 310 onto the frame through the H6 hardware using the lower rear mounting hole 4 Complete the hardware install per the above stacking order This step is shown in the below figure Figu...

Страница 33: ...ards of the frame rail through the circular hole as done in the previous step 6 Place RAPTOR 310 foremost mounting hole over the hardware and install H8 H10 H13 in the stacking order noted in the begi...

Страница 34: ...driver as shown below Figure 40 Air Horn Disassembly 2 Install the Drivers onto RAPTOR 310 311 brackets as shown below The drivers are installed by being slid in between the horn mounting hardware pr...

Страница 35: ...ng so debris does not enter the line while you are routing the tubing through the vehicle Use a heat gun to soften the ends of the air tubing to easily slide the tubing over the lip of compression fit...

Страница 36: ...electrical system consult vehicle owner s manual for further instruction Route connect the wiring electrical components as desired Use the below figure the following tips for routing installation PRE...

Страница 37: ...if installed until all electrical connections are complete system is ready to be tested The included push button can be installed in any location that has 1 of clearance behind the install surface A h...

Страница 38: ...fittings as needed 10 4 Test Train Horns 1 Allow the air compressor to run and shut off automatically i e air tank is full 2 Ensure all nearby persons have adequate hearing protection and provide cour...

Страница 39: ...ervals 1 Yearly or every 12 000 miles verify all mounting fasteners are properly torqued Applying witness marks across fasteners and mounting parts is good practice to quickly ensure fasteners have no...

Страница 40: ...rchasing our Air Horn Kit Shall you experience any unexpected problems during installation or have problems with any part at any time please contact Kleinn support END OF MANUAL Kleinn Air Horns 2021...

Отзывы: