www.klarstein.com
QUICKSTICK
SMART
Sous-vide-StickSous-vide StickVarilla Sous-videVariglia sous-videStick sous-vide
10035556
Страница 1: ...www klarstein com QUICKSTICK SMART Sous vide Stick Sous vide Stick Varilla Sous vide Variglia sous vide Stick sous vide 10035556...
Страница 2: ......
Страница 3: ...n bernehmen wir keine Haftung Scannen Sie den folgenden QR Code um Zugriff auf die aktuellste Bedienungsanleitung und weitere Informationen rund um das Produkt zu erhalten INHALTSVERZEICHNIS Technisch...
Страница 4: ...g 1200 W Minimale Temperatur 20 C Maximale Temperatur 95 C Temperatur Genauigkeit 1 Minimale Wassertiefe 1 1 cm Minimale Topf Beh ltergr e 10 L Maximale Topf Beh ltergr e 15 L Pumpen Umw lzmenge 8 5 L...
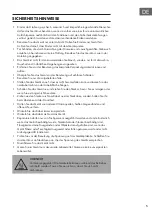
Страница 5: ...und lassen Sie das netzkabel nicht von der Arbeitsfl che h ngen Schalten Sie das Ger t aus und ziehen Sie den Stecker bevor Sie es reinigen oder wenn Sie es l nger nicht benutzen Ziehen sie den Steck...
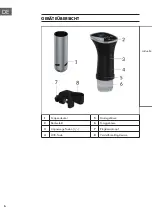
Страница 6: ...6 DE GER TE BERSICHT 1 Pumpendeckel 5 Motorgeh use 2 Bedienfeld 6 Pumpgeh use 3 Anpassungs Tasten 7 Ringklemmknopf 4 WiFi Taste 8 Verstellbare Ringklemme Aktuelle T T...
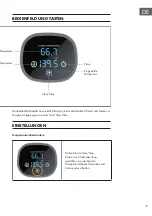
Страница 7: ...und Tasten zur Temperaturregelung sowie einer Start Stop Taste EINSTELLUNGEN Temperatureinheit ndern Halten Sie die Start Stop Taste etwa 3 Sekunden lang gedr ckt um zwischen den Temperatureinheiten F...
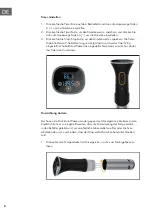
Страница 8: ...eigt damit an dass der Timer fertig eingestellt ist Sobald das Wasser die eingestellte Temperatur erreicht hat startet der Timer den Countdown Flussrichtung ndern Der Sous vide Stick kann Wasser im od...
Страница 9: ...t denen Ihres Thermometers bereinstimmen f hren Sie die folgenden Schritte durch um den Sous vide Stick neu zu kalibrieren 1 Bestimmen Sie die Differenz zwischen der Temperaturanzeige auf dem Sous vid...
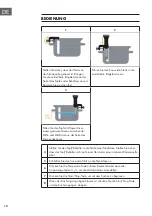
Страница 10: ...MAX Linie an der Seite des Pumpengeh uses 4 Stellen Sie den Topf Beh lter in die N he einer Steckdose Stellen Sie sicher dass der Topf Beh lter nicht auf einem Herd oder einer anderen W rmequelle ste...
Страница 11: ...ehe unten oder laden Sie diese direkt aus dem App Store oder bei Google Play herunter 2 Versichern Sie sich dass Ihr Smartphone mit demselben WLAN Netzwerk verbunden ist mit dem Ihr Klarstein Ger t ve...
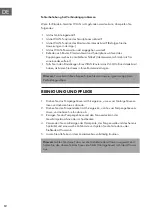
Страница 12: ...lungen Hinweis F r weitere Hilfestellungen folgen Sie den Anweisungen der App beim Verbindungsaufbau REINIGUNG UND PFLEGE 1 Drehen Sie das Pumpengeh use im Uhrzeigersinn um es vom Motorgeh use zu l se...
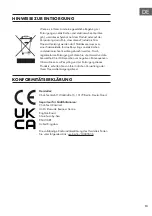
Страница 13: ...Durch regelkonforme Entsorgung sch tzen Sie die Umwelt und die Gesundheit Ihrer Mitmenschen vor negativen Konsequenzen Informationen zum Recycling und zur Entsorgung dieses Produkts erhalten Sie von...
Страница 14: ......
Страница 15: ...r damage caused by disregard of the instructions and improper use Scan the QR code to get access to the latest user manual and more product information CONTENT Technical Data 16 Safety Instructions 17...
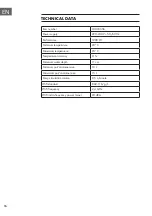
Страница 16: ...W Minimum temperature 20 C Maximum temperature 95 C Temperature accuracy 1 Minimum water depth 1 1 cm Minimum pot container size 10 L Maximum pot container size 15 L Pump circulation volume 8 5 L minu...
Страница 17: ...r the cord or any extension cord The appliance must not be used together with a timer switch or a separate remote control system Turn off the appliance and remove the plug from the socket before clean...
Страница 18: ...18 EN DEVICE OVERVIEW 1 Pump covers 5 Motor housing 2 Control panel 6 Pump housing 3 Adjustment keys 7 Ring terminal button 4 WiFi button 8 Adjustable ring clamp Current te Te...
Страница 19: ...a timer temperature control buttons and a start stop button SETTINGS Changing the temperature unit Press and hold the Start Stop button for about 3 seconds to toggle between the temperature units Fahr...
Страница 20: ...flash for about 3 seconds to indicate that the timer is set Once the water has reached the set temperature the timer will start the countdown Change flow direction The sous vide stick can circulate w...
Страница 21: ...ou want the readings on the stove to match those of your thermometer follow these steps to recalibrate the sous vide stick 1 Determine the difference between the temperature reading on the sous vide s...
Страница 22: ...level between the MIN and MAX lines on the side of the pump housing 4 Place the pot container near a power outlet Make sure that the pot container is not placed on a stove or other heat source 5 Conn...
Страница 23: ...with your smartphone see below or download it directly from App Store or Google Play 2 Make sure your smartphone is connected to the same WiFi network that your Klarstein device is to be connected to...
Страница 24: ...r wireless router activate it in your router settings Note For further help follow the instructions in the app when setting up the connection CLEANING AND CARE 1 Turn the pump housing clockwise to det...
Страница 25: ...the rules you are protecting the environment and the health of your fellow human beings from negative consequences For information about the recycling and disposal of this product please contact your...
Страница 26: ......
Страница 27: ...por un uso indebido del producto o por haber desatendido las indicaciones de seguridad Escanee el c digo QR para obtener acceso al manual de usuario m s reciente y otra informaci n sobre el producto...
Страница 28: ...nima 20 C Temperatura m xima 95 C Precisi n de temperatura 1 Profundidad m nima de agua 1 1 cm Tama o m nimo del recipiente olla 10 L Tama o m ximo del recipiente olla 15 L Capacidad de circulaci n de...
Страница 29: ...le de alimentaci n no quede colgando del borde de la encimera Apague el aparato y desconecte el enchufe de la toma de corriente antes de limpiarlo o si no lo va a utilizar durante un largo periodo de...
Страница 30: ...GENERAL DEL APARATO 1 Tapa de la bomba 5 Carcasa del motor 2 Panel de control 6 Alojamiento de la bomba 3 Botones de ajuste 7 Bot n de la anilla de sujeci n 4 Bot n WiFi 8 Anilla de sujeci n regulable...
Страница 31: ...s para regular la temperatura adem s de una tecla Start stop AJUSTES Modificar la unidad de temperatura Mantenga pulsado el bot n Start Stop durante 3 segundos para cambiar la unidad de temperatura de...
Страница 32: ...el temporizador se ha programado correctamente Cuando el agua haya alcanzado la temperatura seleccionada el temporizador inicia la cuenta atr s Modificar la direcci n de circulaci n El stick de cocci...
Страница 33: ...ue el valor de medici n de su hornillo coincida con el del term metro siga estos pasos para volver a calibrar el stick de cocci n al vac o 1 Calcule la diferencia entre el indicador de temperatura del...
Страница 34: ...alojamiento de la bomba 4 Coloque la olla recipiente cerca de una toma de corriente Aseg rese de que la olla recipiente no se sit en sobre un hornillo u otra fuente de calor 5 Conecte el stick de coc...
Страница 35: ...v ase m s abajo o desc rguelo directamente de la App Store o de Google Play 2 Aseg rese de que su smartphone est conectado a la misma red WiFi a la que debe conectarse su dispositivo Klarstein 3 Abra...
Страница 36: ...de su encaminador Nota Para obtener m s ayuda sigue las instrucciones de la aplicaci n al configurar la conexi n LIMPIEZA Y CUIDADO 1 Gire el alojamiento de la bomba en sentido horario para soltarla d...
Страница 37: ...ene consecuencias potencialmente negativas para el medio ambiente y la salud de las personas Puede consultar m s informaci n sobre el reciclaje y la eliminaci n de este producto contactando con su adm...
Страница 38: ......
Страница 39: ...ommages dus au non respect des consignes et la mauvaise utilisation de l appareil Scannez le QR Code pour acc der la derni re version du mode d emploi et d autres informations concernant le produit SO...
Страница 40: ...Temp rature maximale 95 C Pr cision de temp rature 1 Niveau d eau minimal 1 1 cm Taille minimale de la casserole du r cipient 10 L Taille maximale de la casserole du r cipient 15 L Taux de circulatio...
Страница 41: ...laissez pas le c ble d alimentation pendre sur le bord du plan de travail teignez et d branchez l appareil avant de le nettoyer ou lorsque vous ne l utilisez pas pendant une longue p riode Ne d branch...
Страница 42: ...R APER U DE L APPAREIL 1 Couvercle de la pompe 5 Carter moteur 2 Panneau de commande 6 Carter de la pompe 3 Touches d ajustement 7 Bouton de serrage anneau 4 Touche WiFi 8 Bouton de serrage r glable T...
Страница 43: ...ches de contr le de la temp rature ainsi qu une touche marche arr t R GLAGES Changement d unit de temp rature Maintenez la touche Marche Arr t pendant environ 3 secondes pour basculer entre les unit s...
Страница 44: ...pendant environ 3 secondes indiquant que la minuterie a t r gl e D s que l eau a atteint la temp rature r gl e la minuterie d marre le compte rebours Changer la direction du flux Le stick sous vide pe...
Страница 45: ...es sur la cuisini re correspondent celles de votre thermom tre suivez les tapes ci dessous pour recalibrer le stick sous vide 1 D terminez la diff rence entre la lecture de temp rature sur le Stick So...
Страница 46: ...les lignes MIN et MAX sur le c t du corps de pompe 4 Placez la casserole r cipient pr s d une prise lectrique Assurez vous que la casserole r cipient n est pas sur une cuisini re ou une autre source...
Страница 47: ...ous ou t l chargez le directement depuis l App Store ou Google Play 2 Assurez vous que votre smartphone est connect au m me r seau WiFi que votre appareil Klarstein 3 Ouvrez l application Klarstein 4...
Страница 48: ...emarque Pour plus d aide suivez les instructions de l application lors de la configuration de la connexion NETTOYAGE ET ENTRETIEN 1 Tournez le corps de pompe dans le sens des aiguilles d une montre po...
Страница 49: ...conforme aux r gles prot ge l environnement et la sant de vos semblables des cons quences n gatives Pour plus d informations sur le recyclage et l limination de ce produit veuillez contacter votre aut...
Страница 50: ......
Страница 51: ...una mancata osservazione delle avvertenze di sicurezza e da un uso improprio del dispositivo Scansionare il codice QR seguente per accedere al manuale d uso pi attuale e per ricevere informazioni sul...
Страница 52: ...ura massima 95 C Precisione della temperatura 1 Profondit minima dell acqua 1 1 cm Dimensioni minime del contenitore della pentola 10 L Dimensioni massime del contenitore della pentola 15 L Capacit di...
Страница 53: ...on possa cadere e non far penzolare il cavo di alimentazione dal piano di lavoro Spegnere il dispositivo e staccare la spina prima di pulirlo o se non viene utilizzato per lunghi periodi di tempo Non...
Страница 54: ...DISPOSITIVO 1 Coperchio della pompa 5 Alloggiamento motore 2 Pannello di controllo 6 Alloggiamento pompa 3 Tasti di regolazione 7 Manopola del morsetto ad anello 4 Tasto Wi Fi 8 Morsetto ad anello re...
Страница 55: ...LED un timer tasti di regolazione della temperatura e tasto Start Stop IMPOSTAZIONI Cambiare l unit di misura della temperatura Tenere premuto Start Stop per circa 3 secondi per passare da Fahrenheit...
Страница 56: ...stato con successo Non appena l acqua raggiunge la temperatura impostata inizia il conto alla rovescia del timer Cambiare la direzione del flusso Lo stick sous vide pu far circolare acqua in senso ora...
Страница 57: ...olare i valori di misurazione del vostro fornello con quelli del termometro seguire questi passaggi per ricalibrare lo stick sous vide 1 Definire la differenza tra indicazione della temperatura sullo...
Страница 58: ...reso tra le linee MIN e MAX sul lato dell alloggiamento della pompa 4 Posizionare la pentola il contenitore vicino a una presa elettrica Assicurarsi che la pentola il contenitore non si trovino su un...
Страница 59: ...o o scaricarla direttamente dall App Store o da Google Play 2 Accertarsi che lo smartphone sia connesso alla stessa rete WiFi a cui deve collegarsi il dispositivo Klarstein 3 Aprire l applicazione Kla...
Страница 60: ...ri informazioni seguire le istruzioni nell app quando si configura la connessione PULIZIA E MANUTENZIONE 1 Girare l alloggiamento della pompa in senso orario per staccarlo dall alloggiamento del motor...
Страница 61: ...spositivi si tutela il pianeta e la salute delle persone da possibili conseguenze negative Informazioni riguardanti il riciclo e lo smaltimento di questi prodotti si ottengono presso l amministrazione...
Страница 62: ......
Страница 63: ......
Страница 64: ......