background image

16

EN

Ions function

Press the Ions button after startup or in other modes, the indicator will light while anion 
generator releasing anions.  Press the Ions button again the indicator will light out and 
the anion generator stop releasing anions.

UV Lamp function

Press the UV button after startup or in other modes, the indicator will light while the UV 
LED light. Press the UV button  again, stop this function.

Stop function

If you want to switch off the air purifier completely press the [Power] button, the unit will 

switch off and all light will be off.

PM2.5 Indicator function

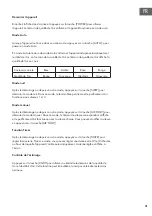
After start up, the PM2.5 Indicator will glow twinkle, 30 seconds later, it will show 
the indication of PM2.5 detected by sensor. Notice: This function cannot be used as 

Professional instrument 

Filters reset button function

Press this button when start up , the button lamp light, and the display will show the 

Residual life of filters „%“. 3 seconds later ,it will turn back. When the filters needed 
to changed, the button Lamp glow twinkle . After replace filters, Press this button for 5 

seconds to reset.

CARE AND MAINTENANCE

Before attempting to perform any  maintenance  on  the  air purifier,  disconnect  the 

power adapter!

Filter

• 

Suggested time of changing filter: about once a year.

• 

It depends on different places and usages. For example, changing time of filter may 

be shorter in contaminated zones or smoking areas, etc.

• 

Please change the filter if the purification effect is not good. 

Содержание 10031907

Страница 1: ...10031907 10031908 Luftreiniger Air Purifier Purificador de aire Purificateur d air Purificatore d aria ...

Страница 2: ......

Страница 3: ...NHALTSVERZEICHNIS Technische Daten 3 Konformitätserklärung 3 Sicherheitshinweise 4 Hinweise zur Entsorgung 4 Geräteübersicht 5 Inbetriebnahme und Bedienung 6 Pflege und Wartung 8 Fehlersuche und Fehlerbehebung 10 TECHNISCHE DATEN Artikelnummer 10031907 10031908 Stromversorgung 220 240 V 50 60 Hz KONFORMITÄTSERKLÄRUNG Hersteller Chal Tec GmbH Wallstraße 16 10179 Berlin Deutschland Dieses Produkt en...

Страница 4: ...Gerät fern von Wasser und Wärmequellen Verwenden Sie das nicht in sehr staubigen Umgebungen HINWEISE ZUR ENTSORGUNG Befindet sich die linke Abbildung durchgestrichene Mülltonne auf Rädern auf dem Produkt gilt die Europäische Richtlinie 2012 19 EU Diese Produkte dürfen nicht mit dem normalen Hausmüll entsorgt werden Informieren Sie sich über die örtlichen Regelungen zur getrennten Sammlung elektris...

Страница 5: ...uftauslass 3 Seitlicher Auslass 4 Ionisator 5 Gehäuse 6 Basis Rückseite 7 Luftqualitäts Anzeige 8 PM 2 5 Sensorabdeckung 9 Ein Aus Schalter 10 Netzeingang 1 1 Hinterer Lufteinlass Filtersystem 1 Zum Öffnen drehen 2 Basis Abdeckung 3 Konpositfilter 4 UV Lampe ...

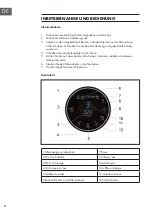
Страница 6: ...chtung wieder zu 4 Schließen Sie den Netzadapter am Gerät an 5 Achten Sie darauf dass das Gerät auf einem trockenen stabilen und ebenen Untergrund steht 6 Stecken Sie den Netzadapter in die Steckdose 7 Das Gerät geht mit einem Piepton an Bedienfeld 1 Filteranzeige zurücksetzen 7 Timer 2 Ein Aus Schalter 8 Licht ein aus 3 PM 2 5 Anzeige 9 Auto Modus 4 UV Lampe ein aus 10 Luftfluss Anzeige 5 Luftflu...

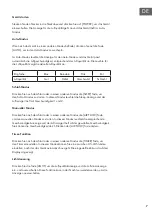
Страница 7: ...odus zu starten In diesem Modus leuchtet die Sleep Anzeige und der Luftreiniger läuft mit Geschwindigkeit 1 und 2 Manueller Modus Drücken Sie nach dem Start oder in einem anderen Modus die AIR FLOW Taste um den manuellen Modus zu starten In diesem Modus leuchtet die entsprechende Geschwindigkeitsanzeige und der Luftreiniger läuft mit der gewählten Geschwindigkeit Sie können die Geschwindigkeit dur...

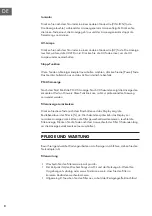
Страница 8: ... den erkannten Wert an Hinweis Diese Funktion kann nicht zur professionellen Messung verwendet werden Filteranzeige zurücksetzen Drücken Sie diese Taste nach dem Einschalten und das Display zeigt die Restlebensdauer der Filter in an Drei Sekunden später kehr das Display zur normalen Anzeige zurück Wenn die Filter gewechselt werden müssen leuchtet die Filteranzeige Drücken Sie die Taste nach dem Au...

Страница 9: ... Der empfohlene Reinigungszyklus beträgt mindestens einmal im Monat bei regelmäßigem Gebrauch Reinigen Sie den Sensor mit einem Wattestäbchen wie in der Abbildung gezeigt Verwenden Sie keine Reinigungsmittel oder Flüssigkeiten zur Reinigung Äußere Oberfläche Reinigen Sie die Oberfläche und die Lufteinlässe Luftauslässe mit einem trockenen weichen Lappen Benutzen Sie keine chemischen Reiniger Bei l...

Страница 10: ...tzt Reinigen oder ersetzen Sie ihn Es riecht verbrannt Halten Sie das Gerät an und wenden Sie sich an einen Fachbetrieb Kein Luftfluss Das Gerät läuft im Schlaf Modus Wechseln Sie den Modus Das Gerät funktioniert nicht richtig oder ist nicht eingesteckt Überprüfen Sie ob der Netzstecker eingesteckt ist Das Gerät arbeitet nicht effizient Der Filter ist zugesetzt und nicht mehr zu gebrauchen Wechsel...

Страница 11: ...ranty and any liability CONTENT Technical Data 1 1 Declaration of Conformity 1 1 Safety Instructions 12 Hints on Disposal 12 Product Description 13 Use and Operation 14 Care and Maintenance 16 Troubleshooting 18 TECHNICAL DATA Item number 10031907 10031908 Power supply 220 240 V 50 60 Hz DECLARATION OF CONFORMITY Producer Chal Tec GmbH Wallstraße 16 10179 Berlin Germany This product is conform to ...

Страница 12: ...purifier away from the water heat and fire Do not run the air purifier without filter the suction of dust may cause problems in the equipment and its components HINTS ON DISPOSAL According to the European waste regulation 2012 19 EU this symbol on the product or on its packaging indicates that this product may not be treated as household waste Instead it should be taken to the appropriate collecti...

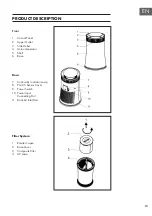
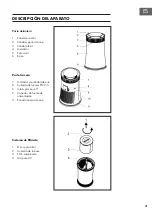
Страница 13: ...er Outlet 3 Side Outlet 4 Anion Generator 5 Shell 6 Base Rear 7 Air Quality Indicator Lamp 8 PM 2 5 Sensor Cover 9 Power Switch 10 Power Input Connecting Port 1 1 Back Air Inlet Duct Filter System 1 Rotate to open 2 Base Cover 3 Composite Filter 4 UV Lamp ...

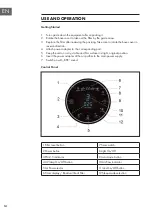
Страница 14: ...apter to the corresponding port 5 Keep the unit on a dry stable and firm surface in stright original position 6 Insert the power adapter of the air purifier to the main power supply 7 Switch on with BEE sound Control Panel 1 Filter reset button 7 Timer switch 2 Power button 8 Light On Off 3 PM 2 5 indicator 9 Auto mode button 4 UV lamp On Off button 10 Air flow indicator 5 Air flow selector 1 1 Io...

Страница 15: ... In this mode the sleep indicator will light and the air purifier will run in speed 1 2 Manual mode Press the AIR FLOW button after the start or in the other mode it will go into the manual mode In this mode the corresponding speed indicator will light and the air purifier will run in selected speed You can change the speed by pressing the air flow selector button Timer function Press the TIMER bu...

Страница 16: ...twinkle 30 seconds later it will show the indication of PM2 5 detected by sensor Notice This function cannot be used as Professional instrument Filters reset button function Press this button when start up the button lamp light and the display will show the Residual life of filters 3 seconds later it will turn back When the filters needed to changed the button Lamp glow twinkle After replace filte...

Страница 17: ...ity is affected and even fails to work Recommended cleaning cycle is less than 1 month for regularly used Clean the sensor with a cotton swab as shown in the picture below Do not use detergent or any liquid in the cleaning process External surface Please use dry soft fabric to wipe the surface inlets and outlets Do not use the chemical cleaning agent During long unuse Unplug the unit from socket C...

Страница 18: ...completely chocked filter Clean the filter If problem is not resolved replace the filter Burning smell Stop the air purifier immediately and cut off the power contact to repair it No Air flow Air purifier being operated in sleep mode change the mode The air purifier is malfunctioning check power supply if still problem exists contact to repair it Ineffectiveness The filter is chocked and no longer...

Страница 19: ...E DE CONTENIDOS Datos técnicos 19 Declaración de conformidad 19 Indicaciones de seguridad 20 Retirada del aparato 20 Descripción del aparato 21 Puesta en marcha y uso 22 Cuidado y mantenimiento 24 Detección y resolución de problemas 26 DATOS TÉCNICOS Número de artículo 10031907 10031908 Suministro eléctrico 220 240 V 50 60 Hz DECLARACIÓN DE CONFORMIDAD Fabricante Chal Tec GmbH Wallstraße 16 10179 ...

Страница 20: ...co cualificado Mantenga el aparato lejos del agua y de fuentes de calor No utilice el aparato en zonas con mucho polvo RETIRADA DEL APARATO Si el aparato lleva adherida la ilustración de la izquierda el contenedor de basura tachado entonces rige la normativa europea directiva 2012 19 UE Este producto no debe arrojarse a un contenedor de basura común Infórmese sobre las leyes territoriales que regu...

Страница 21: ...lida lateral 4 Ionizador 5 Estructura 6 Base Parte trasera 7 Indicador de calidad de aire 8 Cubierta del sensor PM 2 5 9 Interruptor on off 9 Conector de fuente de alimentación 1 1 Entrada trasera de aire Sistema de filtrado 1 Girar para abrir 2 Cubierta de la base 3 Filtro combinado 4 Lámpara UV ...

Страница 22: ...5 Asegúrese de que el aparato se sitúe en una superficie plana seca y estable 6 Conecte el adaptador de red a la toma de corriente 7 El aparato se enciende y emite un tono Panel de control 1 Restablecer indicador de filtro 7 Temporizador 2 Interruptor on off 8 Luz on off 3 Indicador PM 2 5 9 Modo AUTO 4 Lámpara UV on off 10 Indicador de flujo de aire 5 Selección de flujo de aire 1 1 Ionizador on o...

Страница 23: ... comenzar con el modo noche En este modo se ilumina el indicador correspondiente y el purificador funciona a velocidad 1 y 2 Modo manual Tras iniciar el aparato o en otro modo pulse el botón AIR FLOW para iniciar el modo manual En este modo se ilumina el indicador de velocidad correspondiente y el purificador funciona a la velocidad seleccionada Puede modificar la velocidad presionando el botón AI...

Страница 24: ...o Advertencia Esta función no puede utilizarse para realizar mediciones profesionales Restablecer indicador de filtro Pulse este botón tras encender el aparato para que el display muestra la vida útil restante del filtro en Tres segundos después el display regresará a su pantalla normal Si debe cambiar el filtro se ilumina el indicador correspondiente Pulse el botón durante 5 segundos tras cambiar...

Страница 25: ...ón será incorrecto El ciclo de limpieza recomendado es de al menos una vez al mes con un uso frecuente Limpie el sensor con un bastoncillo tal y como se muestra en la ilustración No utilice productos de limpieza ni líquidos Superficie exterior Limpie la superficie y las salidas y entradas de aire con un paño seco y suave No utilice limpiadores químicos Durante una ausencia prolongada Desconecte el...

Страница 26: ... está obstruido Límpielo o sustitúyalo Huele a quemado Detenga el aparato y contacte con un servicio técnico No hay circulación de aire El aparato está funcionando en modo noche Cambie de modo El aparato no funciona correctamente o no está enchufado Compruebe que ha conectado el enchufe El aparato no funciona de manera eficiente El filtro está obstruido y no puede utilizarse más Cambie el filtro E...

Страница 27: ...tion de l appareil SOMMAIRE Fiche technique 27 Déclaration de conformité 27 Consignes de sécurité 28 Conseils pour le recyclage 28 Aperçu de l appareil 29 Mise en service et utilisation 30 Entretien et maintenance 32 Identification et résolution des problèmes 34 FICHE TECHNIQUE Numéro d article 10031907 10031908 Alimentation 220 240 V 50 60 Hz DÉCLARATION DE CONFORMITÉ Fabricant Chal Tec GmbH Wall...

Страница 28: ...de l eau et des sources de chaleur Ne l utilisez pas dans les environnements très poussiéreux CONSEILS POUR LE RECYCLAGE Le pictogramme ci contre apposé sur le produit signifie que la directive européenne 2012 19 UE s applique poubelle à roues barrée d une croix Ces produits ne peuvent être jetés dans les poubelles domestiques courantes Renseignez vous concernant les règles appliquées pour la coll...

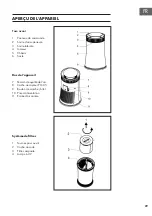
Страница 29: ...e 3 Sortie latérale 4 Ioniseur 5 Châssis 6 Socle Dos de l appareil 7 Témoin de qualité de l air 8 Cache du capteur PM 2 5 9 Bouton de marche arrêt 10 Prise d alimentation 1 1 Entrée d air arrière Système de filtres 1 Tournez pour ouvrir 2 Cache du socle 3 Filtre composite 4 Lampe à UV ...

Страница 30: ...lez à ce que l appareil soit posé sur un support sec stable et horizontal 6 Branchez la fiche dans la prise 7 L appareil démarre et émet un bip Panneau de commande 1 Réinitialiser le témoin de filtre 7 Timer 2 Interrupteur de marche arrêt 8 Allumer et éteindre la lumière 3 Témoin PM 2 5 9 Mode Auto 4 Allumer et éteindre la lampe à UV 10 Témoin de débit d air 5 Sélection du débit d air 1 1 Allumer ...

Страница 31: ...er le mode nuit Dans ce mode le témoin Sleep s allume et le purificateur d air fonctionne aux vitesses 1 et 2 Mode manuel Après le démarrage ou depuis un autre mode appuyez sur la touche AIR FLOW pour démarrer le mode manuel Dans ce mode le témoin de vitesse correspondant s affiche et le purificateur d air fonctionne avec la vitesse choisie Vous pouvez modifier la vitesse en appuyant sur la touche...

Страница 32: ...te fonction ne peut être utilisée comme mesure professionnelle Réinitialiser le témoin des filtres Appuyez sur cette touche au démarrage et l écran inique la durée de vie restante du filtre en Trois secondes plus tard l écran retourne en affichage normal Si les filtres ont besoin d être changés le témoin des filtres reste allumé Après renouvellement des filtres appuyez sur cette touche pendant 5 s...

Страница 33: ...era faussé La fréquence de nettoyage recommandée est d au moins une fois par mois pour une utilisation régulière Nettoyez le capteur avec un coton tige tel qu illustré sur le schéma N utilisez aucun produit de nettoyage ni de liquide pour le nettoyage Surfaces externes Nettoyez les surfaces externes et les entrées et sorties d air avec un chiffon doux et sec N utilisez aucun produit chimique En ca...

Страница 34: ...filtre est bouché Nettoyez le ou remplacez le Cela sent le brûlé Arrêtez l appareil et adressez vous à un professionnel Pas de débit d air L appareil fonctionne en mode nuit Changez de mode L appareil ne fonctionne pas correctement ou n est pas branché Vérifiez que l adaptateur secteur est bien branché L appareil n est pas efficace Le filtre est bouché et ne doit plus être utilisé Remplacez le fil...

Страница 35: ...el dispositivo INDICE Dati tecnici 35 Dichiarazione di conformità 35 Avvertenze di sicurezza 36 Smaltimento 36 Descrizione del prodotto 37 Messa in funzione e utilizzo 38 Pulizia e manutenzione 40 Ricerca e risoluzione dei problemi 42 DATI TECNICI Articolo numero 10031907 10031908 Alimentazione 220 240 V 50 60 Hz DICHIARAZIONE DI CONFORMITÀ Produttore Chal Tec GmbH Wallstraße 16 10179 Berlino Germ...

Страница 36: ...ato Tenere il dispositivo lontano da acqua e da fonti di calore Non utilizzare il dispositivo in ambienti molto polverosi SMALTIMENTO Se sul prodotto è presente la figura a sinistra il cassonetto dei rifiuti mobile sbarrato si applica la direttiva europea 2012 19 UE Questi prodotti non possono essere smaltiti con i rifiuti normali Informarsi sulle disposizioni vigenti in merito alla raccolta separ...

Страница 37: ...uperiore 3 Uscita laterale 4 Ionizzatore 5 Alloggiamento 6 Base Retro 7 Spia qualità dell aria 8 Coperchio sensore PM 2 5 9 Interruttore on off 10 Ingresso alimentatore 1 1 Ingresso aria posteriore Sistema del filtro 1 Ruotare per aprire 2 Coperchio base 3 Filtro composito 4 Lampada UV ...

Страница 38: ...a 4 Collegare l alimentatore al dispositivo 5 Posizionare il dispositivo su una superficie asciutta stabile e piana 6 Inserire la spina nella presa 7 Il dispositivo si accende ed emette un segnale acustico Pannello dei comandi 1 Reset filtro 7 Timer 2 Interruttore on off 8 Luce on off 3 Spia PM 2 5 9 Modalità automatica 4 Lampada UV on off 10 Spia flusso aria 5 Selezione flusso dell aria 1 1 Ioniz...

Страница 39: ...iare la modalità notturna In questa modalità la spia corrispondente si accende e il dispositivo funziona a velocità 1 e 2 Modalità manuale Dopo l avvio o in un altra modalità premere il tasto AIR FLOW per avviare la modalità manuale In questa modalità la spia della velocità è accesa e il dispositivo è in funzione alla velocità selezionata È possibile modificare la velocità premendo il tasto AIR FL...

Страница 40: ...n si tratta di una rilevazione professionale Resettare la spia del filtro Premere questo tasto dopo l accensione e il display indica la vita residua del filtro in Tre secondi dopo il display torna alla normale visualizzazione Se è necessario sostituire i filtri la spia del filtro si accende Tenere premuto il tasto per 5 secondi dopo la sostituzione del filtro per azzerare il display spegnimento PU...

Страница 41: ...tti Il ciclo di pulizia consigliato è di almeno una volta al mese in caso di utilizzo regolare Pulire il sensore con un batuffolo di cotone come mostrato nella figura Non utilizzare detergenti o solventi per la pulizia delle superfici esterne Pulizia delle superfici esterne Pulire le superfici e le prese d aria con un panno morbido e asciutto Non utilizzare detergenti chimici In caso di assenza pr...

Страница 42: ...re di bruciato Tenere il dispositivo acceso e rivolgersi ad un tecnico specializzato Assenza di flusso di aria Il dispositivo si trova in modalità notturna Cambiare la modalità Il dispositivo non funziona correttamente oppure la spina non è inserita nella presa Controllare cha la spina sia inserita nella presa Il dispositivo non funziona in modo efficiente Il filtro è ostruito e non è più utilizza...

Страница 43: ......

Страница 44: ......

Отзывы: