background image

7

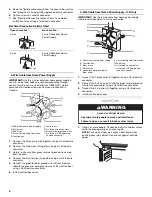
2. Push against seal area of front frame to push oven into 

cabinet.

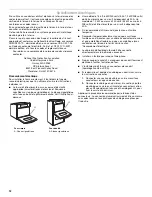
3. Push oven completely into cabinet and center oven into 

cabinet cutout.

4. Securely fasten oven to cabinet using the #8-14 x 1" screws 

(2 for single oven, 4 for double oven) provided. Insert the 
screws through holes in mounting rails. Do not overtighten 
screws.

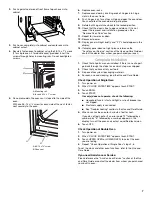
5. On some models, the oven vent is taped to the side of the 

oven. 

With one #8-14 x 

³⁄₈

" screw for each side of the vent, fasten 

vent securely to the oven.

6. Replace oven racks.

7. Replace oven door by inserting ends of hinges into hinge 

slots in the oven frame.

8. Push hinges in as far as they will go and open the oven door. 

You should feel the oven door drop into place.

9. Rotate both hinge latches back to the locked position.

10. Check that the door is free to open and close. If it is not,  

repeat the removal  and installation procedures. See 
“Remove Oven Door” section.

11. Repeat for lower oven door.

12. Reconnect power.

13. Display panel will light briefly, and “PF” should appear in the 

display.

14. If display panel does not light, please reference the 

“Assistance or Service” section of the Use and Care Guide or 
contact the dealer from whom you purchased your oven.

Complete Installation

1. Check that all parts are now installed. If there is an extra part, 

go back through the steps to see which step was skipped.

2. Check that you have all of your tools.

3. Dispose of/recycle all packaging materials.

4. For oven use and cleaning, read the Use and Care Guide.

Check Operation of Single Oven

1. Turn power on.

2. When “CLOCK ENTER TIME” appears touch START.

3. Touch BROIL.

4. Touch START.

If oven(s) does not operate, check the following:

Household fuse is intact and tight; or circuit breaker has 
not tripped.

Electrical supply is connected.

See “Troubleshooting” section in the Use and Care Guide.

5. When oven has been on for 5 minutes, feel for heat.

If you do not feel heat or if an error code (“F” followed by a 
number plus “E” followed by a number) appears in the 
display, turn off the oven and contact a qualified technician.

6. Touch OFF.

Check Operation of Double Oven

1. Turn power on. 

2. When “CLOCK ENTER TIME” appears touch START.

3. Touch UPPER OVEN or LOWER OVEN, to select the oven 

you are testing.

4. Repeat “Check Operation of Single Oven” steps 2-6.

To set the clock and other oven functions, refer to the Use and 
Care Guide.

If you need Assistance or Service:

Please reference the “Assistance or Service” section of the Use 
and Care Guide or contact the dealer from whom you purchased 
your built-in oven.

A. Mounting rail
B. Insert #8-14 x 1" screw.

A. #8-14 x 

³⁄₈

" screw

B. Oven vent

A

B

A

B

Содержание Architect Series II KEBS107SSS

Страница 1: ... 5 Prepare Built In Oven 5 Remove Oven Door 5 Make Electrical Connection 5 Install Oven 6 Complete Installation 7 SÉCURITÉ DU FOUR ENCASTRÉ 9 EXIGENCES D INSTALLATION 9 Outillage et pièces 9 Exigences d emplacement 9 Spécifications électriques 12 INSTRUCTIONS D INSTALLATION 13 Préparation du four encastré 13 Dépose de la porte du four 13 Raccordement électrique 13 Installation du four 14 Achever l...

Страница 2: ...A 1 2 5 cm minimum diameter hole should have been drilled in the right rear or left rear corner of the support surface to pass the appliance cable through to the junction box NOTE For undercounter installation it is recommended that the junction box be located in the adjacent right or left cabinet If you are installing the junction box on rear wall behind oven the junction box must be recessed and...

Страница 3: ... D 25 64 8 cm cutout width E 27 70 5 cm min cutout height 30 76 2 cm models A 30 76 2 cm min cabinet width B 1 3 8 cm min top of cutout to underside of countertop C 5 13 3 cm bottom of cutout to floor D 28 72 4 cm cutout width E 27 70 5 cm min cutout height A B C D E A B C D E 27 68 6 cm models A 27 68 6 cm min cabinet width B 1 2 5 cm top of cutout to bottom of upper cabinet door C 32 81 3 cm bot...

Страница 4: ...and follow the instructions provided for it here Oven must be connected to the proper electrical voltage and frequency as specified on the model serial number rating plate The model serial number rating plate is located at the bottom of the right hand mounting rail See the following illustration Models rated from 7 3 to 9 6 kW at 240 volts 5 5 to 7 2 kW at 208 volts require a separate 40 amp circu...

Страница 5: ...ven 4 Remove the hardware package from inside the bag containing literature 5 Remove and set aside racks and other parts from inside the oven 6 Move oven and cardboard close to the oven s final location RemoveOvenDoor IMPORTANT Use both hands to remove oven door s 1 Open the oven door 2 Locate the oven door latches in both corners of the oven door and rotate the latches forward to the unlocked pos...

Страница 6: ...ower supply where local codes permit a 3 wire connection 1 Connect the 2 black wires C together using a UL listed wire connector 2 Connect the 2 white wires D and the green or bare ground wire of the oven cable using a UL listed wire connector 3 Connect the 2 red wires G together using a UL listed wire connector 4 Install junction box cover InstallOven 1 Using 2 or more people lift oven partially ...

Страница 7: ...eteInstallation 1 Check that all parts are now installed If there is an extra part go back through the steps to see which step was skipped 2 Check that you have all of your tools 3 Dispose of recycle all packaging materials 4 For oven use and cleaning read the Use and Care Guide Check Operation of Single Oven 1 Turn power on 2 When CLOCK ENTER TIME appears touch START 3 Touch BROIL 4 Touch START I...

Страница 8: ...8 Notes ...
Страница 9: ...été percé dans l angle arrière gauche ou droit de la surface de support pour le passage du câble d alimentation de l appareil jusqu au boîtier de connexion REMARQUE Pour l installation sous un plan de travail on recommande que le boîtier de connexion soit situé dans le placard adjacent à droite ou à gauche Dans le cas de l installation du boîtier de connexion sur le mur arrière derrière le four le...

Страница 10: ...ce inférieure du plan de travail C 5 13 3 cm entre le bas de l ouverture découpée et le sol D Largeur de l ouverture découpée 25 64 8 cm E Hauteur de l ouverture découpée 27 70 5 cm min Modèles de 30 76 2 cm A Largeur du placard 30 76 2 cm min B 1 3 8 cm min entre le sommet de l ouverture découpée et la face inférieure du plan de travail C 5 13 3 cm entre le bas de l ouverture découpée et le sol D...

Страница 11: ... 1 2 5 cm entre le sommet de l ouverture découpée et la porte du placard supérieur C 14 37 5 cm entre le bas de l ouverture découpée et le sol D Largeur de l ouverture découpée 25 64 8 cm E 1 3 8 cm min entre le bas de l ouverture découpée et le sommet de la porte du placard F Hauteur d encastrement 49 126 4 cm min Modèles de 30 76 2 cm A Largeur du placard 30 76 2 cm min B 1 2 5 cm entre le somme...

Страница 12: ...ère de droite Voir l illustration ci dessous Un modèle de 7 3 à 9 6 kW 240 volts 5 5 à 7 2 kW 208 volts doit être alimenté par un circuit indépendant de 40 A Un modèle de 7 2 kW ou moins à 240 volts 5 4 kW ou moins à 208 volts doit être alimenté par un circuit indépendant de 30 A On recommande d utiliser un disjoncteur ou un fusible temporisé Raccorder l appareil directement au coupe circuit avec ...

Страница 13: ...four à part sur une surface de travail couverte Raccordementélectrique Le câblage d alimentation de ce four comporte un conducteur neutre blanc et un conducteur vert ou nu de liaison à la terre connecté à la caisse ces deux conducteurs sont torsadés 1 Déconnecter la source de courant électrique 2 Faire passer le conduit de câble flexible depuis le four à travers l ouverture dans le placard 3 Le ca...

Страница 14: ...ur vert ou nu de liaison à la terre du câble du four avec un connecteur de fils homologation UL 3 Connecter ensemble les 2 conducteurs rouges G avec un connecteur de fils homologation UL 4 Installer le couvercle du boîtier de connexion Installationdufour 1 À l aide de 2 personnes ou plus soulever partiellement le four pour l introduire dans l ouverture d installation dans le placard utiliser l ouv...

Страница 15: ... que toutes les pièces sont maintenant installées S il reste une pièce passer en revue les différentes étapes pour découvrir laquelle aurait été oubliée 2 Vérifier la présence de tous les outils 3 Jeter recycler tous les matériaux d emballage 4 Pour l utilisation et le nettoyage du four lire le Guide d utilisation et d entretien Vérification du fonctionnement du four simple 1 Mettre l appareil sou...

Страница 16: ...8304336 2007 Whirlpool Corporation All rights reserved Tous droits réservés 1 07 Printed in U S A Imprimé aux É U ...

Отзывы: