12 SPEED BLENDER
LICUADORA DE 12 VELOCIDADES
English……Page 3 Español…..Página 12
Страница 1: ...12 SPEED BLENDER LICUADORA DE 12 VELOCIDADES English Page 3 Español Página 12 ...
Страница 2: ...Contents Parts List 3 Contents 3 Assembly 4 General Information 5 Safety Instructions 6 User Instructions 7 Cleaning and Maintenance 9 Other Useful Information 10 Technical Specifications 10 Storing 10 ...
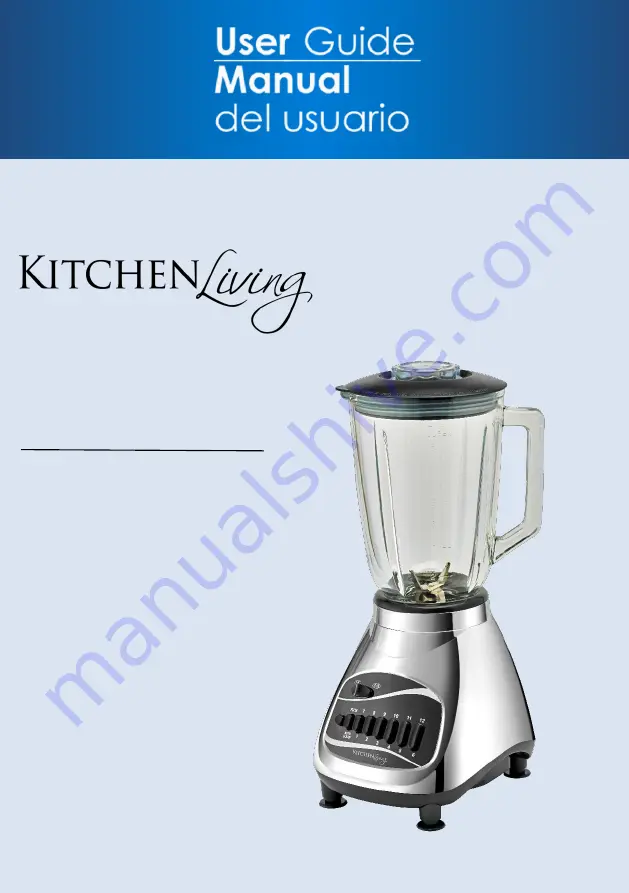
Страница 3: ...om 888 367 7373 MAIN PARTS 1 Glass jar with handle 2 Lid with measuring cup 3 Base with control panel 4 Skid resistant feet 5 Blade assembly 6 Blade assembly parts a Blades b Cup support c Jar base d Silicone ring CONTENTS OF PACKAGING Base Jar with lid and blade assembly Instruction Manual 1 2 3 5 6 4 a b d c ...
Страница 4: ...EAN THE SURFACE DO NOT IMMERSE THE BLENDER BASE IN WATER AT ANY TIME 4 After cleaning insert the measuring cup into the lid with the open side down 5 To assemble the blade assembly place the silicone ring d on the top of the blade base a 6 Insert the blade and silicone ring into the jar base c 7 Place the cup support b on top of the blade base a 8 Set the glass jar into the blade base and twist th...
Страница 5: ...ner Please follow the warranty instructions found on the warranty card Do not attempt to repair the blender yourself 8 Do not let the power cord hang over the edge of a table or counter or touch any hot surface 9 The use of accessory attachments not recommended by the manufacturer may result in fire electrical shock or risk of injury 10 Do not place blender on or near hot gas or electric burner or...
Страница 6: ...ture to reduce the risk of electrical shock this plug is intended to fit in a polarized outlet only one way If the plug does not fit fully in the outlet reverse the plug If the plug still does not fit contact a qualified electrician Do not attempt to defeat this safety feature ELECTRIC POWER If electric circuit is overloaded with other appliances your appliances may not operate properly The applia...
Страница 7: ... Plug the power cord into a wall socket 6 Begin by using the pulse button on the control panel It is next to the OFF button 7 Once the mixture starts to blend you may use the other button for a continuous blending action 8 To blend at the lower speeds make sure the control switch is pushed to the left as shown below This will give you the 1 6 speeds 9 To blend at the higher speeds make sure the co...
Страница 8: ...button and wait for the blades to stop moving 14 Unplug the blender from the wall outlet before removing the glass jar from the base 15 Carefully remove the lid pour and serve WARNING NEVER USE BOILING LIQUIDS OR RUN THE APPLIANCE WHEN IT IS EMPTY ALWAYS keep fingers and utensils out of the blender when it is running or plugged in ALWAYS make sure that the blender is unplugged from the power outle...
Страница 9: ...th a soft cloth 3 Carefully unscrew the blade base from the glass jar 4 Remove the cup holder and the very carefully remove the blade and silicone rings from the blade base 5 The glass jar is dishwasher safe 6 We recommend hand washing the lid measuring cup cup holder blades with silicone ring and blade base If you must use a dishwasher please put these items on the top shelf only 7 ALWAYS handle ...
Страница 10: ...if possible Do not place any heavy items on top of the blender during storage as this may result in possible damage Service Center If you have any questions in regards to the operation of this blender or are in need of a spare part please contact our service center at Wachsmuth Krogmann Inc Tel 1 888 367 7373 Business Hours Mon Fri 10 00am 5 00pm EST Email customer service wk usa com Website www w...
Страница 11: ...T 888 367 7373 customer service wk usa com Contenido Lista de componentes 12 Contenido 12 Ensamblaje 13 Información general 14 Instrucciones de seguridad 15 Modo de empleo 16 Limpieza y mantenimiento 18 Información adicional de utilidad 19 Especificaciones técnicas 19 Almacenamiento 19 ...
Страница 12: ...rra de vidrio con mango 2 Tapa con vaso dosificador 3 Base con panel de control 4 Resistentes patas antideslizantes 5 Conjunto de hojas 6 Componentes del conjunto de hojas a Cuchillas aspas b Aro porta cuchillas c Base de la jarra d Anillo de silicona CONTENIDO Una base Una jarra con tapa y conjunto de hojas Un manual de instrucciones 1 2 3 5 6 4 a b d c ...
Страница 13: ...e limpiarla inserte el vasito dosificador dentro de la tapa con el lado abierto hacia abajo 5 Para armar el conjunto de hojas coloque el anillo de silicona d sobre la base de las cuchillas a 6 Inserte las cuchillas y el anillo de silicona dentro de la base de la jarra c 7 Coloque el aro porta cuchillas b sobre la base de las cuchillas a 8 Inserte la jarra de vidrio dentro de base de la jarra y gir...
Страница 14: ...tran en la tarjeta de garantía No intente reparar la licuadora usted mismo 8 No permita que el cable de alimentación eléctrica cuelgue por el borde de una mesa o mostrador ni que haga contacto algún tipo de superficie caliente 9 El uso de accesorios no recomendados por el fabricante podría dar lugar a incendios descargas eléctricas o riesgos de sufrir lesiones 10 No coloque la licuadora sobre o ce...
Страница 15: ...ica este enchufe está diseñado para encajar en un tomacorriente polarizado en una sola posición Si el enchufe no encaja completamente en el tomacorriente invierta la posición del enchufe Si aún así no encaja comuníquese con un electricista calificado No intente deshacer esta característica de seguridad ENERGÍA ELÉCTRICA Si el circuito eléctrico se sobrecarga con otros aparatos electrodomésticos es...
Страница 16: ...6 Comience presionando el botón pulse del panel de control Es el botón que se encuentra al lado del botón de apagado off 7 Una vez que la mezcla se comienza a licuar usted puede usar otro botón para continuar la acción de licuado 8 Para licuar a velocidades más bajas asegúrese de que el interruptor de control esté hacia la izquierda como se muestra a continuación Esto le activará las velocidades d...
Страница 17: ...de moverse 14 Desconecte la licuadora del tomacorriente de la pared antes de sacar la jarra de vidrio de la base 15 Con mucho cuidado retire la tapa vierta y sirva ADVERTENCIA NUNCA USE LÍQUIDOS QUE ESTÉN HIRVIENDO NI PONGA A FUNCIONAR LA UNIDAD SI ESTÁ VACÍA SIEMPRE mantenga los dedos y los utensilios fuera de la licuadora cuando esté funcionando o cuando esté conectada al tomacorriente SIEMPRE a...
Страница 18: ... un trapo suave 3 Con mucho cuidado desenrosque la base de la jarra 4 Retire el aro porta cuchillas y después con mucho cuidado saque las cuchillas y el anillo de silicona de la base de la jarra 5 La jarra de vidrio se puede lavar en el lavavajillas 6 Recomendamos lavar a mano la tapa el vasito dosificador el aro porta cuchillas las cuchillas con el anillo de silicona y la base de la jarra 7 SIEMP...
Страница 19: ...bjetos pesados sobre la licuadora mientras esté almacenado ya que esto podría ocasionar posibles daños Centro de servicio Si tiene cualquier pregunta con respecto al funcionamiento de esta licuadora o si necesita alguna pieza de repuesto por favor comuníquese con nuestro centro de servicio a Wachsmuth Krogmann Inc Teléfono 1 888 367 7373 Horario de servicio de lunes a viernes de 10 00 a m a 5 00 p...
Страница 20: ...DISTRIBUTED BY DISTRIBUIDO POR ALDI INC BATAVIA IL 60510 www aldi us MODEL PN 668G PRODUCT CODE 47818 08 2015 ...