- 1-
Rack Mount CAT5 KVM Switch
(8 Port/16 Port/32 Port)
User Manual
www.kinankvm.com
@all right reserved Shenzhen Kinan Technology Co., Ltd
Printing date
:
2018/01
Version
V3.0
Страница 1: ...1 Rack Mount CAT5 KVM Switch 8 Port 16 Port 32 Port User Manual www kinankvm com all right reserved Shenzhen Kinan Technology Co Ltd Printing date 2018 01 Version V3 0...
Страница 2: ...Cables KVM switching module 6 Installation Instruction 8 Operation 10 OSD Operation 12 OSD Functions 13 F1 ADM 14 F2 Scan 17 F3 Set 18 F4 Tool 20 F6 Edit port names 21 F7 Set Quick View port 21 F8 LOU...
Страница 3: ...control up to 4 8 16 32 computes Extending the transmitting distance between the console and the computer 1600x1200 60Hz 50m 1280x1024 60Hz 100m 1024x768 60Hz 150m Supports Multiple systems PC Mac Sun...
Страница 4: ...he Cat5 KVM switch will be installed in the front or rear rack cabinet Make sure all the connecting computers as well as external device are shut down Installation instruction 1 Remove the front or re...
Страница 5: ...8Port 16Port 32 Port User Manual 5 3 Screw the KVM device to the rack cabinet front or rear part Structure and Size...
Страница 6: ...LED Flashing green light The module is power on Green light keeps on The module has been connected to the KVM Link LED Quickly flashing The module is communicating with the host Orange light keeps on...
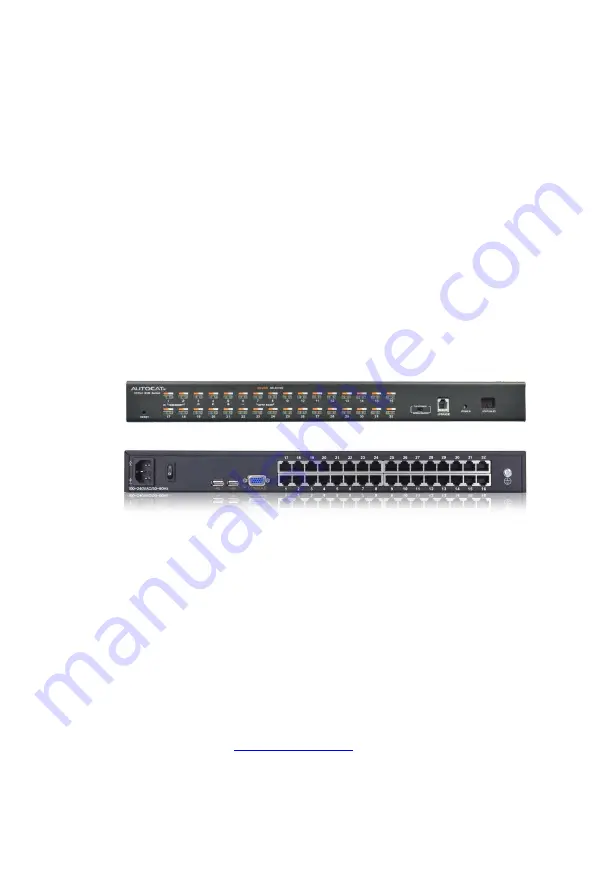
Страница 7: ...100V 240V AC 47 63Hz 16 15 14 13 12 11 10 9 1 2 3 4 5 6 7 8 16 15 14 13 12 11 10 9 1 2 3 4 5 6 7 8 CONSOLE 5 4 CONSOLE 100V 240V AC 47 63Hz 2 3 1 100V 240V AC 47 63Hz 1 2 3 4 5 6 7 8 1 2 3 4 No Explan...
Страница 8: ...t KVM switching module to the host computer 3 Connect KVM switching module to any available KVM port with CAT5 cable 4 Plug the female port of the power cable into the KVM power socket and the male po...
Страница 9: ...of KC11 12 and connect the other port to the RJ45 port with Chain in of KC12 series 2 Repeat above operation to cascade more KVM switches 4 Port max cascade 4 KVM switches 8 Port max cascade 8 KVM sw...
Страница 10: ...ction Buttons LEDs Indicator LEDs are built into the switches the online LED light is on the left and the selected LED light is on the right 1 An online LED light orange indicates that the KVM has con...
Страница 11: ...tube Then press 5 6 to adjust Press 3 exits or waits for five seconds and it will auto exit Press 4 for three seconds enters definition adjusting mode 44 are flashing on the LED tube Then press 5 6 to...
Страница 12: ...then press Enter 2 Press Page Up or Page Down quickly moves to next BANK 3 Press any key from 0 9 to enter any port of current station To access the OSD menu through mouse Moving Port selection Click...
Страница 13: ...OSD Hotkey set OSD hotkeys Lout Time off to set the time out value Tool F4 Reset RGB Press Enter reset RGB Beeper On press Enter switch Bee sounds Mouse Hot On press Enter to close touchpad operating...
Страница 14: ...Diagram 4 1 1 Diagram 4 1 2 Note You can set up an account and password according to diagram 4 1 2 then User setup ok pops up showing that you have done your set and if Password Not Match pops up you...
Страница 15: ...NULL If you set this function the port will be not displayed on the user s OSD menu Note The administrator always has full access to all the ports Diagram 4 1 4 Diagram 4 1 5 E g 1 If you want to set...
Страница 16: ...BRC Mode ON diagram 4 1 6 2 Open the port that need broadcast function Press key select the port that need broadcast function F7 a speaker symbol appears in the QV column which shows the port has ent...
Страница 17: ...nction to scan all signal ports with according to the set scanning interval Quick View Use this function to scan all ports with quick view symbols according to the set scanning interval Operating inst...
Страница 18: ...Lock F12 F12 Ctrl Ctrl KVM Hotkey Lout Time off 0 off 01 99M set the screen saver timeout it is automatically log out if the current operator is no longer operate for a while then the KVM will be loc...
Страница 19: ..._Ctrl the corresponding function key Function Operating Function description Switching port 2 number k eys Eg switch to port 4 by hotkeys L_Ctrl L_Ctrl 0 4 F1 F8 Skip ports from 1 8 Invoke OSD main me...
Страница 20: ...Mouse Hot On To open and close the mouse with this function We can t operate the OSD when it is Off Restore Values Restore to original factory default values About KVM It shows the KVM version informa...
Страница 21: ...o Note Press F7 to cancel the QV symbol if the current port has already have a QV arrowhead symbol in its QV column if you want to cancel all the QV function press Restore Values under F4 Tool The por...
Страница 22: ...e diagram 4 1 5 we can connect 8 computers to the 8 port KVM Press Pa UP to select port on current station then press Enter to operate the port 2 Return to OSD main menu Note 1 Press Tab then in colum...
Страница 23: ...Port display mode Port No port name Port name SYSTEM Scan duration 5 seconds Scan mode All Auto log out Esc Operating system Support operating system Operating system Version Windows 2000 or higher L...
Страница 24: ...le 101 104 keys keyboard can emulate the functions of the Mac keyboard The emulation mappings are listed in the below table PC keyboard MAC keyboard Shift Shift Ctrl Ctrl L_Win 1 L_Win 2 L_Win 3 L_Win...
Страница 25: ...is used in conjunction with other keys The corresponding functions are shown in the below table PC keyboard Sun keyboard L_Win L_Alt Stop L_Win F4 Again L_Win L_Ctrl Props L_Win F5 Undo L_Win F1 Front...
Страница 26: ...t Switch Port Selecting buttons 8 16 32 Reset 1x tuch button Upgrading switch 1x pull switch Power 1x rocker switch Indicating LEDs Online green 8 16 32 Selected orange 8 16 32 Power 1 blue Cascading...
Страница 27: ...oor display quality of PC screen Solutions 1 Adjust the definition and brightness 2 Use good quality network cable such as CAT5 cables or upper 3 Shorten the network cable length 4 Lower the display r...